Toyota Corolla Hybrid (2021 year). Manual in english - part 7


  Index      Toyota     Toyota Corolla Hybrid (2021 year). Manual in english


Search            copyright infringement  


Content      ..     5      6      7      8     ..


Toyota Corolla Hybrid (2021 year). Manual in english - part 7


397

6-3. Using the storage features

COROLLA HV_U

6

Interior

 featur

es

6-3.Using the storage features

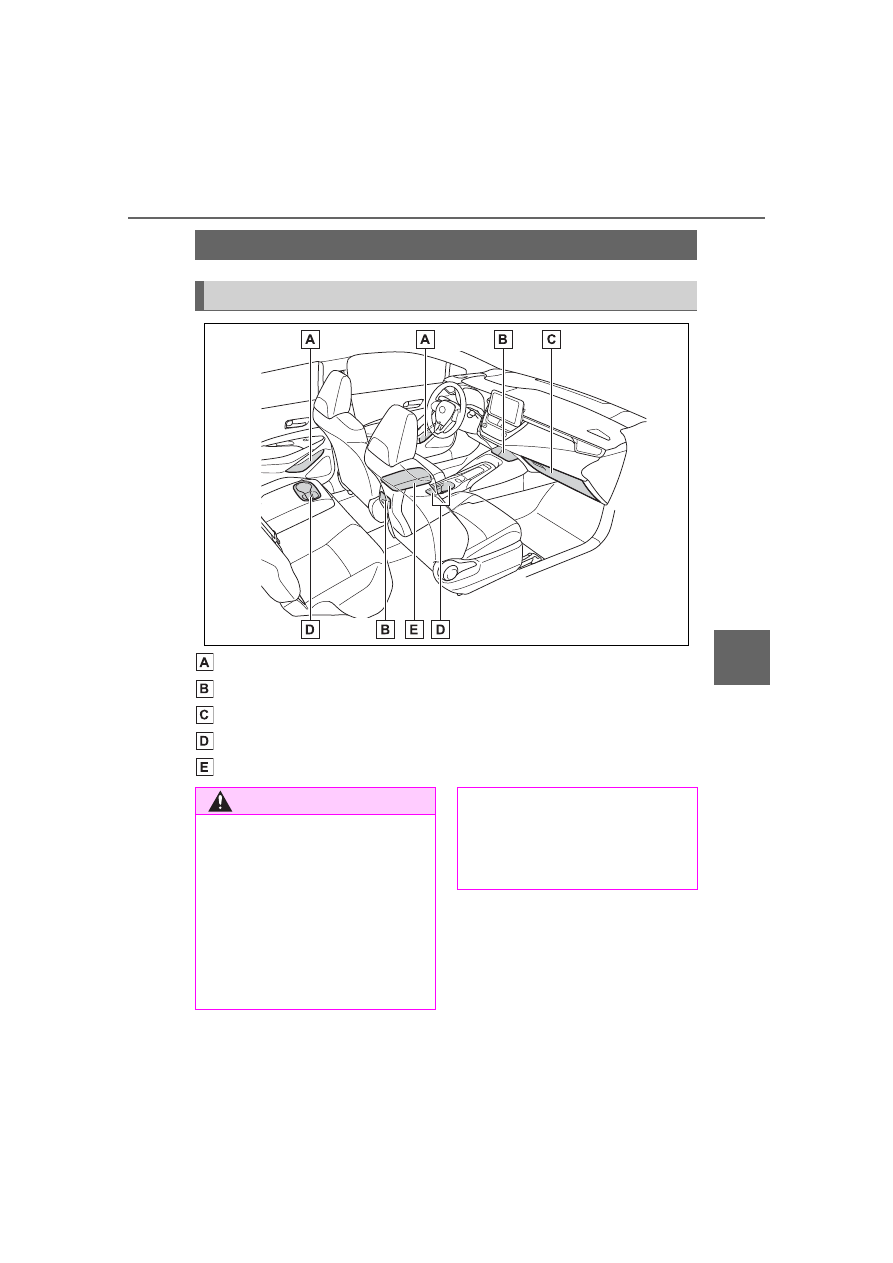
Bottle holders/door pockets (

P.398)

Open trays (if equipped) (

P.399)

Glove box (

P.398)

Cup holders (

P.398)

Console box (

P.399)

List of storage features

Location of the storage features

WARNING

Items that should not be left 

in the storage spaces

Do not leave glasses, lighters or 

spray cans in the storage spaces, 

as this may cause the following 

when cabin temperature becomes 

high:

Glasses may be deformed by 

heat or cracked if they come 

into contact with other stored 

items.

Lighters or spray cans may 

explode. If they come into con-

tact with other stored items, the 

lighter may catch fire or the 

spray can may release gas, 

causing a fire hazard.

-------------------------------------------------------------------------------------------------------------------------------------------------------------

398

6-3. Using the storage features

COROLLA HV_U

Pull up the lever to open the 
glove box.

Front

Rear

Pull the armrest down.

Front

Rear

Glove box

WARNING

Caution while driving

Keep the glove box closed. In the 

event of sudden braking or sud-

den swerving, an accident may 

occur due to an occupant being 

struck by the open glove box or 

the items stored inside.

Cup holders

WARNING

Items unsuitable for the cup 

holder

Do not place anything other than 

cups or beverage cans in the cup 

holders.

Other items may be thrown out of 

the holders in the event of an 

accident or sudden braking and 

cause injury. If possible, cover hot 

drinks to prevent burns.

Bottle holders

-------------------------------------------------------------------------------------------------------------------------------------------------------------

399

6-3. Using the storage features

COROLLA HV_U

6

Interior

 featur

es

Bottle holders

When storing a bottle, close the 

cap.

The bottle may not be stored 

depending on its size or shape.

1

Slide the lid to the rear most 
position.

2

Lift the lid while pulling up the 
knob.

Slide function

The console box lid can be slid for-

ward or backward.

Front (if equipped)

Rear

WARNING

Items unsuitable for the bottle 

holders

Do not place anything other than 

a bottle in the bottle holders.

Other items may be thrown out of 

the holders in the event of an 

accident or sudden braking and 

cause injury.

Console box

WARNING

Caution while driving

Keep the console box closed.

Injuries may result in the event of 

an accident or sudden braking.

Open trays

WARNING

Caution while driving

Observe the following precautions 

when putting items in the open 

tray. Failure to do so may cause 

items to be thrown out of the tray 

in the event of sudden braking or 

steering. In these cases, the items 

may interfere with pedal operation 

or cause driver distraction, result-

ing in an accident.

Do not store items in the tray 

that can easily shift or roll out.

-------------------------------------------------------------------------------------------------------------------------------------------------------------

400

6-3. Using the storage features

COROLLA HV_U

Lift the deck mat.

Type A

Type B

WARNING

Do not stack items in the tray 

higher than the tray’s edge.

Do not put items in the tray that 

may protrude over the tray’s 

edge.

Trunk features

Auxiliary box

-------------------------------------------------------------------------------------------------------------------------------------------------------------

401

6-4. Other interior features

COROLLA HV_U

6

Interior

 featur

es

6-4.Other interior features

The USB charging port are used 
to supply 2.1 A of electricity at 5 
V to external devices.
The USB charging port are for 
charging only. They are not 
designed for data transfer or 
other purposes.
Depending on the external 
device, it may not charge prop-
erly. Refer to the manual 
included with the device before 
using a USB charging port.

Using the USB charging 
port

Lift the lid while pulling up the 
knob.

The USB charging port can be 

used when

The power switch is in ACC or ON.

Situations in which the USB 

charging port may not operate 

correctly

If a device which consumes more 

than 2.1 A at 5 V is connected

If a device designed to communi-

cate with a personal computer, 

such as a USB memory device, is 

connected

If the connected external device is 

turned off (depending on device)

If the temperature inside the vehi-

cle is high, such as after the vehi-

cle has been parked in the sun

About connected external 

device

Depending on the connected exter-

nal device, charging may occasion-

ally be suspended and then start 

again. This is not a malfunction.

Other interior features

USB charging port

NOTICE

To prevent damage to the 

USB charging port

Do not insert foreign objects into 

the port.

Do not spill water or other liq-

uids into the port.

Do not apply excessive force to 

or impact the USB charging 

port.

Do not disassemble or modify 

the USB charging port.

To prevent damage to exter-

nal devices

Do not leave external devices in 

the vehicle. The temperature 

inside the vehicle may become 

high, resulting in damage to an 

external device.

Do not push down on or apply 

unnecessary force to an exter-

nal device or the cable of an 

external device while it is con-

nected.

To prevent 12-volt battery dis-

charge

Do not use the USB charging port 

for a long period of time with the 

hybrid system stopped.

-------------------------------------------------------------------------------------------------------------------------------------------------------------

402

6-4. Other interior features

COROLLA HV_U

The power outlet can be used 
for 12 V accessories that run on 
less than 10 A.
Lift the lid while pulling up the 
knob and open the power outlet 
lid.

The power outlet can be used 

when

The power switch is in ACC or ON.

When stopping the hybrid sys-

tem

Disconnect electrical devices with 

charging functions, such as mobile 

battery packs.

If such devices are left connected, 

the hybrid system may not stop nor-

mally.

A portable device, such as a 
smartphone or mobile battery, 
can be charged by just placing it 
on the charging area, provided 
the device is compatible with the 
Qi wireless charging standard 
created by the Wireless Power 
Consortium.
The wireless charger cannot be 
used with a portable device that 
is larger than the charging area. 
Additionally, depending on the 
portable device, the wireless 
charger may not operate prop-
erly. Refer to the operation man-
ual of the portable device.

The “Qi” symbol

The “Qi” symbol is a trademark 
of the Wireless Power Consor-
tium.

Power outlet

NOTICE

To prevent the fuse from 

being blown

Do not use an accessory that 

uses more than 12 V 10 A.

To avoid damaging the power 

outlet

Close the power outlet lid when 

the power outlet is not in use. 

Foreign objects or liquids that 

enter the power outlet may cause 

a short circuit.

To prevent 12-volt battery dis-

charged

Do not use the power outlet lon-

ger than necessary when the 

hybrid system is off.

Wireless charger (if 
equipped)

-------------------------------------------------------------------------------------------------------------------------------------------------------------

403

6-4. Other interior features

COROLLA HV_U

6

Interior

 featur

es

Name for all parts

Power supply switch
Operation indicator light
Charge area

Using the wireless charger

1

Press the power supply 
switch of the wireless char-
ger.

Pressing the switch again turns the 

wireless charger off.

When turned on, the operation indi-

cator light (green) comes on. 

When the power switch is turned 

off, the on/off state of the wireless 

charger will be memorized.

2

Place a portable device on 
the charging area with its 
charging surface facing 
down.

While charging, the operation indi-

cator light (orange) will be illumi-

nated.

If charging does not begin, move 

the portable device as close to the 

center of the charging area as pos-

sible.

When charging is complete, the 

operation indicator light (green) will 

illuminate.

Recharging function

If a certain amount of time has 
elapsed since charging com-
pleted and the portable device 
has not been moved, the 
wireless charger will restart 
charging.

If the portable device is 
moved within the charging 
area, charging will stop tem-
porarily then restart.

-------------------------------------------------------------------------------------------------------------------------------------------------------------

404

6-4. Other interior features

COROLLA HV_U

Operation indicator light status

*

: Depending on the portable device, the operation indicator light may stay 

illuminated (orange) after charging has completed.

If the operation indicator light blinks

If an error is detected, the operation indicator light will blink (orange). Take 
the appropriate measures according to the table below.

The wireless charger can be 

operated when

The power switch is in ACC or ON.

Portable devices that can be 

charged

Portable devices compatible with 

the Qi wireless charging standard 

can be charged by the wireless 

charger. However, compatibility 

with all devices which meet the Qi 

wireless charging standard is not 

guaranteed.

The wireless charger is designed 

to supply low power electricity (5 

W or less) to a cellular phone, 

smartphone, or other portable 

device.

Operation indicator light

State

Off

The Wireless charger is off

Green (illuminated)

Standby (charging is possible)

Charging is complete

*

Orange (illuminated)

A portable device has been placed on the 
charging area (identifying the portable 
device)

Charging in progress

Operation indicator light Suspected cause

Measure

Blinks (orange) at a one 
second interval continu-
ously

Vehicle to charger com-
munication failure.

Contact your Toyota 
dealer.

Blinks (orange) 3 times 
repeatedly

A foreign object exists 
between the portable 
device and charging 
area.

Remove the foreign 
object.

Portable device is not 
positioned properly on 
the charging area.

Move the portable 
device toward the cen-
ter of the charging area.

Blinks (orange) 4 times 
repeatedly

The temperature of the 
wireless charger is 
excessively high.

Stop charging immedi-
ately and continue 
charging after a while.

-------------------------------------------------------------------------------------------------------------------------------------------------------------

405

6-4. Other interior features

COROLLA HV_U

6

Interior

 featur

es

If a cover or accessory is 

attached to the portable device

Do not charge a portable device if a 

cover or accessory which is not Qi 

compatible is attached. Depending 

on the type of cover and/or acces-

sory attached, it may not be possi-

ble to charge the portable device. If 

the portable device is placed on the 

charging area and does not charge, 

remove the cover and/or accesso-

ries.

If interference is heard in AM 

radio broadcasts while 

charging

Turn off the wireless charger and 

check if the noise is reduced. If 

noise is reduced, press and hold the 

power supply switch of the wireless 

charger for 2 seconds. The fre-

quency of the wireless charger is 

changed and noise may be 

reduced. When the frequency is 

changed, the operation indicator 

light will blink (orange) 2 times.

Charging precautions

If the electronic key cannot be 

detected in the cabin, charging 

cannot be performed. When a 

door is opened and closed, 

charging may be temporarily sus-

pended.

While charging, the wireless char-

ger and the portable device will 

become warm. 

This is not a malfunction.If a porta-

ble device becomes warm while 

charging and charging stops due 

to the protection function of the 

portable device, wait until the por-

table device cools down and 

charge it again.

Sound generated during opera-

tion

When the power supply switch is 

turned on or while a portable device 

is being identified, operation sounds 

may be heard. This is not a malfunc-

tion.

Cleaning the wireless charger

P.423

Certification for the wireless charger

-------------------------------------------------------------------------------------------------------------------------------------------------------------

406

6-4. Other interior features

COROLLA HV_U

-------------------------------------------------------------------------------------------------------------------------------------------------------------

407

6-4. Other interior features

COROLLA HV_U

6

Interior

 featur

es

-------------------------------------------------------------------------------------------------------------------------------------------------------------

408

6-4. Other interior features

COROLLA HV_U

WARNING

Caution while driving

When charging a portable device 

while driving, for safety reasons, 

the driver should not operate the 

portable device.

Caution regarding interfer-

ence with electronic devices

People with implantable cardiac 

pacemakers, cardiac resynchroni-

zation therapy pacemakers or 

implantable cardioverter defibrilla-

tors, as well as any other electri-

cal medical device, should consult 

their physician about the usage of 

the wireless charger.

Operations of the wireless char-

ger may have an affect on medi-

cal devices.

To prevent damage or burns

Observe the following precau-

tions. 

Failure to do so may result in the 

possibility of fire, equipment fail-

ure or damage, or burns due to 

heat.

Do not put any metallic objects 

between the charging area and 

the portable device while 

charging.

Do not attach metallic objects, 

such as aluminum stickers, to 

the charging area.

Do not cover the wireless char-

ger with a cloth or other object 

while charging.

Do not attempt to charge porta-

ble devices which are not com-

patible with the Qi wireless 

charging standard.

Do not disassemble, modify or 

remove the wireless charger.

Do not apply force or impact to 

the wireless charger.

NOTICE

Conditions in which the wire-

less charger may not operate 

correctly

In the following situations, the 

wireless charger may not operate 

correctly:

When a portable device is fully 

charged

When there is a foreign object 

between the charging area and 

portable device

When a portable device 

becomes hot while charging

When a portable device is 

placed on the wireless area with 

its charging surface facing up

When a portable device is not 

centered on the charging area

When the vehicle is near a TV 

tower, electric power plant, gas 

station, radio station, large dis-

play, airport or other facility that 

generates strong radio waves or 

electrical noise

When the portable device is in 

contact with, or is covered by 

any of the following metallic 

objects:

• Cards to which aluminum foil is 

attached

• Cigarette boxes that have alu-

minum foil inside

• Metallic wallets or bags

• Coins

• Metal hand warmers

• Media such as CDs and DVDs

-------------------------------------------------------------------------------------------------------------------------------------------------------------

409

6-4. Other interior features

COROLLA HV_U

6

Interior

 featur

es

1

To set the visor in the forward 
position, flip it down.

2

To set the visor in the side 
position, flip down, unhook, 
and swing it to the side.

3

To use the side extender, 
place the visor in the side 
position, then slide it back-
ward.

Slide the cover to open.

The vanity light turns on.

To prevent 12-volt battery dis-

charge

If the vanity lights remain on when 

the power switch is OFF, the lights 

will go off automatically after 20 min-

utes.

NOTICE

When wireless keys (that emit 

radio waves) other than those of 

your vehicle are being used 

nearby.

If in situations other than above 
the wireless charger does not 
operate properly or the operation 
indicator light is blinking, the wire-
less charger may be malfunction-
ing. Contact your Toyota dealer.

To prevent failure or damage 

to data

Do not bring magnetic cards, 

such as a credit card, or mag-

netic recording media, close to 

the wireless charger while 

charging. Otherwise, data may 

be erased due to the influence 

of magnetism.

Additionally, do not bring preci-

sion instruments such as wrist 

watches, close to the wireless 

charger, as such objects may 

malfunction.

Do not leave portable devices in 

the cabin. The temperature 

inside the cabin may become 

high when parked in the sun, 

and cause damage to the 

device.

To prevent 12-volt battery dis-

charge

Do not use the wireless charger 

for a long period of time with the 

hybrid system stopped.

Sun visors

Vanity mirrors

-------------------------------------------------------------------------------------------------------------------------------------------------------------

410

6-4. Other interior features

COROLLA HV_U

Fold down the armrest for use.

An assist grip installed on the 
ceiling can be used to support 
your body while sitting on the 
seat.

The coat hooks are provided 
with the rear assist grips.

NOTICE

To prevent the 12-volt battery 

from being discharged

Do not leave the vanity lights on 

for extended periods while the 

hybrid system is off.

Armrest

NOTICE

To prevent damage to the 

armrest

Do not apply too much load on the 

armrest.

Assist grips

WARNING

Assist grip

Do not use the assist grip when 

getting in or out of the vehicle or 

rising from your seat.

NOTICE

To prevent damage to the 

assist grip

Do not hang any heavy object or 

put a heavy load on the assist 

grip.

Coat hooks

WARNING

Items that cannot be hung on 

the coat hook

Do not hang coat hangers or 

other hard or sharp objects on the 

hook. If the SRS curtain shield air-

bags deploy, these items may 

become projectiles, causing death 

or serious injury.

-------------------------------------------------------------------------------------------------------------------------------------------------------------

411

6-4. Other interior features

COROLLA HV_U

6

Interior

 featur

es

*

: If equipped

The HomeLink

®

 wireless control 

system in your vehicle has 3 
buttons which can be pro-
grammed to operate 3 different 
devices. Refer to the program-
ming methods on the following 
pages to determine the method 
which is appropriate for the 
device.

HomeLink

®

 indicator light

Garage door operation indi-
cators

HomeLink

®

 icon

Illuminates while HomeLink

®

 is 

operating.

Buttons

Codes stored in the Home-
Link

®

 memory

The registered codes are not 

erased even if the 12-volt battery 

cable is disconnected.

If learning failed when registering 
a different code to a HomeLink

®


button that already has a code 

registered to it, the already regis-

tered code will not be erased.

Certification for the garage door opener

Except for vehicles sold in Canada

Garage door opener

*

The garage door opener can 
be programmed using the 
HomeLink

®

 to operate 

garage doors, gates, entry 
doors, door locks, home 
lighting systems, security 
systems, and other devices.

System components

-------------------------------------------------------------------------------------------------------------------------------------------------------------

412

6-4. Other interior features

COROLLA HV_U

For vehicles sold in Canada

When support is necessary

Visit on the web at www.

homelink.com/toyota or call 

1-800-355-3515.

Before programming Home-
Link

®

During programming, it is pos-
sible that garage doors, 
gates, or other devices may 
operate. For this reason, 
make sure that people and 
objects are clear of the 
garage door or other devices 
to prevent injury or other 
potential harm.

It is recommended that a new 
battery be placed in the 
remote control transmitter for 
more accurate programming.

WARNING

When programming a garage 

door or other remote control 

device

The garage door or other device 

may operate, so ensure people 

and objects are out of danger to 

prevent potential harm.

Conforming to federal safety 

standards

Do not use the HomeLink

®

 com-

patible transceiver with any 

garage door opener or device that 

lacks safety stop and reverse fea-

tures as required by federal safety 

standards.
This includes any garage door 

that cannot detect an interfering 

object. A door or device without 

these features increases the risk 

of death or serious injury.

When operating or program-
ming HomeLink

®

Never allow a child to operate or 
play with the HomeLink

®

 buttons.

Programming the Home-
Link

®

-------------------------------------------------------------------------------------------------------------------------------------------------------------

413

6-4. Other interior features

COROLLA HV_U

6

Interior

 featur

es

Garage door opener motors 
manufactured after 1995 may 
be equipped with rolling code 
protection. If this is the case, 
you may need a stepladder or 
other sturdy, safe device to 
reach the “Learn” or “Smart” 
button on the garage door 
opener motor.

Programming HomeLink

®

Steps 

1

 through 

3

 must be per-

formed within 60 seconds, oth-
erwise the indicator light will 
stop flashing and programming 
will not be able to be completed.

1

Press and release the Home-
Link

®

 button you want to pro-

gram and check that the 
HomeLink

®

 indicator light 

flashes (orange).

2

Point the remote control 
transmitter for the device at 
the rear view mirror, 1 to 3 in. 
(25 to 75 mm) from the 
HomeLink

®

 buttons.

Keep the HomeLink

®

 indicator light 

in view while programming.

3

Program a device.

Programming a device other 
than an entry gate (for U.S.A. 
owners)

Press and hold the handheld 
transmitter button until the 
HomeLink

®

 indicator light 

changes from slowly flashing 
orange to rapidly flashing green 
(rolling code) or continuously lit 
green (fixed code), then release 
the button.

Programming an entry gate 
(for U.S.A. owners)/Program-
ming a device in the Cana-
dian market

Press and release the remote 
control transmitter button at 2 
second intervals, repeatedly, 
until the HomeLink

®

 indicator 

light changes from slowly flash-
ing (orange) to rapidly flashing 
(green) (rolling code) or continu-
ously lit (green) (fixed code).

4

Test the HomeLink

®

 opera-

tion by pressing the newly 
programmed button and 
observing the indicator light:

Indicator light illuminates: 
Programming of a fixed code 
device has completed. The 

-------------------------------------------------------------------------------------------------------------------------------------------------------------

414

6-4. Other interior features

COROLLA HV_U

garage door or other device 
should operate when a Home-
Link

®

 button is pressed and 

released.

Indicator light flashes rapidly: 
The garage door opener 
motor or other device is 
equipped with a rolling code. 
To complete programming, 
firmly press and hold the 
HomeLink

®

 button for 2 sec-

onds then release it.

If the garage door or other 
device does not operate, pro-
ceed to “Programming a roll-
ing code system”.

5

Repeat the steps above to 
program another device for 
any of the remaining Home-
Link

®

 buttons.

Programming a rolling code 
system

2 or more people may be neces-
sary to complete rolling code 
programming.

1

Locate the “Learn” or “Smart” 
button on the garage door 
opener motor in the garage.

This button can usually be found 

where the hanging antenna wire is 

attached to the unit. The name and 

color of the button may vary by 

manufacturer. Refer to the owner’s 

manual supplied with the garage 

door opener motor for details.

2

Press and release the 
“Learn” or “Smart” button.

Perform 

3

 within 30 seconds after 

performing 

2

.

3

Press and hold the desired 
HomeLink

®

 button (inside the 

vehicle) for 2 seconds and 
release it. Repeat this 
sequence 
(press/hold/release) up to 3 
times to complete program-
ming.
If the garage door opener 
motor operates when the 
HomeLink

®

 button is 

pressed, the garage door 

-------------------------------------------------------------------------------------------------------------------------------------------------------------

415

6-4. Other interior features

COROLLA HV_U

6

Interior

 featur

es

opener motor recognizes the 
HomeLink

®

 signal.

Enabling 2-way communi-
cation with a garage door 
(only available for compati-
ble devices)

When enabled, 2-way communi-
cation allows you to check the 
status of the opening and clos-
ing of a garage door through 
indicators in your vehicle.
2-way communication is only 
available if the garage door 
opener motor used is a compati-
ble device. (To check device 
compatibility, refer to 
www.homelink.com.)

1

Within 5 seconds after pro-
gramming the garage door 
opener has been completed, 
if the garage door opener 
motor is trained to Home-
Link

®

, both garage door 

operation indicators will flash 
rapidly (green) and the light 
on the garage door opener 
motor will blink twice, indicat-
ing that 2-way communica-
tion is enabled.

If the indicators do not flash, per-

form 

2

 and 

3

 within the first 10 

presses of the HomeLink

®

 button 

after programming has been com-

pleted.

2

Press a programmed Home-
Link

®

 button to operate a 

garage door.

3

Within 1 minute of pressing 
the HomeLink

®

 button, after 

the garage door operation 
has stopped, press the 
“Learn” or “Smart” button on 
the garage door opener 
motor. Within 5 seconds of 
the establishment of 2-way 
communication with the 
garage door opener, both 
garage door operation indica-
tors in the vehicle will flash 
rapidly (green) and the light 
on the garage door opener 
motor will blink twice, indicat-
ing that 2-way communica-
tion is enabled.

Reprogramming a single 
HomeLink

®

 button

When the following procedure is 
performed, buttons which 
already have devices registered 
to them can be overwritten:

1

With one hand, press and 
hold the desired HomeLink

®


button.

2

When the HomeLink

®

 indica-

tor starts flashing (orange), 
continue to hold the Home-
Link

®

 button and perform 

“Programming HomeLink

®

” 

1


-------------------------------------------------------------------------------------------------------------------------------------------------------------

416

6-4. Other interior features

COROLLA HV_U

(it takes 20 seconds for the 
HomeLink

®

 indicator to start 

flashing).

Before programming

Install a new battery in the trans-

mitter.

The battery side of the transmitter 

must be pointed away from the 
HomeLink

®

.

Press the appropriate Home-
Link

®

 button. The HomeLink

®


indicator light should turn on.
The status of the opening and 
closing of a garage door is 
shown by the indicators.

Opening
Closing

This function is only available if the 
garage door opener motor used is a 
compatible device. (To check 
device compatibility, refer to 
www.homelink.com.)

The indicators can operate 
within approximately 820 ft. (250 
m) of the garage door. However, 
if there are obstructions 
between the garage door and 
the vehicle, such as houses and 
trees, feedback signals from the 
garage door may not be 
received.
To recall the previous door oper-
ation status, press and release 
either HomeLink

®

 buttons 


and 

 or 

 and 


simultaneously. The last 
recorded status will be dis-
played for 3 seconds.

Press and hold the 2 outside 
buttons for 10 seconds until the 
HomeLink

®

 indicator light 

changes from continuously lit 
(orange) to rapidly flashing 
(green).

If you sell your vehicle, be sure to 
erase the programs stored in the 

Operating HomeLink

®

Color

Status

Orange (flash-

ing)

Currently open-

ing/closing

Green

Opening/closing 

has completed

Red (flashing)

Feedback sig-

nals cannot be 

received

Erasing the entire Home-
Link

®

 memory (all three 

codes)

-------------------------------------------------------------------------------------------------------------------------------------------------------------

417

6-4. Other interior features

COROLLA HV_U

6

Interior

 featur

es

HomeLink

®

 memory.

-------------------------------------------------------------------------------------------------------------------------------------------------------------

418

6-4. Other interior features

COROLLA HV_U

-------------------------------------------------------------------------------------------------------------------------------------------------------------

419

COROLLA HV_U

7

7

Maintena

nce
 a

nd ca

re

Maintenance and care

.

7-1. Maintenance and care

Cleaning and protecting the 

vehicle exterior ..........

420

Cleaning and protecting the 

vehicle interior ...........

422

7-2. Maintenance

Maintenance requirements

..................................

425

General maintenance..

426

Emission inspection and 

maintenance (I/M) pro-
grams ........................

429

7-3. Do-it-yourself mainte-

nance

Do-it-yourself service pre-

cautions.....................

430

Hood ...........................

432

Positioning a floor jack

..................................

433

Engine compartment...

434

Tires ............................

441

Tire inflation pressure..

450

Wheels ........................

452

Air conditioning filter....

454

Cleaning the hybrid battery 

(traction battery) air intake 
vent and filter.............

455

Electronic key battery..

459

Checking and replacing 

fuses..........................

461

Light bulbs...................

463

-------------------------------------------------------------------------------------------------------------------------------------------------------------

420

7-1. Maintenance and care

COROLLA HV_U

7-1.Maintenance and care

Working from top to bottom, 
liberally apply water to the 
vehicle body, wheel wells and 
underside of the vehicle to 
remove any dirt and dust.

Wash the vehicle body using 
a sponge or soft cloth, such 
as a chamois.

For hard-to-remove marks, 
use car wash soap and rinse 
thoroughly with water.

Wipe away any water.

Wax the vehicle when the 
waterproof coating deterio-
rates.

If water does not bead on a clean 
surface, apply wax when the vehi-
cle body is cool.

Automatic car washes

Fold the mirrors before washing 

the vehicle. Start washing from the 

front of the vehicle. Make sure to 

extend the mirrors before driving.

Brushes used in automatic car 

washes may scratch the vehicle 

surface, parts (wheel, etc.) and 

harm your vehicle’s paint.

High pressure car washes

As water may enter the cabin, do 

not bring the nozzle tip near the 

gaps around the doors or perimeter 

of the windows, or spray these 

areas continuously.

When using a car wash

If the door handle becomes wet 

while the electronic key is within the 

effective range, the door may lock 

and unlock repeatedly. In that case, 

follow the following correction pro-

cedures to wash the vehicle:

Place the key in a position 6 ft. (2 

m) or more separate from the 

vehicle while the vehicle is being 

washed. (Take care to ensure that 

the key is not stolen.)

Set the electronic key to bat-

tery-saving mode to disable the 

smart key system. (

P.126)

Wheels and wheel ornaments

Remove any dirt immediately by 

using a neutral detergent.

Wash detergent off with water 

immediately after use.

To protect the paint from damage, 

make sure to observe the follow-

ing precautions.

• Do not use acidic, alkaline or 

abrasive detergent

• Do not use hard brushes

• Do not use detergent on the 

wheels when they are hot, such 

as after driving or parking in hot 

weather

Bumpers

Do not scrub with abrasive cleaners.

Plated portions

If dirt cannot be removed, clean the 

parts as follows:

Use a soft cloth dampened with an 

approximately 5% solution of neu-

tral detergent and water to clean 

the dirt off.

Wipe the surface with a dry, soft 

cloth to remove any remaining 

moisture.

To remove oily deposits, use alco-

hol wet wipes or a similar product.

Cleaning and protect-

ing the vehicle exte-

rior

Perform cleaning in a man-
ner appropriate to each 
component and its material.

Cleaning instructions

-------------------------------------------------------------------------------------------------------------------------------------------------------------

421

7-1. Maintenance and care

COROLLA HV_U

7

Maintena

nce
 a

nd ca

re

WARNING

When washing the vehicle

Do not apply water to the inside of 

the engine compartment. Doing 

so may cause the electrical com-

ponents, etc. to catch fire.

Precautions regarding the 

exhaust pipe

Exhaust gasses cause the 

exhaust pipe to become quite hot.

When washing the vehicle, be 

careful not to touch the pipe until it 

has cooled sufficiently, as touch-

ing a hot exhaust pipe can cause 

burns.

Precaution regarding the rear 

bumper with Blind Spot Moni-

tor (if equipped)

If the paint of the rear bumper is 

chipped or scratched, the system 

may malfunction. If this occurs, 

consult your Toyota dealer.

NOTICE

To prevent paint deteriora-

tion and corrosion on the 

body and components (alumi-

num wheels, etc.)

Wash the vehicle immediately in 

the following cases:

• After driving near the sea coast

• After driving on salted roads

• If coal tar or tree sap is present 

on the paint surface

• If dead insects, insect droppings 

or bird droppings are present on 

the paint surface

• After driving in an area contami-

nated with soot, oily smoke, 

mine dust, iron powder or chem-

ical substances

• If the vehicle becomes heavily 

soiled with dust or mud

• If liquids such as benzene and 

gasoline are spilled on the paint 

surface

If the paint is chipped or 

scratched, have it repaired 

immediately.

To prevent the wheels from cor-

roding, remove any dirt and 

store in a place with low humid-

ity when storing the wheels.

Cleaning the exterior lights

Wash carefully. Do not use 

organic substances or scrub 

with a hard brush.

This may damage the surfaces 

of the lights.

Do not apply wax to the sur-

faces of the lights.

Wax may cause damage to the 

lenses.

To prevent damage to the 

windshield wiper arms

When lifting the wiper arms away 

from the windshield, pull the driver 

side wiper arm upward first, and 

repeat for the passenger side. 

When returning the wipers to their 

original position, do so from the 

passenger side first.

When using a high pressure 

car wash

When washing the vehicle, do 

not spray the camera or its sur-

rounding area directly with a 

high pressure washer. Shock 

applied from high pressure 

water may cause the device to 

not operate normally.

Do not bring the nozzle tip close 

to boots (rubber or resin manu-

factured cover), connectors or 

the following parts. The parts 

may be damaged if they come 

into contact with high-pressure 

water.

• Traction related parts

-------------------------------------------------------------------------------------------------------------------------------------------------------------

422

7-1. Maintenance and care

COROLLA HV_U

Remove dirt and dust using a 
vacuum cleaner. Wipe dirty 
surfaces with a cloth damp-
ened with lukewarm water.

If dirt cannot be removed, 
wipe it off with a soft cloth 
dampened with neutral deter-
gent diluted to approximately 
1%.
Wring out any excess water 
from the cloth and thoroughly 
wipe off remaining traces of 
detergent and water.

Shampooing the carpets

There are several commercial foam-

ing-type cleaners available. Use a 

sponge or brush to apply the foam. 

Rub in overlapping circles. Do not 

use water. Wipe dirty surfaces and 

let them dry. Excellent results are 

obtained by keeping the carpet as 

dry as possible.

Handling the seat belts

Clean with mild soap and lukewarm 

water using a cloth or sponge. Also 

check the belts periodically for 

excessive wear, fraying or cuts.

NOTICE

• Steering parts

• Suspension parts

• Brake parts

Keep the cleaning nozzle at 

least 11.9 in. (30 cm) away from 

the vehicles body. Otherwise 

resin section, such as moldings 

and bumpers, may be deformed 

and damaged. Also, do not con-

tinuously hold the nozzle in the 

same place.

Do not spray the lower part of 

the windshield continuously. If 

water enters the air conditioning 

system intake located near the 

lower part of the windshield, the 

air conditioning system may not 

operate correctly.

Do not wash the underside of 

the vehicle using a high pres-

sure car washer.

Cleaning and protect-

ing the vehicle interior

Perform cleaning in a man-
ner appropriate to each 
component and its material.

Protecting the vehicle 
interior

-------------------------------------------------------------------------------------------------------------------------------------------------------------

423

7-1. Maintenance and care

COROLLA HV_U

7

Maintena

nce
 a

nd ca

re

WARNING

Water in the vehicle

Do not splash or spill liquid in 

the vehicle, such as on the floor, 

in the hybrid battery (traction 

battery) air intake vent, and in 

the trunk. (

P.422)

Doing so may cause the hybrid 

battery, electrical components, 

etc. to malfunction or catch fire.

Do not get any of the SRS com-

ponents or wiring in the vehicle 

interior wet.

(

P.31)

An electrical malfunction may 

cause the airbags to deploy or 

not function properly, resulting 

in death or serious injury.

Vehicles with wireless charger:

Do not let the wireless charger 

(

P.402) get wet. Failure to do 

so may cause the charger to 

become hot and cause burns or 

could cause electric shock 

resulting in death or serious 

injury.

Cleaning the interior (espe-

cially instrument panel)

Do not use polish wax or polish 

cleaner. The instrument panel 

may reflect off the windshield, 

obstructing the driver’s view and 

leading to an accident, resulting in 

death or serious injury.

NOTICE

Cleaning detergents

Do not use the following types 

of detergent, as they may dis-

color the vehicle interior or 

cause streaks or damage to 

painted surfaces:

• Areas other than the seats and 

steering wheel: Organic sub-

stances such as benzene or 

gasoline, alkaline or acidic solu-

tions, dye, and bleach

• Seats: Alkaline or acidic solu-

tions, such as thinner, benzene, 

and alcohol

• Steering wheel: Organic sub-

stances, such as thinner, and 

cleaner that contains alcohol

Do not use polish wax or polish 

cleaner. The instrument panel’s 

or other interior part’s painted 

surface may be damaged.

Preventing damage to leather 

surfaces

Observe the following precautions 

to avoid damage to and deteriora-

tion of leather surfaces:

Remove any dust or dirt from 

leather surfaces immediately.

Do not expose the vehicle to 

direct sunlight for extended peri-

ods of time. Park the vehicle in 

the shade, especially during 

summer.

Do not place items made of 

vinyl, plastic, or containing wax 

on the upholstery, as they may 

stick to the leather surface if the 

vehicle interior heats up signifi-

cantly.

Water on the floor

Do not wash the vehicle floor with 

water.

Vehicle systems such as the 

audio system may be damaged if 

water comes into contact with 

electrical components such as the 

audio system above or under the 

floor of the vehicle. Water may 

also cause the body to rust.

When cleaning the inside of 

the windshield

Do not allow glass cleaner to con-

tact the lens. Also, do not touch 

the lens. (

P.183)

-------------------------------------------------------------------------------------------------------------------------------------------------------------

424

7-1. Maintenance and care

COROLLA HV_U

Remove dirt using a 
water-dampened soft cloth or 
synthetic chamois.

Wipe the surface with a dry, 
soft cloth to remove any 
remaining moisture.

Cleaning the areas with 

satin-finish metal accents

The metal areas use a layer of real 

metal for the surface. It is necessary 

to clean them regularly. If dirty areas 

are left uncleaned for long periods 

of time, they may be difficult to 

clean.

Remove dirt and dust using a 
vacuum cleaner.

Wipe off any excess dirt and 
dust with a soft cloth damp-
ened with diluted detergent.

Use a diluted water solution of 
approximately 5% neutral wool 
detergent.

Wring out any excess water 
from the cloth and thoroughly 
wipe off all remaining traces 
of detergent.

Wipe the surface with a dry, 
soft cloth to remove any 
remaining moisture. Allow the 
leather to dry in a shaded and 
ventilated area.

Caring for leather areas

Toyota recommends cleaning the 

interior of the vehicle at least twice a 

year to maintain the quality of the 

vehicle’s interior.

Remove dirt and dust using a 
vacuum cleaner.

Wipe it off with a soft cloth 
dampened with neutral deter-
gent diluted to approximately 
1%.

Wring out any excess water 
from the cloth and thoroughly 
wipe off remaining traces of 
detergent and water.

NOTICE

Cleaning the inside of the rear 

window

Do not use glass cleaner to 

clean the rear window, as this 

may cause damage to the rear 

window defogger heater wires 

or antenna. Use a cloth damp-

ened with lukewarm water to 

gently wipe the window clean. 

Wipe the window in strokes run-

ning parallel to the heater wires 

or antenna.

Be careful not to scratch or 

damage the heater wires or 

antenna.

Cleaning the areas with 
satin-finish metal accents

Cleaning the leather areas

Cleaning the synthetic 
leather areas

-------------------------------------------------------------------------------------------------------------------------------------------------------------

425

7-2. Maintenance

COROLLA HV_U

7

Maintena

nce
 a

nd ca

re

7-2.Maintenance

Repair and replacement

It is recommended that genuine 

Toyota parts be used for repairs to 

ensure performance of each sys-

tem. If non-Toyota parts are used in 

replacement or if a repair shop other 

than a Toyota dealer performs 

repairs, confirm the warranty cover-

age.

Allow inspection and repairs to 

be performed by a Toyota 

dealer

Toyota technicians are 

well-trained specialists and are 

kept up to date with the latest ser-

vice information. They are well 

informed about the operation of all 

systems on your vehicle.

Keep a copy of the repair order. It 

proves that the maintenance that 

has been performed is under war-

ranty coverage. If any problem 

should arise while your vehicle is 

under warranty, your Toyota 

dealer will promptly take care of it.

General maintenance should be 
performed on a daily basis. This 
can be done by yourself or by a 
Toyota dealer.

Scheduled maintenance should 
be performed at specified inter-
vals according to the mainte-
nance schedule.

For details about maintenance 
items and schedules, refer to the 
“Scheduled Maintenance Guide” or 
“Owner’s Manual Supplement”.

Maintenance require-

ments

To ensure safe and econom-
ical driving, day-to-day care 
and regular maintenance 
are essential. It is the 
owner’s responsibility to 
perform regular checks. 
Toyota recommends the 
maintenance below.

WARNING

If your vehicle is not properly 

maintained

Improper maintenance could 

result in serious damage to the 

vehicle and possible death or seri-

ous injury.

Handling of the 12-volt bat-

tery

Engine exhaust, some of its 

constituents, and a wide variety 

of automobile components con-

tain or emit chemicals known to 

the State of California to cause 

cancer and birth defects and 

other reproductive harm. Work 

in a well ventilated area.

Oils, fuels and fluids contained 

in vehicles as well as waste pro-

duced by component wear con-

tain or emit chemicals known to 

the State of California to cause 

cancer and birth defects or 

other reproductive harm. Avoid 

exposure and wash any 

affected area immediately.

12-volt battery posts, terminals 

and related accessories con-

tain lead and lead compounds 

which are known to cause brain 

damage. Wash your hands after 

handling. (

P.439)

General maintenance

Scheduled maintenance

-------------------------------------------------------------------------------------------------------------------------------------------------------------

426

7-2. Maintenance

COROLLA HV_U

Resetting the message indicat-

ing maintenance is required

After the required maintenance is 

performed according to the mainte-

nance schedule, please reset the 

message.

To reset the message, follow the 

procedure described below:

1

Press 

 or 

 of the meter 

control switch to select 

.

2

Press 

 or 

 to select “Vehi-

cle Settings” and then press and 
hold 

.

3

Press 

 or 

 to select 

“Scheduled Maintenance” and 
then press 

.

4

Press 

 or 

 to select “Yes” 

and then press 

.

A message will be displayed on the 

multi-information display when the 

reset procedure has been com-

pleted.

You can perform some mainte-
nance procedures by yourself.
Please be aware that do-it-your-
self maintenance may affect 
warranty coverage.

The use of Toyota repair manuals is 
recommended.
For details about warranty cover-
age, refer to the separate “Owner’s 
Warranty Information Booklet” or 
“Owner’s Manual Supplement”.

Do-it-yourself mainte-
nance

General maintenance

Listed below are the general 
maintenance items that 
should be performed at the 
intervals specified in the 
“Owner’s Warranty Informa-
tion Booklet” or “Owner’s 
Manual Supplement/Sched-
uled Maintenance Guide”. It 
is recommended that any 
problem you notice should 
be brought to the attention 
of your Toyota dealer or 
qualified service shop for 
advice.

WARNING

If the hybrid system is operat-

ing

Turn the hybrid system off and 

ensure that there is adequate 

ventilation before performing 

maintenance checks.

Engine compartment

Items

Check points

12-volt battery

Check the connec-
tions. (

P.439)

Brake fluid

Is the brake fluid at 
the correct level? 
(

P.438)

Engine/power 
control unit 
coolant

Is the 
engine/power con-
trol unit coolant at 
the correct level? 
(

P.436)

-------------------------------------------------------------------------------------------------------------------------------------------------------------

427

7-2. Maintenance

COROLLA HV_U

7

Maintena

nce
 a

nd ca

re

Engine oil

Is the engine oil at 
the correct level? 
(

P.434)

Exhaust sys-
tem

There should not 
be any fumes or 
strange sounds.

Radiator/con-
denser

The radiator and 
condenser should 
be free from for-
eign objects. 
(

P.437)

Washer fluid

Is there sufficient 
washer fluid? 
(

P.440)

Vehicle interior

Items

Check points

Accelerator 
pedal

The accelerator 
pedal should move 
smoothly (without 
uneven pedal effort 
or catching).

Brake pedal

• Does the brake 

pedal move 
smoothly?

• Does the brake 

pedal have 
appropriate 
clearance from 
the floor? 
(

P.528)

• Does the brake 

pedal have the 
correct amount 
of free play? 
(

P.528)

Items

Check points

Brakes

• The vehicle 

should not pull to 
one side when 
the brakes are 
applied.

• The brakes 

should work 
effectively.

• The brake pedal 

should not feel 
spongy.

• The brake pedal 

should not get 
too close to the 
floor when the 
brakes are 
applied.

Head 
restraints

Do the head 
restraints move 
smoothly and lock 
securely?

Hybrid trans-
mission “Park” 
mechanism

When parked on a 
slope and the shift 
lever is in P, is the 
vehicle securely 
stopped?

Indica-
tors/buzzers

Do the indicators 
and buzzers func-
tion properly?

Lights

Do all the lights 
come on?

Parking brake

• Does the park-

ing brake oper-
ate normally?

• When parked on 

a slope and the 
parking brake is 
on, is the vehicle 
securely 
stopped?

Items

Check points

-------------------------------------------------------------------------------------------------------------------------------------------------------------

428

7-2. Maintenance

COROLLA HV_U

Seat belts

• Do the seat belts 

operate 
smoothly?

• The seat belts 

should not be 
damaged.

Seats

Do the seat con-
trols operate prop-
erly?

Steering wheel

• Does the steer-

ing wheel rotate 
smoothly?

• Does the steer-

ing wheel have 
the correct 
amount of free 
play?

• There should not 

be any strange 
sounds coming 
from the steer-
ing wheel.

Vehicle exterior

Items

Check points

Doors/trunk

Do the doors/trunk 
operate smoothly?

Engine hood

Does the engine 
hood lock system 
work properly?

Fluid leaks

There should not 
be any signs of 
fluid leakage after 
the vehicle has 
been parked.

Items

Check points

Tires

• Is the tire infla-

tion pressure 
correct?

• The tires should 

not be damaged 
or excessively 
worn.

• Have the tires 

been rotated 
according to the 
maintenance 
schedule?

• The wheel nuts 

should not be 
loose.

Windshield 
wipers

• The wiper blades 

should not show 
any signs of 
cracking, split-
ting, wear, con-
tamination or 
deformation.

• The wiper blades 

should clear the 
windshield with-
out streaking or 
skipping.

Items

Check points

-------------------------------------------------------------------------------------------------------------------------------------------------------------

429

7-2. Maintenance

COROLLA HV_U

7

Maintena

nce
 a

nd ca

re

The OBD system determines 
that a problem exists some-
where in the emission control 
system. Your vehicle may not 
pass the I/M test and may need 
to be repaired. Contact your 
Toyota dealer to service the 
vehicle.

When the 12-volt battery is 
disconnected or discharged

Readiness codes that are set 
during ordinary driving are erased.
Also, depending on your driving 
habits, the readiness codes may 
not be completely set.

When the fuel tank cap is 
loose

The malfunction indicator lamp 
comes on indicating a temporary 
malfunction and your vehicle may 
not pass the I/M test.

The error code in the OBD sys-
tem will not be cleared unless 
the vehicle is driven 40 or more 
times.

Contact your Toyota dealer to 
prepare the vehicle for re-test-
ing.

Emission inspection 

and maintenance (I/M) 

programs

Some states have vehicle 
emission inspection pro-
grams which include OBD 
(On Board Diagnostics) 
checks. The OBD system 
monitors the operation of 
the emission control sys-
tem.

If the malfunction indica-
tor lamp comes on

Your vehicle may not pass 
the I/M test in the follow-
ing situations:

When the malfunction 
indicator lamp still 
remains on after several 
driving trips

If your vehicle does not 
pass the I/M test

-------------------------------------------------------------------------------------------------------------------------------------------------------------

430

7-3. Do-it-yourself maintenance

COROLLA HV_U

7-3.Do-it-yourself maintenance

Do-it-yourself service 

precautions

If you perform maintenance 
by yourself, be sure to fol-
low the correct procedure 
as given in these sections.

Maintenance

Items

Parts and tools

12-volt bat-
tery condi-
tion 
(

P.439)

• Warm water
• Baking soda
• Grease
• Conventional 

wrench (for terminal 
clamp bolts)

Brake fluid 
level 
(

P.438)

• FMVSS No.116 

DOT 3 or SAE 
J1703 brake fluid
FMVSS No.116 
DOT 4 or SAE 
J1704 brake fluid

• Rag or paper towel
• Funnel (used only 

for adding brake 
fluid)

Engine/pow
er control 
unit cool-
ant level 
(

P.436)

• “Toyota Super Long 

Life Coolant” or a 
similar high quality 
ethylene gly-
col-based non-sili-
cate, non-amine, 
non-nitrite and 
non-borate coolant 
with long-life hybrid 
organic acid tech-
nology
For the U.S.A.:
“Toyota Super Long 
Life Coolant” is 
pre-mixed with 50% 
coolant and 50% 
deionized water.
For Canada:
“Toyota Super Long 
Life Coolant” is 
pre-mixed with 55% 
coolant and 45% 
deionized water.

• Funnel (used only 

for adding coolant)

Engine oil 
level 
(

P.434)

• “Toyota Genuine 

Motor Oil” or equiva-
lent

• Rag or paper towel
• Funnel (used only 

for adding engine 
oil)

Fuses 
(

P.461)

• Fuse with same 

amperage rating as 
original

Hybrid bat-
tery (trac-
tion battery) 
air intake 
vent 
(

P.455)

• Vacuum cleaner, 

etc.

• Phillips screwdriver

Items

Parts and tools

-------------------------------------------------------------------------------------------------------------------------------------------------------------

431

7-3. Do-it-yourself maintenance

COROLLA HV_U

7

Maintena

nce
 a

nd ca

re

Light bulbs 
(

P.463)

• Bulb with same 

number and wattage 
rating as original

• Flathead screw-

driver

• Wrench

Radiator 
and con-
denser 
(

P.437)

Tire infla-
tion pres-
sure 
(

P.450)

• Tire pressure gauge
• Compressed air 

source

Washer 
fluid 
(

P.440)

• Water or washer 

fluid containing anti-
freeze (for winter 
use)

• Funnel (used only 

for adding water or 
washer fluid)

WARNING

The engine compartment contains 

many mechanisms and fluids that 

may move suddenly, become hot, 

or become electrically energized. 

To avoid death or serious injury, 

observe the following precautions.

When working on the engine 

compartment

Make sure that the “ACCES-

SORY” or “IGNITION ON” on 

the multi-information display 

and the “READY” indicator are 

both off.

Keep hands, clothing and tools 

away from the moving fans.

Items

Parts and tools

Be careful not to touch the 

engine, power control unit, radi-

ator, exhaust manifold, etc. right 

after driving as they may be hot. 

Oil and other fluids may also be 

hot.

Do not leave anything that may 

burn easily, such as paper and 

rags, in the engine compart-

ment.

Do not smoke, cause sparks or 

expose an open flame to fuel or 

the 12-volt battery. Fuel and 

12-volt battery fumes are flam-

mable.

Be extremely cautious when 

working on the 12-volt battery. It 

contains poisonous and corro-

sive sulfuric acid.

When working near the elec-

tric cooling fans or radiator 

grille

Be sure the power switch is OFF.

With the power switch in ON, the 

electric cooling fans may auto-

matically start to run if the air con-

ditioning is on and/or the coolant 

temperature is high. (

P.437)

Safety glasses

Wear safety glasses to prevent 

flying or falling material, fluid 

spray, etc. from getting in your 

eyes.

NOTICE

If you remove the air cleaner 

filter

Driving with the air cleaner filter 

removed may cause excessive 

engine wear due to dirt in the air.

-------------------------------------------------------------------------------------------------------------------------------------------------------------

432

7-3. Do-it-yourself maintenance

COROLLA HV_U

1

Pull the hood lock release 
lever.

The hood will pop up slightly.

2

Pull the auxiliary catch lever 
to the left and lift the hood.

3

Hold the hood open by insert-
ing the support rod into the 
slot.

Hood

Opening the hood

WARNING

Pre-driving check

Check that the hood is fully closed 

and locked.

If the hood is not locked properly, 

it may open while the vehicle is in 

motion and cause an accident, 

which may result in death or seri-

ous injury.

After installing the support 

rod into the slot

Make sure the rod supports the 

hood securely preventing it from 

falling down onto your head or 

body.

NOTICE

When closing the hood

Be sure to return the support rod 

to its clip before closing the hood. 

Closing the hood with the support 

rod not clipped could cause the 

hood to bend.

-------------------------------------------------------------------------------------------------------------------------------------------------------------

433

7-3. Do-it-yourself maintenance

COROLLA HV_U

7

Maintena

nce
 a

nd ca

re

Front

Rear

Positioning a floor 

jack

When using a floor jack, fol-
low the instructions in the 
manual provided with the 
jack and perform the opera-
tion safely.
When raising your vehicle 
with a floor jack, position 
the jack correctly. Improper 
placement may damage 
your vehicle or cause injury.

Location of the jack point

-------------------------------------------------------------------------------------------------------------------------------------------------------------

434

7-3. Do-it-yourself maintenance

COROLLA HV_U

Washer fluid tank (

P.440)

Engine coolant reservoir (

P.436)

Fuse boxes (

P.461)

Engine oil level dipstick (

P.435)

Engine oil filler cap (

P.435)

Power control unit coolant reservoir (

P.436)

Brake fluid reservoir (

P.438)

12-volt battery (

P.439)

Radiator (

P.437)

Condenser (

P.437)

Electric cooling fans

With the engine at operating 

temperature and turned off, 
check the oil level on the dip-
stick.

Engine compartment

Components

Checking and adding the 
engine oil

-------------------------------------------------------------------------------------------------------------------------------------------------------------

435

7-3. Do-it-yourself maintenance

COROLLA HV_U

7

Maintena

nce
 a

nd ca

re

Checking the engine oil

1

Park the vehicle on level 
ground. After warming up the 
engine and turning off the 
hybrid system, wait more 
than 5 minutes for the oil to 
drain back into the bottom of 
the engine.

2

Holding a rag under the end, 
pull the dipstick out.

3

Wipe the dipstick clean.

4

Reinsert the dipstick fully.

5

Holding a rag under the end, 
pull the dipstick out and 
check the oil level.

Low
Normal
Excessive

The shape of the dipstick may differ 

depending on the type of vehicle or 

engine.

6

Wipe the dipstick and reinsert 
it fully.

Checking the oil type and 
preparing the item needed

Make sure to check the oil type 
and prepare the items needed 
before adding oil.

Engine oil selection

P.526

Oil quantity (Low 

 Full)

1.6 qt. (1.5 L, 1.3 Imp. qt.)

Item
Clean funnel

Adding engine oil

If the oil level is below or near 
the low level mark, add engine 
oil of the same type as that 
already in the engine.

1

Remove the oil filler cap by 
turning it counterclockwise.

2

Add engine oil slowly, check-
ing the dipstick.

3

Install the oil filler cap by 
turning it clockwise.

Engine oil consumption

A certain amount of engine oil will 

be consumed while driving. In the 

following situations, oil consump-

-------------------------------------------------------------------------------------------------------------------------------------------------------------

436

7-3. Do-it-yourself maintenance

COROLLA HV_U

tion may increase, and engine oil 

may need to be refilled in between 

oil maintenance intervals.

When the engine is new, for 

example directly after purchasing 

the vehicle or after replacing the 

engine

If low quality oil or oil of an inap-

propriate viscosity is used

When driving at high engine 

speeds or with a heavy load, or 

when driving while accelerating or 

decelerating frequently

When leaving the engine idling for 

a long time, or when driving fre-

quently through heavy traffic

Engine coolant reservoir

The coolant level is satisfactory 
if it is between the “MAX” and 
“MIN” lines on the reservoir 
when the engine is cold.

Reservoir cap
“MAX” line
“MIN” line

If the level is on or below the “MIN” 
line, add coolant up to the “MAX” 
line. (

P.517)

Power control unit coolant 
reservoir

The coolant level is satisfactory 
if it is between the “FULL” and 
“LOW” lines on the reservoir 
when the hybrid system is cold.

WARNING

Used engine oil

Used engine oil contains poten-

tially harmful contaminants 

which may cause skin disorders 

such as inflammation and skin 

cancer, so care should be taken 

to avoid prolonged and 

repeated contact. To remove 

used engine oil from your skin, 

wash thoroughly with soap and 

water.

Dispose of used oil and filters 

only in a safe and acceptable 

manner. Do not dispose of used 

oil and filters in household trash, 

in sewers or onto the ground.

Call your Toyota dealer, service 

station or auto parts store for 

information concerning recy-

cling or disposal.

Do not leave used engine oil 

within the reach of children.

NOTICE

To prevent serious engine 

damage

Check the oil level on a regular 

basis.

When replacing the engine oil

Be careful not to spill engine oil 

on the vehicle components.

Avoid overfilling, or the engine 

could be damaged.

Check the oil level on the dip-

stick every time you refill the 

vehicle.

Be sure the engine oil filler cap 

is properly tightened.

Checking the coolant

-------------------------------------------------------------------------------------------------------------------------------------------------------------

437

7-3. Do-it-yourself maintenance

COROLLA HV_U

7

Maintena

nce
 a

nd ca

re

Reservoir cap
“FULL” line
“LOW” line

If the level is on or below the “LOW” 
line, add coolant up to the “FULL” 
line. (

P.517)

Coolant selection

Only use “Toyota Super Long Life 

Coolant” or a similar high quality 

ethylene glycol based non-silicate, 

non-amine, non-nitrite, and 

non-borate coolant with long-life 

hybrid organic acid technology.
U.S.A.:
“Toyota Super Long Life Coolant” is 

a mixture of 50% coolant and 50% 

deionized water. (Minimum tem-

perature: -31°F [-35°C])
Canada:
“Toyota Super Long Life Coolant” is 

a mixture of 55% coolant and 45% 

deionized water. (Minimum tem-

perature: -44°F [-42°C])
For more details about coolant, con-

tact your Toyota dealer.

If the coolant level drops within 

a short time of replenishing

Visually check the radiator, hoses, 

engine/power control unit coolant 

reservoir caps, drain cock and water 

pump.

If you cannot find a leak, have your 

Toyota dealer test the cap and 

check for leaks in the cooling sys-

tem.

Check the radiator and con-
denser and clear away any for-
eign objects. If either of the 
above parts is extremely dirty or 
you are not sure of their condi-
tion, have your vehicle 
inspected by your Toyota dealer.

WARNING

When the hybrid system is 

hot

Do not remove the engine/power 

control unit coolant reservoir 

caps.
The cooling system may be under 

pressure and may spray hot cool-

ant if the cap is removed, causing 

serious injuries, such as burns.

NOTICE

When adding coolant

Coolant is neither plain water nor 

straight antifreeze. The correct 

mixture of water and antifreeze 

must be used to provide proper 

lubrication, corrosion protection 

and cooling. Be sure to read the 

antifreeze or coolant label.

If you spill coolant

Be sure to wash it off with water to 

prevent it from damaging parts or 

paint.

Checking the radiator and 
condenser

WARNING

When the hybrid system is 

hot

Do not touch the radiator or con-

denser as they may be hot and 

cause serious injuries, such as 

burns.

-------------------------------------------------------------------------------------------------------------------------------------------------------------

438

7-3. Do-it-yourself maintenance

COROLLA HV_U

Checking fluid level

The brake fluid level should be 
between the “MAX” and “MIN” 
lines on the tank.

Adding fluid

1

Slide and lift up the rubber 
strip to partly remove it as 
shown.

2

Disconnect the claws and 
remove the service cover.

3

Remove the reservoir cap.

4

Add brake fluid slowly while 
checking the fluid level.

Make sure to check the fluid 
type and prepare the necessary 
item.

Fluid type

FMVSS No.116 DOT 3 or SAE 
J1703 brake fluid
FMVSS No.116 DOT 4 or SAE 
J1704 brake fluid

Item

Clean funnel

Brake fluid can absorb moisture 

from the air

Excess moisture in the brake fluid 

can cause a dangerous loss of brak-

ing efficiency. Use only newly 

opened brake fluid.

Checking and adding the 
brake fluid

WARNING

When filling the reservoir

Take care as brake fluid can harm 

your hands and eyes and damage 

painted surfaces.

If fluid gets on your hands or in 

your eyes, flush the affected area 

with clean water immediately.
If you still experience discomfort, 

see a doctor.

-------------------------------------------------------------------------------------------------------------------------------------------------------------

439

7-3. Do-it-yourself maintenance

COROLLA HV_U

7

Maintena

nce
 a

nd ca

re

Check the 12-volt battery as fol-
lows.

12-volt battery exterior

Make sure that the 12-volt bat-
tery terminals are not corroded 
and that there are no loose con-
nections, cracks, or loose 
clamps.

Terminals
Hold-down clamp

Before recharging

When recharging, the 12-volt bat-

tery produces hydrogen gas which 

is flammable and explosive. There-

fore, observe the following precau-

tions before recharging:

If recharging with the 12-volt bat-

tery installed on the vehicle, be 

sure to disconnect the ground 

cable.

Make sure the charger is off when 

connecting and disconnecting the 

charger cables to the 12-volt bat-

tery.

After recharging/reconnecting 

the 12-volt battery

Unlocking the doors using the 

smart key system may not be pos-

sible immediately after reconnect-

ing the 12-volt battery. If this 

happens, use the wireless remote 

control or the mechanical key to 

lock/unlock the doors.

Start the hybrid system with the 

power switch in ACC. The hybrid 

system may not start with the 

power switch turned off. However, 

the hybrid system will operate nor-

mally from the second attempt.

The power switch mode is 

recorded by the vehicle. If the 

12-volt battery is reconnected, the 

vehicle will return the power 

switch mode to the status it was in 

before the 12-volt battery was dis-

connected. Make sure to turn off 

the power before disconnecting 

the 12-volt battery. Take extra 

care when connecting the 12-volt 

battery if the power switch mode 

prior to discharge is unknown.

If the system will not start even after 

multiple attempts, contact your Toy-

ota dealer.

NOTICE

If the fluid level is low or high

It is normal for the brake fluid level 

to go down slightly as the brake 

pads wear out or when the fluid 

level in the accumulator is high.

If the reservoir needs frequent 

refilling, there may be a serious 

problem.

12-volt battery

WARNING

Chemicals in the 12-volt bat-

tery

The 12-volt battery contains poi-

sonous and corrosive sulfuric acid 

and may produce hydrogen gas 

which is flammable and explosive. 

To reduce the risk of death or seri-

ous injury, take the following pre-

cautions while working on or near 

the 12-volt battery:

Do not cause sparks by touch-

ing the 12-volt battery terminals 

with tools.

-------------------------------------------------------------------------------------------------------------------------------------------------------------

440

7-3. Do-it-yourself maintenance

COROLLA HV_U

Add washer fluid in the following 
situations:

A washer does not work.

The warning message 
appears on the multi-informa-
tion display.

WARNING

Do not smoke or light a match 

near the 12-volt battery.

Avoid contact with eyes, skin 

and clothes.

Never inhale or swallow electro-

lyte.

Wear protective safety glasses 

when working near the 12-volt 

battery.

Keep children away from the 

12-volt battery.

Where to safely charge the 

12-volt battery

Always charge the 12-volt battery 

in an open area. Do not charge 

the 12-volt battery in a garage or 

closed room where there is insuf-

ficient ventilation.

Emergency measures regard-

ing electrolyte

If electrolyte gets in your eyes

Flush your eyes with clean 

water for at least 15 minutes 

and get immediate medical 

attention. If possible, continue 

to apply water with a sponge or 

cloth while traveling to the near-

est medical facility.

If electrolyte gets on your skin

Wash the affected area thor-

oughly. If you feel pain or burn-

ing, get medical attention 

immediately.

If electrolyte gets on your 

clothes

It can soak through clothing on 

to your skin. Immediately take 

off the clothing and follow the 

procedure above if necessary.

If you accidentally swallow elec-

trolyte

Drink a large quantity of water 

or milk. Get emergency medical 

attention immediately.

When disconnecting the 

12-volt battery

Do not disconnect the negative (-) 

terminal on the body side. The 

disconnected negative (-) terminal 

may touch the positive (+) termi-

nal, which may cause a short and 

result in death or serious injury.

NOTICE

When recharging the 12-volt 

battery

Never recharge the 12-volt bat-

tery while the hybrid system is 

operating. Also, be sure all acces-

sories are turned off.

Adding the washer fluid

-------------------------------------------------------------------------------------------------------------------------------------------------------------

441

7-3. Do-it-yourself maintenance

COROLLA HV_U

7

Maintena

nce
 a

nd ca

re

Check if the treadwear indica-
tors are showing on the tires. 
Also check the tires for uneven 
wear, such as excessive wear 
on one side of the tread.
Check the spare tire condition 
and pressure if not rotated.

New tread
Worn tread
Treadwear indicator

The location of treadwear indicators 
is shown by a “TWI” or “

” mark, 

WARNING

When adding washer fluid

Do not add washer fluid when the 

hybrid system is hot or operating 

as washer fluid contains alcohol 

and may catch fire if spilled on the 

engine, etc.

NOTICE

Do not use any fluid other 

than washer fluid

Do not use soapy water or engine 

antifreeze instead of washer fluid.

Doing so may cause streaking on 

the vehicle’s painted surfaces, as 

well as damaging the pump lead-

ing to problems of the washer 

fluid not spraying.

Diluting washer fluid

Dilute washer fluid with water as 

necessary.

Refer to the freezing tempera-

tures listed on the label of the 

washer fluid bottle.

Tires

Replace or rotate tires in 
accordance with mainte-
nance schedules and tread-
wear.

Checking tires

-------------------------------------------------------------------------------------------------------------------------------------------------------------

442

7-3. Do-it-yourself maintenance

COROLLA HV_U

etc., molded into the sidewall of 
each tire.
Replace the tires if the treadwear 
indicators are showing on a tire.

When to replace your vehicle’s 

tires

Tires should be replaced if:

The treadwear indicators are 

showing on a tire

You have tire damage such as 

cuts, splits, cracks deep enough 

to expose the fabric, and bulges 

indicating internal damage

A tire goes flat repeatedly or can-

not be properly repaired due to the 

size or location of a cut or other 

damage

If you are not sure, consult with your 

Toyota dealer.

Tire life

Any tire over 6 years old must be 

checked by a qualified technician 

even if it has seldom or never been 

used or damage is not obvious.

Maximum load of tire

Check that the maximum load of the 

replacement tire is greater than 1/2 

of the Gross Axle Weight Ratings 

(GAWR) of either the front axle or 

the rear axle, whichever is greater.
For the GAWR, see the Certification 

Label.

For the maximum load of the tire, 

see the load limit at maximum cold 

tire inflation pressure mentioned on 

the sidewall of the tire. (

P.533)

Tire types

Summer tires

Summer tires are high-speed perfor-
mance tires best suited to highway 
driving under dry conditions. Since 
summer tires do not have the same 
traction performance as snow tires, 
summer tires are inadequate for 
driving on snow-covered or icy 
roads. For driving on snow-covered 
roads or icy roads, the use of snow 
tires is recommended. When install-
ing snow tires, be sure to replace all 
four tires.

All season tires

All season tires are designed to pro-
vide better traction in snow and to 
be adequate for driving in most win-
ter conditions as well as for use 
year-round. All season tires, how-
ever, do not have adequate traction 
performance compared with snow 
tires in heavy or loose snow. Also, 
all season tires fall short in accelera-
tion and handling performance com-
pared with summer tires in highway 
driving.

Snow tires

For driving on snow-covered roads 
or icy roads, we recommend using 
snow tires. If you need snow tires, 
select tires of the same size, con-
struction and load capacity as the 
originally installed tires. Since your 
vehicle has radial tires as original 
equipment, make sure your snow 
tires also have radial construction. 
Do not install studded tires without 
first checking local regulations for 
possible restrictions. Snow tires 
should be installed on all wheels. 
(

P.247)

If the tread on snow tires wears 

down below 0.16 in. (4 mm)

The effectiveness of the tires as 

snow tires is lost.

-------------------------------------------------------------------------------------------------------------------------------------------------------------

443

7-3. Do-it-yourself maintenance

COROLLA HV_U

7

Maintena

nce
 a

nd ca

re

Checking the tire valves

When replacing the tires, check the 

tire valves for deformation, cracks, 

and other damage.

Rotate the tires in the order 
shown.

Front

To equalize tire wear and extend 
tire life, Toyota recommends that 
tire rotation is carried out at the 
same interval as tire inspection.
Vehicles with a tire pressure warn-
ing system: Do not fail to initialize 
the tire pressure warning system 
after tire rotation.

Your vehicle is equipped with a 
tire pressure warning system 
that uses tire pressure warning 
valves and transmitters to detect 

WARNING

When inspecting or replacing 

tires

Observe the following precautions 

to prevent accidents.

Failure to do so may cause dam-

age to parts of the drive train as 

well as dangerous handling char-

acteristics, which may lead to an 

accident resulting in death or seri-

ous injury.

Do not mix tires of different 

makes, models or tread pat-

terns.

Also, do not mix tires of remark-

ably different treadwear.

Do not use tire sizes other than 

those recommended by Toyota.

Do not mix differently con-

structed tires (radial, bias-belted 

or bias-ply tires).

Do not mix summer, all season 

and snow tires.

Do not use tires that have been 

used on another vehicle.

Do not use tires if you do not 

know how they were used previ-

ously.

NOTICE

If tire inflation pressure of 

each tire becomes low while 

driving

Do not continue driving, or your 

tires and/or wheels may be 

ruined.

Driving on rough roads

Take particular care when driving 

on roads with loose surfaces or 

potholes.

These conditions may cause 

losses in tire inflation pressure, 

reducing the cushioning ability of 

the tires. In addition, driving on 

rough roads may cause damage 

to the tires themselves, as well as 

the vehicle’s wheels and body.

Tire rotation

Tire pressure warning 
system (if equipped)

-------------------------------------------------------------------------------------------------------------------------------------------------------------

444

7-3. Do-it-yourself maintenance

COROLLA HV_U

low tire inflation pressure before 
serious problems arise.
If the tire pressure drops below 
a predetermined level, the driver 
is warned by a warning light. 
(

P.482)

Routine tire inflation pressure 

checks

The tire pressure warning system 

does not replace routine tire inflation 

pressure checks. Make sure to 

check tire inflation pressure as part 

of your routine of daily vehicle 

checks.

Situations in which the tire 

pressure warning system may 

not operate properly

In the following cases, the tire 

pressure warning system may not 

operate properly.

• If non-genuine Toyota wheels are 

used.

• A tire has been replaced with a 

tire that is not an OE (Original 

Equipment) tire.

• A tire has been replaced with a 

tire that is not of the specified size.

• Tire chains, etc. are equipped.

• An auxiliary-supported run-flat tire 

is equipped.

• If a window tint that affects the 

radio wave signals is installed.

• If there is a lot of snow or ice on 

the vehicle, particularly around the 

wheels or wheel housings.

• If the tire inflation pressure is 

extremely higher than the speci-

fied level.

• If tires not equipped with tire pres-

sure warning valves and transmit-

ters are used.

• If the ID code on the tire pressure 

warning valves and transmitters is 

not registered in the tire pressure 

warning computer.

Performance may be affected in 

the following situations.

• Near a TV tower, electric power 

plant, gas station, radio station, 

large display, airport or other facil-

ity that generates strong radio 

waves or electrical noise.

• When carrying a portable radio, 

cellular phone, cordless phone or 

other wireless communication 

device.

When the vehicle is parked, the 

time taken for the warning to start 

or go off could be extended.

When tire inflation pressure 

declines rapidly for example when 

a tire has burst, the warning may 

not function.

Warning performance of the tire 

pressure warning system

The warning of the tire pressure 

warning system will change in 

accordance with driving conditions. 

For this reason, the system may 

give a warning even if the tire pres-

sure does not reach a low enough 

level, or if the pressure is higher 

than the pressure that was adjusted 

to when the system was initialized.

-------------------------------------------------------------------------------------------------------------------------------------------------------------

445

7-3. Do-it-yourself maintenance

COROLLA HV_U

7

Maintena

nce
 a

nd ca

re

Tire pressure warning system certification

-------------------------------------------------------------------------------------------------------------------------------------------------------------

446

7-3. Do-it-yourself maintenance

COROLLA HV_U

When replacing tires or wheels, 
tire pressure warning valves and 
transmitters must also be 
installed.
When new tire pressure warning 

Installing tire pressure 
warning valves and trans-
mitters (vehicles with a 
tire pressure warning sys-
tem)

-------------------------------------------------------------------------------------------------------------------------------------------------------------

447

7-3. Do-it-yourself maintenance

COROLLA HV_U

7

Maintena

nce
 a

nd ca

re

valves and transmitters are 
installed, new ID codes must be 
registered in the tire pressure 
warning computer and the tire 
pressure warning system must 
be initialized. Have tire pressure 
warning valves and transmitter 
ID codes registered by your Toy-
ota dealer. (

P.449)

Replacing tires and wheels

If the ID code of the tire pressure 

warning valve and transmitter is not 

registered, the tire pressure warning 

system will not work properly. After 

driving for about 20 minutes, the tire 

pressure warning light blinks for 1 

minute and stays on to indicate a 

system malfunction.

The tire pressure warning 
system must be initialized 
in the following circum-
stances:

When rotating front and rear 
tires which have different tire 
inflation pressures.

When changing the tire size.

When the tire inflation pres-
sure is changed such as 
when changing traveling 
speed or load weight.

When changing between two 
registered wheel sets.

When the tire pressure warning 
system is initialized, the current 
tire inflation pressure is set as 
the benchmark pressure.

How to initialize the tire 
pressure warning system

1

Park the vehicle in a safe 
place and turn the power 
switch off.

NOTICE

Repairing or replacing tires, 

wheels, tire pressure warn-

ing valves, transmitters and 

tire valve caps

When removing or fitting the 

wheels, tires or the tire pressure 

warning valves and transmit-

ters, contact your Toyota dealer 

as the tire pressure warning 

valves and transmitters may be 

damaged if not handled cor-

rectly.

Make sure to install the tire 

valve caps. If the tire valve caps 

are not installed, water could 

enter the tire pressure warning 

valves and the tire pressure 

warning valves could be bound.

When replacing tire valve caps, 

do not use tire valve caps other 

than those specified. The cap 

may become stuck.

To avoid damage to the tire 

pressure warning valves and 

transmitters

When a tire is repaired with liquid 

sealants, the tire pressure warn-

ing valve and transmitter may not 

operate properly. If a liquid seal-

ant is used, contact your Toyota 

dealer or other qualified service 

shop as soon as possible. Make 

sure to replace the tire pressure 

warning valve and transmitter 

when replacing the tire. (

P.446)

Initializing the tire pres-
sure warning system (if 
equipped)

-------------------------------------------------------------------------------------------------------------------------------------------------------------

448

7-3. Do-it-yourself maintenance

COROLLA HV_U

Initialization cannot be performed 

while the vehicle is moving.

2

Adjust the tire inflation pres-
sure to the specified cold tire 
inflation pressure level. 
(

P.529)

Make sure to adjust the tire pres-

sure to the specified cold tire infla-

tion pressure level. The tire 

pressure warning system will oper-

ate based on this pressure level.

3

Turn the power switch to ON.

4

Press 

 or 

 of the meter 

control switch to select 

.

5

Press 

 or 

 to select 

“Vehicle Settings” and then 

press and hold 

.

6

Press 

 or 

 to select 

“TPWS” and then press 

.

7

Press 

 or 

 to select “Set 

Pressure”. Then press and 

hold 

 until the tire pres-

sure warning light blinks 3 
times.

Initialization procedure

Make sure to carry out initializa-

tion after adjusting the tire inflation 

pressure.

Also, make sure the tires are cold 

before carrying out initialization or 

tire inflation pressure adjustment.

If you have accidentally turned the 

power switch off during initializa-

tion, it is not necessary to press 

the reset switch again as initializa-

tion will restart automatically when 

the power switch to ON for the 

next time.

If initialization has accidentally 

been started when it is not neces-

sary, adjust the tire inflation pres-

sure to the specified level when 

the tires are cold, and then per-

form the initialization procedure 

again.

When initialization of the tire 

pressure warning system has 

failed

Initialization can be completed in a 

few minutes. However, in the follow-

ing cases, the settings have not 

been recorded and the system will 

not operate properly. If repeated 

attempts to record tire inflation pres-

sure settings are unsuccessful, 

have the vehicle inspected by your 

Toyota dealer.

When attempting to start initializa-

tion, the tire pressure warning light 

does not blink 3 times.

After driving for a certain period of 

time since the initialization has 

been completed, the warning light 

comes on after blinking for 1 min-

ute.

-------------------------------------------------------------------------------------------------------------------------------------------------------------

449

7-3. Do-it-yourself maintenance

COROLLA HV_U

7

Maintena

nce
 a

nd ca

re

The tire pressure warning valve 
and transmitter is equipped with 
a unique ID code. When replac-
ing a tire pressure warning valve 
and transmitter, it is necessary 
to register the ID code. Have the 
ID code registered by your Toy-
ota dealer.

Your vehicle is equipped with 
tire pressure warning system 
with the function to have ID 
codes registered for a second 
wheel set, for example a winter 
set, by Toyota dealer.
After registration of a second 
wheel set, either of these two 
wheel sets can be selected for 
usage with the tire pressure 
warning system.

Operating conditions for 
the function

This function will perform the 
change of wheel set only if a 

second wheel set has been 
registered. If no second wheel 
set has been registered, no 
change will be made when 
selecting this function in the 
menu.

Only a change between both 
registered wheel set is possi-
ble, mixing between these 
wheel sets is not supported.

How to change between 
wheel sets

1

Have the vehicle fitted with 
the preferred wheel set.

2

Press 

 or 

 of the meter 

control switch to select 

.

3

Press 

 or 

 to select 

“Vehicle Settings” and then 

press 

.

4

Press 

 or 

 to select 

“TPWS” and then press 

.

5

Press 

 or 

 to select 

“Change Wheel”. Then press 

and hold 

until the tire 

pressure warning light blinks 
slowly 3 times.

WARNING

When initializing the tire pres-

sure warning system

Do not initialize the tire pressure 

warning system without first 

adjusting the tire inflation pres-

sure to the specified level. Other-

wise, the tire pressure warning 

light may not come on even if the 

tire inflation pressure is low, or it 

may come on when the tire infla-

tion pressure is actually normal.

Registering ID codes

Selecting wheel set

-------------------------------------------------------------------------------------------------------------------------------------------------------------

450

7-3. Do-it-yourself maintenance

COROLLA HV_U

6

Initialize the tire pressure 
warning system. (

P.447)

The recommended cold tire 
inflation pressure and tire size 
are displayed on the tire and 
loading information label. 
(

P.529)

Tire valve

Tire inflation pressure

Checking the specified 
tire inflation pressure

Inspection and adjust-
ment procedure

-------------------------------------------------------------------------------------------------------------------------------------------------------------

451

7-3. Do-it-yourself maintenance

COROLLA HV_U

7

Maintena

nce
 a

nd ca

re

Tire pressure gauge

1

Remove the tire valve cap.

2

Press the tip of the tire pres-
sure gauge onto the tire 
valve.

3

Read the pressure using the 
gauge gradations.

4

If the tire inflation pressure is 
not at the recommended 
level, adjust the pressure.
If you add too much air, press 
the center of the valve to 
deflate.

5

After completing the tire infla-
tion pressure measurement 
and adjustment, apply soapy 
water to the valve and check 
for leakage.

6

Put the tire valve cap back 
on.

Tire inflation pressure check 

interval

You should check tire inflation pres-

sure every two weeks, or at least 

once a month. Do not forget to 

check the spare.

Effects of incorrect tire inflation 

pressure

Driving with incorrect tire inflation 

pressure may result in the following:

Reduced fuel economy

Reduced driving comfort and poor 

handling

Reduced tire life due to wear

Reduced safety

Damage to the drive train

If a tire needs frequent inflating, 

have it checked by your Toyota 

dealer.

Instructions for checking tire 

inflation pressure

When checking tire inflation pres-

sure, observe the following:

Check only when the tires are 

cold.

If your vehicle has been parked for 

at least 3 hours or has not been 

driven for more than 1 mile or 1.5 

km, you will get an accurate cold 

tire inflation pressure reading.

Always use a tire pressure gauge.

It is difficult to judge if a tire is 

properly inflated based only on its 

appearance.

It is normal for the tire inflation 

pressure to be higher after driving 

as heat is generated in the tire. Do 

not reduce tire inflation pressure 

after driving.

Never exceed the vehicle capacity 

weight.

Passengers and luggage weight 

should be placed so that the vehi-

cle is balanced.

WARNING

Proper inflation is critical to 

save tire performance

Keep your tires properly inflated.

If the tires are not properly 

inflated, the following conditions 

may occur which could lead to an 

accident resulting in death or seri-

ous injury:

Excessive wear

Uneven wear

Poor handling

Possibility of blowouts resulting 

from overheated tires

Air leaking from between tire 

and wheel

Wheel deformation and/or tire 

damage

-------------------------------------------------------------------------------------------------------------------------------------------------------------

452

7-3. Do-it-yourself maintenance

COROLLA HV_U

When replacing wheels, care 
should be taken to ensure that 
they are equivalent to those 
removed in load capacity, diam-
eter, rim width and inset

*

.

Replacement wheels are avail-
able at your Toyota dealer.

*

: Conventionally referred to as off-

set.

Toyota does not recommend 
using the following:

Wheels of different sizes or 
types

Used wheels

Bent wheels that have been 
straightened

When replacing wheels (vehi-

cles with a tire pressure warn-

ing system)

The wheels of your vehicle are 

equipped with tire pressure warning 

valves and transmitters that allow 

the tire pressure warning system to 

provide advance warning in the 

event of a loss in tire inflation pres-

sure. Whenever wheels are 

replaced, the tire pressure warning 

valves and transmitters must be 

installed. (

P.446)

WARNING

Greater possibility of tire dam-

age while driving (due to road 

hazards, expansion joints, 

sharp edges in the road, etc.)

NOTICE

When inspecting and adjust-

ing tire inflation pressure

Be sure to put the tire valve caps 

back on.

If a valve cap is not installed, dirt 

or moisture may get into the valve 

and cause an air leak, resulting in 

decreased tire inflation pressure.

Wheels

If a wheel is bent, cracked or 
heavily corroded, it should 
be replaced. Otherwise, the 
tire may separate from the 
wheel or cause a loss of 
handling control.

Wheel selection

-------------------------------------------------------------------------------------------------------------------------------------------------------------

453

7-3. Do-it-yourself maintenance

COROLLA HV_U

7

Maintena

nce
 a

nd ca

re

Use only Toyota wheel nuts 
and wheel nut wrenches 
designed for use with your 
aluminum wheels.

When rotating, repairing or 
changing your tires, check 
that the wheel nuts are still 
tight after driving 1000 miles 
(1600 km).

Be careful not to damage the 
aluminum wheels when using 
tire chains.

Use only Toyota genuine bal-
ance weights or equivalent 
and a plastic or rubber ham-
mer when balancing your 
wheels.

WARNING

When replacing wheels

Do not use wheels that are a dif-

ferent size from those recom-

mended in the Owner’s Manual, 

as this may result in a loss of 

handling control.

Never use an inner tube in a 

leaking wheel which is designed 

for a tubeless tire.

Doing so may result in an acci-

dent, causing death or serious 

injury.

When installing the wheel 

nuts

Never use oil or grease on the 

wheel bolts or wheel nuts.

Oil and grease may cause the 

wheel nuts to be excessively tight-

ened, leading to bolt or disc wheel 

damage. In addition, the oil or 

grease can cause the wheel nuts 

to loosen and the wheel may fall 

off, causing an accident and 

resulting in death or serious injury. 

Remove any oil or grease from 

the wheel bolts or wheel nuts.

Use of defective wheels pro-

hibited

Do not use cracked or deformed 

wheels. Doing so could cause the 

tire to leak air during driving, pos-

sibly causing an accident.

NOTICE

Replacing tire pressure warn-

ing valves and transmitters 

(vehicles with a tire pressure 

warning system)

Because tire repair or replace-

ment may affect the tire pres-

sure warning valves and 

transmitters, make sure to have 

tires serviced by your Toyota 

dealer or other qualified service 

shop. In addition, make sure to 

purchase your tire pressure 

warning valves and transmit-

ters at your Toyota dealer.

Ensure that only genuine Toyota 

wheels are used on your vehi-

cle.

Tire pressure warning valves 

and transmitters may not work 

properly with non-genuine 

wheels.

Aluminum wheel precau-
tions

-------------------------------------------------------------------------------------------------------------------------------------------------------------

454

7-3. Do-it-yourself maintenance

COROLLA HV_U

1

Turn the power switch off.

2

Open the glove box. Slide off 
the damper.

3

Push in the glove box on the 
vehicle’s outer side to discon-
nect the claws. Then pull out 
the glove box and disconnect 
the lower claws.

4

Unlock the filter cover ( ), 
pull the filter cover out of the 

claws ( ), and remove the 
filter cover.

5

Remove the filter case.

6

Remove the air conditioning 
filter from the filter case and 
replace it with a new one.

The “

UP” marks shown on the 

filter and the filter case should be 

pointing up.

Checking interval

Replace the air conditioning filter 

according to the maintenance 

schedule. In dusty areas or areas 

with heavy traffic flow, early replace-

Air conditioning filter

The air conditioning filter 
must be changed regularly 
to maintain air conditioning 
efficiency.

Removing the air condi-
tioning filter

-------------------------------------------------------------------------------------------------------------------------------------------------------------

455

7-3. Do-it-yourself maintenance

COROLLA HV_U

7

Maintena

nce
 a

nd ca

re

ment may be required. (For sched-

uled maintenance information, 

please refer to the “Scheduled 

Maintenance Guide” or “Owner’s 

Manual Supplement”.)

If air flow from the vents 

decreases dramatically

The filter may be clogged. Check 

the filter and replace if necessary.

Remove the dust from the air 
intake vent with a vacuum 
cleaner, etc.

Make sure to only use a vacuum to 
suck out dust and clogs. Attempting 
to blow out dust and clogs using an 
airgun, etc. may push it into the air 
intake vent. (

P.458)

NOTICE

When using the air condition-

ing system

Make sure that a filter is always 

installed.

Using the air conditioning system 

without a filter may cause damage 

to the system.

To prevent damage to the fil-

ter cover

When moving the filter cover in 

the direction of arrow to release 

the fitting, pay attention not to 

apply excessive force to the 

claws. Otherwise, the claws may 

be damaged.

Cleaning the hybrid 

battery (traction bat-

tery) air intake vent 

and filter

To prevent the fuel economy 
from being affected, visually 
inspect the hybrid battery 
(traction battery) air intake 
vent periodically for dust 
and clogs. If it is dusty or 
clogged or if “Maintenance 
Required for Traction Bat-
tery Cooling Parts See 
Owner’s Manual” is dis-
played on the multi-informa-
tion display, clean the air 
intake vent using the follow-
ing procedures:

Cleaning the air intake 
vent

-------------------------------------------------------------------------------------------------------------------------------------------------------------

456

7-3. Do-it-yourself maintenance

COROLLA HV_U

If dust and clogs cannot be com-
pletely removed with the air 
intake vent cover installed, 
remove the cover and clean the 
filter.

1

Turn the power switch off.

2

Using a Phillips screwdriver, 
remove the clip.

3

Remove the air intake vent 
cover.

Pull the cover as shown in 
the illustration to disengage 
the 3 claws, starting from the 
claw in the upper right corner.
Pull the cover toward the 
front of the vehicle to remove 
it.

4

Remove the air intake vent 
filter.

Disengage the claw as 
shown in the illustration.
Remove the filter from the 
cover.

5

Remove the dust and clogs 
from the filter using a vacuum 
cleaner, etc.

Make sure to also remove the dust 

and clogs from the inside of the air 

intake vent cover.

6

Reinstall the filter to the 
cover.

If dust and clogs cannot 
be completely removed

-------------------------------------------------------------------------------------------------------------------------------------------------------------

457

7-3. Do-it-yourself maintenance

COROLLA HV_U

7

Maintena

nce
 a

nd ca

re

Engage the filter to the 2 
claws as shown in the illus-
tration.
Engage the claw to install the 
filter.

Make sure that the filter is not 

crooked or deformed when install-

ing it.

7

Install the air intake vent 
cover.

Insert the tab of the cover as 
shown in the illustration.
Push the cover to engage the 
3 claws.

8

Using a Phillips screwdriver, 
install the clip.

Scheduled maintenance of the 

air intake vent is necessary 

when

In some situations such as when the 

vehicle is used frequently or in 

heavy traffic or dusty areas, the air 

intake vent may need to be cleaned 

more regularly. For details, refer to 

“Scheduled Maintenance Guide” or 

“Owner’s Manual Supplement”.

Cleaning the air intake vent

Dust in the air intake vent may 

interfere with the cooling of the 

hybrid battery (traction battery). If 

charging/discharging of the hybrid 

battery (traction battery) becomes 

limited, the distance that the vehi-

cle can be driven using the electric 

motor (traction motor) may be 

reduced and the fuel economy 

may be reduced.

Inspect and clean the air intake 

vent periodically.

Improper handling of the air intake 

vent cover and filter may result in 

damage to them. If you have any 

concerns about cleaning the filter, 

contact your Toyota dealer.

If “Maintenance Required for 

Traction Battery Cooling Parts 

See Owner’s Manual” is dis-

played on the multi-information 

display

If this warning message is dis-

played on the multi-information 

display, remove the air intake vent 

cover and clean the filter. 

(

P.456)

After cleaning the air intake vent, 

start the hybrid system and check 

that the warning message is no 

longer displayed.

After the hybrid system is started, 

it may be necessary to drive the 

vehicle up to approximately 20 

minutes before the warning mes-

sage disappears. If the warning 

message does not disappear after 

driving for appropriately 20 min-

utes, have the vehicle inspected 

by your Toyota dealer.

-------------------------------------------------------------------------------------------------------------------------------------------------------------

458

7-3. Do-it-yourself maintenance

COROLLA HV_U

WARNING

When cleaning the air intake 

vent

Do not use water or other liq-

uids to clean the air intake vent. 

If water is applied to the hybrid 

battery (traction battery) or 

other components, a malfunc-

tion or fire may occur.

Before cleaning the air intake 

vent, make sure to turn the 

power switch off to stop the 

hybrid system.

When removing the air intake 

vent cover

Do not touch the service plug 

located near the air intake vent. 

(

P.84)

NOTICE

When cleaning the air intake 

vent

When cleaning the air intake vent, 

make sure to only use a vacuum 

to suck out dust and clogs. If a 

compressed air blow gun, etc. is 

used to blow out dust and clogs, 

the dust or clogs may be pushed 

into the air intake vent, which may 

affect the performance of the 

hybrid battery (traction battery) 

and cause a malfunction.

To prevent damage to the 

vehicle

Do not allow liquid or foreign 

material to enter the air intake 

vent when the cover is 

removed.

Carefully handle the removed 

filter so that it will not be dam-

aged.

If the filter is damaged, have it 

replaced with a new filter by 

your Toyota dealer.

Make sure to reinstall the filter 

and cover to their original posi-

tions after cleaning.

Do not install anything to the air 

intake vent other than the exclu-

sive filter for this vehicle or use 

the vehicle without the filter 

installed.

If “Maintenance Required for 

Traction Battery Cooling 

Parts See Owner’s Manual” is 

displayed on the multi-infor-

mation display

If the vehicle is continuously 

driven with the warning message 

(indicating that charging/discharg-

ing of the hybrid battery [traction 

battery] may become limited) dis-

played, the hybrid battery (traction 

battery) may malfunction. If the 

warning message is displayed, 

clean the air intake vent immedi-

ately.

-------------------------------------------------------------------------------------------------------------------------------------------------------------

459

7-3. Do-it-yourself maintenance

COROLLA HV_U

7

Maintena

nce
 a

nd ca

re

If the electronic key battery is 

depleted

The following symptoms may occur:

The smart key system and wire-

less remote control will not func-

tion properly.

The operational range will be 

reduced.

Flathead screwdriver

Small flathead screwdriver

Lithium battery CR2032

Use a CR2032 lithium battery

Batteries can be purchased at 

your Toyota dealer, local electrical 

appliance shops or camera stores.

Replace only with the same or 

equivalent type recommended by 

the manufacturer.

Dispose of used batteries accord-

ing to local laws.

1

Release the lock and remove 
the mechanical key.

2

Remove the key cover.

To prevent damage to the key, 

cover the tip of the flathead screw-

driver with a rag.

3

Remove the depleted battery 
using a small flathead screw-
driver.

When removing the cover, the elec-

tronic key module may stick to the 

cover and the battery may not be 

visible. In this case, remove the 

electronic key module in order to 

remove the battery.
Insert a new battery with the “+” ter-

Electronic key battery

Replace the battery with a 
new one if it is depleted.
As the key may be damaged 
if the following procedure is 
not performed properly, it is 
recommended that key bat-
tery replacement be per-
formed by your Toyota 
dealer.

Items to prepare

Replacing the battery

-------------------------------------------------------------------------------------------------------------------------------------------------------------

460

7-3. Do-it-yourself maintenance

COROLLA HV_U

minal facing up.

4

When installing the key cover 
and mechanical key, install 
by conducting step 

2

 and 

step 

1

 with the directions 

reversed.

5

Operate the 

 or 

 switch 

and check that the doors can 
be locked/unlocked.

WARNING

Removed battery and other 

parts

These parts are small and if swal-

lowed by a child, they can cause 

choking. Keep away from chil-

dren. Failure to do so could result 

in death or serious injury.

NOTICE

When replacing the battery

Use a flathead screwdriver of 

appropriate size. Applying exces-

sive force may deform or damage 

the cover.

For normal operation after 

replacing the battery

Observe the following precautions 

to prevent accidents:

Always work with dry hands.

Moisture may cause the battery 

to rust.

Do not touch or move any other 

component inside the remote 

control.

Do not bend either of the battery 

terminals.

-------------------------------------------------------------------------------------------------------------------------------------------------------------


Content      ..     5      6      7      8     ..