Toyota Camry (2019 year). Instruction - part 30


  Index      Toyota     Toyota Camry - instruction 2019 year in english


Search            


Content   ..  28  29  30  31   ..


Toyota Camry (2019 year). Instruction - part 30


465

6-3. Do-it-yourself maintenance

CAMRY_U

6

Mainten

ance an

d ca

re

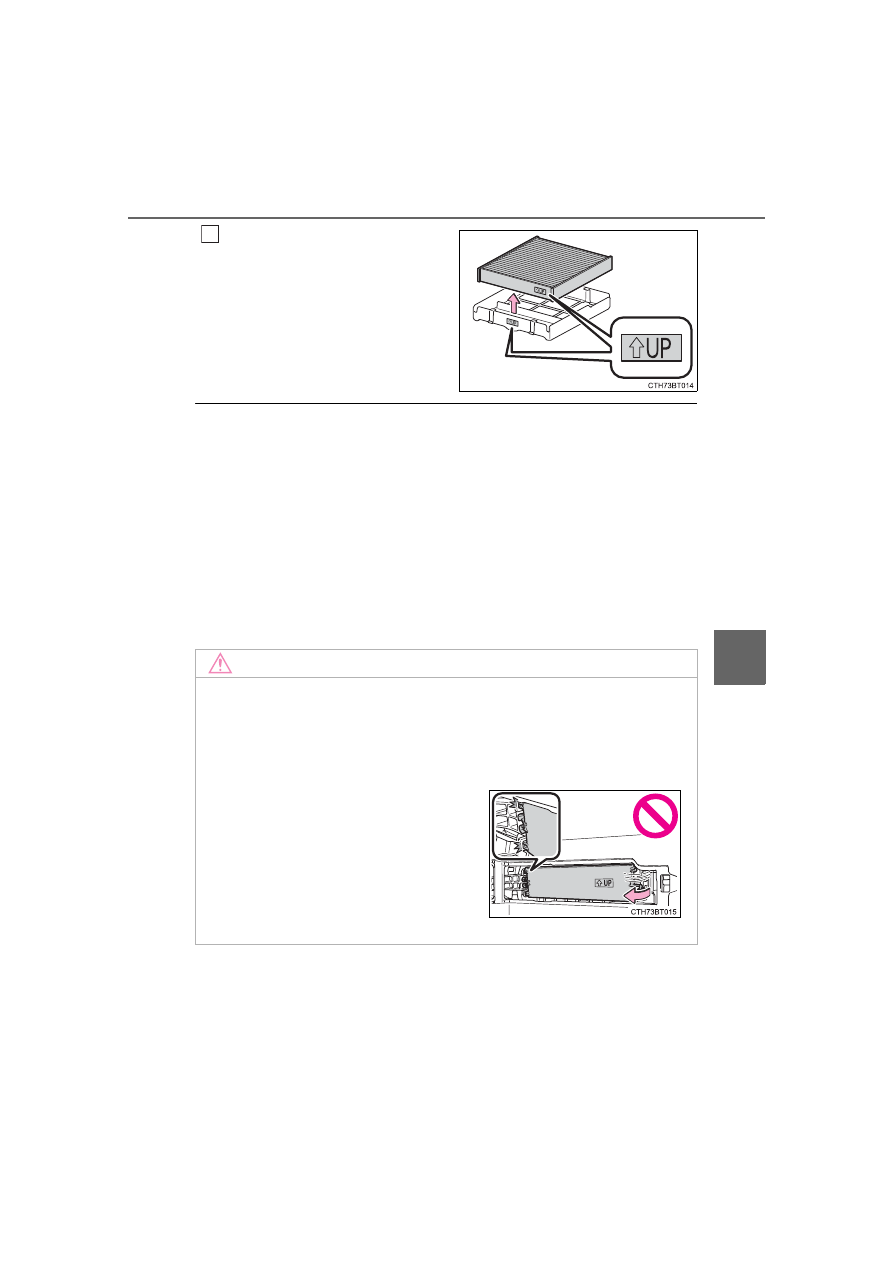
Remove the air conditioning fil-
ter  from  the  filter  case  and
replace it with a new one.

The “

UP” marks shown on the fil-

ter  and  the  filter  case  should  be
pointing up.

Checking interval
Inspect and replace the air conditioning  filter  according to  the  maintenance
schedule. In dusty areas or areas with heavy traffic flow, early replacement
may be required. (For scheduled maintenance information, please refer to the
“Schedule maintenance guide” or “Owner’s Manual Supplement”.)

If air flow from the vents decreases dramatically
The filter may be clogged. Check the filter and replace if necessary.

Air conditioning filter with deodorizing function
When  fragrances  are  placed  in  your  vehicle,  the  deodorizing  effect  may
become significantly weakened in a short period.
When an air conditioning odor comes out continuously, replace the air condi-
tioning filter.

5

NOTICE

When using the air conditioning system
Make sure that a filter is always installed.
Using the air conditioning system without a filter may cause damage to the
system.

To prevent damage to the filter cover

When moving the filter cover in the direc-
tion  of  arrow  to  release  the  fitting,  pay
attention  not  to apply excessive  force  to
the  claws.  Otherwise,  the  claws  may  be
damaged.

466

6-3. Do-it-yourself maintenance

CAMRY_U

● Flathead screwdriver
● Small flathead screwdriver
● Lithium battery CR2032

Vehicles without a smart key system

Remove the key cover.

To  prevent  damage  to  the  key,
cover the tip of the flathead screw-
driver with a rag.

Remove the battery cover.

If  the  battery  cover  is  difficult  to
remove, lift the edge to remove it.

Remove  the  depleted  battery
using  a  small  flathead  screw-
driver.

Insert  a  new  battery  with  the  “+”
terminal facing up.

Wireless remote control/electronic key 

battery

Replace the battery with a new one if it is depleted.

You will need the following items:

Replacing the battery

1

2

3

467

6-3. Do-it-yourself maintenance

CAMRY_U

6

Mainten

ance an

d ca

re

Install the battery cover with the
tab facing up.

Push the entire edge of the battery
cover into the key.

Install the key cover.

Align  the  key  cover  with  the  key
and  then  press  it  straight  into  the
key.
Make  sure  that  the  key  cover  is
securely installed without any gaps
between it and the key.

Operate the 

 or 

 switch and check that the doors can

be locked/unlocked.

4

5

6

468

6-3. Do-it-yourself maintenance

CAMRY_U

Vehicles with a smart key system

Release  the  lock  and  remove
the mechanical key.

Remove the key cover.

To  prevent  damage  to  the  key,
cover the tip of the flathead screw-
driver with a rag.

Remove  the  depleted  battery
using  a  small  flathead  screw-
driver.

When  removing  the  cover,  the
electronic key module may stick to
the cover and the battery may not
be visible. In this case, remove the
electronic  key  module  in  order  to
remove the battery.
Insert a new battery with the “+” terminal facing up.

When installing the key cover and mechanical key, install by con-
ducting 

 and 

 with the directions reversed.

Operate the 

 or 

 switch and check that the doors can

be locked/unlocked.

1

2

3

4

2

1

5

469

6-3. Do-it-yourself maintenance

CAMRY_U

6

Mainten

ance an

d ca

re

When replacing the key battery
Be careful not to lose the battery or any other small parts.

Use a CR2032 lithium battery

Batteries can be purchased at your Toyota dealer, local electrical appliance
shops or camera stores.

Replace only with the same or equivalent type recommended by the manu-
facturer.

Dispose of used batteries according to local laws.

If the key battery is depleted 
The following symptoms may occur:

The  smart  key  system  (if  equipped)  and  wireless  remote  control  will  not
function properly.

The operational range will be reduced.

WARNING

Removed battery and other parts
These parts are small and if swallowed by a child, they can cause choking.
Keep away from children. Failure to do so could result in death or serious
injury.

NOTICE

For normal operation after replacing the battery
Observe the following precautions to prevent accidents:

Always work with dry hands.
Moisture may cause the battery to rust.

Do not touch or move any other component inside the remote control.

Do not bend either of the battery terminals.

When  removing  the  battery  cover  (vehicles  without  a  smart  key  sys-
tem)
Do not forcibly remove the battery cover, otherwise it may be damaged.
If the battery cover is difficult to remove, lift the edge to remove it.

470

6-3. Do-it-yourself maintenance

CAMRY_U

Turn the engine switch off.
Open the fuse box cover. 

Checking and replacing fuses

If any of the electrical components do not operate, a fuse may
have blown. If this happens, check and replace the fuses as nec-
essary.

1

2

Engine compartment (type A)

Engine  compartment  (type  B)
(if equipped)

Push the tabs in and lift the lid off.

Push  the  tabs  in  and  lift  the  lid
off.

Under  the  driver’s  side  instru-
ment panel

Remove the lid.

Make  sure  to  push  the  claw  when
removing/installing the lid.

471

6-3. Do-it-yourself maintenance

CAMRY_U

6

Mainten

ance an

d ca

re

Remove  the  fuse  with  the  pull-
out tool.

Only type A fuses can be removed
using the pullout tool.

Check if the fuse is blown.

Normal fuse
Blown fuse

Replace the blown fuse with a new fuse of an appropriate amperage rat-
ing. The amperage rating can be found on the fuse box lid.

3

4

Type A

Type B

Type C

1

2

472

6-3. Do-it-yourself maintenance

CAMRY_U

After a fuse is replaced

If the lights do not turn on even after the fuse has been replaced, a bulb may
need replacement. (

P. 473)

If the replaced fuse blows again, have the vehicle inspected by your Toyota
dealer.

If there is an overload in a circuit
The fuses are designed to blow, protecting the wiring harness from damage.

WARNING

To prevent system breakdowns and vehicle fire
Observe the following precautions.
Failure to do so may cause damage to the vehicle, and possibly a fire or
injury.

Never use a fuse of a higher amperage rating than that indicated, or use
any other object in place of a fuse.

Always use a genuine Toyota fuse or equivalent.
Never replace a fuse with a wire, even as a temporary fix.

Do not modify the fuses or fuse boxes.

NOTICE

Before replacing fuses
Have  the  cause  of  electrical  overload  determined  and  repaired  by  your
Toyota dealer as soon as possible.

473

6-3. Do-it-yourself maintenance

CAMRY_U

6

Mainten

ance an

d ca

re

Check the wattage of the light bulb to be replaced. (

P. 550)

Light bulbs

You may replace the following bulbs yourself. The difficulty level
of replacement varies depending on the bulb. If necessary bulb
replacement  seems  difficult  to  perform,  contact  your  Toyota
dealer.
For more information about replacing other light bulbs, contact
your Toyota dealer.

Preparing for light bulb replacement

Bulb locations

Front

Rear

Front  turn  signal/parking  lights
(bulb type)
Front  side  marker  lights  (bulb
type)

Back-up lights (bulb type)
Rear  turn  signal  lights  (bulb
type)
Rear  side  marker  lights  (bulb
type)

1

2

1

2

3

474

6-3. Do-it-yourself maintenance

CAMRY_U

Front turn signal/parking lights (bulb type)

Turn  the  bulb  base  counter-
clockwise.

Remove the light bulb.

Install  a  new  light  bulb  and
then  install  the  bulb  base  to
the  light  unit  by  inserting  it
and turning it clockwise.

Replacing light bulbs

1

2

3

475

6-3. Do-it-yourself maintenance

CAMRY_U

6

Mainten

ance an

d ca

re

Front side marker lights (bulb type)

To  ensure  enough  space  to
perform work, turn the steer-
ing  wheel  to  move  the  front
wheel  away  from  the  light
bulb to be replaced.

Turn  the  steering  wheel  to  the
left when replacing the right side
light  bulb,  and  turn  the  steering
wheel  to  the  right  when  replac-
ing the left side light bulb.

Remove  the  fender  liner
clips.

To  protect  the  front  bumper
from  being  damaged,  apply
protective  tape  around  the
clip  as  shown  in  the  illustra-
tion.

Use  masking  tape,  etc.  Do  not
use  duct  tape,  as  it  may  leave
residue  or  damage  the  paint
when removed.

1

2

3

476

6-3. Do-it-yourself maintenance

CAMRY_U

Insert a small flathead screw-
driver  between  the  front
bumper  and  fender  liner  at
the  position  marked  with  a

”  and  then  separate  the

front bumper from the fender
liner.

To  separate  the  front  bumper
from the fender liner, pry up the
fender  liner  while  pulling  the
front bumper outward as shown
in the illustration.

Pull back the fender liner and
turn  the  bulb  base  counter-
clockwise.

Remove the light bulb.

Install  a  new  light  bulb  and
then  install  the  bulb  base  to
the  light  unit  by  inserting  it
and turning it clockwise.

4

5

6

7

477

6-3. Do-it-yourself maintenance

CAMRY_U

6

Mainten

ance an

d ca

re

Return  the  fender  liner  to  its
original  position,  and  install
the clips.

Make  sure  that  the  fender  liner
is  correctly  positioned  on  the
inner side of the front bumper.

To  Install  the  fender  liner  to
the front bumper, engage the
clip to the front bumper.

Remove the protective tape.

8

9

10

478

6-3. Do-it-yourself maintenance

CAMRY_U

Back-up lights (bulb type)

Open the trunk lid and remove the clips.

Type A: To  prevent damaging  the  vehicle,  wrap  the  tip  of  the flathead
screwdriver with tape.

Partly  remove  the  trunk  lid
cover.

Disconnect  the  connector
while  depressing  the  lock
release.  (When  replacing
right side bulb only.)

Turn  the  bulb  base  counter-
clockwise.

1

Type A

Type B

2

3

4

479

6-3. Do-it-yourself maintenance

CAMRY_U

6

Mainten

ance an

d ca

re

Remove the light bulb.

Install  a  new  light  bulb  and
then  install  the  bulb  base  to
the  light  unit  by  inserting  it
and turning it clockwise.

Connect 

the 

connector.

(When  replacing  right  side
bulb only.)

Reinstall the trunk lid cover with the clips.

5

6

7

8

Type A

Type B

480

6-3. Do-it-yourself maintenance

CAMRY_U

Rear turn signal lights (bulb type) and rear side marker lights
(bulb type)

Open  the  trunk  and  apply
protective tape to the vehicle
body around the light unit.

Use  masking  tape,  etc.  Do  not
use  duct  tape,  as  it  may  leave
residue  or  damage  the  paint
when removed.

Remove the cover.

Insert  a  flathead  screw-
driver  between  the  cover
and  the  light  unit  and  pry
up  the  cover  in  several
positions  as  shown  in  the
illustration  to  disengage
the  claws  (indicated  by  a
dotted line).
Pull  the  cover  toward  the
rear  of  the  vehicle  to  dis-
engage  the  claws  (indi-
cated by a dotted line) and
remove the cover.

To  prevent  scratching  the  vehi-
cle,  wrap  the  tip  of  the  flathead
screwdriver with a cloth, etc.

Remove the 2 bolts.

1

2

1

2

3


Content   ..  28  29  30  31   ..