Toyota Tundra (2015 year). Manual - part 2560


  Index      Toyota     Toyota Tundra (2015 year) - Service and Repair Manual


Search            copyright infringement  


Content   ..  2558  2559  2560  2561   ..


Toyota Tundra (2015 year). Manual - part 2560


Last Modified: 9-16-2014

6.6 A

Doc ID: RM000002BOF02IX

Model Year: 2015

Model: Tundra

Prod Date Range: [08/2014 -           ]

Title: 3UR-FE ENGINE MECHANICAL: DRIVE BELT: INSTALLATION; 2015 MY Tundra [08/2014 -        ]

INSTALLATION

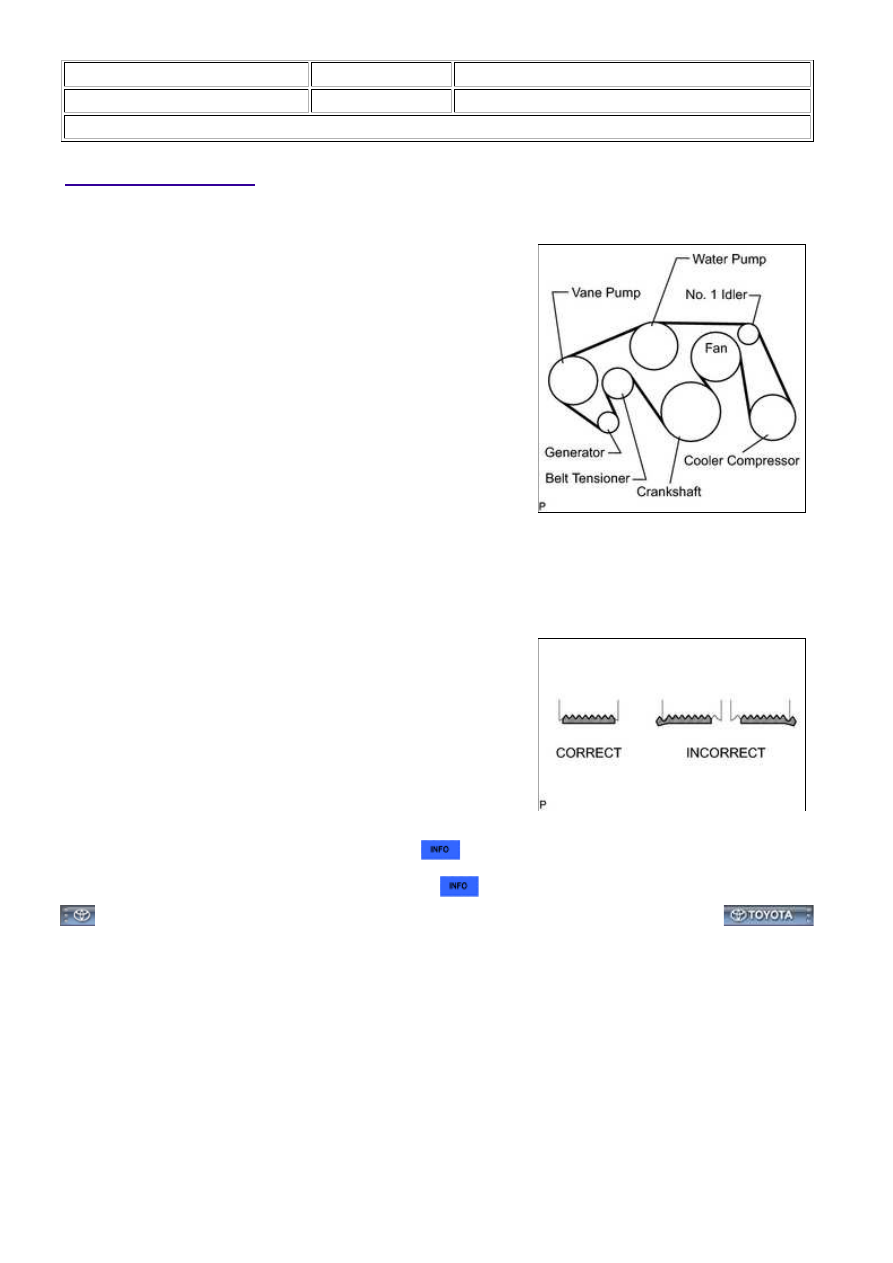
1. INSTALL FAN & GENERATOR V BELT

(a) Set the V belt onto every part.

(b) While turning the belt tensioner counterclockwise, remove the pin.

NOTICE:

Make sure that the V belt is properly set to each pulley.

(c) After installing the belt, check that it fits properly in the

ribbed grooves.

HINT:

Make sure to check by hand that the belt has not slipped out

3. INSTALL V-BANK COVER SUB-ASSEMBLY 

3UR-FE ENGINE MECHANICAL: DRIVE BELT: INSTALLATION; 2...

Last Modified: 9-16-2014

6.6 A

Doc ID: RM0000031RS021X

Model Year: 2015

Model: Tundra

Prod Date Range: [08/2014 -           ]

Title: 3UR-FE ENGINE MECHANICAL: ENGINE ASSEMBLY: REMOVAL; 2015 MY Tundra [08/2014 -        ]

REMOVAL

1. PRECAUTION

NOTICE:

After turning the ignition switch off, waiting time may be required before disconnecting the cable from

the battery terminal. Therefore, make sure to read the disconnecting the cable from the battery

terminal notice before proceeding with work 


.

2. DISCHARGE FUEL SYSTEM PRESSURE 

3. DISCONNECT CABLE FROM NEGATIVE BATTERY TERMINAL

4. REMOVE NO. 1 ENGINE UNDER COVER 

5. DRAIN ENGINE OIL 

6. DRAIN ENGINE COOLANT 

7. REMOVE HOOD SUB-ASSEMBLY

(a) Using a screwdriver, release the 2 clips and remove the hood

support assembly.

HINT:

Tape the screwdriver tip before use.

CAUTION:

Remove the hood support assembly while supporting the

hood by hand.

(b) Remove the 4 bolts and hood.

8. REMOVE WINDSHIELD WIPER MOTOR ASSEMBLY

(a) Remove the windshield wiper motor 


.

9. REMOVE COWL TOP OUTER PANEL SUB-ASSEMBLY 

10. REMOVE V-BANK COVER SUB-ASSEMBLY

3UR-FE ENGINE MECHANICAL: ENGINE ASSEMBLY: REMOVAL...

and remove the V-bank cover.

11. REMOVE AIR CLEANER HOSE ASSEMBLY

(a) Disconnect the vacuum hose and ventilation hose.

(b) Loosen the 2 clamps.

(c) Remove the air cleaner hose.

12. REMOVE AIR CLEANER ASSEMBLY

(a) Remove the air cleaner cap.

(1) Disconnect the MAF meter connector.

(2) Using a clip remover, detach the wire harness clamp.

(3) for Type A:

Unfasten the 4 hook clamps and then remove the air

cleaner cap.

(4) for Type B:

Unfasten the 2 hook clamps and then remove the air

cleaner cap.

3UR-FE ENGINE MECHANICAL: ENGINE ASSEMBLY: REMOVAL...


Content   ..  2558  2559  2560  2561   ..