Toyota Tundra (2015 year). Manual - part 2518


  Index      Toyota     Toyota Tundra (2015 year) - Service and Repair Manual


Search            copyright infringement  


Content   ..  2516  2517  2518  2519   ..


Toyota Tundra (2015 year). Manual - part 2518


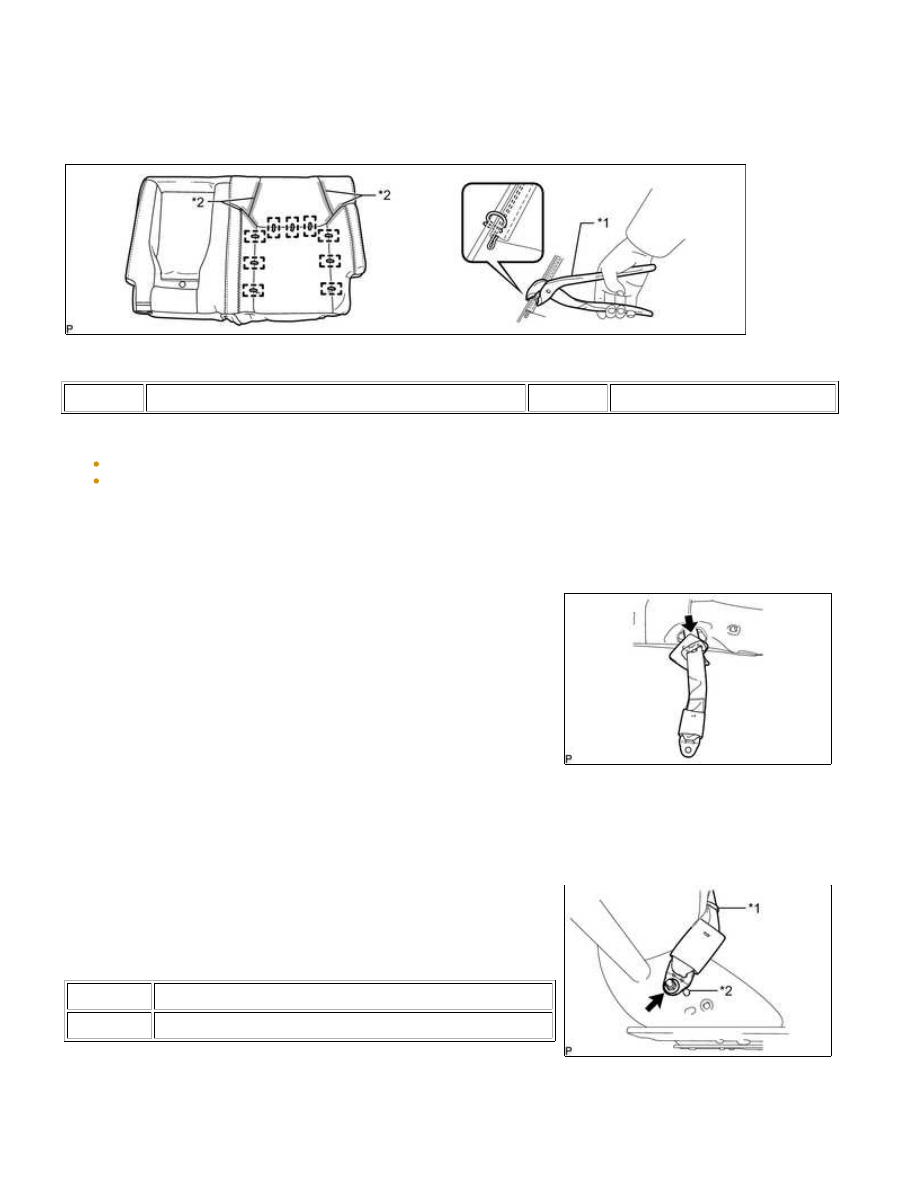
7. INSTALL SEPARATE TYPE REAR SEATBACK COVER

(a) Set the separate type rear seatback cover in place.

(b) Using hog ring pliers, install the separate type rear seatback cover to the separate type rear seatback pad

with 9 new hog rings as shown in the illustration.

Text in Illustration

*1

Hog Ring Pliers

*2

Fastener

NOTICE:

Be careful not to damage the separate type rear seatback cover.
Be sure to securely install the hog rings as shown in the illustration while preventing wrinkles from forming
on the separate type rear seatback cover.

(c) Attach the 4 fasteners.

8. INSTALL SEPARATE TYPE REAR SEATBACK COVER WITH PAD

pad in the direction indicated by the arrow shown in the

illustration.

(b) Attach the 8 hooks to install the separate type rear seatback cover with pad.

(d) Pass the rear center seat outer belt assembly through the rubber

*1

Rubber Band

*2

Protruding Part

Torque:

42 N·m {428 kgf·cm, 31ft·lbf}

NOTICE:

(a) Attach the 4 claws to install the 2 rear No. 1 seat headrest support assemblies.

10. INSTALL REAR SEAT HEADREST SUPPORT

(a) Attach the 4 claws to install the 2 rear seat headrest supports.

11. INSTALL TETHER ANCHOR BRACKET SUB-ASSEMBLY

(a) Install the 2 tether anchor bracket sub-assemblies with the 2

bolts.

Torque:

33 N·m {337 kgf·cm, 24ft·lbf}

(a) Attach the 3 hooks to install the rear No. 1 seat center armrest

cover.

13. INSTALL CUP HOLDER ASSEMBLY

SEAT: REAR SEAT ASSEMBLY (for CrewMax LH Side): REASSEMBL...

(a) Attach the 4 claws in the order shown in the illustration to install

the cup holder assembly.

14. INSTALL REAR SEAT CENTER ARMREST ASSEMBLY

(a) Install the rear seat armrest bracket and 2 bushes to the rear seat center armrest assembly.

(b) Using a T25 "TORX" socket wrench, install the 2 bolts.

Torque:

22 N·m {224 kgf·cm, 16ft·lbf}

(c) Install the rear seat center armrest assembly with the 3 nuts.

Torque:

6.0 N·m {61 kgf·cm, 53in·lbf}

15. INSTALL REAR NO. 1 SEAT INNER BELT ASSEMBLY LH

(a) Attach the guide.

(b) Tighten the bolt to install the rear No. 1 seat inner belt assembly LH.

Torque:

42 N·m {428 kgf·cm, 31ft·lbf}

16. INSTALL REAR SEAT INNER RECLINING COVER LH

(a) Attach the 2 guides in the direction indicated by the arrow shown

in the illustration.

(b) Attach the clip.

(c) Using a T25 "TORX" socket wrench, install the rear seat inner reclining cover LH with the screw.

SEAT: REAR SEAT ASSEMBLY (for CrewMax LH Side): REASSEMBL...

17. INSTALL REAR SEAT RECLINING COVER LH

(a) Attach the guide and claw.

(b) Using a T25 "TORX" socket wrench, install the rear seat reclining cover LH with the 2 screws.

18. INSTALL SEPARATE TYPE REAR SEAT CUSHION COVER

(a) Set the separate type rear seat cushion cover in place.

(b) Using hog ring pliers, install the separate type rear seat cushion cover to the separate type rear seat

cushion pad with 12 new hog rings as shown in the illustration.

Text in Illustration

*1

Hog Ring Pliers

*2

Fastener

NOTICE:

Be careful not to damage the separate type rear seat cushion cover.
Be sure to securely install the hog rings as shown in the illustration while preventing wrinkles from forming
on the separate type rear seat cushion cover.

(c) Attach the 2 fasteners.

19. INSTALL SEPARATE TYPE REAR SEAT CUSHION COVER WITH PAD

(a) Attach the 6 hooks to install the separate type rear seat cushion cover with pad.

20. INSTALL REAR SEATBACK LOCK CONTROL BEZEL

(a) Attach the 4 claws to install the rear seatback lock control bezel.

SEAT: REAR SEAT ASSEMBLY (for CrewMax LH Side): REASSEMBL...


Content   ..  2516  2517  2518  2519   ..