Toyota Tundra (2015 year). Manual - part 2377


  Index      Toyota     Toyota Tundra (2015 year) - Service and Repair Manual


Search            copyright infringement  


Content   ..  2375  2376  2377  2378   ..


Toyota Tundra (2015 year). Manual - part 2377


(a) Apply protective tape as shown in the illustration.

Text in Illustration

*1

Protective Tape

(b) Detach the 3 clips, claw and remove the instrument cluster finish panel ornament.

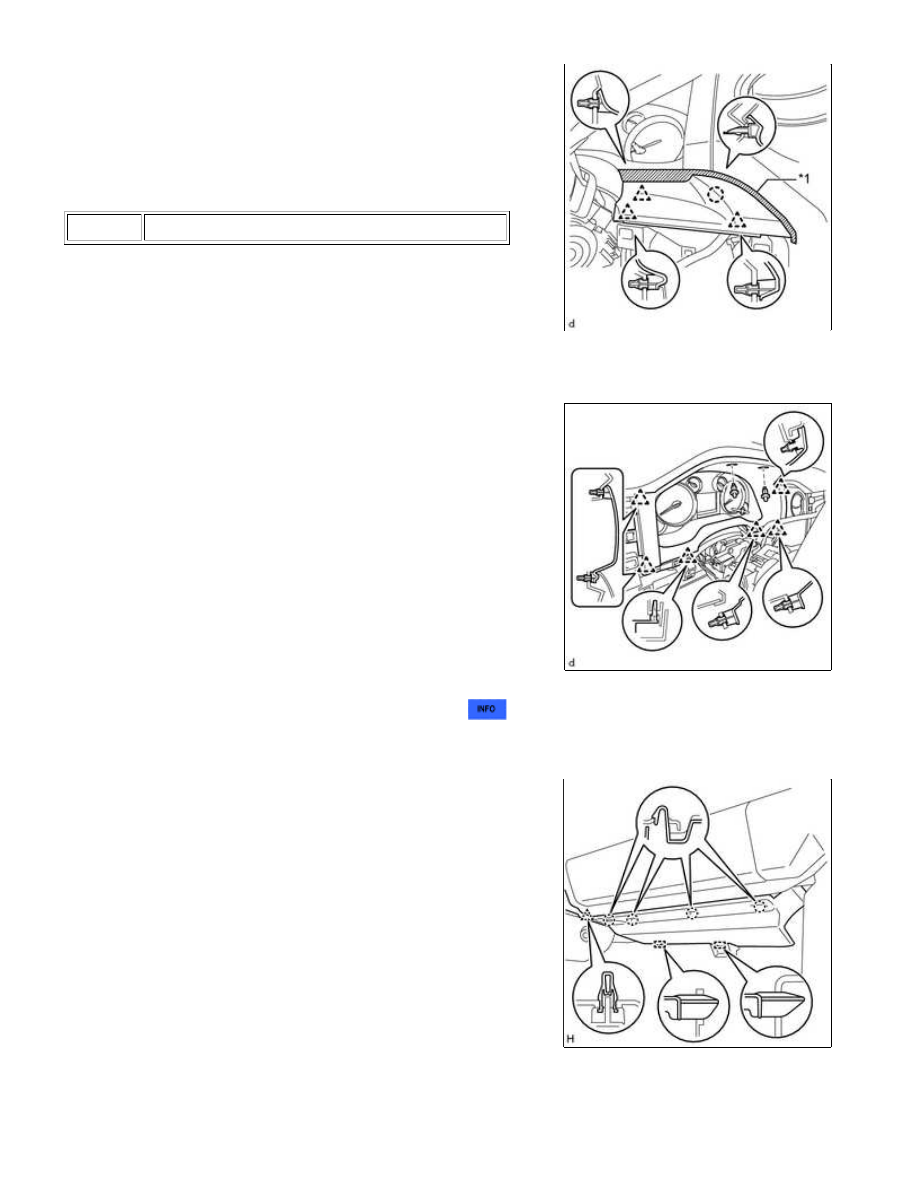
18. REMOVE INSTRUMENT CLUSTER FINISH PANEL

ASSEMBLY

(a) Remove the 2 clips.

(b) Detach the 6 clips and remove the instrument cluster finish panel

assembly.

19. REMOVE COMBINATION METER ASSEMBLY 

20. REMOVE NO. 2 INSTRUMENT PANEL UNDER COVER SUB-ASSEMBLY

(a) Detach the clip, 4 claws and 2 guides and remove the No. 2

instrument panel under cover sub-assembly.

21. REMOVE LOWER INSTRUMENT PANEL

INSTRUMENT PANEL: INSTRUMENT PANEL SAFETY PAD (for Col...

(a) Remove the screw <D> and bolt <A>.

(b) Detach the 3 claws and remove the lower instrument panel.

22. REMOVE LOWER NO. 2 INSTRUMENT PANEL AIRBAG ASSEMBLY 

23. REMOVE NO. 4 INSTRUMENT REGISTER SUB-ASSEMBLY

(a) Apply protective tape as shown in the illustration.

Text in Illustration

*1

Protective Tape

(b) Using a moulding remover B, detach the 10 clips and remove the No. 4 instrument register sub-assembly.

24. REMOVE INSTRUMENT SIDE PANEL RH

(a) Using a moulding remover B, detach the 3 claws, 4 guides and

remove the instrument side panel RH.

INSTRUMENT PANEL: INSTRUMENT PANEL SAFETY PAD (for Col...

25. REMOVE LOWER INSTRUMENT PANEL FINISH PANEL SUB-ASSEMBLY RH

(a) Apply protective tape as shown in the illustration.

Text in Illustration

*1

Protective Tape

(b) Remove the bolt <A> and 4 screws <F>.

(c) Detach the 4 claws and remove the lower instrument panel finish panel sub-assembly RH.

26. REMOVE NO. 2 INSTRUMENT CLUSTER FINISH PANEL GARNISH

(a) Apply protective tape as shown in the illustration.

Text in Illustration

*1

Protective Tape

(b) Using a moulding remover B, detach the 4 clips, 3 claws and remove the No. 2 instrument cluster finish

panel garnish.

27. REMOVE LOWER CENTER INSTRUMENT PANEL FINISH PANEL WITH AIR

CONDITIONING CONTROL ASSEMBLY

(a) Apply protective tape as shown in the illustration.

INSTRUMENT PANEL: INSTRUMENT PANEL SAFETY PAD (for Col...

Text in Illustration

*A for Automatic Air Conditioning System

*B for Manual Air Conditioning System

*1 Protective Tape

*2 Air Conditioning Control Assembly

*3 Lower Center Instrument Panel Finish Panel

-

-

(b) Using moulding remover B, detach the 8 clips, 2 claws and guide and remove the lower center instrument

panel finish panel together with the air conditioning control assembly.

(c) Disconnect each connector.

28. REMOVE RADIO AND DISPLAY RECEIVER ASSEMBLY WITH BRACKET 

29. REMOVE CENTER INSTRUMENT CLUSTER FINISH PANEL SUB-ASSEMBLY

(a) Apply protective tape as shown in the illustration.

Text in Illustration

*1

Protective Tape

(b) Detach the wire harness clamp and 18 clips and remove the center instrument cluster finish panel

sub-assembly.

(c) for 4WD:

INSTRUMENT PANEL: INSTRUMENT PANEL SAFETY PAD (for Col...


Content   ..  2375  2376  2377  2378   ..