Toyota Tundra (2015 year). Manual - part 1461


  Index      Toyota     Toyota Tundra (2015 year) - Service and Repair Manual


Search            copyright infringement  


Content   ..  1459  1460  1461  1462   ..


Toyota Tundra (2015 year). Manual - part 1461


Last Modified: 9-16-2014

6.6 A

Doc ID: RM00000329203HX

Model Year: 2015

Model: Tundra

Prod Date Range: [08/2014 -           ]

Title: 3UR-FBE ENGINE CONTROL SYSTEM: ECM: REMOVAL; 2015 MY Tundra [08/2014 -        ]

REMOVAL

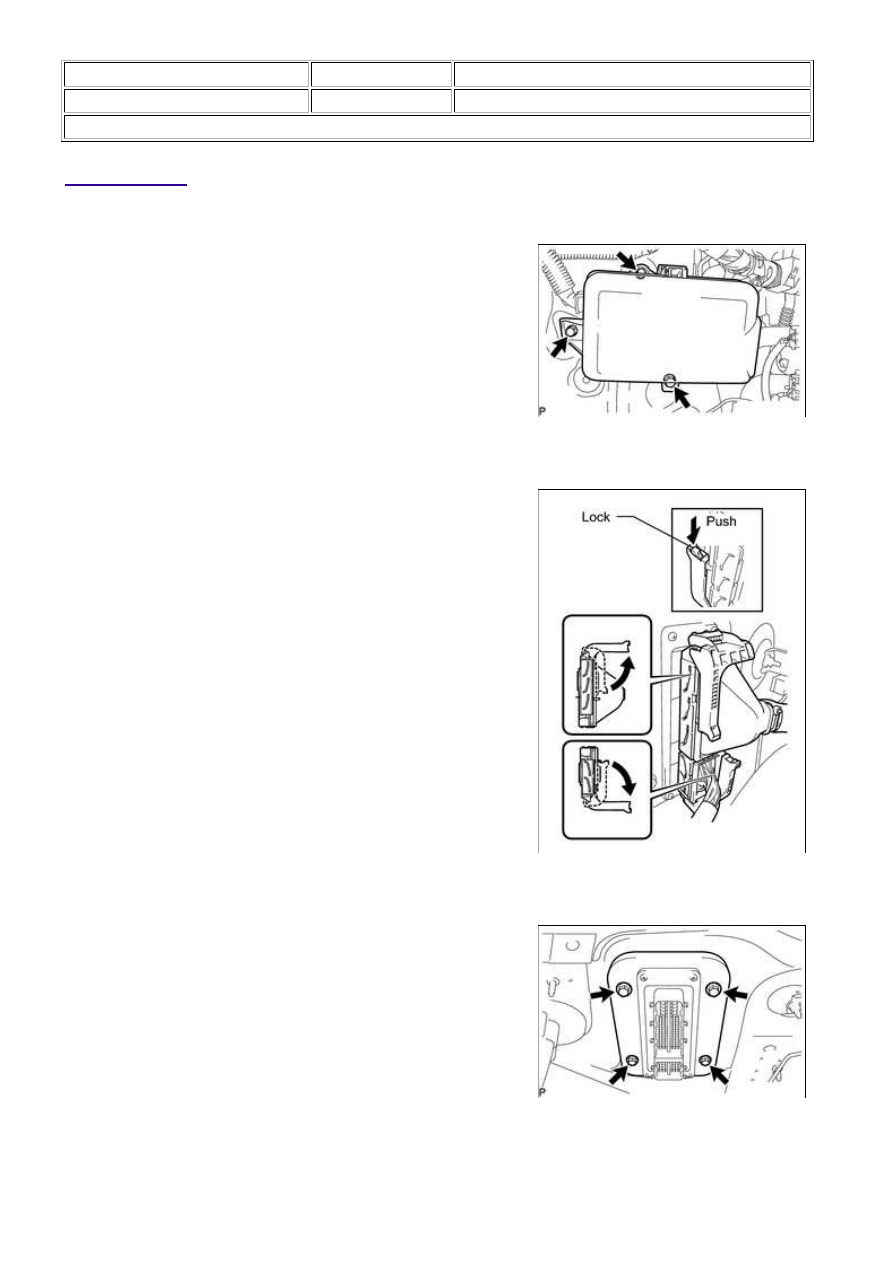
1. DISCONNECT CONNECTOR HOLDER BLOCK

(a) Remove the 3 bolts and move the connector holder block so

that the ECM can be removed in the next step.

2. REMOVE ECM

(a) Raise the 2 levers while pushing the locks on the 2 levers.

NOTICE:

Make sure that the lock lever is raised 90° as shown in the

illustration before disconnecting the connectors. Failure to do
this may cause the connectors to break.

(b) Disconnect the 2 connectors.

(c) Remove the 4 bolts and ECM.

3. REMOVE GASKET

3UR-FBE ENGINE CONTROL SYSTEM: ECM: REMOVAL; 2015 M...

When using gasket remover or equivalent, cover the ECM

connector with a cloth.

3UR-FBE ENGINE CONTROL SYSTEM: ECM: REMOVAL; 2015 M...

Last Modified: 9-16-2014

6.6 A

Doc ID: RM00000329103KX

Model Year: 2015

Model: Tundra

Prod Date Range: [08/2014 -           ]

Title: 3UR-FBE ENGINE CONTROL SYSTEM: ECM: INSTALLATION; 2015 MY Tundra [08/2014 -        ]

INSTALLATION

1. INSTALL GASKET

(a) Clean the ECM seal's surface with non-residue solvent.

(b) Attach a new gasket to the ECM.

2. INSTALL ECM

(a) Install the ECM with the 4 bolts.

Torque:

8.0 N·m {82 kgf·cm, 71in·lbf}

NOTICE:

Make sure the gasket is not folded or caught on any area on
the surrounding part.
Make sure there is no foreign matter caught between the
gasket and surrounding part.
Do not damage the gasket.

(b) Connect the 2 ECM connectors and push each lock lever down

to lock the ECM connectors.

NOTICE:

Make sure that the lock lever is raised 90° before connecting
the ECM connectors. Failure to do this may cause the lock
lever and terminals to break.
Do not twist the wire harness when connecting the ECM
connectors.

3. INSTALL CONNECTOR HOLDER BLOCK

(a) Install the connector holder block with the 3 bolts.

Torque:

7.3 N·m {74 kgf·cm, 65in·lbf}

4. ALCOHOL DENSITY LEARNING INITIALIZATION

(a) Clear DTCs.

5. ALCOHOL DENSITY LEARNING

3UR-FBE ENGINE CONTROL SYSTEM: ECM: INSTALLATION; 20...

(a) Connect the Techstream to the DLC3.

(b) Start the engine and allow it to idle for approximately 10 minutes.

(c) Turn the Techstream main switch ON.

(d) Enter the following menus: Powertrain / Engine and ECT / Data List / Alcohol Density Learning

(1) Check that "Compl" is displayed for "Alcohol Density Learning".

If "Compl" is not displayed, drive the vehicle for approximately 15 minutes, and then check "Alcohol

Density Learning" again.

HINT:

If "Compl" is displayed, alcohol density learning is complete.

6. PERFORM INITIALIZATION

(a) Perform initialization 


.

3UR-FBE ENGINE CONTROL SYSTEM: ECM: INSTALLATION; 20...


Content   ..  1459  1460  1461  1462   ..