Toyota Tundra (2015 year). Manual - part 1326


  Index      Toyota     Toyota Tundra (2015 year) - Service and Repair Manual


Search            copyright infringement  


Content   ..  1324  1325  1326  1327   ..


Toyota Tundra (2015 year). Manual - part 1326


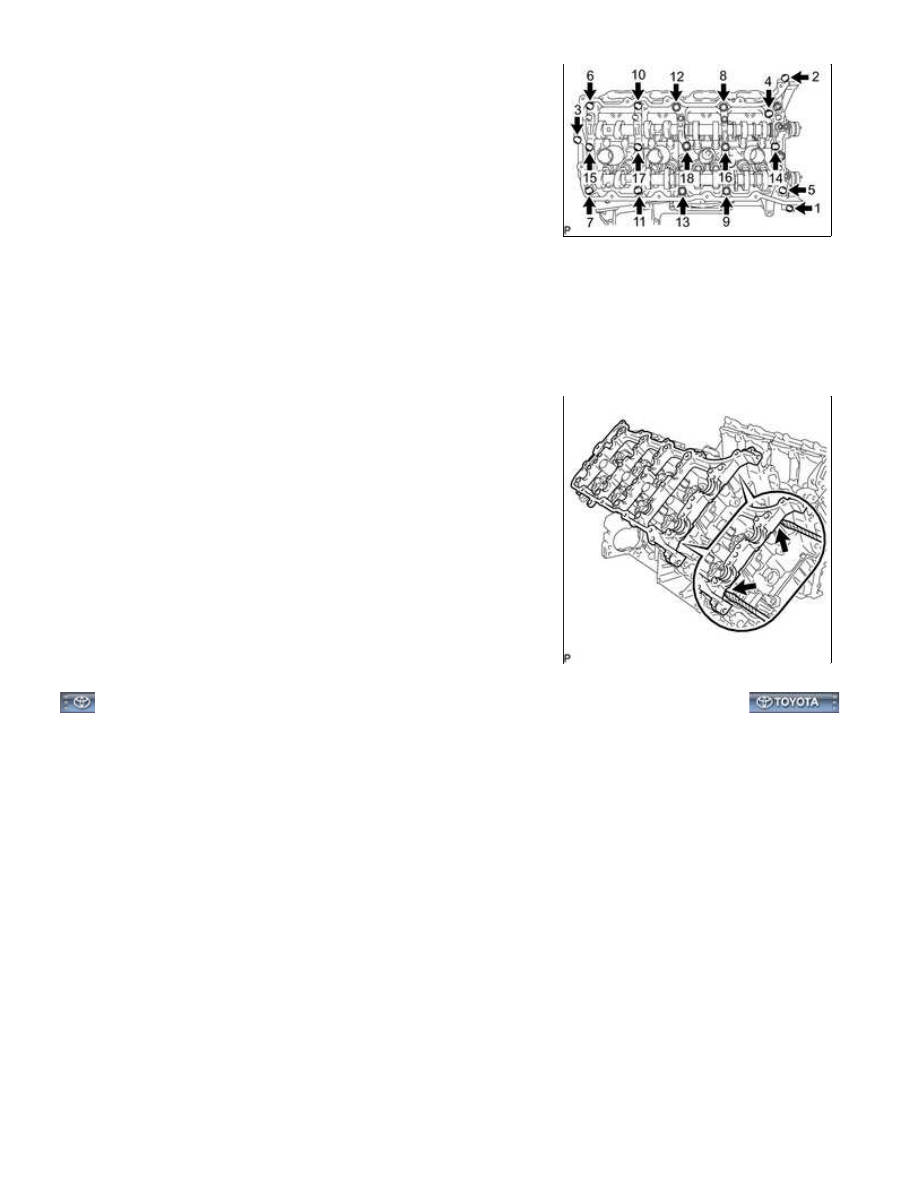
(c) Uniformly loosen and remove the 18 bearing cap bolts in the

sequence shown in the illustration.

NOTICE:

Uniformly loosen the bolts while keeping the camshaft level.

(d) Remove the 6 bearing caps.

HINT:

Arrange the removed parts in the correct order.

(e) Remove the No. 1 and No. 2 camshafts.

13. REMOVE CAMSHAFT HOUSING SUB-ASSEMBLY RH

(a) Remove the camshaft housing by prying between the cylinder

head and camshaft housing with a screwdriver.

HINT:

Tape the screwdriver tip before use.

NOTICE:

1UR-FE ENGINE MECHANICAL: CAMSHAFT (for Bank 2): REM...

Last Modified: 9-16-2014

6.6 A

Doc ID: RM000002S5304HX

Model Year: 2015

Model: Tundra

Prod Date Range: [08/2014 -           ]

Title: 1UR-FE ENGINE MECHANICAL: CAMSHAFT (for Bank 2): INSTALLATION; 2015 MY Tundra [08/2014 -

       ]

INSTALLATION

HINT:

Perform "Inspection After Repairs" after replacing the No. 1 or No. 2 camshaft sub-assembly or camshaft

timing gear RH or camshaft timing exhaust gear RH 


.

1. INSTALL CAMSHAFT BEARING CAP RH

HINT:

Perform "Inspection After Repairs" after replacing the No. 1 or No. 2 camshaft sub-assembly 


.

(b) Install the No. 1 and No. 2 camshafts to the camshaft housing.

(c) Confirm the marks and numbers on the camshaft bearing caps and place them in their proper positions

and directions.

(d) Temporarily install the 10 bolts in the order shown in the

illustration.

2. INSTALL CAMSHAFT HOUSING SUB-ASSEMBLY RH

1UR-FE ENGINE MECHANICAL: CAMSHAFT (for Bank 2): INST...

(a) Make sure that the valve rocker arms are installed as shown in the illustration.

(b) Apply seal packing in a continuous line as shown in the

illustration.

Seal packing:

Toyota Genuine Seal Packing Black, Three Bond 1207B or

equivalent

Standard seal diameter:

3.5 to 4.0 mm (0.138 to 0.157 in.)

NOTICE:

Remove any oil from the contact surface.
Install the camshaft housing within 3 minutes and tighten the
bolts within 15 minutes after applying seal packing.

(c) Install the camshaft housing, and install the 18 bolts in the order

shown in the illustration.

Torque:

for bolt A -

10 N·m {102 kgf·cm, 7ft·lbf}

except bolt A -

30 N·m {306 kgf·cm, 22ft·lbf}

NOTICE:

(d) Tighten the 10 bolts in the order shown in the illustration.

Torque:

16 N·m {163 kgf·cm, 12ft·lbf}

NOTICE:

Thoroughly wipe clean any seal packing.

3. INSTALL NO. 2 CHAIN TENSIONER ASSEMBLY

(a) Install the chain tensioner with the 2 bolts.

Torque:

10 N·m {102 kgf·cm, 7ft·lbf}

4. INSTALL NO. 1 CHAIN SUB-ASSEMBLY RH

HINT:

Perform "Inspection After Repairs" after replacing the No. 1 or No. 2 camshaft sub-assembly or camshaft

timing gear RH or camshaft timing exhaust gear RH 


.

(a) Align the No. 1 chain's orange mark plates with the camshaft

timing gear's timing mark, and attach the chain to the gear as

shown in the illustration.

1UR-FE ENGINE MECHANICAL: CAMSHAFT (for Bank 2): INST...


Content   ..  1324  1325  1326  1327   ..