Toyota Tundra (2015 year). Manual - part 1018


  Index      Toyota     Toyota Tundra (2015 year) - Service and Repair Manual


Search            copyright infringement  


Content   ..  1016  1017  1018  1019   ..


Toyota Tundra (2015 year). Manual - part 1018


19. INSTALL REAR TRANSFER OUTPUT SHAFT RADIAL BALL BEARING

(a) Install the rear transfer output shaft radial ball bearing.

(b) Using a screwdriver, install the transfer output shaft rear shaft snap ring.

Text in Illustration

*a

Protective Tape

HINT:

Tape the screwdriver tip before use.

20. INSTALL TRANSFER DRIVEN SPROCKET BEARING (REAR)

(a) Using SST and a hammer, tap in a new transfer driven sprocket

bearing (rear).

SST: 09950-60010

09951-00340

09952-06010

SST: 09950-60020

09951-00730

SST: 09950-70010

09951-07150

NOTICE:

The transfer driven sprocket bearing (rear) should be installed

completely.

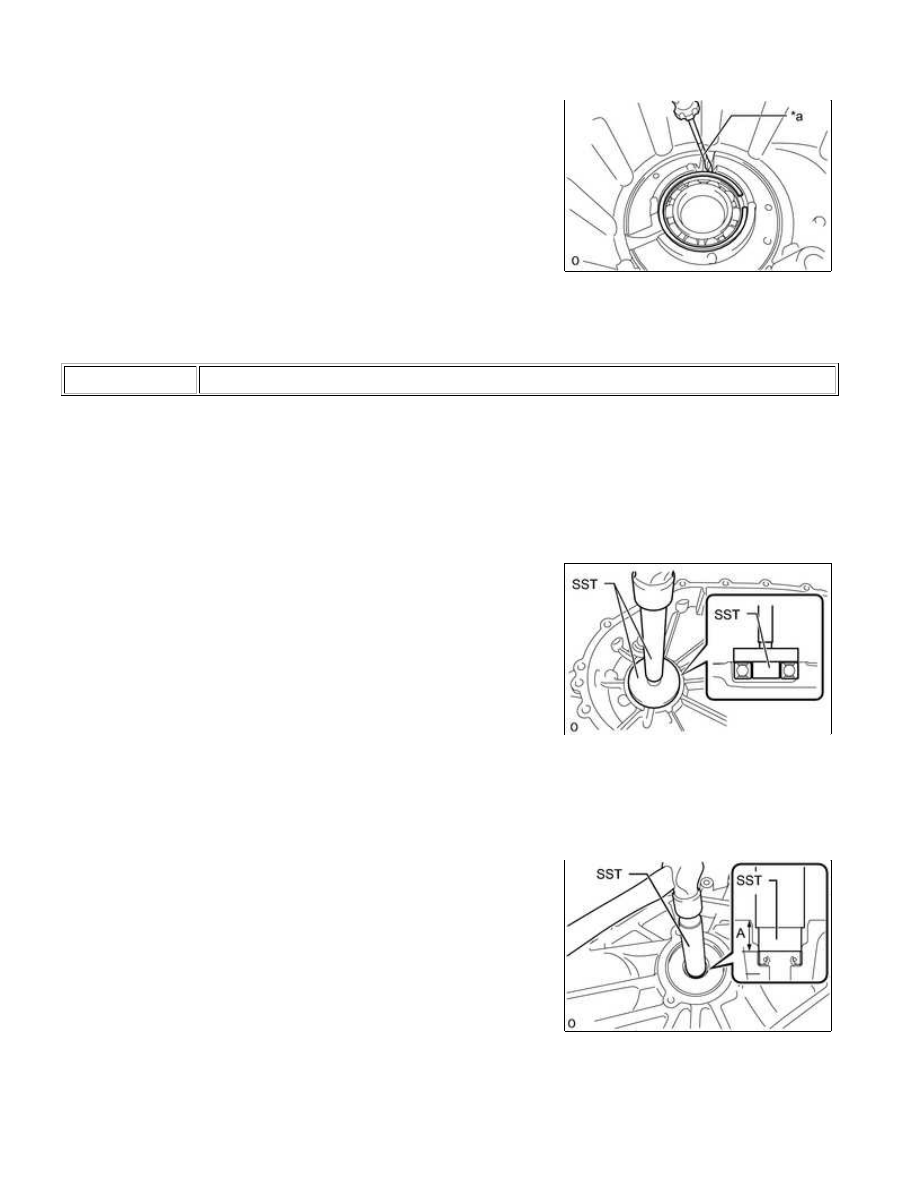
21. INSTALL TRANSFER COVER TYPE T OIL SEAL

(a) Using SST and a hammer, tap in a new transfer cover type T oil

seal.

SST: 09950-70010

09951-07100

SST: 09950-60010

09951-00190

Drive in depth (A):

14.4 to 15.4 mm (0.567 to 0.606 in.)

22. INSTALL SOLENOID COIL SUB-ASSEMBLY

WF1AM TRANSFER: TRANSFER ASSEMBLY: REASSEMBLY; 20...

(a) Install the solenoid coil sub-assembly with the 3 nuts.

Torque:

9.5 N·m {97 kgf·cm, 84in·lbf}

Text in Illustration

*a

Rear Transfer Case Hole

HINT:

Make sure that the solenoid coil sub-assembly terminal extends

out from the rear transfer case hole.

(b) Connect the solenoid coil sub-assembly terminal.

(1) Attach the claw to connect the solenoid coil sub-assembly

terminal.

(2) Install the retainer to the coupler.

23. INSTALL REAR TRANSFER CASE

(a) Apply seal packing to the rear transfer case as shown in the

illustration.

Seal packing:

Toyota Genuine Seal Packing 1281, Three Bond 1281 or

equivalent

Text in Illustration

*a

Seal Packing

NOTICE:

If the removed rear transfer case will be reused: After removing

transfer case, and 3) reapply seal packing to the rear transfer
case.

(b) Using a 40 IP ''TORX PLUS'' socket wrench or T40 ''TORX''

socket wrench, install the 17 bolts.

Torque:

35 N·m {357 kgf·cm, 26ft·lbf}

NOTICE:

24. INSTALL TRANSFER INDICATOR SWITCH 

25. INSTALL TRANSFER OUTPUT SHAFT TYPE T OIL SEAL 

26. INSTALL OUTPUT SHAFT COMPANION FLANGE SUB-ASSEMBLY (REAR)

(a) Install the output shaft companion flange sub-assembly (rear) onto the rear transfer output shaft.

(b) Using SST, hold the output shaft companion flange

sub-assembly (rear).

SST: 09330-00021

(c) Using a 30 mm socket wrench, install a new O-ring and a new transfer output shaft nut.

Torque:

127 N·m {1295 kgf·cm, 94ft·lbf}

Text in Illustration

*a

Hold

*b

Turn

WF1AM TRANSFER: TRANSFER ASSEMBLY: REASSEMBLY; 20...

(d) Using a chisel and hammer, stake the transfer output shaft nut.

Text in Illustration

*1

Transfer Output Shaft Nut

*2

Rear Transfer Output Shaft

*a

Correct

*b

Incorrect

27. INSTALL TRANSFER SHIFT ACTUATOR ASSEMBLY 

28. INSTALL WIRING HARNESS CLAMP BRACKET

(a) Install the wiring harness clamp bracket with the 2 bolts.

Torque:

9.5 N·m {97 kgf·cm, 84in·lbf}

(b) Connect the connector and 3 clamps.

(c) Install the 3 wiring harness clamp brackets with the 3 bolts.

Torque:

8.0 N·m {82 kgf·cm, 71in·lbf}

NOTICE:

Install the wiring harness clamp bracket in the correct direction.

29. INSTALL LOWER TRANSFER CASE PROTECTOR

(a) Install the lower transfer case protector with the 4 bolts.

Torque:

22 N·m {219 kgf·cm, 16ft·lbf}

WF1AM TRANSFER: TRANSFER ASSEMBLY: REASSEMBLY; 20...


Content   ..  1016  1017  1018  1019   ..