Subaru Legacy IV (2008 year). Manual - part 264


  Index      Subaru     Subaru Legacy IV - service repair manual 2008 year


Search            


Content   ..  262  263  264  265   ..


Subaru Legacy IV (2008 year). Manual - part 264


ME(H4DOTC)-36

Engine Assembly

MECHANICAL

6) Remove the lifting device and wire ropes.

7) Remove the garage jack.
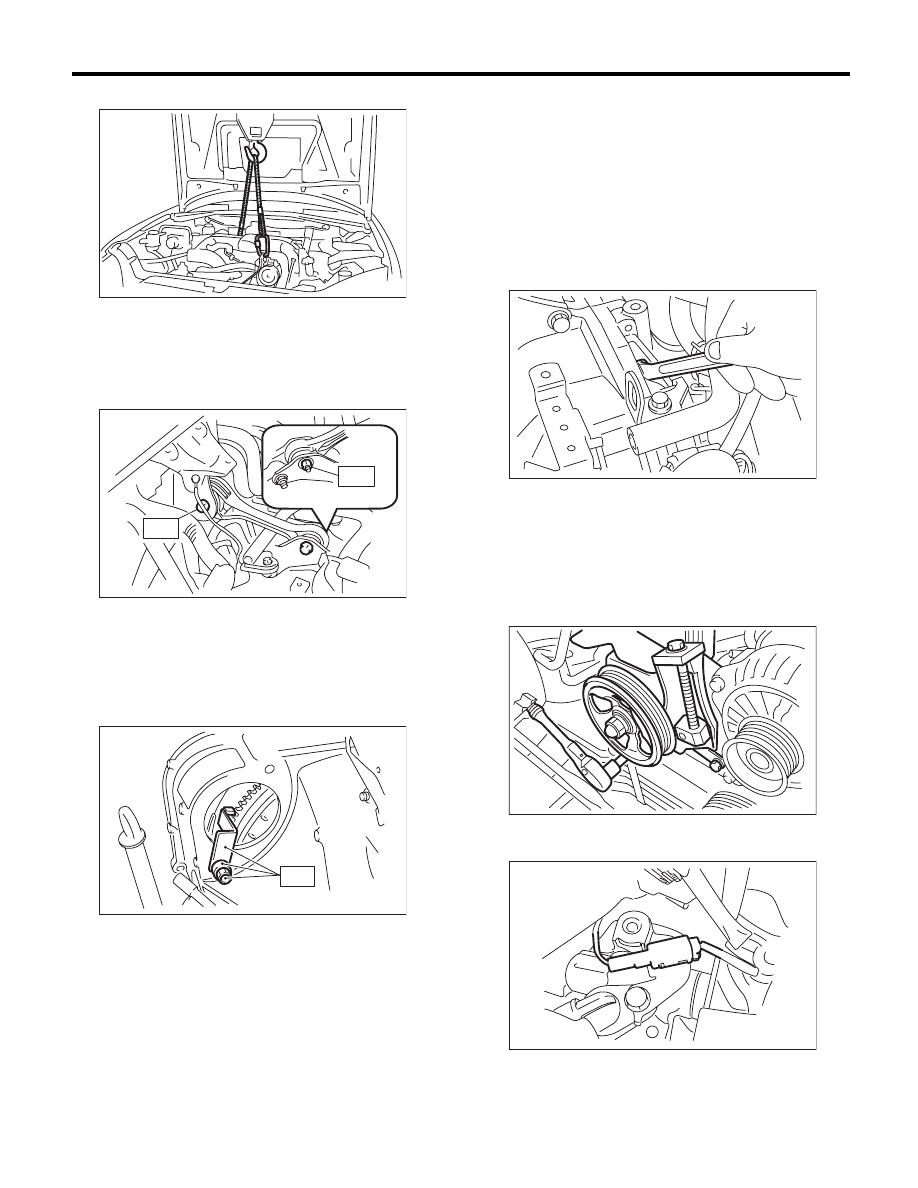
8) Install the pitching stopper.

Tightening torque:

T1: 50 N·m (5.1 kgf-m, 36.9 ft-lb)
T2: 58 N·m (5.9 kgf-m, 42.8 ft-lb)

9) Remove the ST from the torque converter clutch
case. (AT model)

NOTE:
Be careful not to drop the ST into the torque con-
verter clutch case when removing the ST.
ST

498277200

STOPPER SET

10) Install the starter. <Ref. to SC(H4SO)-6, IN-
STALLATION, Starter.>

11) Install the torque converter clutch to drive plate.
(AT model)

(1) Insert the wrench into the crank pulley bolt
and rotate the crank pulley to tighten the bolts
which hold torque converter clutch to drive plate.

NOTE:
Be careful not to drop bolts into the torque convert-
er clutch case.

Tightening torque:

25 N·m (2.5 kgf-m, 18.4 ft-lb)

(2) Fit the plug to service hole.

12) Install the power steering pump.

(1) Install the power steering pump.

Tightening torque:

Refer to “COMPONENT” of “Power Steering” 
for the tightening torque. <Ref. to PS-3, COM-
PONENT, General Description.>

(2) Connect the power steering pump switch
connector.

(3) Install and adjust the front side belt. <Ref. to
ME(H4DOTC)-42, FRONT SIDE BELT, IN-
STALLATION, V-belt.>

LU-00222

T2

T1

AT-03878

ST

ME-00217

ME-00044

ME-00037

FU-03022

ME(H4DOTC)-37

Engine Assembly

MECHANICAL

13) Lift up the vehicle.
14) Tighten the bolts and nuts which hold lower
side of the transmission to engine.

Tightening torque:

50 N·m (5.1 kgf-m, 36.9 ft-lb)

• AT model

• MT  model

15) Tighten the nuts which hold the engine mount
to the crossmember.

NOTE:
Make sure that the engine mount nuts (A) and loca-
tor (B) are securely installed.

Tightening torque:

75 N·m (7.6 kgf-m, 55.3 ft-lb)

16) Install the joint pipe and front exhaust pipe.
<Ref. to EX(H4DOTC)-6, INSTALLATION, Front
Exhaust Pipe.> <Ref. to EX(H4DOTC)-11, IN-
STALLATION, Joint Pipe.>
17) Install the turbocharger. <Ref. to IN(H4DOTC)-
15, INSTALLATION, Turbocharger.>

18) Install the center exhaust pipe. <Ref. to
EX(H4DOTC)-9, INSTALLATION, Center Exhaust
Pipe.>
19) Connect the ground cable.

Tightening torque:

7.5 N·m (0.8 kgf-m, 5.5 ft-lb)

20) Lower the vehicle.
21) Connect the following hoses.

(1) Fuel delivery hose, fuel return hose and
evaporation hose
(2) Heater inlet and outlet hoses
(3) Brake booster vacuum hose

22) Connect the following connectors and termi-
nals.

(1) Generator connector and terminal

Tightening torque:

15 N·m (1.5 kgf-m, 11.1 ft-lb)

(2) A/C compressor connector
(3) Secondary air pump connector

23) Install the engine harness connector to engine
harness bracket, then connect the bulkhead har-
ness connector to the engine harness connector.

24) Install the intercooler. <Ref. to IN(H4DOTC)-
13, INSTALLATION, Intercooler.>
25) Install the A/C pressure hoses. <Ref. to AC-40,
INSTALLATION, Hose and Pipe.>
26) Install the radiator. <Ref. to CO(H4DOTC)-21,
INSTALLATION, Radiator.>
27) Install the coolant filler tank. <Ref. to
CO(H4DOTC)-30, INSTALLATION, Coolant Filler
Tank.>

AT-03238

MT-00077

ME-03704

(A) (B)

(B) (A)

ME-03702

FU-02436

ME(H4DOTC)-38

Engine Assembly

MECHANICAL

28) Install the air cleaner case and air intake duct.
<Ref. to IN(H4DOTC)-8, INSTALLATION, Air
Cleaner Case.> <Ref. to IN(H4DOTC)-9, INSTAL-
LATION, Air Intake Duct.>
29) Install the battery. <Ref. to SC(H4SO)-20, IN-
STALLATION, Battery.>
30) Fill engine coolant. <Ref. to CO(H4DOTC)-14,
FILLING OF ENGINE COOLANT, REPLACE-
MENT, Engine Coolant.>
31) Charge the A/C system with refrigerant. <Ref.
to AC-23, PROCEDURE, Refrigerant Charging
Procedure.>
32) Check the ATF level and replenish it if neces-
sary. (AT model) <Ref. to 5AT-28, INSPECTION,
Automatic Transmission Fluid.>
33) Install the collector cover.
34) Remove the front hood stay, and close the front
hood.
35) Lower the vehicle from lift.

C: INSPECTION

1) Check that pipes, hoses, connectors and clamps
are installed firmly.
2) Check that the engine coolant is at specified lev-
el.
3) Check that the ATF is at specified level. (AT
model)
4) Start the engine and check for exhaust gas, en-
gine coolant, leaks of fuel, etc. Also check for noise
and vibrations.

ME(H4DOTC)-39

Engine Mounting

MECHANICAL

10.Engine Mounting

A: REMOVAL

1) Remove the engine unit. <Ref. to ME(H4DOTC)-
30, REMOVAL, Engine Assembly.>
2) Remove the engine mounting from engine as-
sembly.

B: INSTALLATION

Install in the reverse order of removal.

Tightening torque: 

35 N·m (3.6 kgf-m, 25.8 ft-lb)

C: INSPECTION

Make sure that no crack or other damages do not
exist.


Content   ..  262  263  264  265   ..