Skoda Octavia (2019 year). Manual - part 16


  Index      Skoda     Skoda Octavia (2019 year) - manual in english


Search            copyright infringement  


Content      ..     14      15      16      17     ..


Skoda Octavia (2019 year). Manual - part 16


WARNING

After fitting the tow bar, always secure the lock and remove the key. The

tow bar must not be operated with the key inserted.

Check proper fitting

Fig. 304 

Correctly secured ball rod

Read and observe   on page 250 first.

Correctly secured ball rod 

» Fig. 304

The tow bar must sit securely in the receiving shaft. There must be no play

when “shaken” roughly.
Operating lever 

A

 is as far up as possible.

The release pin 

B

 is completely exposed (both its red and green parts are

visible).
The key is removed and the cap 

C

 attached to the lock.

Removing the bar ball – Step 1

Fig. 305 

Remove the cap from the lock

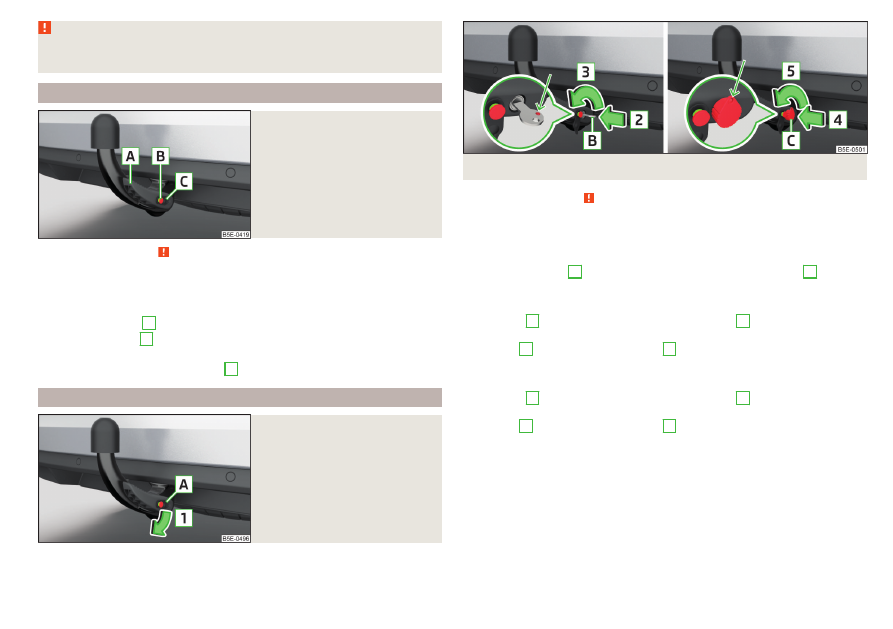
Fig. 306  Unlock lock: Key version 1 / key version 2

Read and observe   on page 250 first.

No trailer or other accessory is connected to the tow bar. We recommend

putting the protective cover onto the ball head before removing the tow bar.

Applies to both key versions

Remove the cover 

A

 from the lock in the direction of the arrow 

1

» Fig. 305

.

Applies to key version 1

Insert key 

B

 into the lock in the direction of arrow 

2

 so that the green

marking is pointing upwards.

Turn key 

B

 in the direction of arrow 

3

 so that the red marking is pointing

upwards 

» Fig. 306

.

Applies to key version 2

Insert key 

C

 into the lock in the direction of arrow 

4

 so that the eye of the

key is pointing downwards.

Turn key 

C

 in the direction of arrow 

5

 so that the eye of the key is pointing

upwards 

» Fig. 306

.

253

Towing device and trailer

-------------------------------------------------------------------------------------------------------------------------------------------------------------

Removing the bar ball – Step 2

Fig. 307 

Release ball bar

Read and observe   on page 250 first.

Removing

Grasp the ball rod from below 

» Fig. 307

.

Push release pin 

A

 in the direction of arrow 

1

 to the stop, and simultane-

ously push operating lever 

B

 in the direction of arrow 

2

 to the stop .

The ball rod is released in this position and falls freely into the hand. If it does

not fall freely into the hand, use your other hand to push it upwards.

Place the cap 

4


» Fig. 297

 on page 250 onto the mounting recess.

If lever 

B

 is held firmly and not pushed downwards to the stop, it will move

back up after the ball rod is removed and will not latch into the ready position.

The knee-joint bar will then need to be brought into this position before the

next time it is installed

» page 251

Adjusting the ready position.

The knee-joint bar must be cleaned before storing in the box with the vehicle

tool always.

WARNING

Never allow the ball rod to remain unsecured in the boot. This can cause

damage to the boot upon sudden braking, and could put the safety of the

occupants at risk.

CAUTION

Store the ball rod in the box in the ready position and with the key facing up-

wards - otherwise there is a risk of damage to the key!

Do not use excessive force when handling the operating lever (e.g. do not

climb on it)!

Vertical load with mounted accessories

Read and observe   on page 250 first.

When using the accessories (e.g. bicycle carrier), the maximum length and the

permissible total weight including load must be considered.
The maximum length of the mounted accessories (from the ball of the towing

device) may not exceed 70 cm.
The permissible total weight of the installed accessory, including its load, cor-

responds to the maximum trailer load on trailers.
If the maximum trailer load in trailer operation is more than 75 kg, then the

permissible total weight of the mounted accessories including their load must

not exceed 75 kg.
This value applies if the center of gravity is at a distance of no more than 30

cm from the towing device ball head.
If the distance of the centre gravity of the load to the ball head of the tow-

ing device is greater than 30 cm, then the max. permissible total weight of

the accessory, including its load, decreases (e.g. at a distance of 60 cm

from the ball head, the permissible weight decreases by half).

CAUTION

Never exceed the permissible total weight of the accessories incl. load and

maximum length of the accessories – There is a risk of damage to the towing

device.

Note

We recommend that you use accessories from ŠKODA Original Accessories.

254

Driving

-------------------------------------------------------------------------------------------------------------------------------------------------------------

Using hitch

Trailer (accessory) connect and disconnect

Fig. 308 

Swivel out the 13-pin power

socket, safety eyelet

Connect / disconnect

Fit the ball rod.

Grip the 13-pin socket at point 

A

 and swing out in the direction of the arrow

» Fig. 308

.

Remove the protective cap 

5


» Fig. 297

 on page 250.

Place the trailer (the accessory) onto the ball head.

Open the socket cap and insert the plug of the trailer (accessories) into the

13-pin socket 

A


» Fig. 308

. (If the trailer / accessories have a 7-pin connec-

tor, use a corresponding adapter from the ŠKODA Original Accessories).

Suspend the breakaway cable of the trailer at the safety eyelet 

B

 (the

breakaway cable must sag in all trailer settings in view of the vehicle).

Uncoupling takes place in reverse order.

Exterior mirrors

You should have additional exterior mirrors fitted if you are not able to see the

traffic behind the trailer using the standard rear-view mirrors.

Headlights

The front of the vehicle may lift up when a trailer (accessory) is being towed

and the headlights may dazzle other road users. Set the range of the headlights

» page 72

Operating the lights

1)

.

Power supply of the trailer / accessory power system

In the electrical connection between the vehicle and trailer (accessory), the

trailer (accessories) is supplied with power from the vehicle (with ignition

switched on and off).
With the engine switched off, the vehicle battery is discharged by the connec-

ted consumers.
At low charge state of the vehicle battery, the power supply to the trailer (ac-

cessories) is interrupted.

WARNING

An improperly connected electrical installation of the trailer (accessories)

may result in an accident or serious injury from electrical shock.

Do not make any adjustments to the electrical installation of the vehicle

and the trailer (accessories) - risk of an accident or serious injury from elec-

trical shock.

After the electrical connection between the vehicle and trailer (accesso-

ry) the trailer / accessory lights should be checked for function.

Never use the securing eye to tow - risk of accident!

CAUTION

An improperly connected electrical installation of the trailer (accessories) can

lead to the inoperability of the vehicle electronics.

The total power consumption of all the connected loads to the trailer power

supply must not exceed 350 watts, otherwise there is a risk of damage to the

electrical system of the vehicle.

Loading a trailer

Correct the tyre inflation pressure on the vehicle for “full load”

» page 279

.

Distribution of the cargo

Distribute the cargo in the trailer in such a way that heavy items are located as

close to the trailer axle as possible. Secure the load from slipping.
The distribution of the weight is very poor if your vehicle is unladen and the

trailer is laden. Drive with particular caution if you cannot avoid driving with

this combination.

1)

Applies to vehicles with Full LED headlights.

255

Towing device and trailer

-------------------------------------------------------------------------------------------------------------------------------------------------------------

WARNING

Sliding cargo can significantly adversely affect stability and driving safety -

risk of accident!

Trailer

The details given in the vehicle's technical documentation always take prece-

dence over the details in the Owner's Manual.

The permissible trailer load must not be exceeded under any circumstances.

Permissible trailer load - Octavia

Engine

Transmission

Permissible trailer weight, braked (kg)

at gradients up to 12%.

Permissible trailer load, unbraked (kg)

1.0 l/85 kW TSI

MG

1300

620

DSG

1300

630

1.4 l/110 kW TSI

MG

1500

630

DSG

1500

640

1.5 l/110 kW TSI

MG

1500

640

DSG

1500

640

1.6 l/81 kW MPI

MG

1100

610

AG

1100

630

1.8 ltr./132 kW TSI

DSG

1600

670

2.0 l/140 kW TSI

DSG

1700

690

DSG 4x4

1700

730

1.6 l/85 kW TDI CR

MG

1500

670

MG 4x4

1700

730

DSG

1500

680

2.0 ltr./105 kW TDI CR

MG

1600

660

DSG

1600

670

2.0 ltr./110 kW TDI CR

MG

1600

680

DSG

1600

700

DSG 4x4

2000

750

2.0 ltr./135 kW TDI CR

DSG 4x4

2000

750

256

Driving

-------------------------------------------------------------------------------------------------------------------------------------------------------------

Permissible trailer load - Octavia RS

Engine

Transmission

Permissible trailer weight, braked (kg)

at gradients up to 12%.

Permissible trailer load, unbraked (kg)

2.0 l/180 kW TSI

MG

1600

700

DSG

1600

720

2.0 l/135 kW TDI CR

DSG

1600

730

DSG 4x4

2000

750

Permissible trailer load - Octavia Combi

Engine

Transmission

Permissible trailer weight, braked (kg)

at gradients up to 12%.

Permissible trailer load, unbraked (kg)

1.0 l/85 kW TSI

MG

1300

630

DSG

1300

640

1.4 l/110 kW TSI

MG

1500

640

DSG

1500

650

1.5 l/96 kW TSI G-TEC

DSG

-

a)

-

a)

1.5 l/110 kW TSI

MG

1500

650

DSG

1500

650

1.6 l/81 kW MPI

MG

1100

620

AG

1100

640

1.8 ltr./132 kW TSI

DSG

1600

680

2.0 l/140 kW TSI

DSG

1700

700

DSG 4x4

1700

740

1.6 l/85 kW TDI CR

MG

1500

680

MG 4x4

1700

740

DSG

1500

690

2.0 ltr./105 kW TDI CR

MG

1600

670

DSG

1600

680

2.0 ltr./110 kW TDI CR

MG

1600

690

DSG

1600

710

DSG 4x4

2000

750

2.0 ltr./135 kW TDI CR

DSG 4x4

2000

750

a)

The valueswere not available at the time of going to press.

257

Towing device and trailer

-------------------------------------------------------------------------------------------------------------------------------------------------------------

Permissible trailer load - Octavia Combi RS

Engine

Transmission

Permissible trailer weight, braked (kg)

at gradients up to 12%.

Permissible trailer load, unbraked (kg)

2.0 l/180 kW TSI

MG

1600

710

DSG

1600

730

2.0 ltr./135 kW TDI CR

DSG

1600

750

DSG 4x4

2000

750

Permissible trailer load - Octavia Combi Scout

Engine

Transmission

Permissible trailer weight, braked (kg)

at gradients up to 12%.

Permissible trailer weight, unbraked (kg)

2.0 l/140 kW TSI

DSG 4x4

1700

750

2.0 ltr./110 kW TDI CR

DSG 4x4

2000

750

2.0 ltr./135 kW TDI CR

DSG 4x4

2000

750

WARNING

The maximum vertical load and the maximum trailer load must not be ex-

ceeded - there is risk of accident!

Towing a trailer

Driving speed

For safety reasons, do not drive faster than 100 km/h when towing a trailer.
Immediately reduce your speed as soon as even the slightest swaying of the

trailer is detected. Never attempt to stop the trailer from “swaying” by accel-

erating.

Brakes

Apply the brakes in good time! If the trailer is fitted with a trailer brake, apply

the brakes gently at first, then brake firmly. This will avoid brake jolts resulting

from the trailer wheels locking.
On downhill sections shift down a gear in good time to also use the engine as a

brake.

WARNING

Always drive particularly carefully with the trailer.

CAUTION

With frequent towing, the vehicle is excessively loaded so this must also be

checked between service intervals.

Anti-theft alarm system

The alarm is triggered if, with a vehicle with activated anti-theft alarm (herein-

after only warning system), the electrical connection to the trailer (accessory)

is interrupted.
Always switch off the anti-theft alarm system before a trailer (accessory) is

coupled or uncoupled 

» page 64

.

Conditions for including a trailer (accessory) in the anti-theft alarm system.

The vehicle is factory-fitted with an anti-theft alarm system and a towing

device.
The trailer (accessory) is electrically connected to the towing vehicle by

means of the trailer socket.
The electrical system of the vehicle and trailer (accessory) is functional.
The vehicle is locked and the anti-theft alarm system is activated.
The trailer (accessory) is not equipped with LED taillights.

258

Driving

-------------------------------------------------------------------------------------------------------------------------------------------------------------

General Maintenance

Care and maintenance

Service work, adjustments and technical alterations

Introduction

The instructions and guidelines from ŠKODA AUTO must be observed when

carrying out any modifications, repairs or technical alterations to your vehicle.
Adhering to these instructions and guidelines helps ensure road safety and

helps keep your vehicle in a good technical condition.

WARNING

Adjustments, repairs and technical changes to the vehicle are to be car-

ried out only by a specialist garage. Improperly conducted work (including

work on the electronic components and their software) can cause faults -

there is a risk of accidents and increased wear on parts!

We advise you only to use ŠKODA Original Accessories and ŠKODA Orig-

inal Parts which have been expressly approved for use on your vehicle. Reli-

ability, safety and suitability for your vehicle are guaranteed with these.

ŠKODA AUTO cannot assume any liability for products which have not

been approved by ŠKODA even though these may be products with a type

approval or have been approved by a nationally recognised testing labora-

tory.

Vehicle operating under different weather conditions

Read and observe   on page 259 first.

If you would like to operate your vehicle in countries other than those with the

intended weather conditions, you should contact a ŠKODA partner. They will

advise you if certain precautions need to be taken to ensure the full function-

ing of the vehicle or to prevent damage (e.g. coolant / battery replacement

etc.).

ŠKODA Service Partner

Read and observe   on page 259 first.

All ŠKODA Service Partners operate according to the most recent guidelines

and instructions from ŠKODA AUTO . All service and repair work is therefore

carried out on time and at the appropriate quality. Adhering to these instruc-

tions and guidelines helps ensure road safety and helps keep your vehicle in a

good technical condition.
We therefore advise you to have all modifications, repairs and technical altera-

tions to your vehicle carried out by a ŠKODA Service Partner.

ŠKODA Original parts

Read and observe   on page 259 first.

We recommend the use of ŠKODA Original Parts for your vehicle, as these

parts are approved by ŠKODA AUTO. These parts correspond exactly to the

ŠKODA AUTO regulations and are identical to the parts used in series produc-

tion.
ŠKODA AUTO is able to warrant the safety, suitability, and long life of these

products.
ŠKODA Service Partners are liable for any defects of ŠKODA Genuine Parts for

a period of 2 years after sale in accordance with the materials defect liability,

unless agreed otherwise in the purchase agreement.

ŠKODA Original accessories

Read and observe   on page 259 first.

If you wish to fit accessories to your vehicle, you should remember the follow-

ing.
We recommend that you use ŠKODA Genuine Accessories in your vehicle.

ŠKODA AUTO has selected such accessories to ensure that they are reliable,

safe and suitable for your particular vehicle. Although we constantly monitor

the market, we are not able to assess or vouch for other products, even

though in some instances such parts may have operational approval or may

have been approved by a nationally recognised testing laboratory.

259

Care and maintenance

-------------------------------------------------------------------------------------------------------------------------------------------------------------

ŠKODA Service Partners are liable for any defects of ŠKODA Genuine Acces-

sories for a period of 2 years after installation or delivery in accordance with

the materials defect liability, unless agreed otherwise in the purchase agree-

ment or any other agreements.

Spoiler

Read and observe   on page 259 first.

WARNING

If your vehicle is equipped with an original spoiler on the front bumper in

combination with the spoiler on the boot lid, the following instructions

must be observed - otherwise there is a risk of accidents and serious inju-

ries!

The vehicle must always be equipped with a spoiler on the front bumper

only in combination with the corresponding spoiler on the boot lid.

This kind of spoiler cannot be left on the front bumper either on its own,

in combination with another spoiler not on the luggage compartment lid or

in combination with an unsuitable spoiler on the luggage compartment lid.

We recommend that you consult the ŠKODA Service Partner for any re-

pairs to or replacement, addition or removal of spoilers.

Improperly conducted work on the spoilers of your vehicle may result in

malfunction.

Component protection

Read and observe   on page 259 first.

Some electronic vehicle components (such as the instrument cluster) are fac-

tory-equipped with component protection. This ensures the functional limita-

tion of these components in a non-legitimate installation in another vehicle

(e.g. after a theft) or operation outside the vehicle.

Airbags

Read and observe   on page 259 first.

WARNING

Modifications, repairs and technical alterations that have been carried out

unprofessionally can cause damage and operational faults, and can also se-

riously impair the effectiveness of the airbag system – risk of accident and

fatal injury!

A change to the vehicle's wheel suspension, including the use of non-ap-

proved wheels and tyre combinations, can alter the functioning of the air-

bag system - risk of accident and fatal injury!

WARNING

No changes may be made to parts of the airbag system, the front bumper

and the body.

Any work on the airbag system including the installation and removal of

system components due to other repair work (e.g. removal of the steering

wheel) must only be carried out by a specialist garage.

Do not manipulate individual parts of the airbag system, as this might re-

sult in the airbag being deployed.

If the airbag is triggered, the airbag system must be exchanged.

WARNING

The airbag system operates using pressure sensors located in the front

doors. For this reason, no adjustments may be carried out to the doors or

door panels (e.g. installation of additional loudspeakers). The resulting dam-

age can negatively affect the function of the airbag system - there is a risk

of accidents and fatal injuries! The following guidelines must be observed.

Any work on the front doors and their door panels must be carried out by

a specialist garage.

Never drive with removed inner door panels or openings in the panels.

Cleaning and care

Introduction

Regular and thorough care retains the value of your vehicle.

260

General Maintenance

-------------------------------------------------------------------------------------------------------------------------------------------------------------

When using the care product, always observe the instructions on the packag-

ing. We recommend that you use the preservative from the ŠKODA Original

Accessories.

WARNING

Vehicle care products may be harmful to your health if not used according

to the instructions.

Always keep the vehicle care products safe from people who are not

completely independent, e.g. children - there is a danger of poisoning!

CAUTION

Do not use any insect sponges, rough kitchen sponges or similar cleaning

products – risk of damaging the paintwork surface.

Do not use aggressive cleaning agents or chemical solvents - there is a dan-

ger of damaging the material that is to be cleaned.

Note

We recommend that the vehicle is cleaned and cared for by a ŠKODA Service

Partner.

Washing the vehicle

Read and observe   and   on page 261 first.

The best way to protect your vehicle against harmful environmental influences

is frequent washing.
The longer insect residues, bird droppings, road salt and other aggressive de-

posits remain on the paintwork of your vehicle, the more detrimental their de-

structive effect can be. High temperatures, such as those caused by intensive

sun's rays, accentuate this caustic effect.
It is essential to also thoroughly clean the underside of the vehicle at the end

of the winter.

Washing by hand

Wash the vehicle from top to bottom, if necessary, wash using a soft sponge

or washing mitt and plenty of water with appropriate detergents. Wash out

the sponge or washing glove thoroughly at short intervals.
Use a different sponge for the wheels, door sills and lower vehicle areas.

Give the vehicle a good rinse after washing it and dry it off using a chamois

leather.

Automatic car washes

The usual precautionary measures must be taken before washing the vehicle in

an automatic car wash system (e.g. closing the windows and the sliding/tilting

roof etc.).
If your vehicle is fitted with any particular attached parts, such as a spoiler,

roof rack system, two-way radio aerial etc., it is best to consult the operator of

the car wash system beforehand.
After an automatic wash with wax treatment, the blades of the wipers should

be cleaned with cleaning agents specially designed for the purpose, and then

degreased.

Pressure washer

When washing the vehicle with a high-pressure cleaner, the instructions for

use of the equipment must be observed. This particularly applies to informa-

tion with respect to the pressure and spray distance from the vehicle surface.

WARNING

When washing your vehicle in the winter: Water and ice in the braking

system can affect the braking efficiency – risk of accident!

Take care when cleaning the underbody or the inside of the wheel wells -

there is a risk of injury on sharp metal parts!

CAUTION

Do not wash the vehicle in direct sunlight, do not exert pressure on the body

while washing. The temperature of the washing water should be max. 60 ° C -

otherwise there is a risk of damaging the vehicle paint.

Before driving through a car wash, fold in the exterior mirrors - there is a risk

of damage.

CAUTION

Washing the vehicle using pressure washers

Do not wash the foils using pressure washers - there is a risk of damage.

261

Care and maintenance

-------------------------------------------------------------------------------------------------------------------------------------------------------------

Do not aim the water jet directly at the lock cylinders or the door or opening

joints when washing the vehicle in the winter – there is a risk of freezing.

During cleaning, always keep a sufficiently large spraying distance in particu-

lar from the parking sensors, the reversing camera lens, the external decorative

and protective plastic parts (e.g. roof racks, spoilers, protective strips) and

other vehicle parts made of non-metallic materials, such as rubber hoses or in-

sulation materials – otherwise there is a risk of damage.

Caring for the outside of the vehicle

Read and observe   and   on page 261 first.

Vehicle compo-

nent

Facts of the

matter

Remedy

Paint

Spilled fuel

Clear water, cloth, (clean as soon as

possible)

No water drop-

lets form on the

paint

Use hard wax (min. twice a year), apply

wax to clean and dry body

Matt paint

Use polish, then preserve (if the polish

does not contain any preservative in-

gredients)

Plastic parts

Soiling

Clear water, cloth / sponge provided

for the intended cleaning agent

Chromed

and anodised

parts

Soiling

Clear water, cloth or cleaning agent

provided for this purpose, then polish

with a soft dry cloth

Foils

Soiling

soft sponge and mild soap solution

a)

Windows

and external mir-

ror glass

Soiling

Wash with clean water and dry using

the intended cloth

Headlights/lights

Soiling

soft sponge and mild soap solution

a)

Reversing camera

Soiling

Wash with clean water and dry with a

soft cloth

Snow / ice

Hand brush / de-icer

Door lock cylinder Snow / ice

De-icer

Vehicle compo-

nent

Facts of the

matter

Remedy

Wiper / wiper

blades

Soiling

Glass cleaner, sponge or cloth

Wheels

Soiling

Clear water, then coat with appropriate

conservation solution

a)

A mild soap solution consisting of 2 tablespoons of natural soap to 1 litre of lukewarm water.

The jack is maintenance-free. If necessary, the moving parts of the jack should

be lubricated with a suitable lubricant.
The towing device is maintenance-free. Coat the ball head of the towing de-

vice with a suitable grease whenever necessary.

Protection of hollow spaces

All the hollow spaces on your vehicle which are at risk from corrosion are pro-

tected for life by a layer of protective wax applied in the factory.
If any small amount of wax flow out of the cavities at high temperatures, these

must be removed with a plastic scraper and the stains cleaned using a petrole-

um cleaner.

Underbody protection

The underside of your vehicle is already permanently protected by the factory

against chemical and mechanical influences.
We recommend having the protective coating underneath the vehicle and the

chassis checked — preferably before the beginning of winter and at the end of

winter.

Product life of the films

Environmental influences (e.g. sunlight, humidity, air pollution, rockfall) affect

the life of the films. Films will age and become brittle – this is entirely normal:

this is not a fault.
Sunlight may also affect the strength of the film colour.
When transporting a load on the roof rack (e.g. roof box or similar), there is an

increased risk of film damage (e.g. of chipping from the secured load).

CAUTION

Vehicle paint

Damaged areas should be repaired as soon as possible.

Do not treat painted parts with or hard waxes.

262

General Maintenance

-------------------------------------------------------------------------------------------------------------------------------------------------------------

Do not polish the paintwork in a dusty environment - risk of paint scratch-

es.

Do not apply any paint care products to door seals or window guides.

Plastic parts

Do not use paint care products.

Chromed and anodised parts

Do not polish the chrome parts in a dusty environment - risk of surface

scratches.

Foils

The following instructions must be observed, otherwise there is a risk of foil

damage.

Do not clean with dirty cloths or sponges.

To remove ice and snow, do not use a scraper or other means.

Do not polish the foils

Do not use a pressure washer to clean the foils

Rubber seals

Do not treat the door seals and window guides with any products - the pro-

tective lacquer layer could be affected.

Windows and external mirror glass

Do not clean the inside of the windows with sharp objects - there is a risk

of damage to the filaments or glass antenna.

Do not use a cloth, which was used to polish the body - this could soil the

window and reduce visibility.

Headlights/lights

Do not dry off the headlights/lights, do not use sharp objects - there is a

risk of damage to the protective coating and subsequent cracking of the

headlight glass.

Reversing camera

The following instructions must be observed, otherwise there is a risk of

camera damage.

Do not remove snow / ice with warm / hot water.

To wash, never use a pressure washer or steam jet.

For cleaning, do not use abrasive cleaners.

Door lock cylinder

Make sure that as little water as possible gets into the locking cylinder

when washing the vehicle - there is a risk of freezing the lock cylinder!

Wheels

Heavy contamination of the wheels can affect the balance of the wheels -

this can result in vibrations and, under some circumstances, can cause pre-

mature wear of the steering wheel.

Removing snow and ice from the windscreens

Fig. 309 

Installation location of the ice

scraper, removing the scraper

Read and observe   and   on page 261 first.

Use a plastic ice scraper for removing snow and ice from the windows and

mirrors. This can be on the inside of the fuel filler flap.

Open the fuel filler flap and slide the scraper in the direction of arrow

» Fig. 309

.

CAUTION

Move the scraper in one direction only, otherwise there is a risk of damage to

the glass surface.

Do not remove snow / ice on the surface that is soiled (e.g. pea gravel, sand,

road salt) - there is a risk of damaging the surface.

Remove snow / ice carefully, otherwise there is a risk of damaging the labels

that have been fitted by the factory.

263

Care and maintenance

-------------------------------------------------------------------------------------------------------------------------------------------------------------

Caring for the interior

Read and observe   and   on page 261 first.

Vehicle compo-

nent

Facts of the

matter

Remedy

Natural leather /

Faux leather /

Alcantara

®

 /

Suede /

Fabric

Dust, surface

contamination

Vacuum cleaner

Pollution (fresh)

Water, slightly damp cotton / wool

cloth, if necessary, mild soap solution

a)

,

then wipe with a soft cloth

Stubborn stains Specially prepared detergent

Care (natural

leather)

Treat the leather periodically with a

suitable leather protector and use a

care cream with light blocker and im-

pregnation after each cleaning.

Care (Alcantara

®

suede / fabric)

Remove stubborn hairs using a “clean-

ing glove”

Remove pills from materials with a

brush

Plastic parts

Soiling

Water, slightly damp cloth or sponge,

or cleaning agent provided for this pur-

pose

Windows

Soiling

Wash with clean water and dry using

the intended cloth

Covers of electri-

cally heated seats Soiling

Specially provided cleaning agent

Seat belts 

» 

Soiling

soft cloth and mild soap solution

a)

a)

A mild soap solution consisting of 2 tablespoons of natural soap to 1 litre of lukewarm water.

WARNING

Never clean the seat belts chemically as chemical cleaning products could

destroy the fabric.

Air fresheners and scents can be hazardous to heath when the tempera-

ture inside the vehicle is high.

CAUTION

Natural leather / Faux leather / Alcantara

®

 suede / material

In lengthy periods in bright sunlight, it might be sensible to cover these ma-

terials in order to avoid bleaching.

Fresh stains (e.g. from pens, lipstick, shoe polish etc.) should be removed as

soon as possible.

Ensure that no part of the leather is soaked through during cleaning and

that no water gets into the seams.

Do not clean the roof panelling with a brush – risk of damage to the surface

of the panelling.

Do not use solvents, floor wax, shoe cream, stain remover or similar agents

on Alcantara

®

 suede seat upholstery.

Some clothing fabrics (e.g. dark denim) do not have sufficient colour fast-

ness - this may leave evident marks on upholstery. This is not a defect in the

fabric.

Sharp objects on garments (e.g. zips, rivets, sharp- edged belts) can dam-

age the upholstery fabrics in the vehicle. Such damage cannot be subse-

quently recognised as a justified complaint.

Plastic parts

Do not attach scents or air fresheners to the dashboard – there is a risk of

damage to the dashboard.

Windows

Do not attach any stickers to the filaments or glass antenna - there is risk

of damage.

Covers of electrically heated seats

Do not clean with water or other liquids - there is a risk of damage to the

heating system.

Do not dry by switching on the heating.

Seat belts

Allow to dry before rolling up the seat belts.

Note

During use, the leather and Alcantara

®

 and suede materials may show minor

changes (e.g. folds, discolouration).

264

General Maintenance

-------------------------------------------------------------------------------------------------------------------------------------------------------------

Inspecting and replenishing

Fuel

Introduction

Fig. 310  Label with prescribed fuel / graphic designation of fuel types

The correct fuel for your vehicle is specified on the inside of the fuel filler flap

» Fig. 310

.

The fuel capacity for vehicles with front wheel drive is about 50 litres, and for

vehicles with four-wheel drive about 55 litres, with about 6 litres as reserve.
Graphic name of the fuel types 

» Fig. 310

Unleaded petrol
Diesel
CNG (compressed natural gas)
Percentage of organic

WARNING

Fuel vapours are explosive - can be fatal!

A
B
C
D

CAUTION

Never drive until the fuel tank is completely empty! The irregular supply of

fuel can cause misfiring, which can result in damage to parts of the engine and

the exhaust system.

Immediately remove any fuel that has spilled onto the vehicle's paintwork –

risk of paint damage.

If you would like to operate your vehicle in countries other than those with

the intended weather conditions, please contact a ŠKODA partner. They will

tell you whether the fuel specified by the manufacturer is offered in the re-

spective country or whether it is permissible to operate the vehicle with an-

other fuel.

Petrol and diesel refuelling

Fig. 311  Open fuel filler flap/unscrew tank cap/place the tank cap on

the fuel filler flap

265

Inspecting and replenishing

-------------------------------------------------------------------------------------------------------------------------------------------------------------

Fig. 312 

Fuel filler tube on vehicles with

diesel engines

Read and observe   and   on page 265 first.

Perform the refuelling under the following conditions.

The vehicle is unlocked.
The ignition is switched off.
The auxiliary heating and ventilation is switched off.

Press the fuel filler flap in direction of arrow 

1

 and fold in the direction of

arrow 

2


» Fig. 311

.

Unscrew the tank cap in the direction of arrow 

3

.

Remove the tank cap and place in the recess on top of the fuel filler flap in

the direction of arrow 

4

.

Insert the pump nozzle into the fuel filler neck as far as it will go, and refuel.

The fuel tank is full just as soon as the pump nozzle switches off for the first

time. Not continue refuelling.

Remove the pump nozzle from the fuel filler neck and put it back in the

pump.

Place the filler cap onto the fuel filler neck and turn it in the opposite direc-

tion to the arrow until it securely engages 

3

.

Close the fuel filler flap until it clicks into place.

Incorrect refuelling guard on vehicles with diesel engines

The fuel filler tube on vehicles with diesel engines has been fitted with an in-

correct refuelling guard 

» Fig. 312

.

If the diesel pump nozzle does not sit directly in the fuel filler tube, move it to

and fro with slight pressure to insert it correctly.
The diameter of the diesel pump nozzle can be identical to that of the petrol

pump nozzle in some countries. When driving in these countries, the incorrect

fuelling protection should be removed by a specialist company.

Unleaded petrol

Read and observe   and   on page 265 first.

The correct fuel for the vehicle is specified on the inside of the fuel filler flap

» Fig. 310

 on page 265.

The vehicle can only be operated with unleaded petrol containing maximum

10% bioethanol (E10).
Unleaded petrol must correspond to the European Standard EN 228 (in Ger-

many DIN 51626-1 or E10 for unleaded petrol with octane number 95 and 91

or DIN 51626-2 or E5 for unleaded petrol with octane number 95 and 98).

Specified petrol 95 / min. 92 and 93 RON/ROZ

We recommend using petrol 95 RON.
Optionally, the petrol 92 or. 93 RON can be used (slight power loss, a slightly

increased fuel consumption).
In an emergency petrol 91 RON can be used (slight power loss, slightly in-

creased fuel consumption) 

» 

.

Unleaded petrol min. 95 RON / ROZ

Use min. 95 ROZ petrol.
In an emergency petrol 9192 or 93 RON can be used (slight loss, a slightly

increased fuel consumption) 

» 

.

Prescribed petrol 98/(95) RON / ROZ

We recommend using petrol 98 RON.
Optionally, petrol 95 RON can be used (slight power loss, a slightly increased

fuel consumption).
In an emergency petrol 9192 or 93 RON can be used (slight loss, a slightly

increased fuel consumption) 

» 

.

CAUTION

The following instructions must be observed, otherwise there is a risk of en-

gine damage and damage to the exhaust system.

If gasoline is used which is lower than the prescribed octane number, then

continue driving at medium engine speeds and minimum engine load. Refuel

using petrol of the prescribed octane number as soon as possible.

266

General Maintenance

-------------------------------------------------------------------------------------------------------------------------------------------------------------

Petrol with a lower Octane count than 91 should not even be used in an

emergency!

If a fuel other than unleaded fuel which complies to the above mentioned

standards (e.g. leaded petrol) is put in the tank by mistake, do not start the en-

gine or switch on the ignition.

CAUTION

Petrol additives (additives)

The unleaded petrol in accordance with the prescribed standards meets all

the conditions for a smooth running engine. Therefore, we recommend that

you do not add any fuel additives to the petrol - there is a risk of engine dam-

age or damage to the exhaust system.

The following additives and auxiliary products may not be used - there is a

risk of engine damage or damage to the exhaust system!

Additives with metal components (metallic additives), in particular with

manganese and iron content.

Fuels with metallic content (e.g. LRP - lead replacement petrol).

Note

Unleaded petrol that has a higher octane number than that required by the

engine can be used without limitations.

The use of petrol with an octane rating higher than 95 RON in does not result

in either a noticeable increase in power nor lower fuel consumption in vehicles

for which unleaded petrol 95/min 92 or 93 RON is specified.

On vehicles using prescribed petrol of min. 95 RON, the use of petrol with a

higher octane number than 95 RON can increase the power and reduce fuel

consumption.

Diesel fuel

Read and observe   and   on page 265 first.

The correct fuel for the vehicle is specified on the inside of the fuel filler flap

» Fig. 310

 on page 265.

The vehicle can only be operated with diesel fuel that complies with the Euro-

pean standard EN 590 (in Germany also DIN 51628, in Austria ÖNORM C 1590,

in Russia GOST R 52368-2005/EN 590: 2004, in India IS 1460/Bharat IV or in

an emergency IS 1460/Bharat III).
The diesel fuel may contain maximum 7% biodiesel (B7 - In Germany in ac-

cordance with DIN 52638, in Austria ÖNORM C 1590, in France EN 590).

Operating under different weather conditions

Use only diesel in accordance with the current or expected weather condi-

tions. Ask the petrol station personnel whether the diesel fuel offered corre-

sponds to these conditions.

CAUTION

The following instructions must be observed, otherwise there is a risk of en-

gine damage and damage to the exhaust system.

If a different fuel other than diesel fuel, which complies to the above men-

tioned standards (e.g. petrol) is put into the tank, do not start the engine or

switch on the ignition!

The biofuel RME must not be used!

CAUTION

Diesel fuel additives

The diesel fuel in accordance with the prescribed standards meets all the

conditions for a smooth running engine. Therefore, we recommend that you

do not add any fuel additives to the diesel - - there is a risk of engine damage

or damage to the exhaust system.

Refuel CNG (compressed natural gas)

Fig. 313  Natural gas filler tubes

Read and observe   and   on page 265 first.

Refuel with natural gas under the following conditions.

The vehicle is unlocked.
The engine and the ignition are switched off.
The auxiliary heating and ventilation is switched off 

» page 119

.

267

Inspecting and replenishing

-------------------------------------------------------------------------------------------------------------------------------------------------------------

Natural gas refuelling may vary from station to station. If refuelling with natu-

ral gas at a station is unfamiliar to you, get someone to instruct you or allow

the fuelling operation to be carried out by the station staff.

Refuelling operation

Open the fuel filler flap.

Remove cap 

A


» Fig. 313

in the direction of the arrow and insert connector

for the refuelling system into filler neck 

B

.

The fuel tank is full when the compressor of the refuelling system automatical-

ly switches off.

Check that sealing ring 

C


» Fig. 313

has remained inserted in filler neck 

B

. If

the sealing ring has slipped on the connector, reinsert it into the filler neck.

Insert cap 

A

 into the filler neck and close the fuel filler flap until it locks into

place.

The natural gas refuelling systems have an overfill protection relating to the

outdoor temperature. At very high outside temperatures, it may happen that

the gas tank may not be fully refuelled.
If the vehicle is parked directly after a refuelling operation, on restart the

pointer of the gas gauge may not show exactly the same level as immediately

after the filling process. This is not a leak in the system, but a reduction in

pressure due to the cooling of the gas in the gas tank after refuelling.
The maximum lifetime of the gas tank is 20 years.
The capacity of the natural gas fuel tank is approximately 17.5 kg.

WARNING

Natural gas is highly explosive and highly flammable.

When refuelling, never get into the vehicle. If you have to get into your

vehicle in exceptional cases, touch a metal surface before you touch the fill-

ing coupling again. Otherwise, electrostatic discharging may occur - There

is a risk of fire!

CAUTION

LNG (Liquefied Natural Gas), LPG (Liquefied Petroleum Gas) and hythane (mix-

ture of hydrogen and methane) must not be used - there is a risk of damaging

the engine and the exhaust system.

Note

During the filling process sounds are heard which are harmless. If you are un-

sure which service station staff to use, ask the petrol station staff.

CNG

Fig. 314  Position of the CNG label(s).

Read and observe   and   on page 265 first.

A G-TEC-vehicle may be operated with CNG and unleaded petrol.
Positioning of the CNG sticker in natural gas vehicles 

» Fig. 314

.

Automatically switching over from natural gas mode to petrol mode

The vehicle automatically switches from natural gas to petrol, for example, if

the following situations occur.

With an empty gas tank or not enough pressure in the tank.

After natural gas refueling (for protecting the petrol fuel system).

At very low surrounding temperatures.

Never fully empty the petrol tank. After the warning light comes on 

 Refuel

petrol at the nearest petrol station.
To ensure the correct functioning of the fuel system, every 6 months the fuel

tank should be run down until the warning light 

 comes on.

Gas leak

If a gas leak is suspected (noticeable odour), proceed as follows.

Stop the vehicle.

Switch off the ignition.

Extinguish cigarettes, switch off spark-producing or incendiary items and re-

move them from the vehicle.

268

General Maintenance

-------------------------------------------------------------------------------------------------------------------------------------------------------------


Content      ..     14      15      16      17     ..