Peugeot 4007 (2012 year). Instruction - part 13


  Index      Peugeot     Peugeot 4007 - instruction 2012 year in english


Search            


Content   ..  11  12  13  14   ..


Peugeot 4007 (2012 year). Instruction - part 13


11

AUDIO EQUIPMENT and TELEMATICS

  Radio, RDS settings 

 Press  

Explanations  

Result 

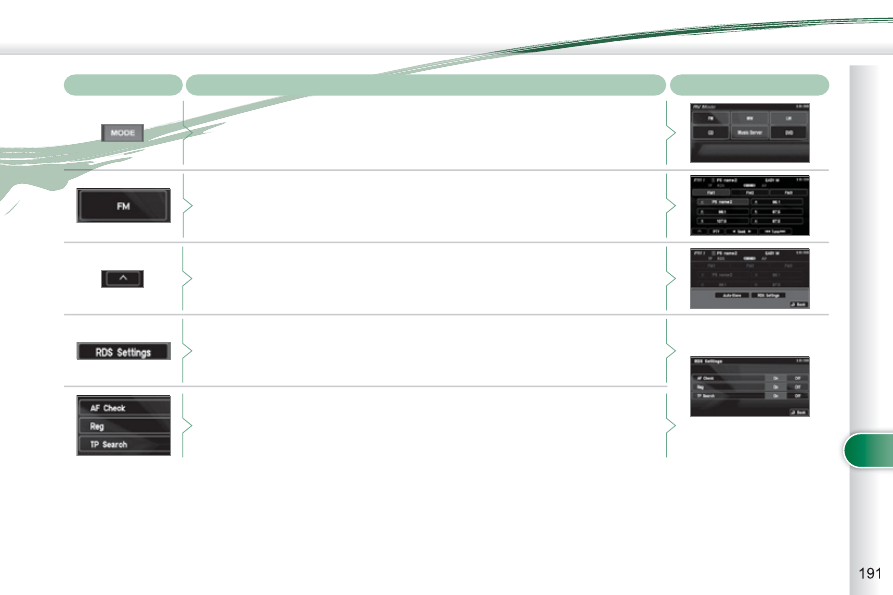
 Press the MODE button. 

 Press FM. By default the screen shows the stations on FM1. 

 Press [^]. 

 Press [RDS Settings]. 

 Press [On] or [Off] to activate or deactivate the functions: 
   -  

AF: automatic search for the best frequency, 

  -  

REG: switch to the regional frequencies, 

  -  

TP: automatic selection of stations broadcasting traffi c information.   

11

AUDIO EQUIPMENT and TELEMATICS

                      CD player 

 Your Audio-Telematic system allows you 

to listen to audio CDs (CDDA, CD-Text, 

CD-R/RW) or MP3 and WMA CDs. 

  Playing an audio CD 

 When the audio CD is in-

serted in the player, playing 

of the tracks is automatic 

and they can be recorded 

onto the hard disk. 

 Simultaneous access to the music re-

cognition service "Gracenote CDDB" 

on the hard disk permits display of the 

title information.  

 Switching off the engine or removing 

the CD during recording will result in 

the tracks being faulty. 
 The operation of the navigation system 

may slow down during recording. 
 The recording speed may be slower 

than 4x due to the processing load on 

the equipment or the condition of the 

audio CD. 
 If jumps or other errors occur, return to 

the beginning of the track and start the 

recording again. 
 Even if there is no gap between the 

tracks on the CD, a brief silence be-

tween tracks is stored on the hard disk.  

  What is the Gracenote CDDB? 

  Copyright 
 Your Audio equipment may allow you 

to listen to music which is usually pro-

tected by copyright in accordance 

with current national and international 

standards. Please consult these stand-

ards and comply with them.   

  Recording onto the music server 

 The tracks of audio CDs (not 

MP3/WMA) can be recorded 

onto the hard disk at approximately 4x 

speed (e.g.: 60 minutes converted to 

15 minutes) and stored on the music 

server. 
 The sounds recorded may be altered 

by the noise present and the quality of 

the sound may differ from the original. 
 The tracks recorded on the music server 

cannot be reproduced on another medi-

um (CD-R/RW, HDD, etc...). 
 Previously recorded tracks cannot be 

recorded again from the same CD. 

 The title information for the 

track currently being played 

can be obtained from the 

"Gracenote CDDB" database 

stored on the hard disk. 

 The Gracenote company uses this 

standard to identify the music and the 

associated information such as: 
   -  

the title of the album, 

  -  

the name of the artist, 

  -  

the title of the tracks, 

  -  

the genre, ...  

 For further details, consult the site: 

www.gracenote.com. 
 The Gracenote CDDB database incorpo-

rated in this equipment cannot guarantee 

the content of the data 100 %. You can 

update this database using a DVD sold 

separately.  

11

AUDIO EQUIPMENT and TELEMATICS

  Information displayed in CD mode and recording a CD 

   A.   The name of the album is displayed 

for the track currently being played. 

  B.   The name of the artist is displayed for 

the album currently being played. 

  C.  The playing time of the track cur-

rently being played is displayed. 

  D.   The playing mode currently selected 

is displayed. 

  E.  Position of the cursor and total 

number of tracks on the album. 

  F.   Displays the item currently selected. 
  G.  To scroll up or down through the 

tracks.  


Press and hold for fast backwards 

or forwards playing of a track. 

  H.   Displays the number and the name of 

the track. While driving, they are not 

available and cannot be selected. 

  I.   To display the secondary menu. 
  J.   Move the cursor onto the track cur-

rently being played. 

  K.   The number and the name of the track 

currently being played are displayed. 

  L.  During recording, this symbol is 

displayed in red and it switches off 

when all recording operations are 

complete. The number indicates the 

percentage of the total number of 

tracks on the CD already recorded 

onto the hard disc. 00 % when only 

one track has been recorded. 

  M.   The tracks which have not been re-

corded are displayed in blue.  


No symbol is displayed for tracks 

which have been recorded.   

 The CD button is only active if the player 

contains a CD. 

 Press Open to return the screen to the 

vertical position. 

A

B

C

D

E

F

G

H

I

J

K

L

M

11

AUDIO EQUIPMENT and TELEMATICS

                   Playing a CD 

 Press the MODE button then CD, if the player already contains a CD. 

 Press  

Explanations 

 Result 

 Otherwise, insert a CD in the player, play begins automatically. 

   Press [    Track] to select the previous track or return to the beginning of 

the track currently being played. 
 Press and hold for fast backwards play. 

   Press [Track 

] to select the next track. 

 Press and hold for fast forwards play. 

 Press [^] to access the secondary menu. 

 Press [Repeat] to play the track in a loop (repetition). 
 Press [^] then [Repeat] to stop. 

 Press [Scan] to play the beginning of each track for approximately 9 seconds 

(scan). Press [^] then [Scan] to stop or press the current track (during the 

9 seconds) and play begins. 

 Press [Random] to play the tracks in random order.

Press [^] then [Random] to stop.  

  Selecting a track  

  Changing the play mode  

11

AUDIO EQUIPMENT and TELEMATICS

                   Recording a CD onto the music server (1/3) 

 Press  

Explanations  

Result 

 All of the tracks are recorded automatically when a CD is inserted. 
 This automatic recording is programmed by default on leaving the factory. 

  Automatic recording of all of the tracks 

 If you have changed the recording mode (manual or fi rst track), while a 

CD is being played press [^] to access to secondary menu. 

 Press [REC. Setting]. 

 Press [Auto REC.] and confi rm by pressing [Back]. 

 Next, eject the CD currently being played then insert a CD and the recording 

of all of the tracks begins. 

 If you wish to record the CD which is currently being played, press [^] to 

access the secondary menu and press [REC. Start]. 

 If another track (already recorded) is selected during recording, the re-

cording continues and the new track selected is played. 
 If another track (not recorded) is selected, the recording which is in 

progress stops and the recording of the new track selected begins. This 

track is played during recording.   

11

AUDIO EQUIPMENT and TELEMATICS

  Recording a CD onto the music server (2/3) 

 Press  

Explanations  

Result 

  Manual recording of individual tracks 

 You can record the tracks manually, one by one. 
 After inserting a CD and while it is being played, press [^] to access the 

secondary menu. 

 Press [REC. Setting]. 

 Press [Manual REC.] and confi rm by pressing [Back]. 

 Once the manual programming has been carried out, select the track to 

be recorded then press [^]. 

 Press [REC. Start], the recording of the track selected begins. 

 If another track is selected during recording, the recording stops and the new 

track selected is played.   

11

AUDIO EQUIPMENT and TELEMATICS

  Recording a CD onto the music server (3/3) 

 Press  

Explanations  

Result 

  Automatic recording of the fi rst track 

 You can programme the automatic recording of the fi rst track when a CD 

is inserted. 
 After inserting a CD and while it is being played, press [^] to access the 

secondary menu. 

 Press [REC. Setting] then [Single REC.] and confi rm by pressing [Back]. 

 Next, eject the CD which is currently being played then insert a CD and 

the recording of the fi rst track begins. 

 If you wish to record the fi rst track of the CD which is currently being 

played, press [^] to access the secondary menu and press [REC. Start]. 

 If another track is selected during recording, the recording stops and the 

track selected is played.  

  Stopping automatic or manual recording 

 During the recording of a CD or of a track on a CD, press [^] to access the 

secondary menu. 

 Press [REC. Stop], the recording stops.   

11

AUDIO EQUIPMENT and TELEMATICS

  General notes on the Music Server 

  What is the music server? 
 Your Audio-Telematic system allows 

you to copy audio CDs onto a music 

server, up to 2,500 songs on a 10 Gb 

hard disk. 
 The tracks on audio CDs (not MP3 or 

WMA) can be recorded onto the hard 

disk at approximately 4x speed and 

stored on the music server. 
 Refer to the "Recording a CD" section. 
 The music server then allows you to 

manage groups and lists of tracks.  

  "Original" group, number 01: 

 This is the location of 

the original playlist cre-

ated automatically (not manual) when a 

track of an audio CD is recorded. 
 It is not possible to change its name or 

delete it. 
 You can record up to 9 999 playlists in 

this group.  

  "My Best" group, number 02: 

 This is the location of the 

playlists, etc... created 

automatically from the information read 

on the music server. 
 It is not possible to change its name or 

delete it. 
 The groups "My Favorites" and "My 

Frequency" are stored here.  

  "New Group" group for the user, 

numbers 03 to 99: 

 This is the location of the 

user's playlists. 

 You can record up to 9 999 playlists in 

this group. 
 The group can be created, renamed or 

deleted.  

  "Original Playlist" lists: 

 These are original play-

lists created automatical-

ly (not manual) when an 

audio CD is recorded. 
 The lists and the artists 

can be renamed or de-

leted. The genres can also be set.  

  "My Favorites" list: 

 This is the location for 

storing your favourite 

tracks. 

 They can be deleted from the list and 

the order in which they are played can 

be changed.  

  "My Frequency" list: 

 This is the location of 

the playlists used most 

frequently from the  original  list. 
 It is not possible to add tracks or change 

their order.  

  "User Playlist" list: 

 This is the location of a 

playlist of tracks select-

ed by the user from the  original  list. 
 If you delete a track from the original 

list, it will be deleted from the user list. 
 The list and the artist can be renamed 

or deleted. 
 It is possible to add tracks or change 

their order. 


11

AUDIO EQUIPMENT and TELEMATICS

  Information displayed in Music Server mode 

   A.   The number and the name of the track 

currently being played are displayed. 

  B.  The number and the name of the 

playlist currently being played are 

displayed. 

  C.   The name of the artist is displayed for 

the playlist currently being played. 

  D.  The playing time of the track cur-

rently being played is displayed. 

  E.   The playing mode currently selected 

is displayed. 

  F.   Group lists: position of the cursor 

and total number of groups.  


Playlists: position of the cursor and 

total number of playlists.  


Track lists: position of the cursor 

and total number of tracks. 

  G.  To display the list of groups, the 

playlist and the list of tracks. 

  H.  To scroll up or down through the 

tracks.  


Press and hold for fast backwards 

or forwards playing of a track. 

  I.   To scroll up or down through the 

playlists. 

  J.   Group lists: number and name of 

the group.  


Playlists: number and name of the 

playlist.  


Track lists: number and name of the 

track. 

  K.   To display the secondary menu. 
  L.   Displays the item currently selected. 
  M.   Move the cursor onto the track cur-

rently being played.   

A

B

C

D

E

F

G

H

I

J

K

L

M

11

AUDIO EQUIPMENT and TELEMATICS

 Explanations  

Result 

                Playing a track or a playlist on the Music Server 

 Press 

 Press the MODE button then Music Server. 

 The playlists are played in a loop. 
 The server can play a track while recording another track from a CD. You 

must wait until recording is complete before playing the recorded track. 

  Selecting a track 

 Press these buttons to switch between groups, playlists and 

tracks. 
 You cannot switch directly from groups to tracks.   

   Press [    Track] to select the previous track or return to the beginning of 

the track currently being played. 
 Press and hold for fast backwards play. 

   Press [Track 


] to select the next track. 

 Press and hold for fast forwards play.  

  Selecting a playlist 

   Press [    Playlist] to select the previous playlist. 

   Press [Playlist    ] to select the next playlist. 

11

AUDIO EQUIPMENT and TELEMATICS

              Creating a group and a playlist on the Music Server 

 Explanations  

Result 

 Press [^] to access the secondary menu. 

  Creating a group 

 Press [New Group], enter the name of the group and confi rm by pressing [SET]. 
 The group is stored on the server.  

  Creating a playlist 

 Press [^] to access the secondary menu then press [Function Settings]. 

 Press [New Playlist]. 

 Select the group to which the playlist is to be attached. The group must 

be created fi rst. 

 Enter the name of the playlist and confi rm by pressing [SET]. 
 Then select the search method attached to this new list (either from the 

list or by conditions). 
 The list is stored on the server.   

 Press 

11

AUDIO EQUIPMENT and TELEMATICS

              General notes on MP3/WMA CDs 

  Playing an MP3/WMA CD 

  Copyright 
 Your Audio equipment may allow you 

to listen to music which is usually pro-

tected by copyright in accordance 

with current national and international 

standards. Please consult these stan-

dards and comply with them.   

  Acceptance of the fi les 
 Some blank CDs may not be played 

by your equipment (quality, recording 

speed...). 
 When you burn a CD-R or CD-RW, 

select the ISO 9660 level 1.2 or Joliet 

burning standard. 
 To obtain the best acoustic quality pos-

sible, select the lowest burning speed. 
 The MPEG1 and MPEG2 standards 

are accepted. 
 Transmission speeds between 32 and 

320 kbits/s and scans between 16 kHz 

and 48 kHz are accepted. 
 To display the title information (the 

name of the artist, the title of the album, 

etc...), the information contained in the 

ID3 Tags or the WMA Tags must be in-

cluded in the MP3/WMA fi les  burned 

onto the disc.  

  What is the MP3/WMA fi le format? 
 MP3 is the abbreviation of MPEG-1 Audio 

Layer 3 and MPG is the abbreviation of 

Motion Pictures Experts Group, a digital 

video data compression standard used on 

media such as video CDs. 
 The MP3 compression reduces the 

number of bytes in a song by eliminat-

ing the long sound waves in the range of 

frequencies which are imperceptible to 

the human ear, so producing high quality 

audio fi les with a low volume of data. 
 This compression divides the size of 

the content of a conventional audio CD 

by approximately 10, which means that 

the content of 10 audio CDs can be re-

corded onto a single CD-R or CD-RW. 

 WMA is the abbreviation of Windows 

Media Audio, another audio data com-

pression standard offered by Microsoft. 
 It can be used to create and save audio 

fi les at a compression rate higher than 

that of the MP3 format. 
 Windows Media and Microsoft Corpo-

ration are trademarks registered in the 

United States and/or other countries.  

 When the MP3/WMA CD 

is inserted in the player, 

playing of the tracks is 

automatic. 
 The tracks cannot be record-

ed onto the music server. 
  You can play CDs with up 

to 8 levels, 255 folders and 

400 fi les maximum.  

11

AUDIO EQUIPMENT and TELEMATICS

  Information displayed in MP3/WMA CD mode 

   A.   The number and the name of the track 

currently being played are displayed. 

  B.   The name of the album/folder is dis-

played for the track currently being 

played. 

  C.   The name of the artist is displayed 

for the track currently being played. 

  D.   The playing time of the current track 

is displayed. 

  E.   The playing mode currently selected 

is displayed. 

  F.  Position of the cursor and total 

number of folders or tracks on the 

current level. 

  G.  To display the list of folders of a 

higher level. 

  H.   Displays the item currently selected. 

  I.   To scroll up or down through the 

tracks.  


Press and hold for fast backwards 

or forwards playing of a track. 

  J.   To scroll up or down through the 

folders. 

  K.   Displays the folder number and the 

folder name. Plus the lists and num-

bers of tracks and the name of the 

fi le (without extension). 

  L.   To display the secondary menu. 
  M.   Move the cursor onto the track cur-

rently being played. 

  N.   Displays the type of medium, MP3 

or WMA.   

 The CD button is only active if the player 

contains a CD. 

 Press Open to return the screen to the 

vertical position. 

A

B

C

E

F

G

I

K

L

M

N

D

H

J

11

AUDIO EQUIPMENT and TELEMATICS

  Playing an MP3/WMA CD (1/2) 

 Press  

Explanations  

Result 

 Press the MODE button then CD, if the player already contains a CD. 

  Moving around the folders 

  Selecting a folder 

 Otherwise, insert a CD in the player, play begins automatically. 

 You can move by one level at a time. 
 Press on the name of a folder and at each press the list of folders of the 

level below is displayed. 

 Press on the folder above to move up and/or select a level.  

 Press [    Folder] to select the previous folder. 

 Press [Folder    ] to select the next folder.   

 These displays indicate the current level: 
 CD: level 0, folder below: level, folder below that, level 2, etc... 
 Up to 8 levels maximum. 

11

AUDIO EQUIPMENT and TELEMATICS

  Changing the playing mode 

 Press [    Track] to select the previous track or return to the beginning of 

the track currently being played. 
 Press and hold for fast backwards play. 

  Selecting a track 

 Press [Track 

  ] to select the next track. 

 Press and hold for fast forwards play.  

 Press [Repeat] to play the track selected in a loop (repetition). 
 Press [Repeat] again to play all of the tracks in the selected folder in a loop. 
 Press again to stop. 

 Press [Scan] to play the beginning of each track in each folder for approxi-

mately 10 seconds (scanning). 
 Press [Scan] again the play the beginning of each track in the selected 

folder in a loop. 
 Press again to stop or press on the current track (during the 10 seconds) 

and play begins. 

 Press [Random] to play all of the tracks in the selected folder in random order. 
 Press [Random] again to play all of the tracks on the CD in random order. 
 Press again to stop.   

 Press [^] to access the secondary menu. 

 Press  

Explanations  

Result 

  Playing an MP3/WMA CD (2/2) 

11

AUDIO EQUIPMENT and TELEMATICS

DVD MO

DVD MODE

 The DVD button is only active if the 

player contains a DVD. 

 Press Open to return the screen to the 

vertical position. 

 For safety reasons, the video is 

not displayed while driving, how-

ever the audio can be played. 
 To display the picture and watch 

a DVD, park the vehicle in a safe 

place.  

  K.   To display the DVD title menu. 
  L.   To scroll up or down through the 

chapters.   


Press and hold for fast backwards 

or forwards play. 

  M.  To scroll up or down through the 

titles. 

  N.   To enter a title or chapter number. 
  O.   To change the angle. 
  P.   To change the language of the sub-

titles. 

  Q.   To change the language. 
  R.   To select a chapter or title or specify 

a number.  

   A.   This icon is displayed when the op-

eration requested cannot be carried 

out. 

  B.   The number of the chapter currently 

being played is displayed. 

  C.   The number of the title currently be-

ing played is displayed. 

  D.   Symbols display the current status 

of the player. 

  E.   The playing time is displayed. 
  F.   To resume normal play when play is 

paused or during slow-motion play. 

  G.   To stop play temporarily. 
  H.  To stop play. Press the screen to 

access the menu. 

  I.   For slow-motion play. 
  J.   To play the previously selected zone 

on the disc. 

  Information displayed in DVD 

mode 

A

B

C

D

E

F

G

H

I

J

K

L

M

R

Q

P

O

N


Content   ..  11  12  13  14   ..