Peugeot 206 SW Dag (2008 year). Instruction - part 7


  Index      Peugeot     Peugeot 206 SW Dag - instruction 2008 year in english


Search            


Content   ..  5  6  7  8   ..


Peugeot 206 SW Dag (2008 year). Instruction - part 7


91

CHECKS -

CHECKING THE LEVELS

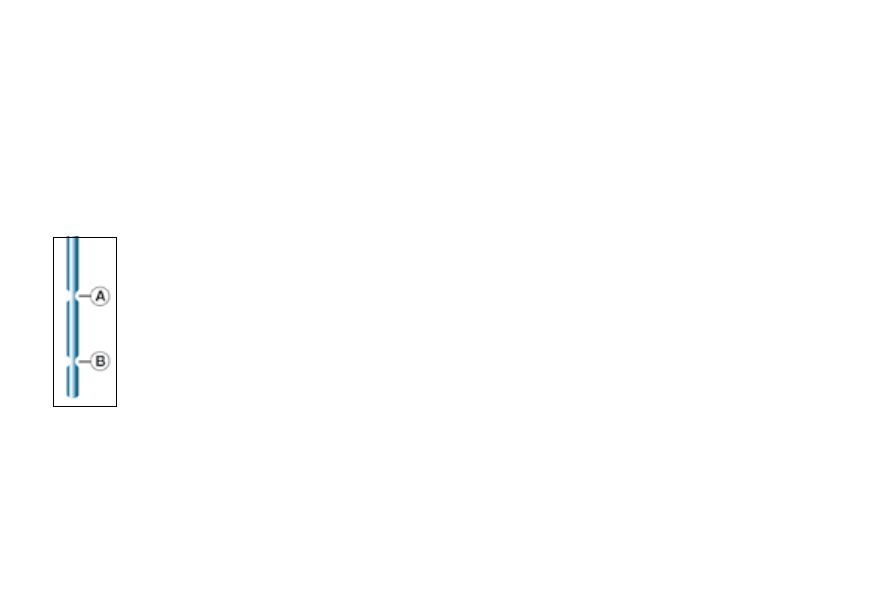
There  are  two  marks  on 
the dipstick:
A = maximum
Never ill past this mark.
B = minimum
To  maintain  the  reliability 
of  engines  and  emission 
control  systems,  the  use 
of  additives  in  engine  oil 
is prohibited.

Oil change
According to the information given in 
the servicing booklet.
Note:  avoid  used  oil  coming  into 
prolonged  contact  with  the  skin. 
Empty  the  used  oil  into  the  contain-
ers  intended  for  this  purpose  in  the 
PEUGEOT network.

Brake fluid level:

The brake luid must be changed ac-

cording  to  the  manufacturer's  servi-
cing schedule.
Use  luids  recommended  by  the 

manufacturer,  which  fulil  DOT4 

standards.
Note:

 brake luid is harmful to health 

and very corrosive. Avoid all contact 
with the skin.

Used oil

Do not dispose of used oil, brake lu-

id  or  coolant  into  drains  or  onto  the 
ground.

Dipstick

Viscosity selection
In  all  cases,  the  oil  selected  must 
meet  the  manufacturer's  require-
ments.

Cooling system

Use  the  luid  recommended  by  the 

manufacturer.
When  the  engine  is  warm,  the  tem-
perature  of  the  coolant  is  controlled 
by  the  engine  fan.  As  this  fan  can 
operate with the ignition key removed 
and  because  the  cooling  system  is 
pressurised, wait for at least one hour 
after  the  engine  has  stopped  before 
carrying out any work.
Slacken  the  cap  by  two  turns  to  re-
lease  the  pressure  to  prevent  any 
risk  of  scalding.  When  the  pressure 
has  dropped,  remove  the  cap  and 
top up the level.
Note:  the  coolant  does  not  need  to 
be changed.
For  vehicles  equipped  with  a  par-

ticle ilter, the engine fan may op-

erate  after  the  ignition  has  been 

switched  off,  even  when  the  en-

gine is cold.

Power steering reservoir

F  Open the reservoir, with the 

engine at ambient temperature. 
The level should always be 
above the MIN. mark and close 
to the MAX. mark.

Windscreen and headlamp 
wash level

For  best  quality  cleaning  and  for  your 
safety,  we  would  advise  that  you  use 
products recommended by PEUGEOT.
For optimum cleaning and to prevent 

freezing, this luid must not be topped 

up or replaced with water.

Oil level

F  Check the level regularly and 

top up between changes. The 
maximum consumption is  
0.5 l per 600 miles (1000 km).

Check the level with the vehicle level, 
engine cold, using the oil level gauge 
on  the  instrument  panel  or  the  dip-
stick.

CHECKS

92 -

CHECKS

Handbrake

Where  the  handbrake  travel  is  too 
great  or  there  is  a  reduction  in  the 
performance  of  the  system,  the 
handbrake should be adjusted, even 
between services.
Have  the  system  checked  by  a 
PEUGEOT dealer.

Only use products recom-
mended  by  PEUGEOT 
or  products  of  equivalent 

quality and speciications.

To  ensure  best  performance  from 
components  as  important  as  the 
power  steering  and  the  braking 
system,  PEUGEOT  selects  and 

offers quite speciic products.
To  prevent  damage  to  the  electri-
cal  units,  avoid  washing  the  en-
gine.

RUNNING OUT OF FUEL 
(DIESEL)

If  you  should  run  out  of  fuel,  it  is 
necessary to re-prime the circuit:
-  ill the fuel tank with at least ive 

litres of diesel,

squeeze and release the manual 
re-priming pump, until fuel 
appears in the transparent pipe 
under the bonnet,

operate the starter until the 
engine starts.

Brake pads

Brake pad wear depends on the style 
of  driving,  in  particular  for  vehicles 
which  are  used  in  town,  over  short 
distances.
It  may  be  necessary  to  check  the 
thickness of the pads, even between 
services.

Disc wear status

For any information relating to check-
ing  the  disc  wear  status,  contact  a 
PEUGEOT dealer.

Oil filter

Change the ilter regularly, in accord-

ance with the servicing schedule.

Air filter and passenger 
compartment filter

Have the ilter elements replaced regu-

larly.  If  you  drive  in  dusty  condi-

tions, change them twice as often.

Manual gearbox

This  does  not  require  an  oil  change. 
Check the level in accordance with the 
manufacturer's servicing schedule.
To check the main levels and cer-

tain  components,  in  accordance 

with  the  manufacturer's  servicing 

schedule,  refer  to  the  pages  of 

the servicing booklet which corre-
spond to your vehicle's engine.

Battery

At the start of winter, have your bat-
tery checked by a PEUGEOT dealer.

93

PRACTICAL INFORMATION -

Access to the spare wheel and 
the jack
The  wheel  is  located  outside  the  
vehicle, under the boot, supported by 
a metal carrier.

Remove the wheelbrace 1
secured on the rear right inner 
panel of the boot
.

Using the wheelbrace 1, slacken 
the spare wheel carrier retaining 
bolt, located inside the boot 
under the carpet
.

Lift the carrier to release the 
hook rearwards, then lower it.

Remove the jack storage box  
2 located in the spare wheel.

CHANGING A WHEEL

Removing a wheel

Chock the rear of the wheel 
diagonally opposite the wheel 
to be changed, using the jack 
storage box.

Remove the wheel trim using 
the wheelbrace, by pulling at the 
valve passage hole.

Slacken the wheel bolts.

Place the jack under the locating 
point on the sub-frame E that 
is closest to the wheel to be 
changed. Ensure that the entire 
surface of the jack base plate is 
in contact with the ground.

Extend the jack, completely 
unscrew the bolts and remove 
the wheel.

Parking the vehicle

If possible, park the vehicle on 
level, stable and non-slippery 
ground.

Apply the handbrake, engage 

irst or reverse gear (position P 

for the automatic gearbox).

PRACTICAL INFORMATION

94 -

For your safety, always change a wheel:
-  on level, stable and non slippery ground,
-  with the handbrake applied,
-  with irst or reverse gear engaged,
-  with the vehicle chocked using the jack storage box,
-  never go underneath a vehicle raised using a jack (use an axle stand).

After changing the wheel

Have the tightening of the bolts and the pressure of the spare tyre checked as soon as possible by a PEUGEOT 
dealer.

Have the punctured tyre repaired and replace it on the vehicle as soon as possible.

The space-saver spare wheel must only be used temporarily:

-  inlation pressure: 4.2 bars (60 p.s.i.).
-  maximum speed: 50 mph (80 km/h).

95

PRACTICAL INFORMATION -

SPECIAL FEATURES OF 
ALLOY WHEELS

Fitting the spare wheel

If your vehicle is equipped with a steel 

spare wheel, when itting it, it is nor-

mal  to  notice  that  the  bolt  washers 
do not come into contact with the rim. 
The  spare  wheel  is  secured  by  the 
cone shape of each bolt. 

Wheel anti-theft bolts

If your wheels are itted with anti-theft 

bolts  (one  per  wheel),  the  chrome-

plated  trim  cap  and  then  the  plastic 
cover on the wheel must be removed, 
using the yellow

 tool (located in the 

box ixed to the left-hand side of the 

boot), before slackening the bolt us-

ing  the  anti-theft  socket  (located  in 

the  glove  box)  and  the  wheelbrace, 
located  in  the  boot  rear  right  inner 
panel.

Note: take a careful note of the code 
number engraved on the head of the 
anti-theft socket. This will enable you 
to obtain a duplicate anti-theft socket 
from a PEUGEOT dealer.

Fitting snow tyres

If you it snow tyres that are mounted 

on steel rims onto your vehicle, it is es-
sential
 that you use special bolts avail-
able from your PEUGEOT dealer.

Bolt covers

Alloy  wheel  bolts  are  covered  by 
chrome trims.
Use  the  yellow  tool  4  to  remove  the 
trims before slackening the bolts.
Tool 4 is located on the rear right in-
ner panel of the boot.

PRACTICAL INFORMATION

96 -

Dipped headlamps H7 55W /  
main beam headlamps H1 55W 

F  Remove the protective cover A 

for the H7 55W bulb or B for the 
H1 55W bulb.

F

  Disconnect the connector(s) C.

F  Press the end of the securing 

clip(s) D to remove it(them). 

Change the faulty bulb.

CHANGING A BULB

To make access easier, on the right-
hand  side

,  irst  remove  the  screen 

wash reservoir iller pipe:
F  align the notches by turning,
F  pull upwards.

1.  Dipped beam headlamps / 

main beam headlamps

2.  Side lights
3.
  Direction indicators

F

  On itting, ensure that the 

direction notches are in the 
correct position and that the 

securing clip(s) is(are) secured 

correctly.

F  Reconnect the connector.
F

  Replace the protective cover(s), 

then the screen wash reservoir 

iller pipe (right-hand side).

97

PRACTICAL INFORMATION -

Amber direction indicators PY21W

F  Turn the pin connector 3 a 

quarter turn (towards the front of 

the vehicle) and remove it.

F  Change the bulb.

Amber direction indicator 
side repeater WY5W

F  Push the repeater forwards and 

release it.

F  Remove the repeater and 

change it.

It can be obtained from a PEUGEOT 
dealer.

Side lights W5W

F  Turn the pin connector 2 a 

quarter turn and remove it.

F  Change the bulb.

Handle  the  bulbs  with  a 
dry cloth.
The  headlamps  are  it-

ted  with  polycarbon  glass 

with  a  protective  coating.  Do  not 
clean them using a dry or abra-
sive  cloth,  or  using  detergents 
or solvents.
Use a sponge and soapy water.

High pressure washing
When  using  this  type  of  washing 
on stubborn dirt, do not persist on 
the  headlamps,  lights  and  their 
surrounds to avoid damaging their 
coating and seal.

PRACTICAL INFORMATION

98 -

Unclip the boot side trim.
Unclip  the  foam  cover  and  reach 
behind  the  cover  to  locate  the  wing 
nut.
Remove the wing nut.
Release the light unit.
Press  the  lug  A  and  disconnect  the 
connector.
Remove the foam.
Move  aside  the  tabs  B  and  remove 
the bulb holder.
Change the faulty bulb.
When  reitting,  ensure  that  the  bulb 

holder,  the  light  and  the  foam  cover 
are repositioned correctly.

Third brake light 5 bulbs 
W5W

Using a 10 mm spanner, unscrew the 

2 nuts A.
Release the light unit.
Squeeze  the  two  tabs  B  to  release 
the bulb holder.
Change the faulty bulb.

Rear lights

1.  Direction indicators  

P21W.

2.  Reversing lights P21W.
3.
  Brake lights/side lights  

P21/5W.

99

PRACTICAL INFORMATION -

Front fog lamps  
H1 55W

Press  under  the  access  lap  to  re-

lease it.
Open the lap.
Turn the cover to remove it.
Disconnect the bulb.
Press  the  two  ends  of  the  securing 
clip to release the bulb.

Rear fog lamp P21W

Unclip  the  lamp  and  release  the  as-
sembly.
Turn the pin connector a quarter turn 
and remove it.
Change the bulb.

Number plate lights  
W5W

Insert a thin screwdriver into one of the 
outer holes of the transparent cover.
Push it outwards to unclip it.
Remove the transparent cover.
Change the faulty bulb.

PRACTICAL INFORMATION

100 -

CHANGING A FUSE

The  fuse  boxes  are  located  under 
the fascia and in the engine compart-
ment.

Correct

Incorrect

Pliers A

Fascia fuse box

Unscrew the catch a quarter turn us-
ing  a  coin  then  remove  the  cover  to 
gain access to the fuses.
The spare fuses and the pliers A are 
secured  on  the  inside  of  the  fascia 
fuse box cover.

Removing and itting a fuse
Before changing a fuse, the cause of the fault must be found and remedied. The 
fuse numbers are indicated on the fuse box.
Use the pliers A.
Always replace a faulty fuse with a fuse of the same rating.

101

PRACTICAL INFORMATION -

Fuse N°

Rating

 Functions

15A

Heated seat - Alarm

4

 20A

Multifunction display - Boot lighting - Audio equipment - Steering wheel controls - Trailer

15A

Automatic gearbox diagnostics 

10A

Coolant level - Automatic gearbox - Audio equipment - Steering wheel angle sensor (ESP)

7

 15A

Driving school accessory - Alarm itted as an accessory

30A 

Rear electric windows

10 

40A

Rear screen and mirror demisting

11

15A

Rear windscreen wiper

12 

30A

Front electric windows - Sunroof

14

10A

Engine fuse box - Air bags - Steering wheel controls - Rain sensor

15 

15A 

Instrument panel - Multifunction display - Air conditioning - Audio equipment

16 

30A 

Locking/unlocking controls for doors, bonnet and boot 

20 

10A

Right-hand brake light

21 

15A

Left-hand brake light - 3rd brake light

22

20A

Front courtesy light - Map reading light - Glove box lighting - Lighter

S1

Shunt 

PARC shunt

PRACTICAL INFORMATION

102 -

or 

The  electrical  circuit  of 
your  vehicle  is  designed 
to  operate  with  standard 
or optional equipment.

Before  installing  other  electri-
cal  equipment  or  accessories  in 
your vehicle, consult a PEUGEOT 
dealer.

Some electrical accessories or the 

way  in  which  they  are  itted  may 

have an adverse effect on the op-

eration  of  your  vehicle  (its  elec-

tronic  control  circuits,  the  audio 
circuit  and  the  electrical  charging 
circuit).

PEUGEOT  declines  any  respon-
sibility 

for 

expenses 

incurred 

through  the  repair  of  your  vehicle 
or  for  any  malfunctions  resulting 
from  the  installation  of  auxiliary 
accessories, not supplied and not 
recommended  by  PEUGEOT  and 
not  installed  in  accordance  with 
PEUGEOT's  instructions,  in  par-
ticular for any equipment the pow-
er consumption of which exceeds 

10 milliamps.

Fuse N°

 Rating 

Functions 

1 *

20A

Fan unit

2 *

60A

ABS/ESP

3 *

30A

ABS/ESP

4 *

70A

Built-in systems interface supply

5 *

70A

Built-in systems interface supply

6 *

-

Not used

7 *

30A 

Ignition switch supply

8 *

20A

Audio equipment ampliier

Engine compartment fuse box

To gain access to the box in the engine compartment (next to the battery), unclip 

the cover.
After carrying out work, close the cover very carefully.

The maxi fuses provide additional protection for the electrical systems. Any 
work on these fuses must be carried out by a PEUGEOT dealer.

103

PRACTICAL INFORMATION -

Fuse N°

Rating

 Functions

1

10A

Pre-heat unit (diesel) - Water in diesel sensor - Reversing lights switch - Speed sensor -  

Air low sensor (diesel)

15A 

Canister solenoid valve - Fuel pump

10A 

ABS/ESP engine control unit - ESP stop switch

10A 

Automatic gearbox control unit - Engine control unit

5

Not used

6

15A 

Front fog lamps

7

20A

Headlamp wash pump

20A

Fan assembly relay - Engine control unit - Diesel injection pump - Diesel high pressure 
regulator - Engine management solenoid valve 

15A

Left-hand dipped beam

10 

15A

Right-hand dipped beam

11 

10A

Left-hand main beam

12 

15A

Right-hand main beam

13 

15A

Horn

14 

10A 

Front and rear windscreen wash pumps

15

30A 

Throttle housing heater - Diesel injection pump - Oxygen sensor - Engine control unit -  

Air low sensor - Ignition coil - Engine management solenoid valve - Diesel heater -  

Injectors

16 

30A

Air pump relay

17

30A 

High and low speed windscreen wiper

18 

40A

Air conditioning fan

PRACTICAL INFORMATION

104 -

BATTERY

To charge the battery using a bat-
tery charger:

Disconnect the battery,

Follow the instructions for use 
given by the battery charger 
manufacturer,

Reconnect starting with the 

negative (-) terminal,

Check that the terminals and 
connectors are clean. If they are 

covered with sulphate (white or 

greenish deposit), disconnect 
them and clean them.

-  Wait for 2 minutes 

after switching off 
the ignition before 
disconnecting the 
battery.

Never disconnect a terminal 
when the engine is running.

Never charge a battery 

without irst disconnecting the 

terminals.

Close the windows and the 
roof before disconnecting the 
battery. 

After every reconnection of 
the battery, switch on the 
ignition and wait 1 minute 
before starting to allow the 
electronic systems to be 

initialised. If slight dificulties 

are experienced after this, 
please consult a PEUGEOT 
dealer. 

It is advisable to disconnect the 
battery if the vehicle is not to be 
used  for  a  period  of  more  than 
one month.

ECONOMY MODE  
FUNCTION

After the engine has stopped, certain 

functions  (windscreen  wiper,  elec-

tric  windows,  courtesy  lights,  audio 
equipment, etc.) can only be used for 
a combined duration of approximately  
thirty minutes, to prevent discharging 
the battery.
Once  the  thirty  minutes  are  over,  a 
switching  to  economy  mode  mes-
sage  appears  on  the  multi-function 
display  and  the  active  functions  are 
put on standby.
These  functions  are  reactivated  au-
tomatically  next  time  the  vehicle  is 
driven.
In  order  to  resume  the  use  of  these 
functions  immediately,  the  engine 
must  be  started  and  left  to  run  for  a 
few minutes.
The  time  available  to  you  will  then 
be double the duration for which the  
engine  is  left  running.  However, 
this  period  will  always  be  between  

ive and thirty minutes.

To  start  the  vehicle  from  another 
battery:

Connect the red cable to the 

positive (+) terminals of the  

two batteries,

Connect one end of the green 

or black cable to the negative (-) 

terminal of the slave battery,

Connect the other end of the 
green or black cable to an 
earth point on the broken down 
vehicle, as far as possible from 

the battery (for example, right-

hand engine mounting),

Operate the starter, let the 
engine run,

Wait for the engine to return to 
idle, then disconnect the cables.

A lat battery prevents the 

engine from starting.

105

PRACTICAL INFORMATION -

FITTING SPEAKERS

The  factory-itted  equipment  allows 

the itting of:

-  165 mm diameter speakers in 

the front doors,

-  130 mm diameter speakers in 

the rear doors,

-  22.5 mm diameter tweeters in 

the mirror trims.

Making the connections
A1 : -
A2 : -
A3 : -
A4 : -
A5 : -
A6 : (+ve) Ignition positive 

A7 : (+ve) Permanent

A8 : Earth

B1 : (+) Rear right speaker 

B2 : (-) Rear right speaker 

B3 :  (+) Front right speaker and 

tweeter 

B4 :  (-) Front right speaker and 

tweeter 

B5 :  (+) Front left speaker and tweeter 

B6 : (-) Front left speaker and tweeter 

B7 : (+) Rear left speaker 

B8 : (-) Rear left speaker

Consult a PEUGEOT dealer 
before installing audio equip-
ment  or  speakers  in  your  
vehicle.

FITTING AUDIO EQUIPMENT

Your vehicle is equipped with certain 

factory-itted audio equipment:

roof aerial,

coaxial aerial cable,

basic interference suppression,

supply to front speakers,

supply to rear speakers,

-  two 8-way connectors.


Content   ..  5  6  7  8   ..