Peugeot 205. Manual - part 40


  Главная      Peugeot     Peugeot 205 - Service And Repair Manual Haynes


поиск по сайту            


содержание   ..  38  39  40  41   ..


Peugeot 205. Manual - part 40


21 Wheel alignment and

steering angles - general
information

A car’s steering and suspension geometry
is defined in four basic settings - all angles are
expressed in degrees (toe settings are also
expressed as a measurement); the relevant
settings are camber, castor, steering axis
inclination, and toe-setting. With the
exception of front wheel toe-setting, none of
these settings are adjustable.

Front wheel toe setting -
checking and adjustment

Due to the special measuring equipment
necessary to accurately check the wheel
alignment, and the skill required to use it
properly, checking and adjustment is best left
to a Peugeot dealer or similar expert. Note
that most tyre-fitting shops now possess
sophisticated checking equipment. The
following is provided as a guide, should the
owner decide to carry out a DIY check.
The front wheel toe setting is checked by
measuring the distance between the front and

rear inside edges of the roadwheel rims.
Proprietary toe measurement gauges are
available from motor accessory shops.
Adjustment is made by screwing the track rod
ends in or out of their track rods, to alter the
effective length of the track rod assemblies.
For accurate checking, the vehicle must
be at the kerb weight, ie unladen and with a
full tank of fuel, and the ride height must be
correct (see Section 12).
Before starting work, check the tyre
pressures and tread wear, the condition of the
hub bearings, the steering wheel free play,
and the condition of the front suspension
components (see Chapter 1). Correct any
faults found.
Park the vehicle on level ground, check that
the front roadwheels are in the straight-ahead
position, then rock the rear and front ends to
settle the suspension. Release the handbrake,
and roll the vehicle backwards 1 metre, then
forwards again, to relieve any stresses in the
steering and suspension components.
Measure the distance between the front
edges of the wheel rims and the rear edges of
the rims. Subtract the rear measurement from
the front measurement, and check that the
result is within the specified range.
If adjustment is necessary, apply the
handbrake, then jack up the front of the
vehicle and support it securely on axle stands
(see “Jacking and vehicle support”). Turn the
steering wheel onto full-left lock, and record
the number of exposed threads on the right-
hand track rod end. Now turn the steering
onto full-right lock, and record the number of
threads on the left-hand side. If there are the
same number of threads visible on both sides,
then subsequent adjustment should be made
equally on both sides. If there are more
threads visible on one side than the other, it
will be necessary to compensate for this
during adjustment. Note: It is most important

that after adjustment, the same number of
threads are visible on each track rod end.
First clean the track rod end threads; if they
are corroded, apply penetrating fluid before
starting adjustment. Release the rubber
bellows outboard clips (where necessary), and
peel back the bellows; apply a smear of
grease to the inside of the bellows, so that
both are free, and will not be twisted or
strained as their respective track rods are
rotated.
10 Use a straight-edge and a scriber or
similar to mark the relationship of each track
rod to its track rod end then, holding each
track rod in turn, unscrew its locknut fully.
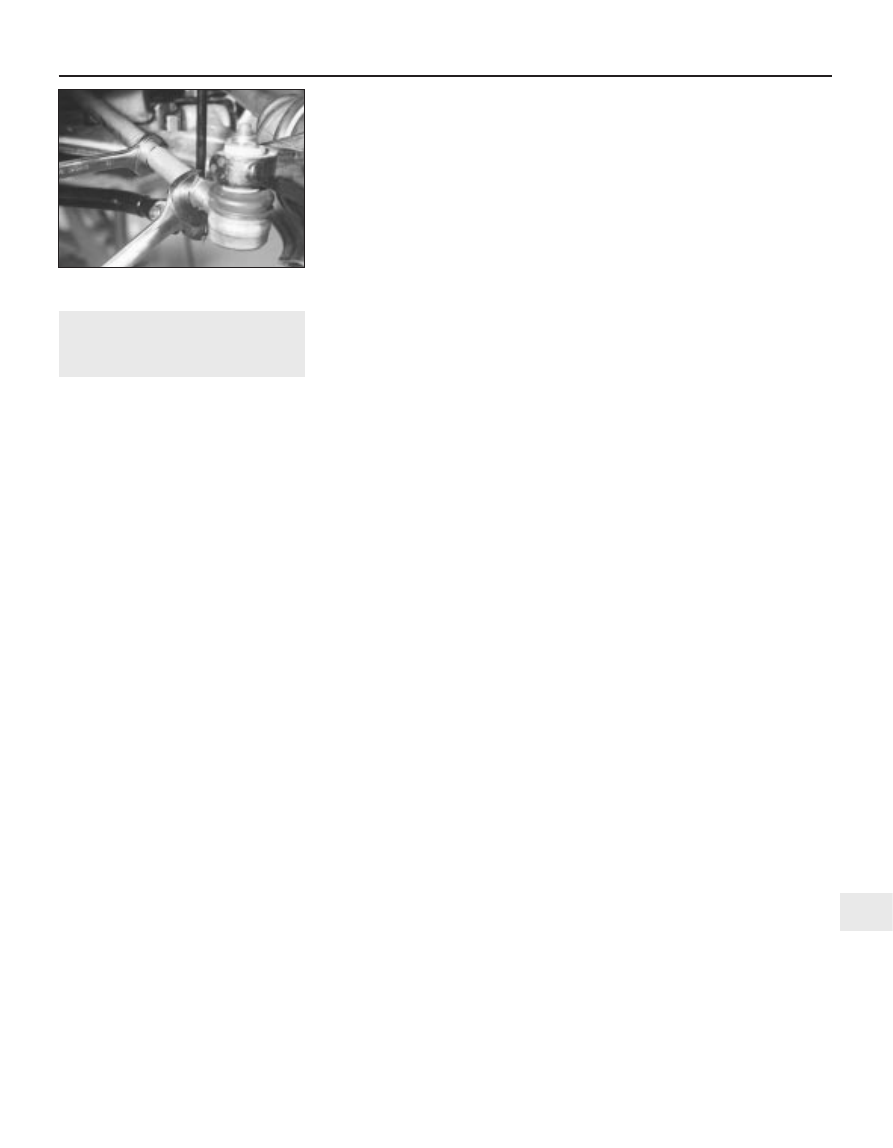
11 Alter the length of the track rods, bearing
in mind the note made in paragraph 8. Screw
them into or out of the track rod ends, rotating
the track rod using an open-ended spanner
fitted to the flats provided on the track rod.
Shortening the track rods (screwing them into
their track rod ends) will reduce toe-
in/increase toe-out (see illustration).
12 When the setting is correct, hold the track
rods and securely tighten the track rod end
locknuts. Count the exposed threads to check
the length of both track rods. If they are not
the same, then the adjustment has not been
made equally, and problems will be
encountered with tyre scrubbing in turns;
also, the steering wheel spokes will no longer
be horizontal when the wheels are in the
straight-ahead position.
13 If the track rod lengths are the same,
lower the vehicle to the ground and re-check
the toe setting; re-adjust if necessary. When
the setting is correct, securely tighten the
track rod end locknuts. Ensure that the rubber
bellows are seated correctly, and are not
twisted or strained, and secure them in
position with new retaining clips (where
necessary).

Suspension and steering  10•11

10

21.11  Adjusting the front wheel toe setting

10•12

Notes

11

Chapter 11
Bodywork and fittings

Bodywork, paint and exterior trim check  . . . . . . . . . . . .See Chapter 1
Bonnet - removal and refitting  . . . . . . . . . . . . . . . . . . . . . . . . . . . . . . 6
Bonnet lock and remote control cable - removal, refitting and

adjustment  . . . . . . . . . . . . . . . . . . . . . . . . . . . . . . . . . . . . . . . . . . . 7

Bumpers - removal and refitting  . . . . . . . . . . . . . . . . . . . . . . . . . . . . 9
Door - removal and refitting . . . . . . . . . . . . . . . . . . . . . . . . . . . . . . . . 10
Door, boot, tailgate and bonnet check and lubrication  . .See Chapter 1
Door (Cabriolet models) - dismantling and reassembly  . . . . . . . . . . 13
Door (Hatchback and Van models) - dismantling and reassembly  . . 12
Door trim panel - removal and refitting  . . . . . . . . . . . . . . . . . . . . . . . 11
Facia panel - removal and refitting  . . . . . . . . . . . . . . . . . . . . . . . . . . 26
Front grille - removal and refitting  . . . . . . . . . . . . . . . . . . . . . . . . . . . 8
General information  . . . . . . . . . . . . . . . . . . . . . . . . . . . . . . . . . . . . . . 1
Glovebox - removal and refitting  . . . . . . . . . . . . . . . . . . . . . . . . . . . . 25
Grab handles - removal and refitting  . . . . . . . . . . . . . . . . . . . . . . . . . 22
Hood and rear window (Cabriolet models) - removal and refitting  . . 14

Maintenance - bodywork and underframe  . . . . . . . . . . . . . . . . . . . . 2
Maintenance - upholstery and carpets  . . . . . . . . . . . . . . . . . . . . . . . 3
Major body damage - repair  . . . . . . . . . . . . . . . . . . . . . . . . . . . . . . . 5
Minor body damage - repair  . . . . . . . . . . . . . . . . . . . . . . . . . . . . . . . 4
Power-operated hood components (Cabriolet models) - general

information  . . . . . . . . . . . . . . . . . . . . . . . . . . . . . . . . . . . . . . . . . . . 15

Rear quarter glass and regulator (Cabriolet models) - removal and

refitting  . . . . . . . . . . . . . . . . . . . . . . . . . . . . . . . . . . . . . . . . . . . . . . 20

Rear quarter glass (GTI models) - removal and refitting  . . . . . . . . . . 19
Seat belt check  . . . . . . . . . . . . . . . . . . . . . . . . . . . . . . . .See Chapter 1
Seats - removal and refitting  . . . . . . . . . . . . . . . . . . . . . . . . . . . . . . . 21
Sunroof - general information  . . . . . . . . . . . . . . . . . . . . . . . . . . . . . . 23
Sunroof glass - removal and refitting  . . . . . . . . . . . . . . . . . . . . . . . . 24
Tailgate - removal and refitting  . . . . . . . . . . . . . . . . . . . . . . . . . . . . . 16
Tailgate lock - removal and refitting  . . . . . . . . . . . . . . . . . . . . . . . . . 17
Windscreen and tailgate glass - general information  . . . . . . . . . . . . 18

11•1

Contents

Easy, suitable for
novice with little
experience

Fairly easy, suitable
for beginner with
some experience

Fairly difficult,
suitable for competent
DIY mechanic

Difficult, suitable for
experienced  DIY
mechanic

Very difficult,
suitable for expert DIY
or  professional

Degrees of difficulty

5

4

3

2

1

1

General information

The body shell is of one-piece design and

safety cell construction, whereby the outer
members yield progressively and in a
controlled direction in the event of impact,
giving maximum protection to the passenger
compartment. The body panels are of
lightweight high strength steel.

The front wings are bolted to the main body

for ease of removal. The complete body is
given an extensive anti-corrosion treatment
during manufacture; including stone chip
protection and wax injection. Peugeot
guarantee the body against perforation as a
result of corrosion for a period of six years
provided the car is given periodic inspections
by a Peugeot garage.

2

Maintenance - bodywork and
underframe

1

The general condition of a vehicle’s

bodywork is the one thing that significantly
affects its value. Maintenance is easy but
needs to be regular. Neglect, particularly after
minor damage, can lead quickly to further
deterioration and costly repair bills. It is
important also to keep watch on those parts
of the vehicle not immediately visible, for
instance the underside, inside all the wheel
arches and the lower part of the engine
compartment.

The basic maintenance routine for the

bodywork is washing preferably with a lot of
water, from a hose. This will remove all the
loose solids which may have stuck to the
vehicle. It is important to flush these off in
such a way as to prevent grit from scratching

the finish. The wheel arches and underframe
need washing in the same way to remove any
accumulated mud which will retain moisture
and tend to encourage rust. Oddly enough,
the best time to clean the underframe and
wheel arches is in wet weather when the mud
is thoroughly wet and soft. In very wet
weather the underframe is usually cleaned of
large accumulations automatically and this is
a good time for inspection.

Periodically, except on vehicles with a wax-

based underbody protective coating, it is a
good idea to have the whole of the
underframe of the vehicle steam cleaned,
engine compartment included, so that a
thorough inspection can be carried out to see
what minor repairs and renovations are
necessary. Steam cleaning is available at
many garages and is necessary for removal of
the accumulation of oily grime which
sometimes is allowed to become thick in
certain areas. If steam cleaning facilities are

not available, there are one or two excellent
grease solvents available which can be brush
applied; the dirt can then be simply hosed off.
Note that these methods should not be used
on vehicles with wax-based underbody
protective coating or the coating will be
removed. Such vehicles should be inspected
annually, preferably just prior to winter, when
the underbody should be washed down and
any damage to the wax coating repaired using
underseal. Ideally, a completely fresh coat
should be applied. It would also be worth
considering the use of such wax-based
protection for injection into door panels, sills,
box sections, etc, as an additional safeguard
against rust damage where such protection is
not provided by the vehicle manufacturer.

After washing paintwork, wipe off with a

chamois leather to give an unspotted clear
finish. A coat of clear protective wax polish
will give added protection against chemical
pollutants in the air. If the paintwork sheen
has dulled or oxidised, use a cleaner/polisher
combination to restore the brilliance of the
shine. This requires a little effort, but such
dulling is usually caused because regular
washing has been neglected. Care needs to
be taken with metallic paintwork as special
non-abrasive cleaner/polisher is required to
avoid damage to the finish.

Always check that the door and ventilator

opening drain holes and pipes are completely
clear so that water can be drained out. Bright
work should be treated in the same way as
paint work. Windscreens and windows can be
kept clear of the smeary film which often
appears by the use of a proprietary glass
cleaner. Never use any form of wax or other
body or chromium polish on glass.

3

Maintenance - upholstery and
carpets

1

Mats and carpets should be brushed or

vacuum cleaned regularly to keep them free of
grit. If they are badly stained remove them
from the vehicle for scrubbing or sponging and
make quite sure they are dry before refitting.
Seats and interior trim panels can be kept
clean by wiping with a damp cloth and a
proprietary upholstery cleaner. If they do
become stained (which can be more apparent
on light coloured upholstery) use a little liquid
detergent and a soft nail brush to scour the
grime out of the grain of the material. Do not
forget to keep the headlining clean in the same
way as the upholstery. When using liquid
cleaners inside the vehicle do not over-wet the
surfaces being cleaned. Excessive damp
could get into the seams and padded interior
causing stains, offensive odours or even rot. If
the inside of the vehicle gets wet accidentally it
is worthwhile taking some trouble to dry it out
properly, particularly where carpets are
involved. Do not leave oil or electric heaters
inside the vehicle for this purpose.

4

Minor body damage - repair

2

Repair of minor scratches in
bodywork

If the scratch is very superficial, and does

not penetrate to the metal of the bodywork,
repair is very simple. Lightly rub the area of
the scratch with a paintwork renovator, or a
very fine cutting paste, to remove loose paint
from the scratch, and to clear the surrounding
bodywork of wax polish. Rinse the area with
clean water.

Apply touch-up paint to the scratch using a

fine paint brush; continue to apply fine layers
of paint until the surface of the paint in the
scratch is level with the surrounding
paintwork. Allow the new paint at least two
weeks to harden: then blend it into the
surrounding paintwork by rubbing the scratch
area with a paintwork renovator or a very fine
cutting paste. Finally, apply wax polish.

Where the scratch has penetrated right

through to the metal of the bodywork, causing
the metal to rust, a different repair technique
is required. Remove any loose rust from the
bottom of the scratch with a penknife, then
apply rust-inhibiting paint, to prevent the
formation of rust in the future. Using a rubber
or nylon applicator fill the scratch with
bodystopper paste. If required, this paste can
be mixed with cellulose thinners, to provide a
very thin paste which is ideal for filling narrow
scratches. Before the stopper-paste in the
scratch hardens, wrap a piece of smooth
cotton rag around the top of a finger. Dip the
finger in cellulose thinners, and then quickly
sweep it across the surface of the stopper-
paste in the scratch; this will ensure that the
surface of the stopper-paste is slightly
hollowed. The scratch can now be painted
over as described earlier in this Section.

Repair of dents in bodywork

When deep denting of the vehicle’s

bodywork has taken place, the first task is to
pull the dent out, until the affected bodywork
almost attains its original shape. There is little
point in trying to restore the original shape
completely, as the metal in the damaged area
will have stretched on impact and cannot be
reshaped fully to its original contour. It is
better to bring the level of the dent up to a
point which is about 3 mm below the level of
the surrounding bodywork. In cases where the
dent is very shallow anyway, it is not worth
trying to pull it out at all. If the underside of the
dent is accessible, it can be hammered out
gently from behind, using a mallet with a
wooden or plastic head. Whilst doing this,
hold a suitable block of wood firmly against
the outside of the panel to absorb the impact
from the hammer blows and thus prevent a
large area of the bodywork from being
“belled-out”.

Should the dent be in a section of the

bodywork which has a double skin or some
other factor making it inaccessible from
behind, a different technique is called for. Drill
several small holes through the metal inside
the area - particularly in the deeper section.
Then screw long self-tapping screws into the
holes just sufficiently for them to gain a good
purchase in the metal. Now the dent can be
pulled out by pulling on the protruding heads
of the screws with a pair of pliers.

The next stage of the repair is the removal

of the paint from the damaged area, and from
an inch or so of the surrounding “sound”
bodywork. This is accomplished most easily
by using a wire brush or abrasive pad on a
power drill, although it can be done just as
effectively by hand using sheets of abrasive
paper. To complete the preparation for filling,
score the surface of the bare metal with a
screwdriver or the tang of a file, or
alternatively, drill small holes in the affected
area. This will provide a really good “key” for
the filler paste.

To complete the repair see the Section on

filling and re-spraying.

Repair of Rust holes or gashes
in bodywork

Remove all paint from the affected area and

from an inch or so of the surrounding “sound”
bodywork, using an abrasive pad or a wire
brush on a power drill. If these are not
available a few sheets of abrasive paper will
do the job just as effectively. With the paint
removed you will be able to gauge the severity
of the corrosion and therefore decide whether
to renew the whole panel (if this is possible) or
to repair the affected area. New body panels
are not as expensive as most people think
and it is often quicker and more satisfactory
to fit a new panel than to attempt to repair
large areas of corrosion.

Remove all fittings from the affected area

except those which will act as a guide to the
original shape of the damaged bodywork (eg
headlight shells etc). Then, using tin snips or a
hacksaw blade, remove all loose metal and
any other metal badly affected by corrosion.
Hammer the edges of the hole inwards in order
to create a slight depression for the filler paste.

Wire brush the affected area to remove the

powdery rust from the surface of the
remaining metal. Paint the affected area with
rust inhibiting paint; if the back of the rusted
area is accessible treat this also.

Before filling can take place it will be

necessary to block the hole in some way. This
can be achieved by the use of aluminium or
plastic mesh, or aluminium tape.

Aluminium or plastic mesh or glass fibre

matting is probably the best material to use for
a large hole. Cut a piece to the approximate
size and shape of the hole to be filled, then
position it in the hole so that its edges are
below the level of the surrounding bodywork. It
can be retained in position by several blobs of
filler paste around its periphery.

11•2 Bodywork and fittings


содержание   ..  38  39  40  41   ..