Opel Frontera UBS. Manual - part 2408


  Index      Opel     Opel Frontera UBS - service repair manual 1998-2002 year


Search            


Content   ..  2406  2407  2408  2409   ..


Opel Frontera UBS. Manual - part 2408


6B – 6 ENGINE COOLING

REMOVAL

1. Drain coolant.
2. AC Generator Drive Belt

1) Loosen AC Generator mounting bolt, adjust

plate lock bolt, and remove the drive belt.

3. Cooling Fan Assembly

1) Remove lock nut and take out cooling fan

assembly with cooling fan clutch.

4. Water Pump Assembly

INSPECTION

Make necessary repair and parts replacement if
excessive wear or damage is found during inspection.
Should any of the following problems occur, the entire
water pump assembly must be replaced.

1) Cracks in the water pump body
2) Coolant leakage from the seal unit
3) Excessive play in radial direction or abnormal noise
4) Excessive play in thrust direction

Limit : 0.2mm (0.008in) or less

5) Cracks or corrosion in the impeller

INSTALLATION

1. Gasket

1) Set gasket to gear case.

2. Water Pump Assembly

1) Install water pump assembly, and tighten to

specified torque.

Torque: 20 N·m (2.0 kg·m/14 lb ft)

3. Cooling Fan Assembly

1) Install cooling fan assembly, and tighten to

specified torque.

Torque: 8 N·m (0.8 kg·m/5.8 lb ft)

4. AC Generator Drive Belt

1) Install AC Generator drive belt and adjust belt

tension.

Torque: 40 N·m (4.1 kg·m/29.7 lb ft)

For ACG to bracket

20 N·m (2.0 kg·m/14.5 lb ft)
For ACG to adjust plate

5. Fill coolant to specified capacity.
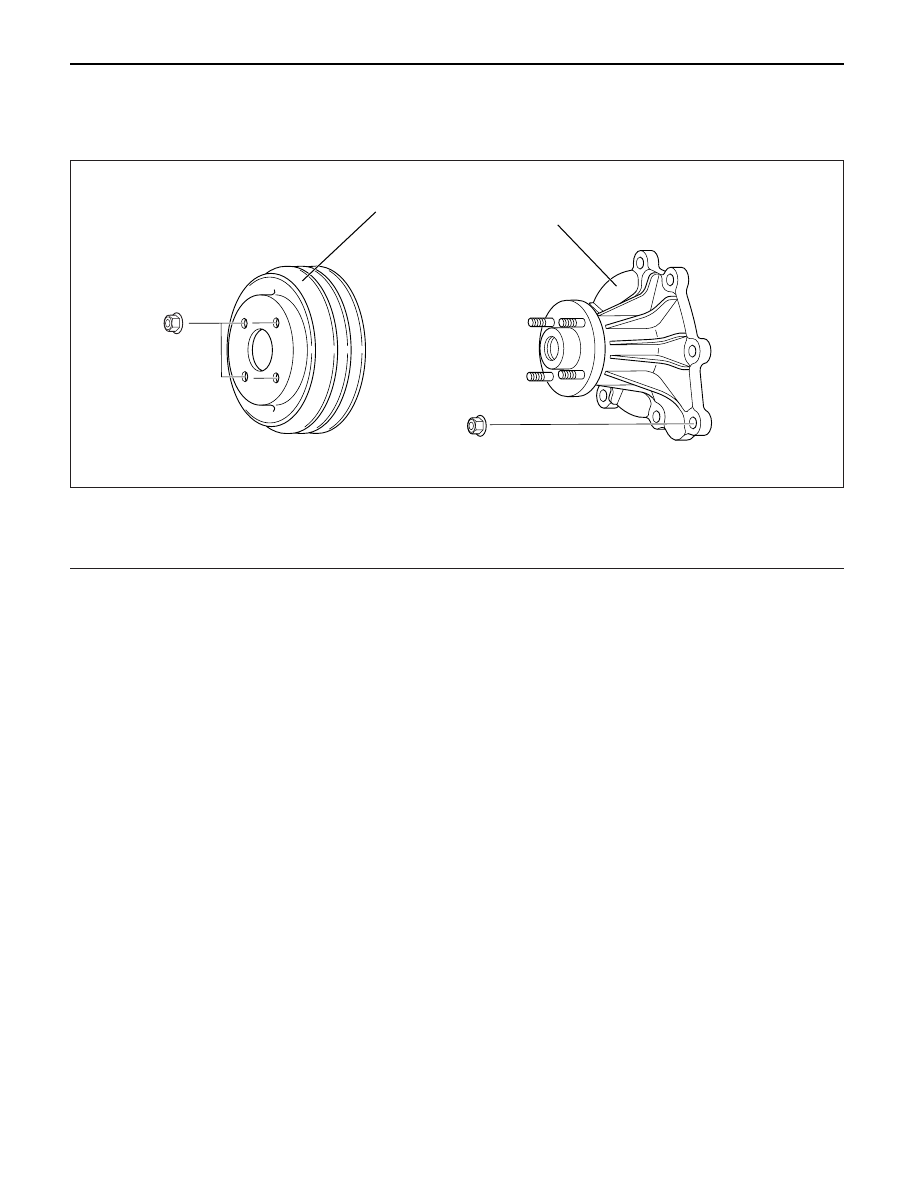
1

2

Legend

(1)

Fan Pulley

(2)

Water Pump Assembly

030RW009

ON-VEHICLE SERVICE

WATER PUMP

ENGINE COOLING  6B – 7

THERMOSTAT

REMOVAL

1. Disconnect battery ground cable.
2. Drain coolant from the radiator and engine.
3. Thermostat housing

1) Remove mounting bolt and remove thermostat

housing together with radiator hose.

4. Gasket
5. Thermostat

INSPECTION

Make necessary repair and parts replacement if
excessive wear or damage is found during inspection.
Submerge the thermostat assembly in the water.
Place wooden blocks on the bottom of the water
container.
Do not heat the thermostat directly.
Gradually increase the water temperature. Stir the
water so that the entire water is the same temperature.

1) Make sure that valve begins to open at the

specified temperature.

Valve Opening Temperature: 85°C (185°F)

2) Make sure that valve opens fully at the specified

temperature.

Valve Full Open Temperature: 100°C (212°F)

1

2

3

4

Legend

(1)

Bolt

(2)

Thermostat Housing

(3)

Thermostat

(4)

Intake Manifold

035RW002

031RS003

6B – 8 ENGINE COOLING

INSTALLATION

1. Thermostat

1) The jiggle valve of the thermostat must face the

cylinder head side.

2. Gasket
3. Install thermostat housing and tighten bolt to the

specified torque.

Torque: 20 N·m (2.0 kg·m/14 lb ft)

4. Reconnect water hose

1) Fill coolant to full level.
2) Reconnect battery ground cable.

5. Start the engine check for coolant leakage.

ENGINE COOLING  6B – 9

RADIATOR

REMOVAL

1. Disconnect battery ground cable
2. Loosen drain plug to drain coolant.
3. Radiator Hose

1) Disconnect lower hose and upper hose from the

engine.

4. Fan Guide

1) Remove clips on both sides and the bottom lock.

5. Reservoir Tank Hose

1) Disconnect the hose from radiator.

6. Bracket
7. Radiator Assembly

1) Remove the radiator assembly upward by the

hoses taking care not to damage the radiator
core by the fan blade.

2) Remove rubber cushions on both sides of the

bottom.

INSPECTION

Radiator Cap

1) Measure the valve opening pressure with the

radiator cap tester. Replace the radiator cap if it
exceeds the standard.

Valve opening pressure: 93.2 – 122.7 kPa

(0.95 – 1.25 kg/cm

2

13.5 – 17.8 psi)

Check the condition of the negative pressure valve in
the center of the valve seat side of the cap. If the valve
seat does not move smoothly due to rust or dust, clean
and replace the radiator cap.

Radiator Core

1) Deformed radiator fins could reduce radiation

effects, resulting in overheating. Straighten the fins.
In such a case, take care not to damage the fin
roots.

2) Remove dust and other foreign materials.

Flushing the Radiator

1) Wash the inside of radiator and the coolant

passage with water and a neutral detergent.
Remove all scales and rust.

110RW017

110RS006


Content   ..  2406  2407  2408  2409   ..