Opel Frontera UBS. Manual - part 1756


  Index      Opel     Opel Frontera UBS - service repair manual 1998-2002 year


Search            


Content   ..  1754  1755  1756  1757   ..


Opel Frontera UBS. Manual - part 1756


8F–95

BODY STRUCTURE

D

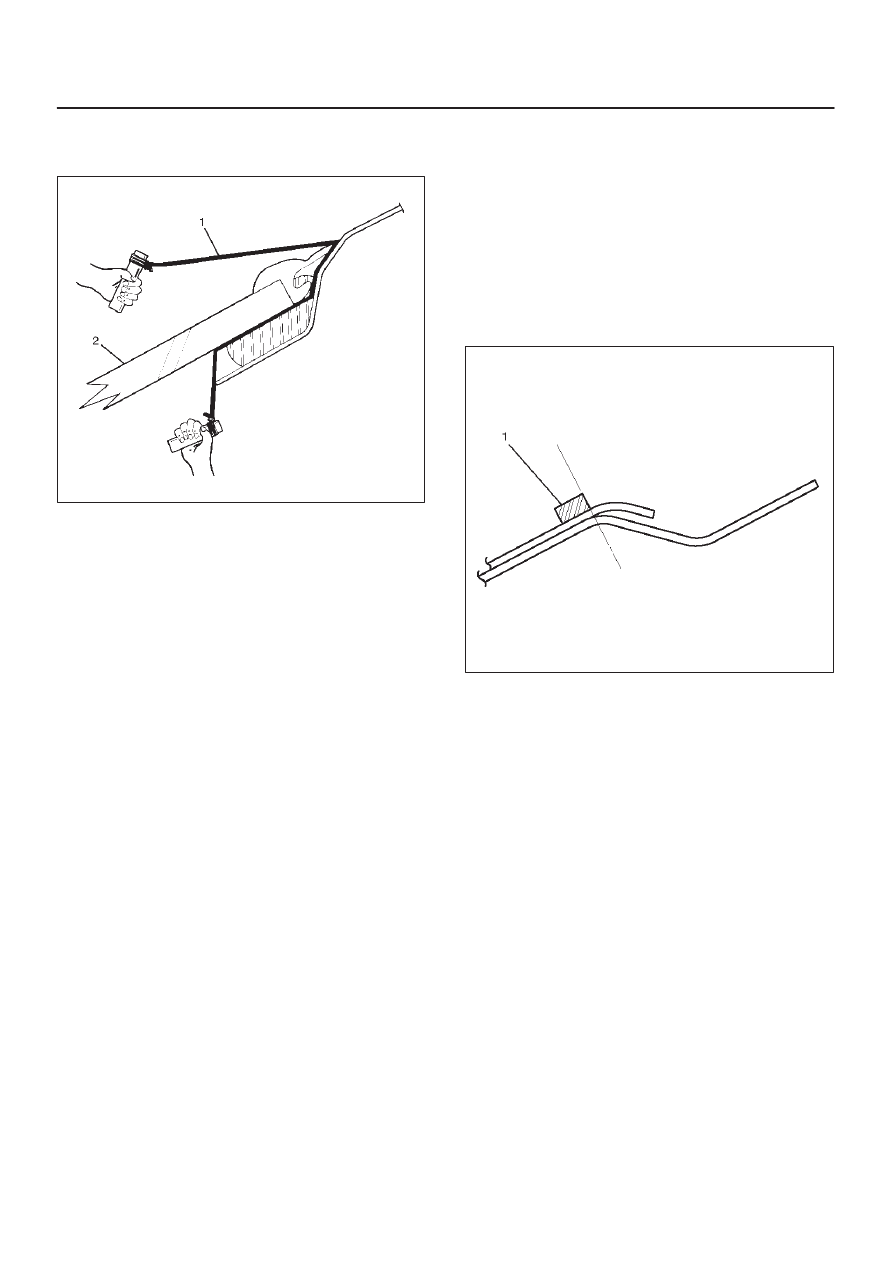
Secure one end of a piece of steel piano wire (1) (0.02
inches in diameter) to a piece of wood that can serve
as a handle.

607RS002

D

Use a pair of needle nose pliers to insert the other end
of the piano wire through the adhesive caulking
material at the edge of the windshield glass.

D

Secure the other end of the piano wire to another
piece of wood.

D

With the aid of an assistant, carefully move the piano
wire with a sawing motion to cut through the adhesive
caulking material around the entire circumference of
the windshield glass.

D

Clean the remaining adhesive caulking material from
the area of the body which holds the windshield.

8. Remove windshield upper moulding.

D

Taking notice of the adhesive tape, and peel the
moulding off the windshield upper portion.

9. Remove moulding clip.

10. Remove spacer.

Installation

1. Install the spacer (1).

D

Clean the bonding surfaces of both the windshield
and the body panel.

D

When installing the spacers, align the lower side
spacer to the R stop of the body panel and the side
spacer to the end of the body panel. Be sure to
always use a new spacer.

607RS003

D

Be absolutely sure to apply glass primer and body
primer to the body panel as shown in the illustration.

8F–96

BODY STRUCTURE

607RW005

Legend

(1) Front Cowl Cover
(2) Windshield Lower Moulding
(3) The portion of the cowl upper rail flange where

sealing adhesive is additionally filled

(4) Apply primer to the glass and portion where

sealing adhesive is additionally filled

(5) Windshield
(6) Cowl Upper Rail

(7) Cowl Upper Panel
(8) Body Primer
(9) Roof Panel

(10) Sealing Adhesive

(11) Windshield Upper Moulding

(12) Moulding Clip
(13) Front Pillar Outer Panel
(14) Windshield Side Moulding
(15) Sealing Adhesive

2. Install the moulding clip (2).

D

Install new moulding clips to the fixed position of the
windshield (3).

D

Always use new moulding clips (4).

607RS004

8F–97

BODY STRUCTURE

3. Install the windshield upper moulding (1).

D

Peel off the adhesive tape (2) and install the
moulding to the fixed position of the windshield (3).

D

Always use new upper moulding (1).

607RS005

4. Install the windshield.

607RW005

8F–98

BODY STRUCTURE

Legend

(1) Front Cowl Cover
(2) Windshield Lower Moulding
(3) The portion of the cowl upper rail flange where

sealing adhesive is additionally filled

(4) Apply primer to the glass and portion where

sealing adhesive is additionally filled

(5) Windshield
(6) Cowl Upper Rail

(7) Cowl Upper Panel
(8) Body Primer
(9) Roof Panel

(10) Sealing Adhesive

(11) Windshield Upper Moulding

(12) Moulding Clip
(13) Front Pillar Outer Panel
(14) Windshield Side Moulding
(15) Sealing Adhesive

5. Install the windshield side seal.
6. Install the windshield support (2).

631RS014

D

Apply a sealing adhesive to the circumference of
the windshield.

D

Apply the sealing adhesive to the frange portion of
the cowl upper rail.

D

Adjust the gap clearance of the windshield.

D

Install the windshield to the body panel by applying
pressure to the windshield.

D

Cure the adhesive at a temperature of 20~30

°

C

(68

86

°

F) for 24 hours.

D

Check that the windshield does not leak water.

607RS007

7. Install the windshield side moulding.

D

Insert the windshield (5) side moulding (1) into the
moulding clip (2). 

607RS008

D

Take care not to damage the side moulding when
you install it.

8. Install the front cowl cover.
9. Install the windshield wiper.


Content   ..  1754  1755  1756  1757   ..