Opel Frontera UBS. Manual - part 126


  Index      Opel     Opel Frontera UBS - service repair manual 1998-2002 year


Search            


Content   ..  124  125  126  127   ..


Opel Frontera UBS. Manual - part 126


4A2B–24

DIFFERENTIAL (REAR 244mm)

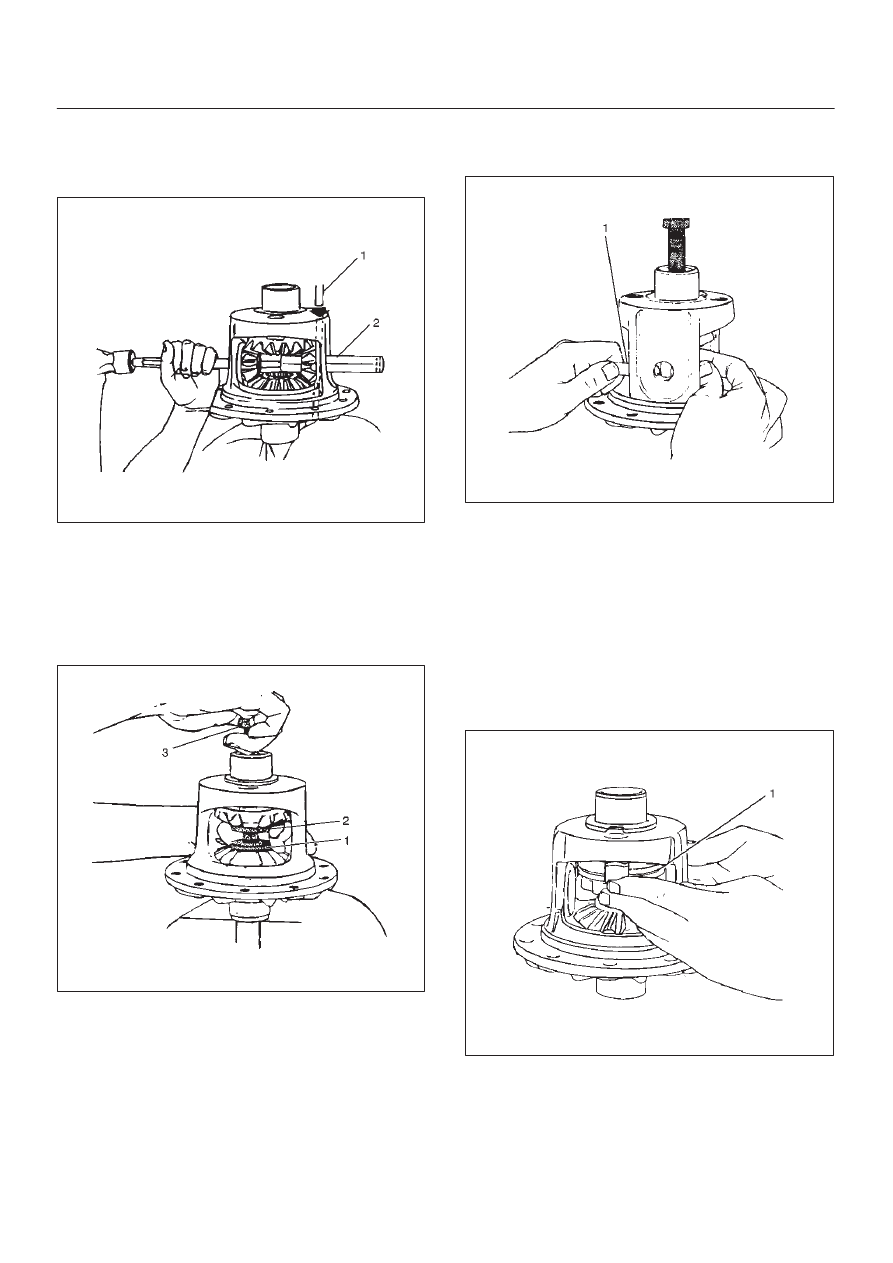
4. Remove Differential shaft (2) using hammer and

punch.
Place shop towel behind case to prevent differential
shaft from dropping out of case.

425RW005

5. Assemble clutch pack unloading tool

5–8840–2586–0 .
a. Install cap (1) to the bottom differential side gear.
b. Install threaded screw cap (2) to top differential

side gear. Thread forcing screws (3) into threaded
screw cap until it becomes centered into the
bottom cap.

425RW064

c. Tighten forcing screw until tight enough to collapse

dished spacers and allow looseness between side
and pinion mate gears.

6. Both pinion mate gear thrust washers using a shim

stock (1) of 0.51 mm (0.020 in.) or equivalent tool to
push out washers.

425RW007

7. Relieve tension of dished spacers by loosening

forcing screw.

NOTE:

D

You may have to adjust the forcing screw slightly to
allow the case to rotate.

8. Insert differential shaft into its hole of case. Pull on

shaft and rotate case until pinion mate gears can be
removed.

9. Remove pinion mate gears.

10. Hold side gear top clutch pack (1) with one hand and

remove positraction unloading tools.

425RW008

DIFFERENTIAL (REAR 244mm) 4A2B–25

11. Remove top side gear and clutch pack.

NOTE:

D

Keep the stack of plates and discs intact and in
exactly the same position while they are being
removed.

12. Remove case from holder.  Turn case with flange or

ring gear side up to allow side gear and clutch pack to
be removed from case.

13. Remove differential plate retainer from both clutch

packs to allow separation of the plates and discs.

NOTE:

D

Keep the discs and plates in the same order as they
were removed.

425RW009

Legend

(1) Differential Plate
(2) Differential Disc
(3) Dished Spacer
(4) Side Gear

Inspection and Repair

Cleaning

D

All parts with solvent.

Visual Inspection

D

Clean all parts with solvent.

D

Plates and Discs. If any one disc or plate in either
stack shows evidence of excessive wear or scoring,
the complete stack is to be replaced on both sides.

D

Side Gears and Pinion Mate Gears. The gear teeth of
these parts should be checked for extreme wear and
possible cracks. The external teeth of the side gear,
which retain the concentric groove discs, should also
be checked for wear or cracks.

D

If replacement of one gear is required due to wear,
etc., then both side gears, pinion mate gears, and
thrust washers are to be replaced.

D

Differential Shaft. If excessive wear is evident, the
differential shaft should be replaced.

D

Differential Plate Retainers. If wear is evident on any
one of the differential plate retainers, all  four retainers
must be replaced.

D

Differential Case. If scoring, wear or metal pickup is
evident on the machined surfaces, replacement of
the case is necessary.

Reassembly

1. Lubricate thrust face of side gears, plates and discs

with the proper limited slip rear axle lubricant.

2. Assemble plates and discs in exactly in the same

position as they were removed, regardless of whether
they are new or original.

3. Install differential plate retainer to ears of plates.

NOTE:

D

Make sure both retainers are completely seated on
ears of plates.

4. Install clutch pack and side gear into bottom side gear

bore. Make sure clutch pack stays assembled to side
gear splines, and that retainers are completely seated
into pockets of case.

NOTE:

D

To prevent clutch pack from falling out of case, hold
clutch pack in place by hand while repositioning case
on bench.

5. Install other side gear and clutch pack. Make sure

clutch pack stays assembled to side gear splines, and
retainers are completely seated into pockets of case.

6. Hold clutch pack in position and assemble special tool

5–8840–2586–0, screw cap (2), cap (1) and forcing
screw (3). Tighten forcing  screw into bottom cap to
hold both clutch packs in position.

7. With tools assembled to case, position case on shaft

by aligning splines of side gear with those of shaft.
Tighten forcing screw to compress clutch packs in
order to provide clearance for pinion mate gears.

425RW064

4A2B–26

DIFFERENTIAL (REAR 244mm)

8. Install pinion mate gears.

D

Place the pinion mate gears into the differential 180
degrees apart.

9. While holding gears in place, insert differential shaft in

its hole of case. Pull on shaft and rotate case, allowing
gears to turn. Make sure that holes in pinion mate
gears align with holes in case.

D

It may be necessary to adjust tension on forcing
screw to rotate case.

10. Tighten forcing screw to compress the clutch packs,

to allow installation of tapered washers.

11. Lubricate tapered washers (2), and assemble into

case (1). Use a small screw driver to push washers
into place. Remove tools.

425RW012

12. Position differential shaft in case and drive in with

hammer. Be sure lock pin hole of differential shaft (5)
is properly aligned to allow installation of lock pin (3).
Be sure that thrust washers and differential pinion
gears are aligned with the differential case (4). Install
new lock pin to proper depth using a punch.
Stake (peen) metal of case over pin in two places, 180
degrees apart.

425RW013

13. Install ring gear and tighten the bolts in diagonal

sequence as illustrated.

Torque: 177N·m (18.0kg·m/130 lb ft)

NOTE: Discard used bolts and install new ones.

425RW033

DIFFERENTIAL (REAR 244mm) 4A2B–27

Main Data and Specifications

General Specifications

Rear axle

Type

Banjo, Semi–floating

Rear axle Size

244 mm (9.61 in)

Gear type

Hypoid

Gear ratio  (to 1)

4.100(6VE1 with A/T)

4.300(6VE1 with M/T,4JX1)

Differential type

Two pinion

Lubricant Grade

GL–5: (Standard differential)

GL–5, LSD: (Limited slip differential)

Locking Differential Lubricant

80W90 GL–5
(USE Limited Slip Differential Gear Lubricant or Friction
Modifier Organic Additive)

Capacity

3.0 liter (2.6 Imp qt/3.2 US qt)


Content   ..  124  125  126  127   ..