Opel Frontera UE. Manual - part 890


  Index      Opel     Opel Frontera UE - service repair manual 1999-2001 year


Search            copyright infringement  


Content   ..  888  889  890  891   ..


Opel Frontera UE. Manual - part 890


6B–8

ENGINE COOLING (6VD1 3.2L)

3. Idle pulley

D

Install idle pulley and tighten bolt to the specified
torque.

Torque: 52 N·m (5.3 kg·m/38 lb ft)

4. Timing belt

D

Install timing belt. Refer to timing belt installation
step in “Timing Belt” in this manual.

5. Connect radiator inlet hose and replenish EC.
6. Connect battery ground cable.
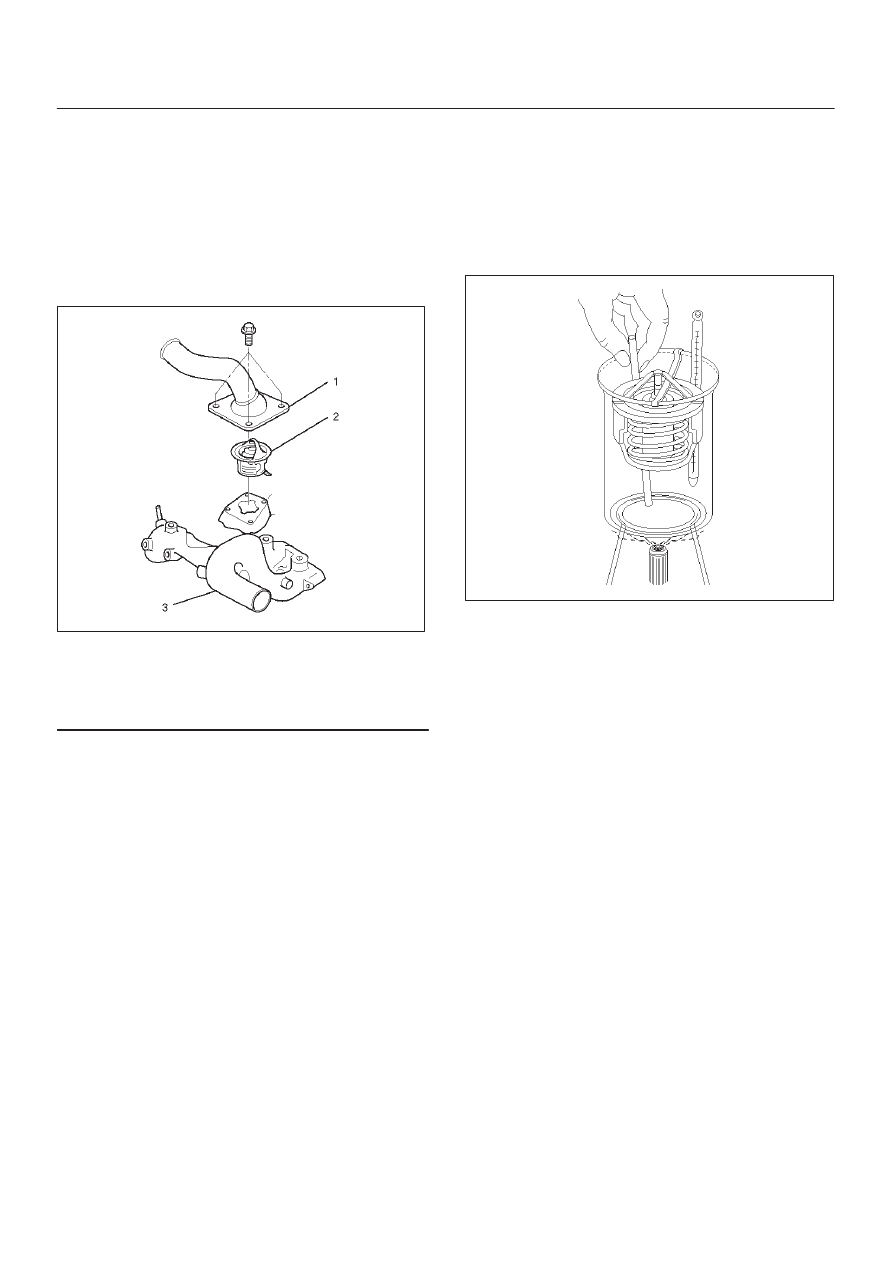
Thermostat

Thermostat and Associated Parts

031RW001

Legend

(1) Thermostat Housing
(2) Thermostat
(3) Outlet Pipe

Removal

1. Disconnect battery ground cable.
2. Drain engine coolant from the radiator and engine.
3. Disconnect radiator hose from the inlet pipe.
4. Remove thermostat housing.
5. Remove thermostat(2).

Inspection

Suspend the thermostat in a water–filled container using
thin wire. Place a thermometer next to the thermostat.
Do not directly heat the thermostat.
Gradually increase the water temperature. Stir the water
so that the entire water is same temperature.

031RS003

Confirm the temperature when the valve first begins to
open.

Valve opening temperature 74.5C 

 78.5

°

C

(166.1

°

 173.3

°

F)

Confirm the temperature when the valve is fully opened.

Valve full open temperature and lift More than
8.5mm (0.33 in) at 90

°

C (194

°

F)

Make necessary repair and parts replacement if extreme
wear or damage is found during inspection.

Installation

1. Install thermostat into the outlet pipe(4) making sure

that the air hole is in the up position.

2. Install thermostat housing and tighten bolts to the

specified torque.

Torque: 25 N·m (2.5 kg·m/18 lb ft)

3. Installation rubber hose.
4. Replenish engine coolant (EC).
5. Start engine and check for EC leakage.

ENGINE COOLING (6VD1 3.2L)

6B–9

Radiator

Radiator and Associated Parts

110RW010

Legend

(1) Oil Cooler Hose For Automatic Transmission
(2) Radiator Hose
(3) Fan Guide, Lower

(4) Reserve Tank Hose
(5) Radiator Assembly
(6) Reserve Tank

Removal

1. Disconnect battery ground cable.
2. Loosen a drain plug (2) to drain Engine Coolant.
3. Disconnect oil cooler hose(1) on automatic

transmission (A/T).

4. Disconnect radiator inlet hose and outlet hose from

the engine.

110RW002

5. Remove fan guide(1), clips (2) on both sides and the

bottom lock, then remove lower fan guide(3) with fan
shroud(4).

110RW001

6B–10

ENGINE COOLING (6VD1 3.2L)

6. Disconnect the reserve tank hose(4) from radiator.
7. Remove bracket.

110RX001

8. Lift up and remove the radiator assembly with hose,

taking care not to damage the radiator core with a fan
blade.

9. Remove rubber cushions on both sides at the bottom.

Inspection

Radiator Cap

Measure the valve opening pressure of the pressurizing
valve with a radiator filler cap tester.
Replace the cap if the valve opening pressure is outside
the standard range.

Valve opening pressure kPa (psi) 88.3 

 117.7

(12.8 

17.1)

Check the condition of the vacuum valve in the center of
the valve seat side of the cap. If considerable rust or dirt is
found, or if the valve seat cannot be moved by hand, clean
or replace the cap.

Valve opening vacuum kPa (psi) 1.96 

 4.91

(0.28 

 0.71)

110RS006

Radiator Core

1. A bent fin may result in reduced ventilation and

overheating may occur. All bent fins must be
straightened. Pay close attention to the base of the fin
when it is being straightened.

2. Remove all dust, bugs and other foreign material.

Flushing the Radiator

Thoroughly wash the inside of the radiator and the engine
coolant passages with cold water and mild detergent.
Remove all signs of scale and rust.

Cooling System Leakage Check

Use a radiator cap tester to force air into the radiator
through the filler neck at the specified pressure of 150 kPa
(22 psi) with a cap tester:

D

Leakage from the radiator

D

Leakage from the coolant pump

D

Leakage from the water hoses

D

Check the rubber hoses for swelling.

ENGINE COOLING (6VD1 3.2L)

6B–11

110RS005

Installation

1. Install rubber cushions on both sides of radiator

bottom.

2. Install radiator assembly with hose, taking care not to

damage the radiator core with a fan blade.

3. Install bracket and support the radiator upper tank

with the bracket and secure the radiator.

4. Connect reserve tank hose (4).
5. Install lower fan guide (3).
6. Connect radiator inlet hose and outlet hose to the

engine.

7. Connect oil cooler hose (1) to automatic

transmission.

110RX001

8. Connect battery ground cable.
9. Pour engine coolant up to filler neck of radiator, and

up to MAX mark of reserve tank.

111RS001

Important operation (in case of 100% engine coolant
change) procedure for filling with engine coolant.

1. Make sure that the engine is cool.

2. Open radiator cap pour coolant up to filler neck.

3. Pour coolant into reservoir tank up to “MAX” line.

4. Tighten radiator cap and start the engine. After

idling for 2 to 3 minutes, stop the engine and
reopen radiator cap. If the water level is lower,
replenish.

WARNING: WHEN THE COOLANT IS HEATED TO A
HIGH TEMPERATURE, BE SURE NOT TO LOOSEN
OR REMOVE THE RADIATOR CAP. OTHERWISE YOU
MIGHT GET SCALDED BY HOT VAPOR OR BOILING
WATER. TO OPEN THE RADIATOR CAP, PUT A
PIECE OF THICK CLOTH ON THE CAP AND LOOSEN
THE CAP SLOWLY TO REDUCE THE PRESSURE
WHEN THE COOLANT HAS BECOME COOLER.

5. After tightening radiator cap, warm up the engine

at about 2000 rpm. Set heater adjustment to the
highest temperature position, and let the coolant
circulate also into heater water system.

6. Check to see the thermostat has opened through

the needle position of water thermometer,
conduct a 5–minute idling again and stop the
engine.

7. When the engine has been cooled, check filler

neck for water level and replenish if required.
Should extreme shortage of coolant is found,
check the cooling system and reservoir tank hose
for leakage.

8. Pour coolant into reservoir tank up tp “MAX” line.


Content   ..  888  889  890  891   ..