Opel Frontera UE. Manual - part 570


  Index      Opel     Opel Frontera UE - service repair manual 1999-2001 year


Search            


Content   ..  568  569  570  571   ..


Opel Frontera UE. Manual - part 570


8J–16

EXTERIOR/INTERIOR TRIM

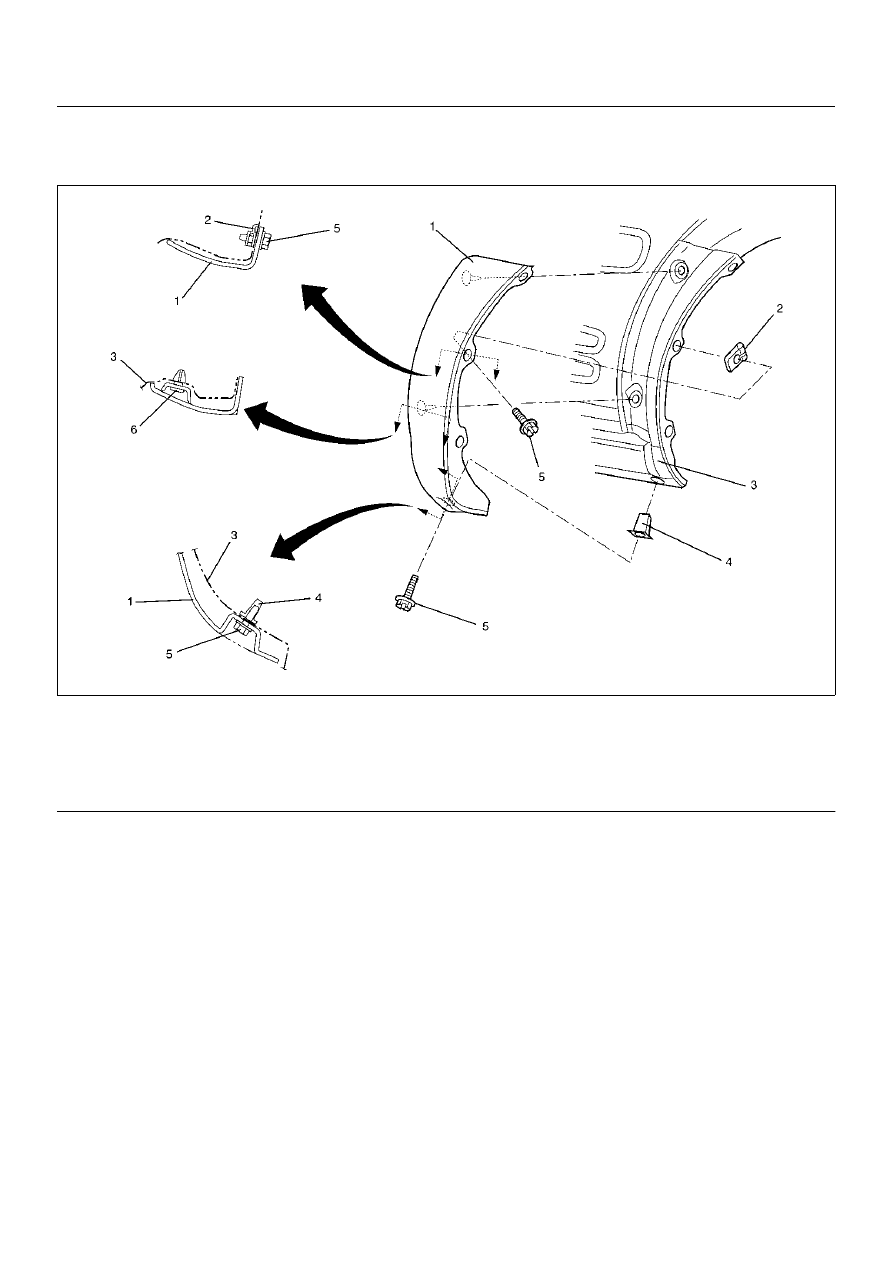
Wheel Arch Protector (SWB)

Wheel Arch Protector and Associated Parts

620RW018

Legend

EndOFCallout

Removal

1. Remove the wheel arch protecter.

• Remove the four fixing screws and pull out the 

clips at two positions.

Installation

To install, follow the removal steps in the reverse order.

(1) Wheel Arch Protector
(2) Spire Nut
(3) Quarter Outer Panel

(4) Screw Grommet
(5) Screw
(6) Clip

EXTERIOR/INTERIOR TRIM

8J–17

Wheel Arch Moulding (SWB)

Wheel Arch Moulding and Associated Parts

620RW017

Legend

EndOFCallout

Removal

1. Remove the front mud flap (2).

• Remove the four fixing screws (1).

(Three of four screws are fixed together with 
moulding.)

647RW002

(1) Front Wheel Arch Moulding
(2) Front Mud Flap

(3) Rear Wheel Arch Moulding

8J–18

EXTERIOR/INTERIOR TRIM

2. Remove the front wheel arch moulding.

• Remove the three fixing screws and pull out the 

clips at three positions from the fender panel.

3. Remove the rear wheel arch moulding.

• Remove the seven fixing screws and pull out the 

clips at three positions from the quarter outer 
panel.

Installation

1. Install the rear wheel arch moulding (2).

• Install the six spire nuts (1) and one screw 

grommet (4) to the body panel (5).

• Put the three clips of the rear wheel arch 

moulding into the body panel in order of A, B and 
C.

• Install the seven fixing screws (3).

620RW016

2. Install the front wheel arch moulding (2).

• Install the six spire nuts (1) to the body panel (4).

• Put the four clips (3) of the front wheel arch 

moulding into the body in order of A, B, C and D.

3. Install the six fixing screws (6).

(Three of six screws are fixed together with the front 
mud flap.)

620RW015

4. Install the front mud flap.

EXTERIOR/INTERIOR TRIM

8J–19

Fuel Filler Door

Parts Location

686RW010

Legend

EndOFCallout

Removal

1. Open the fuel filler door.

2. Remove the fuel filler door.

• Remove the two fixing screws.

3. Pull out the fuel filler door buffer.

4. Pull out the fuel filler hinge buffer.

Installation

To install, follow the removal steps in the reverse order, 
noting the following points.

1. Install the fuel filler door to match the basic hole.

2. Adjust the clearance between quarter outer panel 

(1) and fuel filler door (2).

686RX003

(1) Fuel Filler Door Fixing Screw
(2) Basic Hole
(3) Fuel Filler Door Buffer
(4) Fuel Filler Door
(5) Fuel Filler Door Hinge Buffer


Content   ..  568  569  570  571   ..