Opel Frontera UE. Manual - part 1588


  Index      Opel     Opel Frontera UE - service repair manual 1999-2001 year


Search            


Content   ..  1586  1587  1588  1589   ..


Opel Frontera UE. Manual - part 1588


7A–74

AUTOMATIC TRANSMISSION (4L30–E)

7. Remove retaining washer (3), bearing (4), thrust

washer (5), and clutch plates (6 and 7) from the third
clutch drum assembly (8).

Inspection and Repair

Visual Check:

If any damage, deformation or wear is found, replace the
damaged part.

Reassembly

1. Place third clutch drum and intermediate shaft

assembly upright, using the overdrive internal gear as
a support.

2. Install third clutch spring cushion plate (7), bevel face

down.

3. Install third clutch plates (6) into third clutch drum

assembly (8).  Start with the steel clutch plate and
alternate with lined plates.

4. Install thrust washer (5), bearing (4) and retaining

washer (3). 

5. Fully engage the hub spline of the input sun gear and

sprag unit assembly (2) into the third clutch inner
tangs.

D

Simultaneously rotate the outer sprag race to
engage into the third clutch drum assembly (8).

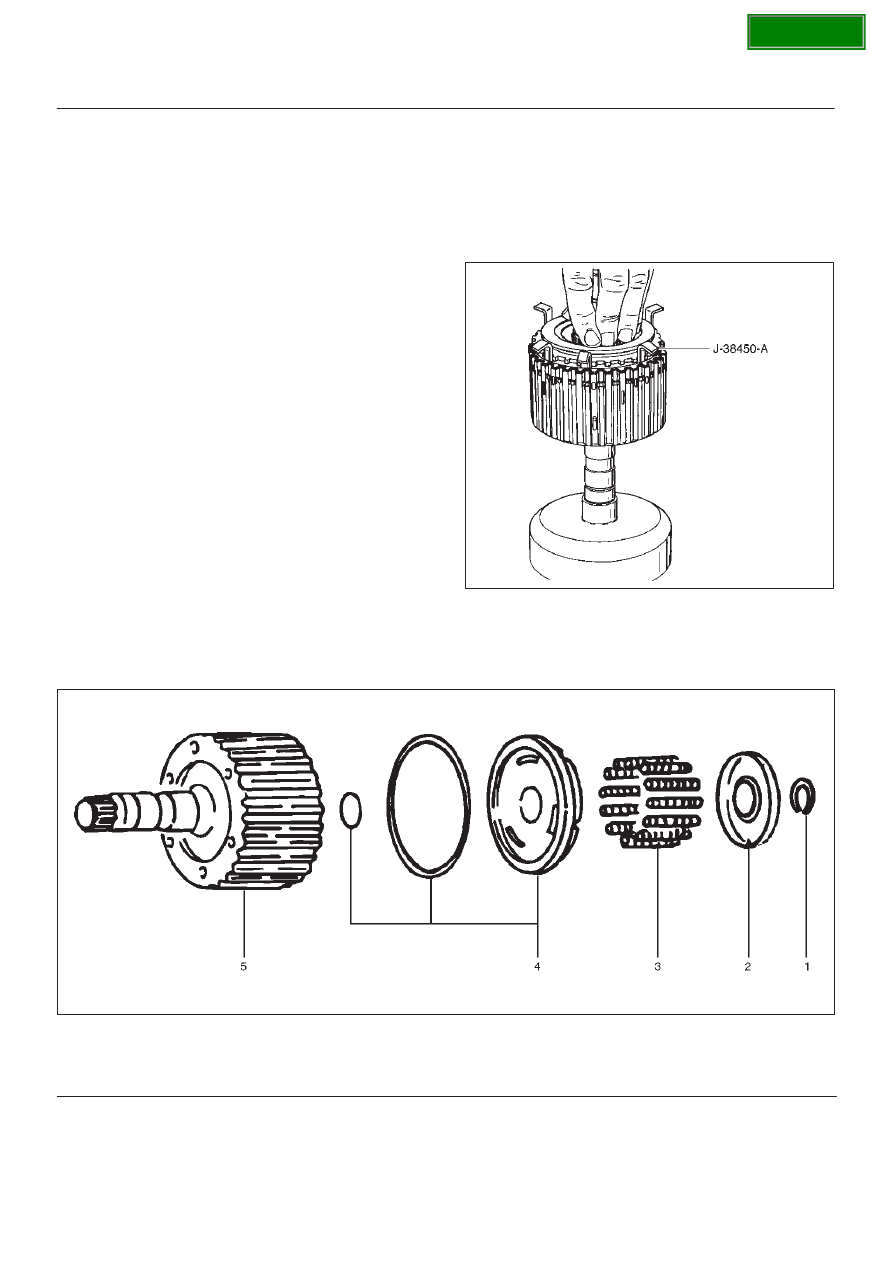
6. Place J-38450-A blades between the retaining ring

and the third clutch drum apporximately (five)
notches apart, and one blade at each end of the
retaining ring (1). Push down on sprag assembly until
the assembly is seated into the third clutch drum
assembly (8).

7. Remove the tool blades and engage retaining ring

into groove of third clutch drum.

248RX002

Third Clutch

Disassembled View

248RS006

Legend

(1) Retaining Ring
(2) Spring Seat

(3) Springs
(4) Piston Assembly
(5) Third Clutch Drum

SECTION

7A–75

AUTOMATIC TRANSMISSION (4L30–E)

Disassemble

1. Compress spring seat using the J–23075 spring

compressor and J–23075–12 adapter tool.

NOTE: Do not overstress the springs and seat. This will
cause damage to the spring seat.

D

Remove the tool.

D

Remove retaining ring (1).

248RS007

2. Release the spring seat (2).

NOTE: Do not let the spring seat catch in the ring groove.

D

Remove spring seat (2) and springs (3).

3. Remove piston assembly (4) from third clutch drum

(5).

Inspection and Repair

Visual check:

If any damage, deformation or wear is found, replace the
damaged part.

Operation check:

Shake the piston and listen for check ball movement.
Movement indicates proper check ball operation.
Replace the piston if the check ball is missing or falls out.

Reassembly

1. The lip of the piston seal must point toward the front of

the transmission.  Lubricate the seal lip with
transmission fluid.

D

Install piston assembly (4) into the third clutch drum
(5).  Use the J–23084 third clutch piston installer to
protect the outer seal during installation.

D

Remove the seal installer.

248RS008

2. Install twelve springs (3) and spring seat (2). 
3. Place retaining ring (1) onto spring seat.

D

Compress the piston springs, using the J–23075
piston spring compressor and J–23075–12
adapter.

CAUTION: Do not overstress the springs and seat.
Do not let the spring seat catch in the ring groove.
This may cause damage to the spring seat.

D

Install spring seat retaining ring (1).

D

Remove the piston spring compressor and adapter.

SECTION

7A–76

AUTOMATIC TRANSMISSION (4L30–E)

Sprag Unit

Disassembled View

248RS009

Legend

(1) Retaining Ring
(2) Sprag Outer Race
(3) Ring

(4) Sprag Assembly
(5) Ring
(6) Third Clutch Hub and Sun Gear Assembly

Disassembly

1. Remove the sprag outer race, retaining ring, and

sprag assembly from the third clutch hub and sun
gear assembly.

2. Remove the rings and sprag assembly from the sprag

outer race.

Inspection and Repair

Visual Check:

If any damage, deformation or local wear is found,
replace the damaged part.

Reassembly

NOTE: Flared shoulder of the sprag cage faces the sun
gear. This procedure must be followed exactly to be sure
that the sprag assembly is installed properly.

1. Install rings and sprag assembly onto the third clutch

hub and sun gear.

2. Install sprag outer race and retaining ring assembly

over the sprag cage assembly.

D

Place third clutch hub and sun gear assembly on a
flat surface, sun gear facing up.  Place sprag outer
race and sprag assembly over the sun gear
assembly, push down and turn the input sun
counterclockwise at the same time. 

NOTE: Check correct rotation by holding the sun gear in
your left hand and turning the outer race.  The outer sprag
race should turn freely towards you and should lock
turning away from you.

248RS010

SECTION

7A–77

AUTOMATIC TRANSMISSION (4L30–E)

Second Clutch

Disassembled View

247RW001

Legend

(1) Retaining Ring
(2) Ring Gear
(3) Retaining Ring
(4) Spacer
(5) Clutch Plates

(6) Waved Washer
(7) Retaining Ring
(8) Spring Seat
(9) Springs

(10) Piston Assembly

(11) Second Clutch Drum

Disassembly

1. Remove retaining ring (1) from second clutch drum

(11). 

2. Remove ring gear (2), retaining ring (3), and spacer

(4). 

3. Remove clutch plates (5) and waved washer (6). 
4. Remove retaining ring (7) using J–23327 compressor

to compress the spring seat (8).

5. Remove spring seat (8), springs (9) and piston

assembly (10) from second clutch drum (11). 

247RS006

SECTION


Content   ..  1586  1587  1588  1589   ..