Opel Frontera UE. Manual - part 151


  Index      Opel     Opel Frontera UE - service repair manual 1999-2001 year


Search            


Content   ..  149  150  151  152   ..


Opel Frontera UE. Manual - part 151


6A–28

ENGINE MECHANICAL (X22SE 2.2L)

• If the engine is turned too far, do not turn 

backwards, but continue to turn in the same 
direction until the marks are again in line.

014RW067

014RW066

014RW063

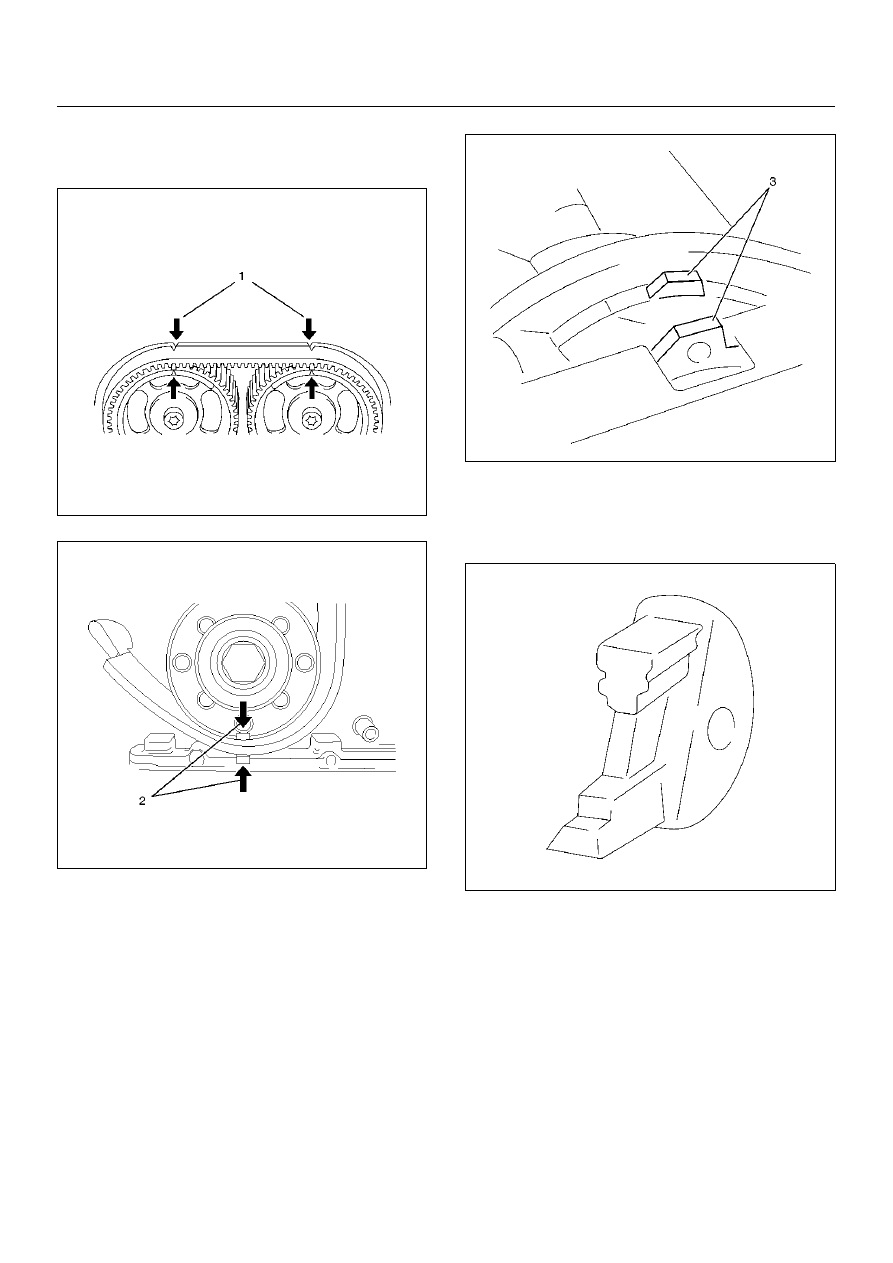
2. Place 5–8840–2659–0 to between intake and 

exhaust of camshaft drive gear to prevent 
camshaft drive gear movement during timing 
belt setting.

014RW065

ENGINE MECHANICAL (X22SE 2.2L)

6A–29

3. Set the timing belt shown in the illustration, 

ensure that tension side of the timing belt is taut 
and move the timing belt  tension adjustment 
lever clockwise, until the pointer of the tensioner 
is flowing. 

014RX061

For used timing belt(over 60 minutes from new): 
the pointer will be approx. 4 mm(0.16 in) to the 
left of the center of  the “V" notch when viewed 
from the front of the engine.

014RW069

For new timing belt: The pointer must be at the 
center of “V" notch when viewed from the front 
of the engine.

014RW062

4. Tighten fixing bolt of timing belt tensioner to the 

specified torque.

Torque: 25 N·m (2.5Kg·m/18lbft)

020RW010

11. Tighten cylinder head cover to the specified torque.

Torque: 8 N·m (0.8Kg·m/5.9lbft)

12. Connect camshaft angle sensor connector.

13. Install the ignition cable to spark plug.

14. Install ignition cable cover and tighten two bolts.

Torque: 3 N·m (0.3Kg·m/2lbft)

15. Install ventilation hoses to cylinder block side and 

cylinder head side.

16. Install timing belt front cover and tighten two bolts to 

the specified torque.

Torque: 6 N·m (0.6Kg·m/4.4lbft)

6A–30

ENGINE MECHANICAL (X22SE 2.2L)

17. Install crankshaft pulley and tighten four bolts.

Torque: 20 N·m (2.0Kg·m/14lbft)

020RW014

18. Connect connector for power steering pump 

pressure switch.

19. Connect engine harness connector to chassis 

harness of the left rear of engine compartment and 
install engine harness cover.

20. Install two bolts to intake manifold for water pipe 

support.

21. Install fixing nut of intake manifold stay to cylinder 

block.

025RW002

22. Install canister hose.

23. Connect connector for evaporation valve.

24. Install fuel pipe joint eye bolts to fuel rail assembly 

and install fuel pipe bracket with electric ground 
cable.

Torque: 25 N·m (2.5Kg·m/18lbft)

042RW001

25. Install water hose between water pipe and throttle 

body.

26. Install heater hose to water pipe side.

27. Install heater hose to adapter side.

28. Connect knock sensor connector.

29. Connect crankshaft angle sensor connector.

30. Install generator with bracket and tighten three bolts.

Torque

35 N·m (3.6Kg·m/25 lbft) for Long bolt

20 N·m (2.0Kg·m/14 lbft) for Short bolt

065RW025

ENGINE MECHANICAL (X22SE 2.2L)

6A–31

31. Install exhaust front pipe to exhaust manifold and 

tighten four nuts to the specified torque.

Torque: 25 N·m (2.5Kg·m/18lbft)

027RW005

32. Install radiator upper hose to engine.

33. Move drive belt tensioner to loose side using wrench 

then install the drive belt to normal position.

033RW001

34. Install intake air duct bracket to cylinder head.

35. Install air intake duct assembly with air cleaner 

cover to throttle body and tighten nut to the air 
intake duct bracket then tighten hose clamp.

Torque

7 N·m (0.7Kg·m/5.1lbft) for nut

3 N·m (0.3Kg·m/2.2lbft) for hose clamp bolt

36. Install PCV hose to air intake duct.

37. Connect connector of intake air temperature sensor 

on intake air duct.

38. Connect battery ground cable.

39. Fill engine coolant to full level in the engine coolant 

reservoir tank.


Content   ..  149  150  151  152   ..