Opel Frontera UE. Manual - part 26


  Index      Opel     Opel Frontera UE - service repair manual 1999-2001 year


Search            


Content   ..  24  25  26  27   ..


Opel Frontera UE. Manual - part 26


1A–76

HEATING, VENTILATION AND AIR CONDITIONING (HVAC)

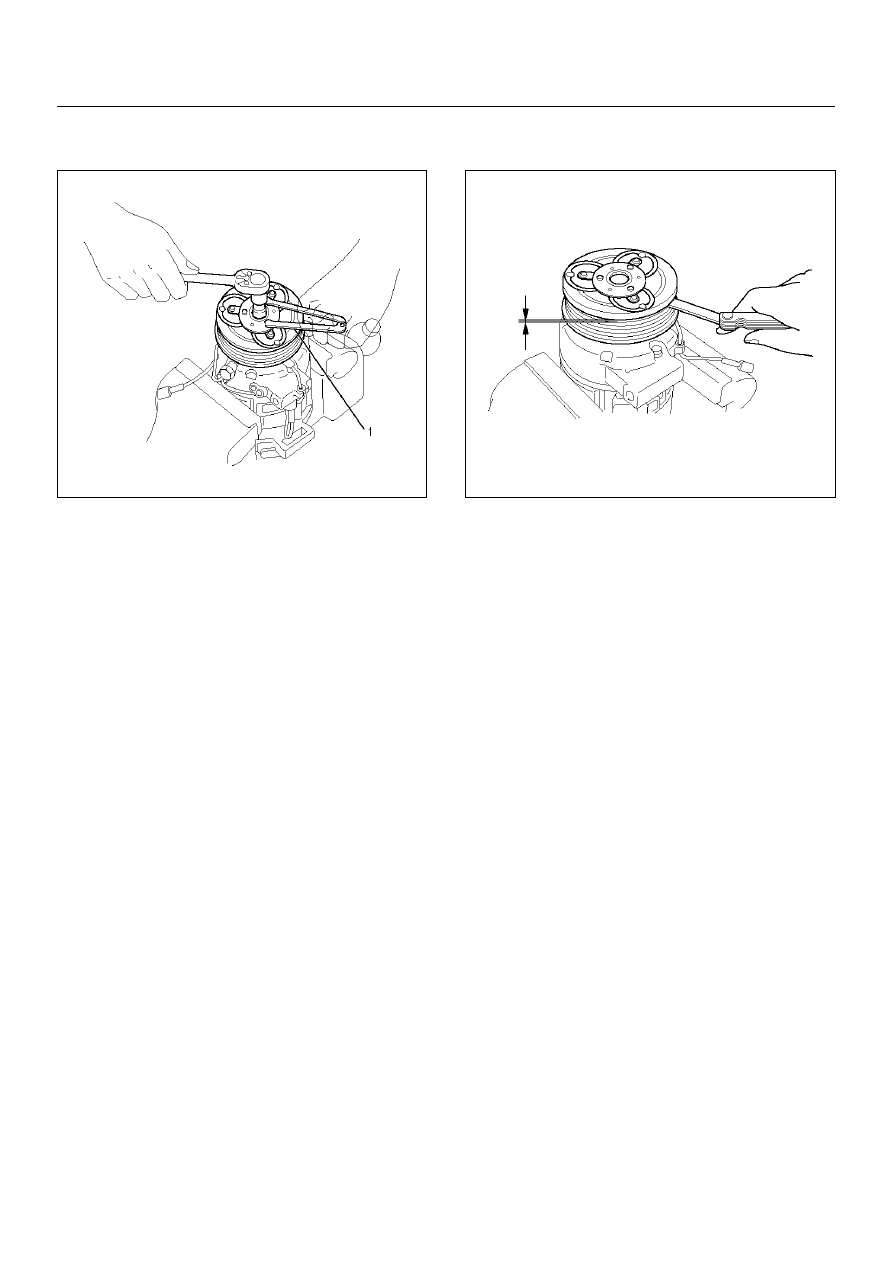
7. Install drive plate bolt by using drive plate holder

J-33939 (1) to prevent the drive plate from rotating.

901RX055

• Tighten the drive plate bolt to the specified

torque.

Torque: 13 N·m (113 lb in)

• After tightening the drive plate bolt, check to be

sure the pulley rotates smoothly.

• Check to be sure that the clutch clearance is

between 0.3-0.6 mm (0.01-0.02 in.)

871RX014

• If necessary, install adjusting shim(s).

• Adjusting shims are available in the following

thickness.

Thickness

• 0.1 mm (0.0039 in.)

• 0.3 mm (0.0118 in.)

• 0.5 mm (0.0197 in.)

HEATING, VENTILATION AND AIR CONDITIONING (HVAC)

1A–77

Compressor Oil

Oil Specification

• The HFC-134a system requires a synthetic (PAG)

compressor oil whereas the R-12 system requires a
mineral compressor oil. The two oils must never be
mixed.

• Compressor (PAG) oil varies according to

compressor model. Be sure to use oil specified for
the model of compressor.

• Always use HFC-134a Vane Rotary Type

Compressor Oil (AIPDN Part No.2-90188-301-0)

Handling of Oil

• The oil should be free from moisture, dust, metal

powder, etc.

• Do not mix with other oil.

• The water content in the oil increases when exposed

to the air. After use, seal oil from air immediately.
(HFC-134a Vane Rotary Compressor Oil absorbs
moisture very easily.)

• The compressor oil must be stored in steel

containers, not in plastic containers.

Compressor Oil Check

The oil used to lubricate the compressor is circulating
with the refrigerant.
Whenever replacing any component of the system or a
large amount of gas leakage occurs, add oil to maintain
the original amount of oil.

Oil Capacity

Capacity total in system: 150cc (5.0 fl.oz)

Compressor (Service parts) charging amount:

150 cc (5.0 fl.oz)

Checking and Adjusting Oil Quantity
for Used Compressor

1. Perform oil return operation. Refer to Oil Return

Operation in this section.

2. Discharge and recover refrigerant and remove the

compressor.

3. Drain the compressor oil and measure the extracted

oil with a measuring cylinder.

871RX020

4. If the amount of oil drained is much less than 90 cc

(3.0 fl. oz.), some refrigerant may have leaked out.
Conduct a leak tests   on the connections of each
system, and if necessary, repair or replace faulty
parts.

5. Check the compressor oil contamination. (Refer to

Contamination of Compressor Oil in this section.)

6. Adjust the oil level following the next procedure

below.

7. Install the compressor, then evacuate, charge and

perform the oil return operation.

8. Check system operation.

When it is impossible to preform oil return
operation, the compressor oil should be  checked in
the following order:

1. Discharge and recover refrigerant and remove the

compressor.

2. Drain the compressor oil and measure the extracted

oil with a measuring cylinder.

3. Check the oil for contamination.

4. If more than 90 cc (3.0 fl. oz.) of oil is extracted from

the compressor, supply the same amount of oil to
the compressor to  be installed.

5. If the amount of oil extracted is less than 90 cc (3.0

fl. oz.), recheck the compressor oil in the following
order.

6. Supply 90 cc (3.0 fl. oz.) of oil to the compressor

and install it onto the vehicle.

(Charging Amount)

(Collected Amount)

more than 90cc (3.0 fl.oz)

same as collected  
amount

less than 90 cc (3.0 fl.oz)

90cc (3.0 fl.oz)

1A–78

HEATING, VENTILATION AND AIR CONDITIONING (HVAC)

7. Evacuate and recharge with the proper amount of

refrigerant.

8. Perform the oil return operation.

9. Remove the compressor and recheck the amount of

oil.

10. Adjust the compressor oil, if necessary.

Checking and Adjusting for
Compressor Replacement

150 cc (5.0 fl.oz.) of oil is charged in compressor
(service parts). So it is necessary to drain the proper
amount of oil from the new compressor.

1. Perform oil return operation.

2. Discharge and recover the refrigerant and remove

the compressor.

3. Drain the compressor oil and measure the extracted

oil.

4. Check the compressor oil for contamination.

5. Adjust the oil level as required.

6. Evacuate, charge and perform the oil return

operation.

7. Check the system operation.

Contamination of Compressor Oil

Unlike engine oil, no cleaning agent is added to the
compressor oil. Even if the compressor runs for a long
period of time (approximately one season), the oil never
becomes contaminated as long as there is nothing
wrong with the compressor or its method of use.

Inspect the extracted oil for any of the following
conditions:

• The capacity of the oil has increased.

• The oil has changed to red.

• Foreign substances, metal powder, etc., are present

in the oil.

If any of these conditions exists, the compressor oil
is contaminated. Whenever contaminated
compressor  oil is discovered, the receiver/drier
must be replaced.

Oil Return Operation

There is close affinity between the oil and the
refrigerant. During normal operation, part of the oil
recirculates with the refrigerant in the  system. When
checking the amount of oil in the system, or replacing
any component of the system, the compressor must be
run in advance for  oil return operation. The procedure is
as follows:

1. Open all the doors and the engine hood.

2. Start the engine and air conditioning switch to “ON"

and set the fan control knob at its highest position.

3. Run the compressor for more than 20 minutes

between 800 and 1,000 rpm in order to operate the
system.

4. Stop the engine.

Replacement of Component Parts

When replacing the system component parts, supply
the following amount of oil to the component parts to be
installed.

(Collected Amount)

(Charging Amount)

more than 90 cc (3.0 fl.oz) same as collected 

amount

less than 90 cc (3.0 fl.oz)

90 cc (3.0 fl.oz)

(Amount of oil drained 
from used compressor)

(Draining amount of oil 
from new compressor)

less than 90 cc (3.0 fl.oz)

Same as drained amount

more than 90 cc (3.0 fl.oz) 90 cc (3.0 fl.oz)

(Component parts to be 
installed)

(Amount of Oil)

Evaporator

 50 cc (1.7 fl. oz.)

Condenser

30 cc (1.0 fl. oz.)

Receiver/dryer

30 cc (1.0 fl. oz.)

Refrigerant line (one 
piece)

10 cc (0.3 fl. oz.)

HEATING, VENTILATION AND AIR CONDITIONING (HVAC)

1A–79

Main Data and Specifications

General Specifications

COMPRESSOR

Model

DKV-14D

Type

Vane rotary type

Number of vanes

5

Rotor diameter

64 mm (2.52 in.)

Stroke

8.75 mm (0.34 in.)

Displacement

140 cc (47.3 fl.oz.)

Maximum speed

7,000 rpm (up to 8,400 rpm)

Direction of rotation

Clockwise (Front-side view)

Lubrication system

Pressure differential type

Lubricant

R-134a Vane Rotary Type Compressor Oil

Be Equivalent to ZXL 200 PG

150 cc (5.0 fl.oz.)

Refrigerant

Refrigerant-134a (R-134a), 650 g (1.43 lbs.)

Shaft seal

Lip type

Weight

3.6 kg

MAGNETIC CLUTCH

Type

Electromagnetic single-plate dry clutch

Rated voltage

12 Volts D.C.

Current consumption

3.7 A

Starting torque

49 N·m (36 lb·ft)

Direction of rotation

Clockwise (Front-side view)

Weight

2.4 kg (5.3 lbs.)


Content   ..  24  25  26  27   ..