Nissan Titan (2023 year). Manual in english - page 17


  Index      Manuals     Nissan Titan (2023 year). Manual in english


Search            copyright infringement  


Content      ..     15      16      17      18     ..


Nissan Titan (2023 year). Manual in english - page 17


Rear-wide view

The rear-wide view shows a wider area on
the entire screen and allows the checking
of the blind corners on right and left sides.
The rear-wide view displays an approxi-
mately 180-degree area. The predicted
course lines are not displayed when using
the rear-wide view.

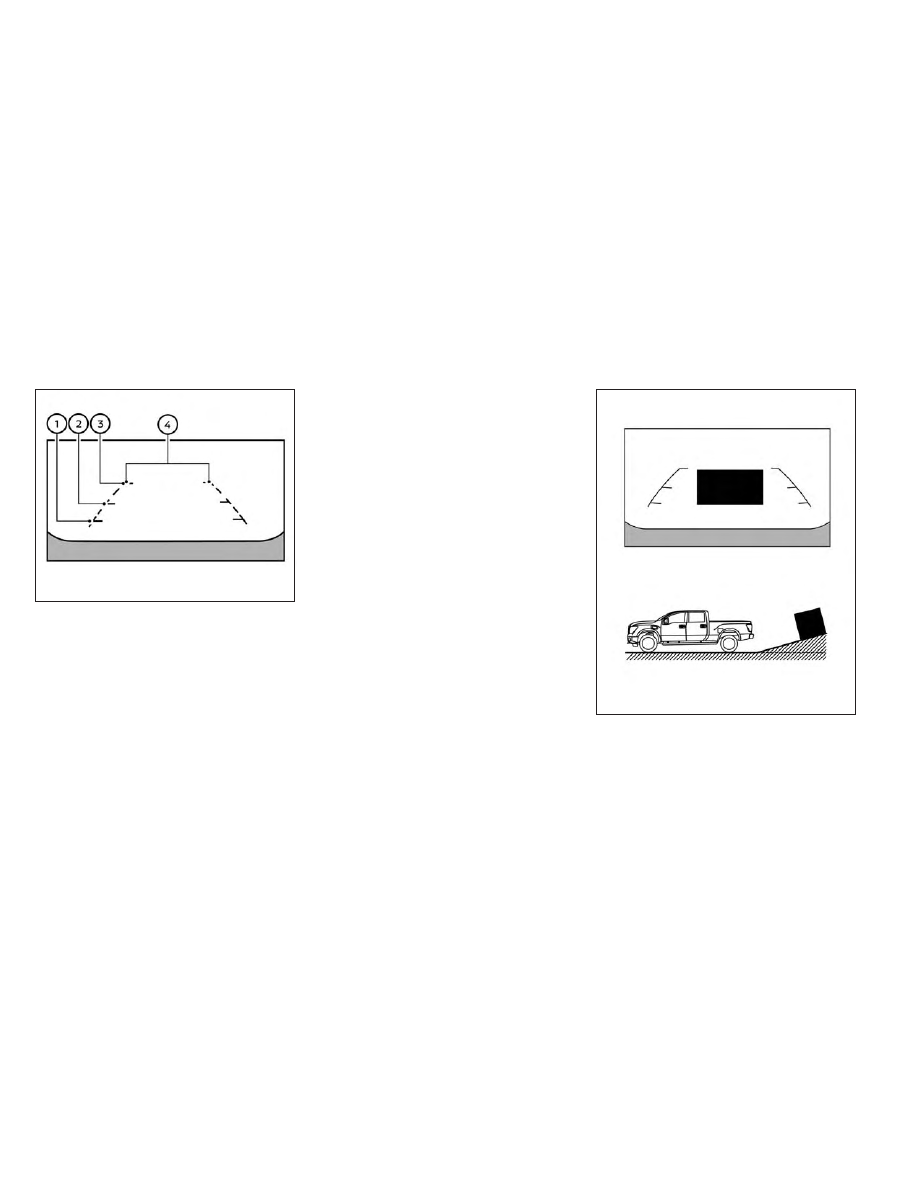
Distance guide lines

Indicates distances from the vehicle body:
• Red line

O

1

: approximately 1.5 ft (0.5 m)

• Yellow line

O

2

: approximately 3 ft (1 m)

• Green line

O

3

: approximately 7 ft (2 m)

Vehicle width guide lines

O

4

Indicate the vehicle width when backing
up.

DIFFERENCE BETWEEN PREDICTED
AND ACTUAL DISTANCES

The displayed guidelines and their loca-
tions on the ground are for approximate
reference only. Objects on uphill or downhill
surfaces or projecting objects will be actu-
ally located at distances different from
those displayed in the monitor relative to
the guidelines (refer to illustrations). When
in doubt, turn around and view the objects
as you are backing up, or park and exit the
vehicle to view the positioning of objects
behind the vehicle.

Backing up on a steep uphill

When backing up the vehicle up a hill, the
distance guide lines and the vehicle width
guide lines are shown closer than the ac-
tual distance. Note that any object on the
hill is further than it appears on the
monitor.

LHA4819

Rear-wide view

LHA5336

4-16

Monitor, climate, audio, phone and voice recognition systems

-------------------------------------------------------------------------------------------------------------------------------------------------------------

Backing up on a steep downhill

When backing up the vehicle down a hill,
the distance guide lines and the vehicle
width guide lines are shown farther than
the actual distance. Note that any object
on the hill is closer than it appears on the
monitor.

Backing up near a projecting
object

The vehicle may seem to nearly clear the
object in the display. However, the vehicle
may hit the object if it projects over the
actual backing up course.

Backing up behind a projecting
object

The position

O

C

is shown farther than the

position

O

B

in the display. However, the po-

sition

O

C

is actually at the same distance as

the position

O

A

. The vehicle may hit the

LHA5337

LHA5338

LHA5339

Monitor, climate, audio, phone and voice recognition systems

4-17

-------------------------------------------------------------------------------------------------------------------------------------------------------------

object when backing up to the position

O

A

if the object projects over the actual back-
ing up course.

HOW TO PARK WITH PREDICTED
COURSE LINES

WARNING

If the tires are replaced with different
sized tires, the predicted course lines
may be displayed incorrectly.

On a snow-covered or slippery road,
there may be a difference between
the predicted course line and the ac-
tual course line.

If the battery is disconnected or be-
comes discharged, the predicted
course lines may be displayed incor-
rectly. If this occurs, please perform
the following procedures:

Turn the steering wheel from lock
to

lock

while

the

engine

is

running.

Drive the vehicle on a straight road
for more than 5 minutes.

When the steering wheel is turned
with the ignition switch in the ACC
position, the predicted course lines
may be displayed incorrectly.

There is the possibility that when the
vehicle mirrors are extended for tow-
ing, the mirrors may be shown in the
bird's-eye view and front side view.

1. Visually check that the parking space is

safe before parking your vehicle.

2. The rear view of the vehicle is displayed

on the screen

O

A

when the shift lever is

moved to the R (Reverse) position.

LHA5340

4-18

Monitor, climate, audio, phone and voice recognition systems

-------------------------------------------------------------------------------------------------------------------------------------------------------------

3. Slowly back up the vehicle adjusting the

steering wheel so that the predicted
course lines

O

B

enter the parking space

O

C

.

4. Maneuver the steering wheel to make

the vehicle width guide lines

O

D

parallel

to the parking space

O

C

while referring

to the predicted course lines.

5. When the vehicle is parked in the space

completely, move the shift lever to the P
(Park) position and apply the parking
brake.

HOW TO SWITCH THE DISPLAY

With the ignition switch in the ON position,
press the CAMERA button or move the shift
lever to the R (Reverse) position to operate
the Intelligent Around View® Monitor.

The Intelligent Around View® Monitor dis-
plays different screen views depending on
the position of the shift lever. Press the
CAMERA button to switch between the
available views.

If the shift lever is in the R (Reverse) position,
the available views are:
• Rear view/bird’s-eye view split screen
• Rear view/front-side view split screen
• Rear-wide view

If the shift lever is in the P (Park) or D (Drive)
position, the available views are:
• Front view/bird’s-eye view split screen
• Front view/front-side view split screen

The display will switch from the Intelligent
Around View® Monitor screen when:
• The shift lever is in the D (Drive) position

and the vehicle speed increases above
approximately 6 mph (10 km/h)

• A different screen is selected.

LHA5341

Monitor, climate, audio, phone and voice recognition systems

4-19

-------------------------------------------------------------------------------------------------------------------------------------------------------------

ADJUSTING THE SCREEN

1. Touch the “Settings” key.

2. Touch the “Camera” key.

3. Touch the “Display Settings” key.

4. Touch the “Brightness”, “Contrast”, Tint”,

“Color”, or “Black Level” key.

5. Adjust the item by touching the “+” or “–”

key on the touch-screen display.

NOTE:

Do not adjust any of the display settings
of the Intelligent Around View® Monitor
while the vehicle is moving. Make sure
the parking brake is firmly applied.

INTELLIGENT AROUND VIEW®
MONITOR SYSTEM LIMITATIONS

LHA5379

LHA3807

4-20

Monitor, climate, audio, phone and voice recognition systems

-------------------------------------------------------------------------------------------------------------------------------------------------------------

WARNING

Listed below are the system limitations
for Intelligent Around View® Monitor.
Failure to operate the vehicle in accor-
dance with these system limitations
could result in serious injury or death.

Do not use the Intelligent Around
View® Monitor with the outside mir-
rors in the stored position, and make
sure that the tailgate is securely
closed when operating the vehicle
using the Intelligent Around View®
Monitor.

The apparent distance between ob-
jects

viewed

on

the

Intelligent

Around View® Monitor differs from
the actual distance.

The cameras are installed on the
front grille, the outside mirrors and
above the rear license plate. Do not
put anything on the vehicle that cov-
ers the cameras.

When washing the vehicle with high
pressure water, be sure not to spray it
around the cameras. Otherwise, wa-
ter may enter the camera unit caus-
ing water condensation on the lens, a
malfunction, fire or an electric shock.

Do not strike the cameras. They are
precision

instruments.

Doing

so

could cause a malfunction or cause
damage resulting in a fire or an elec-
tric shock.

There are some areas where the system
will not show objects and the system does
not warn of moving objects. When in the
front or rear view display, an object below
the bumper or on the ground may not be
viewed

O

1

. When in the bird’s-eye view, a tall

object near the seam

O

2

of the camera

viewing areas will not appear in the
monitor.

The following are operating limitations and
do not represent a system malfunction:
• There may be a delay when switching

between views.

• When the temperature is extremely high

or low, the screen may not display objects
clearly.

• When strong light directly shines on the

camera, objects may not be displayed
clearly.

• The screen may flicker under fluorescent

light.

• The colors of objects on the Intelligent

Around View® Monitor may differ some-
what from the actual color of objects.

• Objects on the Intelligent Around View®

Monitor may not be clear and the color of
the

object

may

differ

in

a

dark

environment.

• There may be differences in sharpness

between each camera view of the bird's-
eye view.

• Do not use wax on the camera lens. Wipe

off any wax with a clean cloth that has
been dampened with a diluted mild
cleaning agent, then wipe with a dry
cloth.

• Due to a sudden change in humidity, con-

densation may form on the camera lens
causing the image to be unclear.

• Under fluorescent lights, the screen may

flicker.

• The vertical lines may appear on the sub-

ject on the screen. This is caused by the
strong reflected light from the bumper.

Monitor, climate, audio, phone and voice recognition systems

4-21

-------------------------------------------------------------------------------------------------------------------------------------------------------------

System temporarily unavailable

When the “!” icon is displayed on the screen,
there are abnormal conditions in the Intel-
ligent Around View® Monitor. This will not
hinder normal driving operation but it is
recommended that the system be in-
spected. It is recommended that you visit a
NISSAN dealer for this service.

When the “[X]” icon is displayed on the
screen, the camera image may be receiv-
ing temporary electronic disturbances
from surrounding devices. This will not hin-
der normal driving operation but it is rec-
ommended that the system be inspected
if it occurs frequently. It is recommended
that you visit a NISSAN dealer for this
service.

SYSTEM MAINTENANCE

CAUTION

Do not use alcohol, benzine or thin-
ner to clean the camera. This will
cause discoloration.

Do not damage the cameras as the moni-
tor screen may be adversely affected.

If dirt, rain or snow accumulates on any of
the cameras

O

1

, the Intelligent Around

View® Monitor may not display objects
clearly. Clean the camera by wiping with a
cloth dampened with a diluted mild clean-
ing agent and then wiping with a dry cloth.

LHA3591

LHA3592

LHA3909

4-22

Monitor, climate, audio, phone and voice recognition systems

-------------------------------------------------------------------------------------------------------------------------------------------------------------

1. CAMERA button

LHA5568

MOVING OBJECT DETECTION (MOD)
(if so equipped)

Monitor, climate, audio, phone and voice recognition systems

4-23

-------------------------------------------------------------------------------------------------------------------------------------------------------------

WARNING

Failure to follow the warnings and in-
structions for proper use of the Mov-
ing Object Detection system could
result in serious injury or death.

The MOD system is not a substitute
for proper vehicle operation and is
not designed to prevent contact with
objects

surrounding

the

vehicle.

When maneuvering, always use the
outside mirrors and rearview mirror
and turn and check the surroundings
to ensure it is safe to maneuver.

The system is deactivated at speeds
above 6 mph (10 km/h). It is reacti-
vated at lower speeds.

The MOD system is not designed to
detect

surrounding

stationary

objects.

The MOD system can inform the driver of
moving objects near the vehicle when
backing out of garages, maneuvering in
parking lots and in other such instances.

The MOD system detects moving objects
by using image processing technology on
the image shown in the display.

MOD SYSTEM OPERATION

The MOD system will turn on automatically
under the following conditions:
• When the shift lever is in the R (Reverse)

position.

• When vehicle speed decreases below ap-

proximately 6 mph (10 km/h) and the
camera screen is displayed.

The MOD system operates in the following
conditions when the camera view is
displayed:
• When the shift lever is in the P (Park) or N

(Neutral) position and the vehicle is
stopped, the MOD system detects mov-
ing objects in the bird’s-eye view. The
MOD system will not operate if the out-
side mirrors are moving in or out, in the
stowed position, or if either front door is
opened.

LHA4190

Front and bird’s-eye views

4-24

Monitor, climate, audio, phone and voice recognition systems

-------------------------------------------------------------------------------------------------------------------------------------------------------------

• When the shift lever is in the D (Drive)

position and the vehicle speed is below
approximately 6 mph (10 km/h), the MOD
system detects moving objects in the
front view.

• When the shift lever is in the R (Reverse)

position and the vehicle speed is below
approximately 6 mph (10 km/h), the MOD
system detects moving objects in the
rear view. The MOD system will not oper-
ate if the tailgate is open.

The MOD system does not detect moving
objects in the front-side view. The MOD
icon is not displayed on the screen when in
this view.

When the MOD system detects moving ob-
jects near the vehicle, a chime will be heard
and a yellow frame will be displayed on the
view where the objects are detected. While
the MOD system continues to detect mov-
ing objects, the yellow frame continues to
be displayed.

NOTE:

While the RCTA chime is beeping, the
MOD system will not chime.

In the bird’s-eye view, the yellow frame

O

1

is

displayed on each camera image (front,
rear, right, left) depending on where mov-
ing objects are detected.

The yellow frame

O

2

is displayed on each

view in the front view and rear view modes.

A blue MOD icon

O

3

is displayed in the view

where the MOD system is operative. A gray
MOD icon is displayed in the view where the
MOD system is not operative.

LHA5677

Rear and bird’s-eye views

LHA5346

Rear and front-side views

LHA4998

Rear-wide view

Monitor, climate, audio, phone and voice recognition systems

4-25

-------------------------------------------------------------------------------------------------------------------------------------------------------------

If the MOD system is turned off, the MOD
icon

O

3

is not displayed.

TURNING MOD ON AND OFF (if so
equipped)

Some vehicles include the option to allow
the MOD system to be turned on or off.

To turn the MOD system on or off:

1. Press the

or

button on the

steering wheel to navigate to the “Set-
tings” screen.

2. Using the

buttons, select “Driver

Assistance” and press the ENTER button.

3. Select “Parking Aids” and press the EN-

TER button.

4. Toggle ON or OFF “Moving Object” using

the ENTER button.

You can also turn the MOD on or off by
pressing the Parking Aids system switch (if
so equipped).

MOD SYSTEM LIMITATIONS

WARNING

Listed below are the system limitations
for MOD. Failure to operate the vehicle
in accordance with these system limi-
tations could result in serious injury or
death.

Do not use the MOD system when
towing a trailer. The system may not
function properly.

Excessive noise (for example, audio
system volume or open vehicle win-
dow) will interfere with the chime
sound, and it may not be heard.

The MOD system performance will be
limited according to environmental
conditions and surrounding objects
such as:

When there is low contrast be-

tween background and the mov-
ing objects.

When there is a blinking source of

light.

When strong light such as another

vehicle’s headlight or sunlight is
present.

When camera orientation is not in

its usual position, such as when a
mirror is folded.

When there is dirt, water drops or

snow on the camera lens.

When the position of the moving

objects in the display is not
changed.

The MOD system might detect flow-
ing water droplets on the camera
lens, white smoke from the muffler,
moving shadows, etc.

The MOD system may not function
properly depending on the speed, di-
rection, distance or shape of the
moving objects.

If your vehicle sustains damage to
the parts where the camera is in-
stalled, leaving it misaligned or bent,
the sensing zone may be altered and
the MOD system may not detect ob-
jects properly.

When the temperature is extremely
high or low, the screen may not dis-
play objects clearly. This is not a
malfunction.

4-26

Monitor, climate, audio, phone and voice recognition systems

-------------------------------------------------------------------------------------------------------------------------------------------------------------

NOTE:
The blue MOD icon will change to or-
ange if one of the following has oc-
curred:

• When the system is malfunctioning.
• When the component temperature

reaches a high level (icon will blink).

• When the rearview camera has de-

tected a blockage (icon will blink).

If the icon light continues to illuminate
orange, have the MOD system checked. It
is recommended that you visit a NISSAN
dealer for this service.

SYSTEM MAINTENANCE

CAUTION

Do not use alcohol, benzine or thin-
ner to clean the camera. This will
cause discoloration.

Do not damage the camera as the
monitor screen may be adversely
affected.

If dirt, rain or snow accumulates on any of
the cameras

O

1

, the MOD system may not

operate properly. Clean the camera by wip-
ing with a cloth dampened with a diluted
mild cleaning agent and then wiping with a
dry cloth.

LHA3909

Monitor, climate, audio, phone and voice recognition systems

4-27

-------------------------------------------------------------------------------------------------------------------------------------------------------------

Adjust air flow direction for the driver's and
passenger's side vents

O

1

, center vents

O

2

,

and rear passengers' vents (if so equipped)

O

3

by moving the vent slide and/or vent

assemblies.

WARNING

The air conditioner cooling function
operates only when the engine is
running.

Do not leave children or adults who
would normally require the assis-
tance of others alone in your vehicle.
Pets should also not be left alone.
They could accidentally injure them-
selves or others through inadvertent
operation of the vehicle. Also, on hot,
sunny days, temperatures in a closed
vehicle could quickly become high
enough to cause severe or possibly
fatal injuries to people or animals.

Do not use the recirculation mode for
long periods as it may cause the inte-
rior air to become stale and the win-
dows to fog up.

NOTE:

• Odors from inside and outside the ve-

hicle can build up in the air conditioner
unit. Odor can enter the passenger
compartment through the vents.

• When parking, set the heater and air

conditioner controls to turn off air re-
circulation to allow fresh air into the
passenger compartment. This should
help reduce odors inside the vehicle.

LHA3772

VENTS

HEATER AND AIR CONDITIONER
(manual) (if so equipped)

4-28

Monitor, climate, audio, phone and voice recognition systems

-------------------------------------------------------------------------------------------------------------------------------------------------------------

CONTROLS

1.

Fan speed control dial / system

OFF dial / A/C (air conditioning) button

2. Air flow control buttons

3. Temperature control dial / MAX A/C

button

4.

Air recirculation button

5.

Outside mirror defroster switch (if

so equipped)

6.

Front windshield defrost button

Fan speed control dial

The

fan speed control dial turns the

fan on and off and controls fan speed.

Fan speed control dial — OFF mode

Setting the

fan speed control dial to the

off position will turn off the fan and the air
recirculation indicator light will turn on. To
get fresh air in fan off mode, press the
air recirculation button to turn off the indica-
tor. In fan off mode, the mode buttons can be
selected to change the air vent distribution
(if the air recirculation mode is off).

Air flow control buttons

The air flow control buttons allow you to
select the air flow outlets.

MAX
A/C

Air flows from center and side
vents with maximum cooling.

Air flows from center and side
vents.

Air flows from center and side
vents and foot outlets.

Air flows mainly from foot out-
lets and side vents.

Air flows from defroster outlets
and foot outlets.

Air flows mainly from defroster
outlets.

LHA4127

Monitor, climate, audio, phone and voice recognition systems

4-29

-------------------------------------------------------------------------------------------------------------------------------------------------------------

Temperature control dial

The temperature control dial allows you to
adjust the temperature of the outlet air. To
lower the temperature, turn the dial to the
left. To increase the temperature, turn the
dial to the right.

Air recirculation button

ON position (Indicator light on)

Interior air is recirculated inside the vehicle.

Press the

button to the ON position

when:
• driving on a dusty road.
• to prevent traffic fumes from entering

passenger compartment.

• for maximum cooling when using the air

conditioner.

OFF position (Indicator light off)

If outside air is desired in off mode, press
the recirculation button until the indicator
turns off.

If fogging occurs, press the

front

windshield defrost button.

A/C (air conditioner) button

Start the engine, turn the

fan speed

control dial to the desired position and
press the

button to turn on the air

conditioner. To turn off the air conditioner,
press the

button again.

The air conditioner cooling function op-
erates only when the engine is running.

Outside mirror defroster switch (if
so equipped)

For additional information, see “Rear win-
dow

and/or

outside

mirror

defroster

switch” (P. 2-45).

HEATER OPERATION

Heating

This mode is used to direct heated air to
the foot outlets. Some air also flows from
the defrost outlets.

1. Press the

button to the OFF posi-

tion for normal heating. The indicator
light on the

button will go off.

2. Press the

air flow control button.

3. Turn the

fan speed control dial to

the desired position.

4. Turn the temperature control dial to the

desired position between the middle
and the hot position.

Ventilation

This mode directs outside air to the side
and center vents.

1. Press the

button to the off position.

The indicator light on the

button

will go off.

2. Press the

air flow control button.

3. Turn the

fan speed control dial to

the desired position.

4. Turn the temperature control dial to the

desired position.

Defrosting or defogging

This mode directs the air to the defrost
outlets to defrost/defog the windows.

1. Press the

defrost/defog button.

2. Turn the

fan speed control dial to

the desired position.

3. Turn the temperature control dial to the

desired position between the middle
and the hot position.

4-30

Monitor, climate, audio, phone and voice recognition systems

-------------------------------------------------------------------------------------------------------------------------------------------------------------

• To quickly remove ice or fog from the win-

dows, turn the

fan speed control dial

to the highest setting and the tempera-
ture control to the full HOT position.

• When the

position is selected, the air

conditioner automatically turns on if the
outside temperature is approximately at
or below freezing. This dehumidifies the
air which helps defog the windshield. The

mode automatically turns off, allow-

ing outside air to be drawn into the pas-
senger compartment to further improve
the defogging performance. Under this
condition, the indicator light on the A/C
button indicator will not turn on if the user
had selected the A/C off. Turning off the
air conditioning via the A/C button is not
allowed In this mode. If the A/C button
indicator was on when entering this
mode, and the A/C button is selected in
this mode, the A/C button indicator will
turn off, but the A/C compressor will still
be automatically enabled. The recircula-
tion button indicator will not illuminate if
the button is pressed in this mode.

Bi-level heating

The bi-level mode directs warmed air to
the side and center vents and to the front
and rear floor outlets.

1. Press the

button to the off position.

The indicator light on the

button

will go off.

2. Press the

air flow control button.

3. Turn the

fan speed control dial to

the desired position.

4. Turn the temperature control dial to the

desired position.

Heating and defogging

This mode heats the interior and defogs
the windshield.

1. Press the

air flow control button.

2. Turn the

fan speed control dial to

the desired position.

3. Turn the temperature control dial to the

desired position between the middle
and the hot position.

• When the

position is selected, the

air conditioner automatically turns on if
the outside temperature is approxi-
mately at or below freezing. Under this
condition, the indicator light on the A/C
button indicator will not turn on if the user
had selected A/C off. Turning off the air
conditioning via the A/C button is not al-
lowed in this mode. If the A/C button indi-
cator was on when entering this mode,
and the A/C button is selected in this
mode, the A/C compressor will still be
automatically

enabled.

It

is

recom-

mended that

mode be turned off for

maximum defogging. The recirculation
button can be selected in this mode to
block outside odors. However, for maxi-
mum defogging in this mode, it is recom-
mended to turn recirculation off when
possible.

Operating tips

Clear snow and ice from the wiper blades
and air inlet in front of the windshield.
This improves heater operation.

Monitor, climate, audio, phone and voice recognition systems

4-31

-------------------------------------------------------------------------------------------------------------------------------------------------------------


Content      ..     15      16      17      18     ..