Nissan Titan (2023 year). Manual in english - page 12


  Index      Manuals     Nissan Titan (2023 year). Manual in english


Search            copyright infringement  


Content      ..     10      11      12      13     ..


Nissan Titan (2023 year). Manual in english - page 12


CAUTION

Do not use bottle holder for any other
objects that could be thrown about in
the

vehicle

and

possibly

injure

people during sudden braking or an
accident.

Do not use bottle holder for open liq-
uid containers.

LIC0556

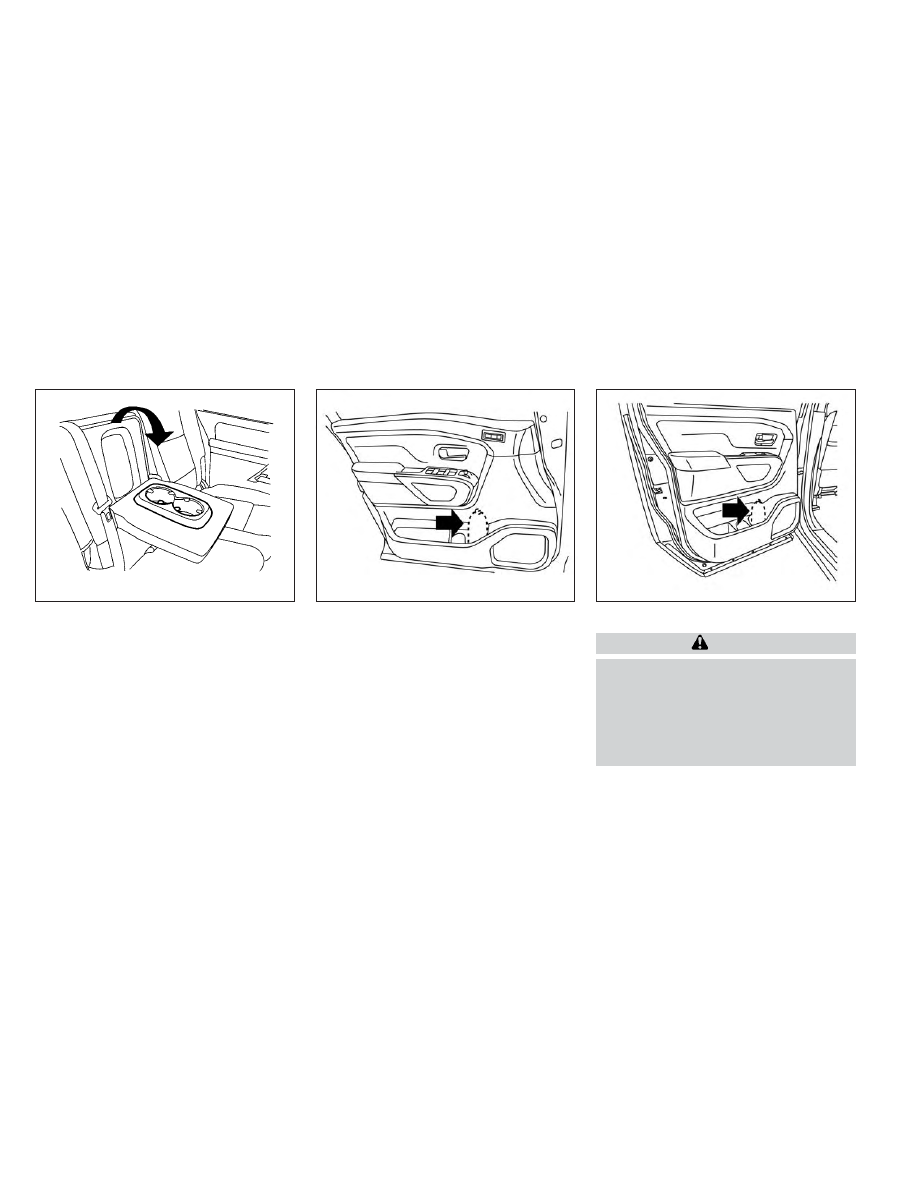
Rear seat bench (if so equipped)

LIC3396

Front bottle holder

LIC3707

Rear bottle holder

Instruments and controls

2-81

-------------------------------------------------------------------------------------------------------------------------------------------------------------

GROCERY HOOKS (if so equipped)

The grocery hooks allow for standard size
plastic grocery bags to hang side by side.

To access the grocery hooks, fold up the
rear bench seat. For additional information,
see “Folding the rear bench seat up” (P. 1-8).

CAUTION

Do not apply a total load of more than
18 lbs. (8 kg) to a single grocery hook.

BED LINER STORAGE BINS (if so
equipped)

To open the bed liner storage bins on the
top of the wheel wells, unlock the bin and
lift the lid toward the inside of the truck bed.

To close, replace the lid and lock the bin.

To open the bed liner storage bins on the
tail gate end of the bed liner, lift the tab
away from the truck bed, pull the lid up and
away from the truck.

LIC3389

LIC3449

LIC3450

2-82

Instruments and controls

-------------------------------------------------------------------------------------------------------------------------------------------------------------

CARGO HOOKS (if so equipped)

When securing items using cargo hooks,
located on the rear door pillars, do not ap-
ply a load more than 110 lbs. (490 N) to a
single hook.

The cargo hooks can be used to secure
cargo with ropes or other types of straps.

WARNING

Properly secure all cargo with ropes
or straps to help prevent it from slid-
ing or shifting. Do not place cargo
higher than the seatbacks. In a sud-
den stop or collision, unsecured
cargo could cause personal injury.

Use suitable ropes and hooks to se-
cure cargo.

Never allow anyone to ride in the
cargo area. It is extremely dangerous
to ride in a cargo area inside of a ve-
hicle. In a collision, people riding in
these areas are more likely to be se-
riously injured or killed.

Do not allow people to ride in any
area of your vehicle that is not
equipped with seats and seat belts.

The child restraint top tether strap
may be damaged by contact with
items in the cargo area. Secure any
items in the cargo area. Your child
could be seriously injured or killed in
a collision if the top tether strap is
damaged.

Be sure everyone in your vehicle is in
a seat and using a seat belt properly.

C-CHANNEL CARGO HOOKS (if so
equipped)

The C-Channel cargo hooks, located on the
back panel, can be used to secure cargo
with ropes or other types of straps.

When securing items using C-Channel
cargo hooks, located on the back panel, do
not apply a load more than 110 lbs. (490 N)
to a single hook.

LIC4976

LIC3710

Instruments and controls

2-83

-------------------------------------------------------------------------------------------------------------------------------------------------------------

WARNING

Properly secure all cargo with ropes
or straps to help prevent it from slid-
ing or shifting. Do not place cargo
higher than the seatbacks. In a sud-
den stop or collision, unsecured
cargo could cause personal injury.

Use suitable ropes and hooks to se-
cure cargo.

Never allow anyone to ride in the
cargo area. It is extremely dangerous
to ride in a cargo area inside of a ve-
hicle. In a collision, people riding in
these areas are more likely to be se-
riously injured or killed.

Do not allow people to ride in any
area of your vehicle that is not
equipped with seats and seat belts.

The child restraint top tether strap
may be damaged by contact with
items in the cargo area. Secure any
items in the cargo area. Your child
could be seriously injured or killed in
a collision if the top tether strap is
damaged.

Be sure everyone in your vehicle is in
a seat and using a seat belt properly.

POWER WINDOWS

WARNING

Make sure that all passengers have
their hands, etc., inside the vehicle
while it is in motion and before clos-
ing the windows. Use the window
lock switch to prevent unexpected
use of the power windows.

To help avoid risk of injury or death
through unintended operation of the
vehicle and/or its systems, including
entrapment in windows or inadver-
tent door lock activation, do not
leave children, people who require
the assistance of others or pets unat-
tended in your vehicle. Additionally,
the temperature inside a closed ve-
hicle on a warm day can quickly be-
come high enough to cause a signifi-
cant risk of injury or death to people
and pets.

The power windows operate when the ig-
nition switch is placed in the ON position or
for a period of time after the ignition switch
is placed in the OFF position. If the driver's
or passenger's door is opened during this
period of time, the power to the windows is
canceled.

Driver's side power window switch

The driver's side control panel is equipped
with switches to open or close the front and
rear (if so equipped) passenger windows.

WIC1124

1. Window lock button

2. Power door lock switch

3. Front passenger side automatic win-

dow switch

4. Right rear passenger window switch (if

so equipped)

5. Left rear passenger window switch (if so

equipped)

6. Driver side automatic window switch

WINDOWS

2-84

Instruments and controls

-------------------------------------------------------------------------------------------------------------------------------------------------------------

To open a window, push the switch and
hold it down. To close a window, pull the
switch and hold it up. To stop the opening
or closing function at any time, simply re-
lease the switch.

Front passenger's power window
switch

The passenger's window switch operates
only the corresponding passenger's win-
dow. To open the window, push the switch
and hold it down

O

1

. To close the window,

pull the switch up

O

2

.

Rear power window switch (if so
equipped)

The rear power window switches open or
close only the corresponding windows. To
open the window, push the switch and hold
it down

O

1

. To close the window, pull the

switch up

O

2

.

Locking passengers' windows

When the window lock switch is depressed,
only the driver's side window can be
opened or closed. Push it again to cancel
the window lock function.

WIC1125

WIC0261

Instruments and controls

2-85

-------------------------------------------------------------------------------------------------------------------------------------------------------------

Automatic operation

To fully open a window equipped with au-
tomatic

operation,

push

the

window

switch down to the second detent and re-
lease it; it need not be held. The window
automatically opens all the way. To stop
the window, lift the switch up while the win-
dow is opening.

To fully close a window equipped with au-
tomatic operation, pull the switch up to the
second detent and release it; it need not be
held. To stop the window, push the switch
down while the window is closing.

Auto-reverse function

The auto-reverse function can be acti-
vated when a window is closed by auto-
matic operation.

Depending on the environment or driv-
ing conditions, the auto-reverse func-
tion may be activated if an impact or
load similar to something being caught
in the window occurs.

WARNING

There are some small distances imme-
diately

before

the

closed

position

which cannot be detected. Make sure
that all passengers have their hands,
etc., inside the vehicle before closing
the window.

If the vehicle's battery is disconnected, re-
placed, or jump started, the power window
auto-reverse function may not operate
properly. Have the power window auto-
reverse system re-initialized. It is recom-
mended that you visit a NISSAN dealer for
this service.

If the control unit detects something
caught in a window equipped with auto-
matic operation as it is closing, the window
will be immediately lowered.

REAR POWER WINDOW SWITCH (if
so equipped)

WARNING

You must ensure all occupants and
objects are free of the rear window
area prior to and during operation.
Failure to do so may result in injury
and/or damage to the rear window
system.

The rear window is not designed to
carry long items through it.

LIC0410

LIC3448

2-86

Instruments and controls

-------------------------------------------------------------------------------------------------------------------------------------------------------------

Do not place objects through the
opened rear window. Do not use the
rear window as a cargo area pass-
through. This may result in damage
to the rear window system, or per-
sonal injury.

WARNING

To help avoid risk of injury or death
through unintended operation of the
vehicle and or its systems, including
entrapment in windows or inadver-
tent door lock activation, do not
leave children, people who require
the assistance of others or pets unat-
tended in your vehicle. Additionally,
the temperature inside a closed ve-
hicle on a warm day can quickly be-
come high enough to cause a signifi-
cant risk of injury or death to people
and pets.

To open the rear power window, push in
and hold the switch.

To close the rear power window, pull out
and hold the switch.

To stop the opening or closing function at
any time, simply release the switch.

NOTE:

If the rear power window is opened while
the defroster switch is on, the rear win-
dow defroster (if so equipped) will auto-
matically shut off. The heated outside
mirrors (if so equipped) will remain on.
The rear window defroster will auto-
matically turn on when the rear power
window is fully closed if the switch is on.

REAR SLIDING WINDOW (if so
equipped)

WARNING

You must ensure all occupants and
objects are free of the rear window
area prior to and during operation.
Failure to do so may result in injury
and/or damage to the rear window
system.

The rear window is not designed to
carry long items through it.

LIC3488

Instruments and controls

2-87

-------------------------------------------------------------------------------------------------------------------------------------------------------------

Do not place objects through the
opened rear window. Do not use the
rear window as a cargo area pass-
through. This may result in damage
to the rear window system, or per-
sonal injury.

Squeeze the handles of the lever

O

1

, then

slide the window open

O

2

.

POWER MOONROOF

The front moonroof is a power moonroof,
the rear moonroof is fixed glass. The power
moonroof will only operate when the igni-
tion switch is placed in the ON position. The
moonroof is operational for a period of
time, even if the ignition switch is placed in
the OFF position. If the driver's door or the
front passenger's door is opened during
this period of time, the power to the moon-
roof is canceled.

Sliding the moonroof

To fully open or close the moonroof, push
the switch toward the open

O

1

or close

O

2

position and release it; it need not be held.
The roof will automatically open or close all
the way. To stop the roof, push the switch
once while it is opening or closing.

Tilting the moonroof

To tilt up, first close the moonroof, then
push the switch

O

3

and release it; it need

not be held. To tilt down the moonroof,
push the switch to the tilt down position

O

2

.

Resetting the moonroof switch

If the moonroof does not operate properly,
perform the following procedure to initial-
ize the moonroof operation system.

1. If the moonroof is open, close it fully by

repeatedly

pushing

the

moonroof

switch to the close position

O

2

.

2. Push and hold the moonroof switch to

the close position

O

2

for approximately

15 seconds.

3. Release the switch after the moonroof

moves up, down, then back to the full tilt
up position.

LIC4327

MOONROOF (if so equipped)

2-88

Instruments and controls

-------------------------------------------------------------------------------------------------------------------------------------------------------------

4. Push and hold the switch to the close

position

O

2

.

5. Release the switch after the moonroof

completes one full cycle from the tilt up
position to the closed position, then to
the open position, and again to the fully
closed position.

6. Check if the moonroof switch operates

normally.

If the moonroof does not operate properly
after performing the procedure above,
have your vehicle checked. It is recom-
mended that you visit a NISSAN dealer for
this service.

Auto-reverse function (when
closing or tilting down the
moonroof)

The auto-reverse function can be acti-
vated when the moonroof and sunshade
are closed or tilted down by automatic op-
eration when the ignition switch is placed
in the ON position or for a period of time
after the ignition switch is placed in the OFF
position.

Depending on the environment or driv-
ing conditions, the auto-reverse func-
tion may be activated if an impact or
load similar to something being caught
in the moonroof occurs.

WARNING

There are some small distances imme-
diately

before

the

closed

position

which cannot be detected. Make sure
that all passengers have their hands,
etc., inside the vehicle before closing
the moonroof.

When closing

If the control unit detects something
caught in the moonroof and sunshade as it
moves to the front, the moonroof and sun-
shade will immediately open backward.

When tilting down

If the control unit detects something
caught in the moonroof as it tilts down, the
moonroof will immediately tilt up.

WARNING

In an accident you could be thrown
from the vehicle through an open
moonroof. Always use seat belts and
child restraints.

Do not allow anyone to stand up or
extend any portion of their body out
of the moonroof opening while the
vehicle is in motion or while the
moonroof is closing.

CAUTION

Remove water drops, snow, ice or
sand from the moonroof before
opening.

Do not place heavy objects on the
moonroof or surrounding area.

Instruments and controls

2-89

-------------------------------------------------------------------------------------------------------------------------------------------------------------

Sunshade

To open the sunshade:
• To fully open the sunshade, push the

switch toward the open position

O

1

.

• To fully open the sunshade and the

moonroof together, push the moonroof
switch toward the open position.

To close the sunshade:
• To fully close the sunshade, push the

switch toward the close position

O

2

.

If the moonroof does not close

Have your moonroof checked and re-
paired. It is recommended that you visit a
NISSAN dealer for this service.

The interior light has a three-position
switch and operates regardless of ignition
switch position.

When the switch is in the ON position

O

1

,

the interior lights illuminate, regardless of
door position. The lights will go off after a
period of time unless the ignition switch is
placed in the ON position.

When the switch is in the DOOR or normal
operation position

O

2

, the interior lights,

puddle lights (if so equipped), and cargo
light will stay on for a period of time when:

LIC4346

LIC0792

INTERIOR LIGHTS

2-90

Instruments and controls

-------------------------------------------------------------------------------------------------------------------------------------------------------------

• The doors are unlocked by the key fob, a

key or the power door lock switch while
all doors are closed and the ignition
switch is in the OFF position.

• The driver’s door is opened and then

closed while the ignition switch is placed
in the OFF position.

• The ignition switch is placed in the OFF

position while all doors are closed.

The lights will turn off while the timer is
activated when:
• The driver’s door is locked by the key fob,

a key, or the power door lock switch.

• The ignition switch is turned ON.

When the switch is in the OFF position

O

3

,

the interior lights do not illuminate, regard-
less of door position. The puddle lights (if so
equipped) and cargo light come on when
any front or rear passenger door is opened.

The lights will turn off automatically after a
period of time while doors are open to pre-
vent

the

battery

from

becoming

discharged.

CAUTION

Do not use for extended periods of time
with the engine stopped. This could re-
sult in a discharged battery.

CONSOLE LIGHT (if so equipped)

The console light will turn on whenever the
parking lights or headlights are illuminated.

The console light brightness can be ad-
justed with the illumination brightness
control.

MAP LIGHTS (if so equipped)

To turn the map lights on, push the
switches. To turn them off, push the
switches again.

CAUTION

Do not use for extended periods of time
with the engine stopped. This could re-
sult in a discharged battery.

LIC3405

LIC0790

Instruments and controls

2-91

-------------------------------------------------------------------------------------------------------------------------------------------------------------

PERSONAL LIGHTS (if so equipped)

To turn the rear personal lights on, push the
switch. To turn them off, push the switch
again.

The HomeLink® Universal Transceiver pro-
vides a convenient way to consolidate the
functions of up to three individual hand-
held transmitters into one built-in device.

HomeLink® Universal Transceiver:
• Will operate most radio frequency de-

vices such as garage doors, gates, home
and office lighting, entry door locks and
security systems.

• Is powered by your vehicle's battery. No

separate batteries are required. If the ve-
hicle's battery is discharged or is discon-
nected,

HomeLink®

will

retain

all

programming.

When the HomeLink® Universal Trans-
ceiver is programmed, retain the original
transmitter for future programming pro-
cedures (Example: new vehicle pur-
chases). Upon sale of the vehicle, the
programmed

HomeLink®

Universal

Transceiver buttons should be erased for
security purposes. For additional infor-
mation, see “Programming HomeLink®”
(P. 2-93).

WARNING

Your vehicle's engine should be
turned off while programming the
HomeLink® Universal Transceiver. For
additional information, see “Push-
button ignition switch” (P. 5-12). 
Do
not breathe exhaust gases; they con-
tain colorless and odorless carbon
monoxide. Carbon monoxide is dan-
gerous. It can cause unconscious-
ness or death.

Do not use the HomeLink® Universal
Transceiver with any garage door
opener that lacks safety stop and re-
verse features as required by federal
safety standards. (These standards
became effective for opener models
manufactured after April 1, 1982.) A
garage door opener which cannot
detect an object in the path of a clos-
ing garage door and then automati-
cally stop and reverse does not meet
current federal safety standards. Us-
ing a garage door opener without
these features increases the risk of
serious injury or death.

LIC3907

HOMELINK® UNIVERSAL
TRANSCEIVER (Type A) (if so
equipped)

2-92

Instruments and controls

-------------------------------------------------------------------------------------------------------------------------------------------------------------

During the programming procedure
your garage door or security gate will
open and close (if the transmitter is
within range). Make sure that people
or objects are clear of the garage
door,

gate,

etc.,

that

you

are

programming.

PROGRAMMING HOMELINK®

If you have any questions or are having
difficulty programming your HomeLink®
buttons, refer to the HomeLink® web site at:
www.homelink.com or call 1-800-355-3515.

NOTE:

Place the ignition switch in the ON or ACC
position (without starting the engine)
when programming HomeLink®. It is also
recommended that a new battery be
placed in the hand-held transmitter of
the

device

being

programmed

to

HomeLink® for quicker programming
and accurate transmission of the radio
frequency.

1. Position the end of your hand-held

transmitter 1–3 in (2–8 cm) away from
the HomeLink® surface, keeping the
HomeLink® indicator light

O

1

in view.

2. Using both hands, simultaneously press

and hold the desired HomeLink® button
and hand-held transmitter button. DO
NOT release until the HomeLink® indica-
tor light

O

1

flashes slowly and then rap-

idly. When the indicator light flashes rap-
idly, both buttons may be released. (The
rapid

flashing

indicates

successful

programming.)

NOTE:

Some devices may require you to replace
Step 2 with the cycling procedure noted
in “Programming HomeLink® for gate
openers” (P. 2-94).

LIC2365

LIC4095

Instruments and controls

2-93

-------------------------------------------------------------------------------------------------------------------------------------------------------------

3. Press

and

hold

the

programmed

HomeLink® button and observe the indi-
cator light.

• If

the

indicator

light

O

1

is

solid/

continuous, programming is complete

and your device should activate when the
HomeLink®

button

is

pressed

and

released.

• If the indicator light

O

1

blinks

rapidly for 2

seconds and then turns to a solid/
continuous light, continue with Steps
4-6

for a rolling code device. A second

person may make the following steps
easier. Use a ladder or other device. Do
not stand on your vehicle to perform the
next steps.

4. At the receiver located on the garage

door opener motor in the garage, locate
the “learn” or “smart” button (the name
and color of the button may vary by
manufacturer but it is usually located
near where the hanging antenna wire is
attached to the unit). If there is difficulty
locating the button, reference the ga-
rage door opener’s manual.

5. Press and release the “learn” or “smart”

button.

NOTE:
Once the button is pressed, you have ap-
proximately 30 seconds to initiate the
next step.

6. Return to the vehicle and firmly press

and hold the trained HomeLink® button
for 2 seconds and release. Repeat the
“press/hold/release” sequence up to
three times to complete the training
process. HomeLink® should now acti-
vate your rolling code equipped device.

7. If you have any questions or are having

difficulty programming your HomeLink®
buttons, refer to the HomeLink® web site
at:

www.homelink.com

or

call

1-800-355-3515.

PROGRAMMING HOMELINK® FOR
GATE OPENERS

If you are having difficulties training a gate
operator or garage door opener by using
the “Training” procedures, replace “Pro-
gramming HomeLink®” Step 2 with the
following:

NOTE:

When

programming

a

garage

door

opener, etc., unplug the device during
the “cycling” process to prevent possible
damage to the garage door opener
components.

1. For additional information, see “Pro-

gramming HomeLink®” step 1 (P. 2-93).

2-94

Instruments and controls

-------------------------------------------------------------------------------------------------------------------------------------------------------------

2. Using both hands, simultaneously press

and hold the desired HomeLink® button
and the hand-held transmitter button.
During training, your hand-held trans-
mitter may automatically stop transmit-
ting. Continue to press and hold the de-
sired HomeLink® button while you press
and re-press (“cycle”) your hand-held
transmitter every two seconds until the
frequency

signal

is

learned.

The

HomeLink® indicator light will flash
slowly and then rapidly after several
seconds upon successful training. DO
NOT release until the HomeLink® indica-
tor light flashes slowly and then rapidly.
When the indicator light flashes rapidly,
both buttons may be released. The rapid
flashing indicates successful training.
Proceed

with

“Programming

HomeLink®” step 3 to complete.
If the device was unplugged during the
programming procedure, remember to
plug it back in when programming is
completed.

OPERATING THE HOMELINK®
UNIVERSAL TRANSCEIVER

The HomeLink® Universal Transceiver, after
it is programmed, can be used to activate
the programmed device. To operate, sim-
ply press and release the appropriate pro-

grammed HomeLink® Universal Trans-
ceiver button. The amber indicator light will
illuminate

while

the

signal

is

being

transmitted.

For convenience, the hand-held transmit-
ter of the device may also be used at any
time.

PROGRAMMING TROUBLE-
DIAGNOSIS

If the HomeLink® does not quickly learn the
hand-held transmitter information:
• Replace the hand-held transmitter bat-

teries with new batteries.

• Position the hand-held transmitter with

its battery area facing away from the
HomeLink® surface.

• Press and hold both the HomeLink® and

hand-held transmitter buttons without
interruption.

• Position the hand-held transmitter 1 - 3

inches (26 - 76 mm) away from the
HomeLink® surface. Hold the transmitter
in that position for up to 15 seconds. If
HomeLink® is not programmed within
that time, try holding the transmitter in
another position – keeping the indicator
light in view at all times.

If you have any questions or are having
difficulty programming your HomeLink®
buttons, refer to the HomeLink® web site at:
www.homelink.com or call 1-800-355-3515.

CLEARING THE PROGRAMMED
INFORMATION

The following procedure clears the pro-
grammed information from both buttons.
Individual buttons cannot be cleared. How-
ever, individual buttons can be repro-
grammed. For additional information, see
“Reprogramming a single HomeLink® but-
ton” (P. 2-96).

To clear all programming:

1. Press and hold the two outer HomeLink®

buttons until the indicator light begins to
flash in approximately 10 seconds. Do
not hold for longer than 20 seconds.

2. Release both buttons.

HomeLink® is now in the programming
mode and can be programmed at any
time

beginning

with

“Programming

HomeLink®” - Step 1 (P. 2-93).

Instruments and controls

2-95

-------------------------------------------------------------------------------------------------------------------------------------------------------------

REPROGRAMMING A SINGLE
HOMELINK® BUTTON

To reprogram a HomeLink® Universal
Transceiver button, complete the following:

1. Press and hold the desired HomeLink®

button.

DO NOT

release the button.

2. The indicator light will begin to flash af-

ter 20 seconds. Without releasing the
HomeLink® button, proceed with “Pro-
gramming HomeLink®” - Step 1 (P. 2-93).

For

questions

or

comments,

contact

HomeLink®

at:

www.homelink.com

or

1–800–355–3515 (except Mexico).

The HomeLink® Universal Transceiver but-
ton has now been reprogrammed. The
new device can be activated by pressing
the HomeLink® button that was just pro-
grammed. This procedure will not affect
any

other

programmed

HomeLink®

buttons.

IF YOUR VEHICLE IS STOLEN

If your vehicle is stolen, you should change
the codes of any non-rolling code device
that

has

been

programmed

into

HomeLink®. Consult the Owner's Manual of
each device or call the manufacturer or
dealer of those devices for additional
information.

When your vehicle is recovered, you will
need to reprogram the HomeLink® Uni-
versal Transceiver with your new trans-
mitter information.

FCC Notice:

For USA:

This device complies with Part 15 of the
FCC Rules. Operation is subject to the fol-
lowing two conditions: (1) This device
may not cause harmful interference, and
(2) this device must accept any interfer-
ence received, including interference
that may cause undesired operation.

NOTE:

Changes or modifications not expressly
approved by the party responsible for
compliance could void the user’s author-
ity to operate the equipment.

For Canada:

This device contains license-exempt
transmitter(s)/receiver(s) that comply
with Innovation, Science and Economic
Development Canada’s licence-exempt
RSS(s). Operation is subject to the fol-
lowing two conditions: (1) This device
may not cause interference. (2) This de-
vice must accept any interference, in-
cluding interference that may cause un-
desired operation of the device.

2-96

Instruments and controls

-------------------------------------------------------------------------------------------------------------------------------------------------------------


Content      ..     10      11      12      13     ..