Nissan Versa (2022 year). Manual in english - page 10
LHA4706
LHA4700
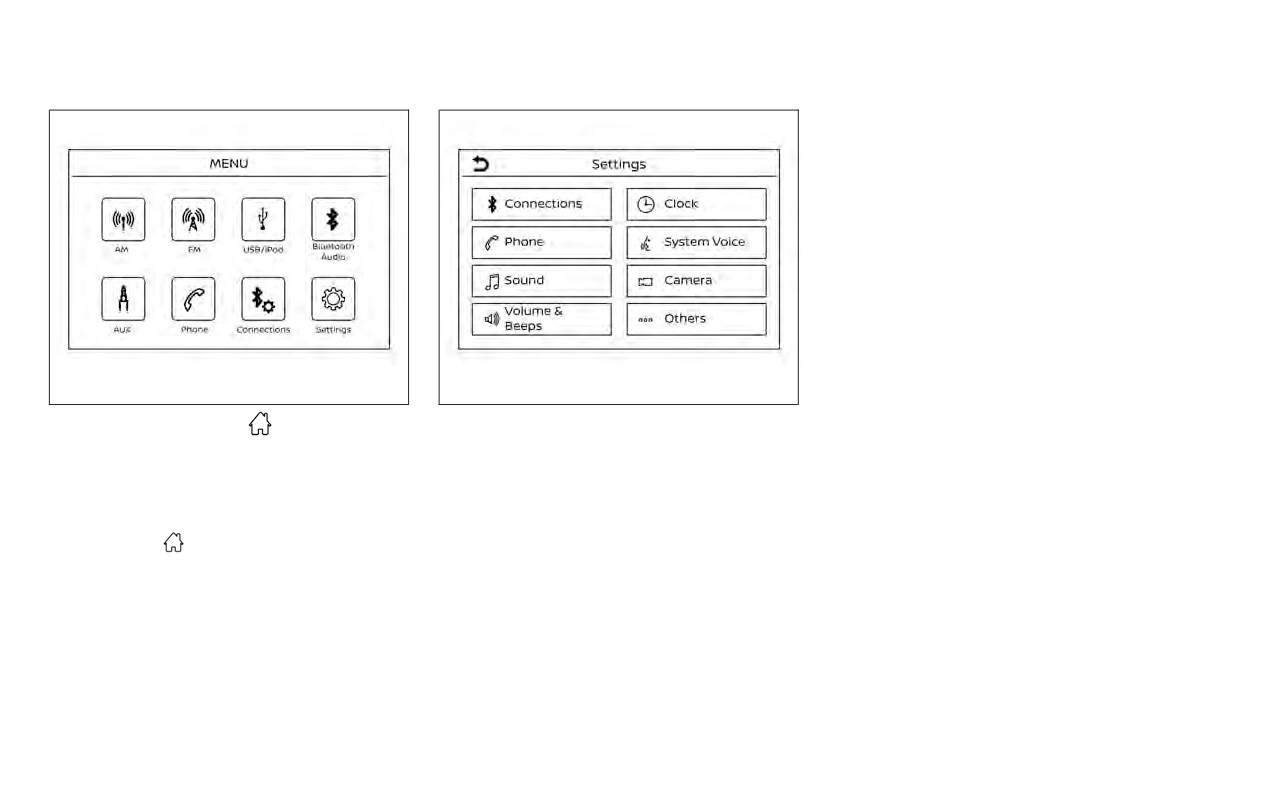
HOW TO USE THE
MENU
BUTTON
To select and/or adjust several functions,
features and modes that are available for
your vehicle:
1. Press the
MENU button.
2. Touch the “Settings” key.
3. Touch the desired item.
4-6
Monitor, climate, audio, phone and voice recognition systems

Menu item
Result
Settings
Touch to change the following settings.
Connections
Touch this key to select either Bluetooth® phone, Bluetooth® audio or USB audio options. For additional information, see
“USB connections screen” (P. 4-37) and “Bluetooth® connections screen” (P. 4-63).
Phone
For additional information, see “Bluetooth® Hands-Free Phone System” (P. 4-50).
Sound
For additional information, see “Audio system” (P. 4-27).
Volume & Beeps
For additional information, see “Volume & beeps” (P. 4-66).
Clock
Touch this key to adjust clock settings.
On-screen
Touch to toggle ON or OFF the clock display on the upper right corner of the display screen.
Clock
Clock Format
Touch to set the clock to 12-hour or 24-hour format.
Daylight Sav-
Touch to adjust the daylight savings time to on or off.
ings Time
Set Clock
Touch to adjust the clock manually; then touch to change between AM and PM, the hour and the minutes.
Manually
System Voice
For additional information, see “Settings” (P. 4-58).
Camera
Touch this key to change the camera settings.
Others
Touch this key to select and/or adjust various functions of this system. A screen with additional options will appear.
Display
Touch this key to toggle the display off or to adjust the appearance of the display. For additional information, see “Adjust-
ing the screen” (P. 4-14).
Language
Touch this key to change the language on the display.
OSS Licenses
Touch this key to display software licensing information.
Return All Set-
Touch this key to return all settings to default and to clear the memory.
tings To De-
fault
Monitor, climate, audio, phone and voice recognition systems
4-7

(brightness control) BUTTON
The following menu items are available on
the Launch Bar:
To change the display brightness, press the
button. Pressing the button again will
•
AM
change the display to the day or the night
•
FM
display.
•
USB/iPod
Press and hold the
button for more
•
Bluetooth
than 2 seconds to turn the display off. Press
•
AUX
the button again to turn the display on.
•
Settings
HOW TO USE THE VOL (volume)
KNOB / PUSH
(power)
BUTTON
Press the PUSH
(power) button to turn
audio function on and off. Turn the VOL
LHA4707
(volume) knob to adjust audio volume.
SELECTING MENU FROM LAUNCH
BAR
Various system functions can be accessed
by touching the items on the Launch Bar
1
which is displayed on most of the main
menu screens (the Launch Bar does not
appear on some screens such as keyboard
screens, camera screens, etc.)
Touch the keys on the Launch Bar to dis-
play the corresponding menu screens.
4-8
Monitor, climate, audio, phone and voice recognition systems

REARVIEW MONITOR
LHA5573
1. CAMERA button
WARNING
• RearView Monitor is a convenience
2. DISP button
feature and is not a substitute for
• Failure to follow the warnings and in-
proper backing. Always turn and look
structions for proper use of the Rear-
out the windows and check mirrors
View Monitor system could result in
to be sure that it is safe to move be-
serious injury or death.
fore operating the vehicle. Always
back up slowly.
Monitor, climate, audio, phone and voice recognition systems
4-9

• The system is designed as an aid to
the driver in showing large station-
ary objects directly behind the ve-
hicle, to help avoid damaging the
vehicle.
• The distance guide lines and the ve-
hicle width lines should be used as a
reference only when the vehicle is on
a level paved surface. The distance
viewed on the monitor is for refer-
ence only and may be different than
the actual distance between the ve-
hicle and displayed objects.
LHA5234
LHA4805
CAUTION
To display the rear view, the RearView Moni-
HOW TO READ THE DISPLAYED
tor system uses a camera located just
Do not scratch the camera lens when
LINES
1
cleaning dirt or snow from the front of
Guiding lines which indicate the vehicle
the camera.
REARVIEW MONITOR SYSTEM
width and distances to objects with refer-
The RearView Monitor system automati-
OPERATION
A are dis-
cally shows a rear view of the vehicle when
played on the monitor.
With the ignition switch in the ON position,
the shift lever is shifted into the R (Reverse)
Distance guide lines
move the shift lever to the R (Reverse) po-
position. The radio can still be heard while
sition to operate the RearView Monitor.
Indicate distances from the vehicle body.
the RearView Monitor is active.
1
: approx. 1.5 ft (0.5 m)
2
: approx. 3 ft (1 m)
3
: approx. 7 ft (2 m)
4-10
Monitor, climate, audio, phone and voice recognition systems

4
Indicate the vehicle width when backing up.
5
Indicate the predicted course when back-
ing up. The predicted course lines will be
displayed on the monitor when the shift
lever is in the R (Reverse) position and the
steering wheel is turned. The predicted
course lines will move depending on how
much the steering wheel is turned and will
not be displayed while the steering wheel is
in the straight-ahead position.
The vehicle width guide lines and the width
of the predicted course lines are wider than
the actual width and course.
DIFFERENCE BETWEEN PREDICTED
AND ACTUAL DISTANCES
The displayed guidelines and their loca-
tions on the ground are for approximate
reference only. Objects on uphill or downhill
LHA5283
LHA5284
surfaces or projecting objects will be actu-
Backing up on a steep uphill
Backing up on a steep downhill
ally located at distances different from
those displayed in the monitor relative to
When backing up the vehicle up a hill, the
When backing up the vehicle down a hill,
the guidelines (refer to illustrations). When
distance guide lines and the vehicle width
the distance guide lines and the vehicle
in doubt, turn around and view the objects
guide lines are shown closer than the ac-
width guide lines are shown farther than
as you are backing up, or park and exit the
tual distance. Note that any object on the
the actual distance. Note that any object
vehicle to view the positioning of objects
hill is further than it appears on the
on the hill is closer than it appears on the
behind the vehicle.
monitor.
monitor.
Monitor, climate, audio, phone and voice recognition systems
4-11
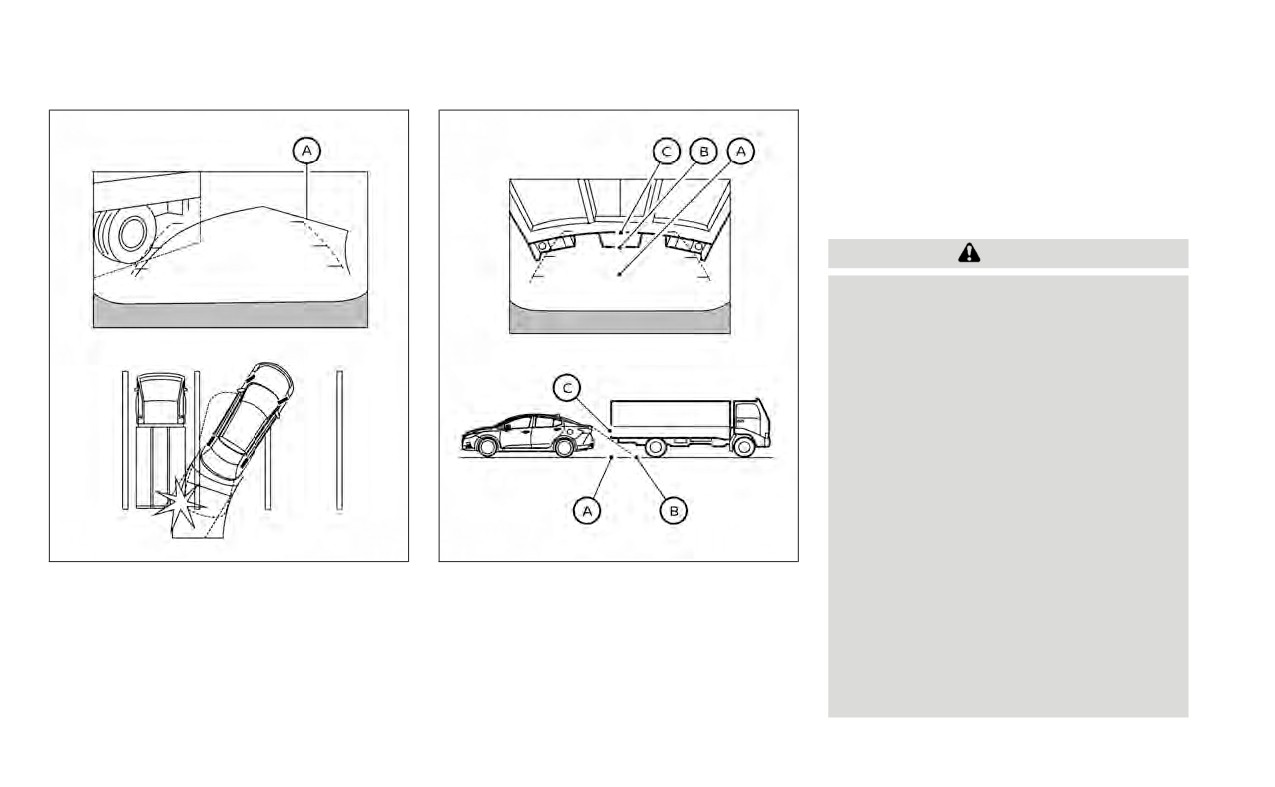
A
if the object projects over the actual back-
ing up course.
HOW TO PARK WITH PREDICTED
COURSE LINES (if so equipped)
WARNING
•
If the tires are replaced with different
sized tires, the predicted course lines
may be displayed incorrectly.
•
On a snow-covered or slippery road,
there may be a difference between
the predicted course line and the ac-
tual course line.
•
If the battery is disconnected or be-
comes discharged, the predicted
course lines may be displayed incor-
rectly. If this occurs, please perform
the following procedures:
- Turn the steering wheel from lock
LHA4995
LHA5285
to lock while the engine is
running.
Backing up near a projecting
Backing up behind a projecting
- Drive the vehicle on a straight road
object
object
for more than 5 minutes.
A
(if so
C is shown farther than the
•
When the steering wheel is turned
equipped) do not touch the object in the
B in the display. However, the po-
with the ignition switch in the AUTO
display. However, the vehicle may hit the
C is actually at the same distance as
ACC position, the predicted course
object if it projects over the actual backing
A . The vehicle may hit the
lines may be displayed incorrectly.
up course.
4-12
Monitor, climate, audio, phone and voice recognition systems

4. Maneuver the steering wheel to make
D parallel
C while referring
to the predicted course lines.
5. When the vehicle is parked in the space
completely, move the shift lever to the P
(Park) position and apply the parking
brake.
LHA5043
LHA4770
1. Visually check that the parking space is
3. Slowly back up the vehicle adjusting the
safe before parking your vehicle.
steering wheel so that the predicted
B enter the parking space
2. The rear view of the vehicle is displayed
C .
A when the shift lever is
moved to the R (Reverse) position.
Monitor, climate, audio, phone and voice recognition systems
4-13

For vehicles with DISP button
REARVIEW MONITOR SYSTEM
1. While on the main menu screen, touch
LIMITATIONS
the “Settings” key.
WARNING
2. Touch the “Camera” key.
Listed below are the system limitations
3. Touch the “Brightness”, “Contrast”, Tint”,
for RearView Monitor. Failure to oper-
“Color”, or “Black Level” key.
ate the vehicle in accordance with
4. Adjust the item by touching the “+” or “-”
these system limitations could result in
key on the touch-screen display.
serious injury or death.
•
The system cannot completely elimi-
NOTE:
nate blind spots and may not show
Do not adjust any of the display settings
every object.
of the RearView Monitor while the ve-
•
Underneath the bumper and the cor-
LHA5047
hicle is moving.
ner areas of the bumper cannot be
ADJUSTING THE SCREEN
viewed on the RearView Monitor be-
HOW TO TURN ON AND OFF
cause of its monitoring range limita-
For vehicles with CAMERA button
PREDICTED COURSE LINES (if so
tion. The system will not show small
1. While on the main menu screen, touch
equipped)
objects below the bumper, and may
the “Settings” key.
To toggle on and off the predicted course
not show objects close to the bum-
lines while in the P (Park) position:
per or on the ground.
2. Touch the “Camera” key.
•
Objects viewed in the RearView
1. Press the CAMERA button.
3. Touch the “Display Settings” key.
Monitor differ from actual distance
2. Touch the “Predicted Course Lines” key
because a wide-angle lens is used.
4. Touch the “Brightness”, “Contrast”, Tint”,
to turn the feature on or off.
“Color”, or “Black Level” key.
•
Objects in the RearView Monitor will
To toggle on and off the predicted course
appear visually opposite compared
5. Adjust the item by touching the “+” or “-”
lines while in the R (Reverse) position, press
to when viewed in the rearview and
key on the touch-screen display.
the CAMERA button.
outside mirrors.
4-14
Monitor, climate, audio, phone and voice recognition systems

•
Vertical lines may be seen in objects on
•
Use the displayed lines as a refer-
the screen. This is due to strong reflected
ence. The lines are highly affected by
light from the bumper.
the number of occupants, fuel level,
vehicle position, road conditions and
•
The screen may flicker under fluorescent
road grade.
light.
•
Make sure that the trunk is securely
•
The colors of objects on the RearView
closed when backing up.
Monitor may differ somewhat from the
actual color of objects.
•
Do not put anything on the rearview
camera. The rearview camera is in-
•
Objects on the monitor may not be clear
stalled above the license plate.
in a dark environment.
•
When washing the vehicle with high
•
There may be a delay when switching
pressure water, be sure not to spray it
between views.
around the camera. Otherwise, water
•
If dirt, rain or snow accumulate on the
may enter the camera unit causing
camera, the RearView Monitor may not
LHA5234
water condensation on the lens, a
display objects clearly. Clean the camera.
malfunction, fire or an electric shock.
SYSTEM MAINTENANCE
•
Do not use wax on the camera lens. Wipe
•
Do not strike the camera. It is a preci-
off any wax with a clean cloth dampened
CAUTION
sion instrument. Otherwise, it may
with a diluted mild cleaning agent, then
malfunction or cause damage result-
wipe with a dry cloth.
• Do not use alcohol, benzine or thin-
ing in a fire or an electric shock.
ner to clean the camera. This will
The following are operating limitations and
cause discoloration.
do not represent a system malfunction:
• Do not damage the camera as the moni-
• When the temperature is extremely high
tor screen may be adversely affected.
or low, the screen may not clearly display
If dirt, rain or snow accumulates on the
objects.
1
, the RearView Monitor may not
• When strong light directly shines on the
display objects clearly. Clean the camera
camera, objects may not be displayed
by wiping it with a cloth dampened with a
clearly.
diluted mild cleaning agent and then wip-
ing it with a dry cloth.
Monitor, climate, audio, phone and voice recognition systems
4-15

VENTS
HEATER AND AIR CONDITIONER
(manual) (if so equipped)
• Do not leave children or adults who
would normally require the assis-
tance of others alone in your vehicle.
Pets should also not be left alone.
They could accidentally injure them-
selves or others through inadvertent
operation of the vehicle. Also, on hot,
sunny days, temperatures in a closed
vehicle could quickly become high
enough to cause severe or possibly
fatal injuries to people or animals.
• Do not use the recirculation mode for
long periods as it may cause the inte-
rior air to become stale and the win-
SAA3126
LHA5224
dows to fog up.
Side vents
Center vents
NOTE:
Adjust the air flow direction of the vents by
WARNING
opening, closing or rotating.
• Odors from inside and outside the ve-
hicle can build up in the air conditioner
Adjust the air flow direction of the vents by
•
The air conditioner cooling function
operates only when the engine is
unit. Odor can enter the passenger
moving the slide as indicated.
compartment through the vents.
running.
• When parking, set the heater and air
conditioner controls to turn off air re-
circulation to allow fresh air into the
passenger compartment. This should
help reduce odors inside the vehicle.
4-16
Monitor, climate, audio, phone and voice recognition systems

Air flow control dial
The air flow control dial allows you to select
the air flow outlets.
— Air flows from center and side
vents.
— Air flows from center and side
vents and foot outlets.
— Air flows mainly from the foot
outlets.
— Air flows from defroster out-
lets and the foot outlets.
— Air flows mainly from de-
froster outlets.
Temperature control dial
The temperature control dial allows you to
adjust the temperature of the outlet air. To
lower the temperature, turn the dial to the
left. To increase the temperature, turn the
dial to the right.
LHA4202
Fresh air intake
CONTROLS
7.
Rear window and outside mirror (if
Press the
fresh air intake button to
so equipped) defroster switch
draw outside air into the passenger
1.
Air flow control dial
compartment.
2.
A/C (air conditioner) button
Fan speed control dial
3.
Fan speed control dial
The
fan speed control dial turns the
4.
Air recirculation button
fan on and off and controls fan speed.
5.
Temperature control dial
6.
Fresh air intake button
Monitor, climate, audio, phone and voice recognition systems
4-17

Air recirculation
HEATER OPERATION
4. Turn the temperature control dial to the
desired position.
Press the
air recirculation button to
Heating
recirculate interior air inside the vehicle.
This mode is used to direct heated air to
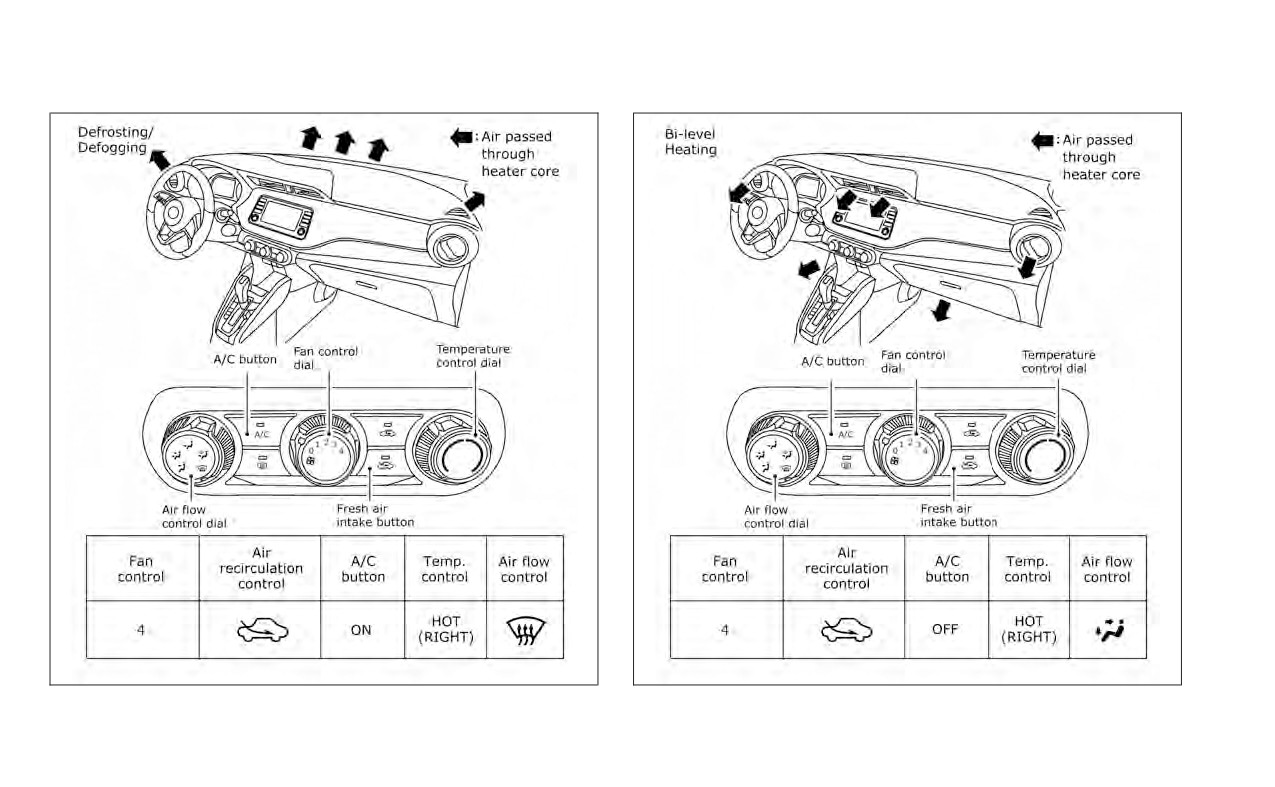
Defrosting or defogging
The air recirculation cannot be activated
the foot outlets. Some air also flows from
This mode directs the air to the defrost
when the air conditioner is in the
front
the defrost outlets.
outlets to defrost/defog the windows.
defrosting mode.
1. Press the
button for normal heat-
1. Turn the air flow control dial to the
ing. The indicator light on the
but-
A/C (air conditioner) button
position.
ton will go off.
Start the engine, turn the
fan speed
2. Turn the
fan speed control dial to
2. Turn the airflow control dial to the
control dial to the desired position and
the desired position.
position.
press the
button to turn on the air
3. Turn the temperature control dial to the
conditioner. To turn off the air conditioner,
3. Turn the
fan speed control dial to
desired position between the middle
press the
button again.
the desired position.
and the hot position.
The air conditioner cooling function op-
4. Turn the temperature control dial to the
• To quickly remove ice or fog from the win-
erates only when the engine is running.
desired position between the middle
dows, turn the
fan speed control dial
and the hot position.
to the right and the temperature control
Rear window and outside mirror
to the full HOT position.
(if so equipped) defroster switch
Ventilation
For additional information, see “Rear win-
This mode directs outside air to the side
Bi-level heating
dow and outside mirror (if so equipped)
and center vents.
The bi-level mode directs warmed air to
defroster switch” (P. 2-40).
the side and center vents and to the foot
1. Press the
button. The indicator light
outlets.
on the
button will go off.
1. Press the
button. The indicator light
2. Turn the air flow control dial to the
on the
button will go off.
position.
2. Turn the airflow control dial to the
3. Turn the
fan speed control dial to
position.
the desired position.
4-18
Monitor, climate, audio, phone and voice recognition systems
3. Turn the
fan speed control dial to
Operating tips
• For quick cooling when the outside tem-
the desired position.
perature is high, press the
button.
Clear snow and ice from the wiper blades
The indicator light on the
button will
4. Turn the temperature control dial to the
and air inlet in front of the windshield.
come on. Press the
button for nor-
desired position.
This improves heater operation.
mal cooling. The indicator light on the
button will go off.
AIR CONDITIONER OPERATION
Heating and defogging
Start the engine, turn the
fan speed
This mode heats the interior and defogs
Dehumidified heating
control dial to the desired position, and
the windshield.
press the
button to activate the air
This mode is used to heat and dehumidify
1. Turn the air flow control dial to the
the air.
conditioner. When the air conditioner is on,
position.
cooling and dehumidifying functions are
1. Press the
button. The indicator light
2. Turn the
fan speed control dial to
added to the heater operation.
on the
button will go off.
the desired position.
The air conditioner cooling function op-
2. Turn the air flow control dial to the
3. Turn the temperature control dial to the
erates only when the engine is running.
position.
desired position between the middle
Cooling
3. Turn the
fan speed control dial to
and the hot position.
the desired position.
• If in the
mode for more than 1
This mode is used to cool and dehumidify
minute, the air conditioning system will
the air.
4. Press the
button on.
continue to operate until the vehicle is
1. Press the
button.
5. Turn the temperature control dial to the
shut off. This dehumidifies the air which
desired position.
helps defog the windshield. The
2. Turn the air flow control dial to the
mode automatically turns off, allowing
position.
Dehumidified defogging
outside air to be drawn into the passen-
3. Turn the
fan speed control dial to
ger compartment to further improve the
This mode is used to defog the windows
the desired position.
defogging performance.
and dehumidify the air.
4. Press the
button.
1. Turn the air flow control dial to the
5. Turn the temperature control dial to the
position.
desired position.
2. Turn the
fan speed control dial to
the desired position.
Monitor, climate, audio, phone and voice recognition systems
4-19

3. Press the
button. The indicator
Operating tips
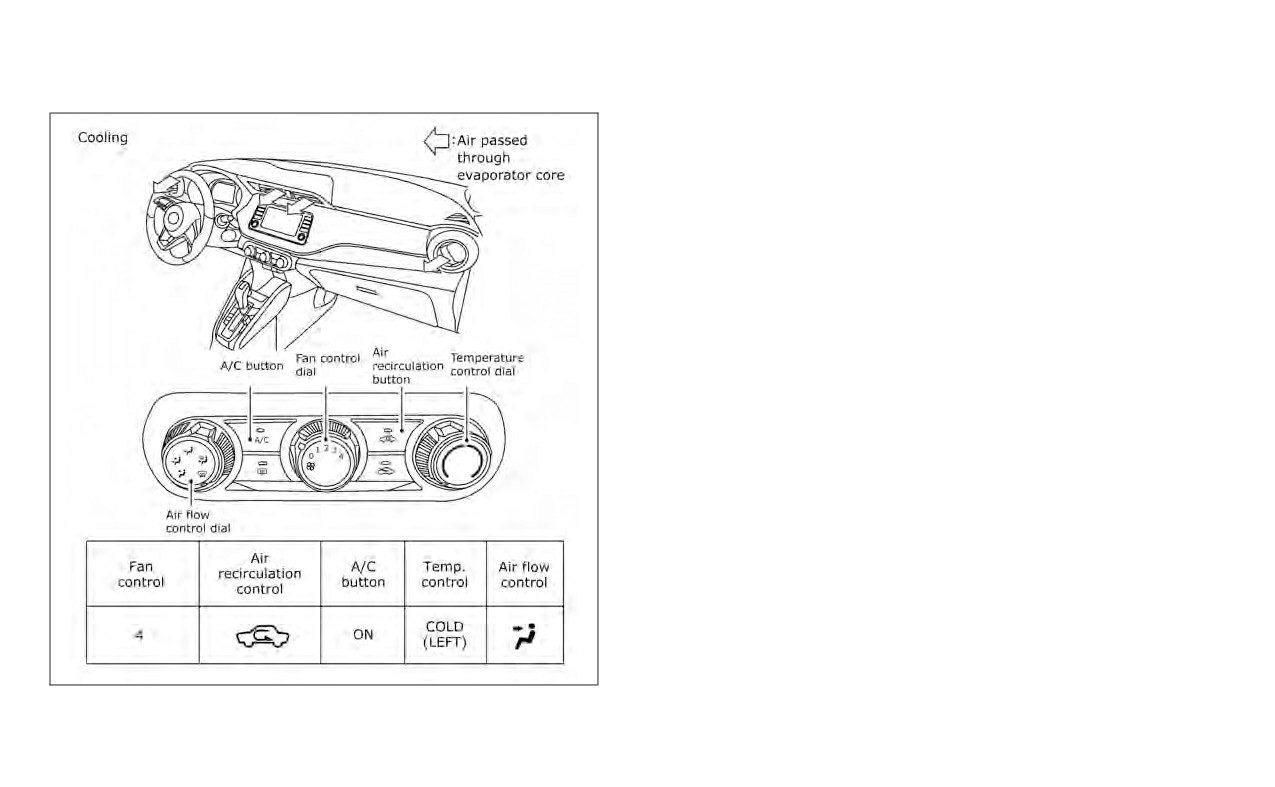
AIR FLOW CHARTS
light comes on.
•
Keep the windows closed while the air
The following charts show the button and
When the
,
or positions in be-
conditioner is in operation.
dial positions for MAXIMUM AND QUICK
tween are selected, the air conditioner au-
•
After parking in the sun, drive for two or
heating, cooling or defrosting. The
air
tomatically turns on. The air conditioning
three minutes with the windows open to
recirculation button should always be in
system will continue to operate until the
vent hot air from the passenger com-
the OFF position
for
heating
and
fan speed control dial is turned to OFF or
partment. Then, close the windows. This
defrosting.
the vehicle is shut off, even if the air flow
allows the air conditioner to cool the inte-
control dial is turned to a position other
rior more quickly.
than the
position. This dehumidifies
•
The air conditioning system should be
the air which helps defog the windshield.
operated for approximately ten min-
The
mode automatically turns off, al-
utes at least once a month. This helps
lowing outside air to be drawn into the pas-
prevent damage to the system due to
senger compartment to further improve
lack of lubrication.
the defogging performance.
•
A visible mist may be seen coming from
4. Turn the temperature control dial to the
the ventilators in hot, humid conditions
desired position.
as the air is cooled rapidly. This does not
indicate a malfunction.
•
If the high temperature warning light
illuminates in red indicating en-
gine coolant temperature is over the
normal range, turn the air conditioner
off. For additional information, see “If
your vehicle overheats” (P. 6-10).
4-20
Monitor, climate, audio, phone and voice recognition systems
LHA4674
LHA4675
Monitor, climate, audio, phone and voice recognition systems
4-21

LHA4676
LHA4677
4-22
Monitor, climate, audio, phone and voice recognition systems
LHA4678
Monitor, climate, audio, phone and voice recognition systems
4-23

HEATER AND AIR CONDITIONER
(automatic) (if so equipped)
WARNING
•
The air conditioner cooling function
operates only when the engine is
running.
•
Do not leave children or adults who
would normally require the assis-
tance of others alone in your vehicle.
Pets should also not be left alone.
They could accidentally injure them-
selves or others through inadvertent
operation of the vehicle. Also, on hot,
sunny days, temperatures in a closed
vehicle could quickly become high
enough to cause severe or possibly
fatal injuries to people or animals.
•
Do not use the recirculation mode for
long periods as it may cause the inte-
rior air to become stale and the win-
dows to fog up.
NOTE:
LHA5218
• Odors from inside and outside the ve-
1.
Temperature control dial /AUTO button
6.
Rear window and outside mirror
hicle can build up in the air conditioner
2.
Heated seat switches (if so
(if so equipped) defroster switch
unit. Odor can enter the passenger
equipped)
7.
MODE (manual air flow control) button
compartment through the vents.
3.
Display Screen
8.
Front defroster button
• When parking, set the heater and air
4.
Fan speed control dial/A/C (air
9.
ON-OFF button
conditioner controls to turn off air re-
conditioner) button
circulation to allow fresh air into the
5.
Air recirculation button
passenger compartment. This should
help reduce odors inside the vehicle.
4-24
Monitor, climate, audio, phone and voice recognition systems

AUTOMATIC OPERATION
2. Turn the temperature control dial to the
Remote Engine Start with
left or right to set the desired
Intelligent Climate Control (if so
Heating (A/C OFF)
temperature.
equipped)
The air conditioner does not activate. When
• The temperature of the passenger com-
you need to heat only, use this mode.
Vehicles equipped with automatic climate
partment will be maintained automati-
cally. Air flow distribution and fan speed
controls and Remote Engine Start function
1. Press the AUTO button.
may go into automatic heating or cooling
are also controlled automatically.
2. Turn the temperature control dial to set
mode when Remote Engine Start is activated
• A visible mist may be seen coming from
the desired temperature.
depending on outside and cabin tempera-
the vents in hot, humid conditions as the
• The temperature of the passenger com-
tures. During this period, the climate control
air is cooled rapidly. This does not indicate
display and buttons will be inoperable until
partment will be maintained automati-
a malfunction.
cally. Air flow distribution and fan speed
the ignition switch is turned on. In Remote
Engine Start defrosting mode, the rear win-
are also controlled automatically.
Dehumidified defrosting or
dow defroster and heated seats
(if so
• Do not set the temperature lower than
defogging
equipped) may be activated automatically.
the outside air temperature. Otherwise,
1. Press the
front defroster button on.
the system may not work properly.
MANUAL OPERATION
• Not recommended if windows fog up.
2. Turn the temperature control dial to set
the maximum temperature to aid in
Fan speed control
Cooling and/or dehumidified
defogging.
Turn the
fan speed control dial to
heating (AUTO)
• To quickly remove ice from the outside of
manually control the fan speed.
the windows, use the
fan speed con-
This mode may be used all year round as
Press the AUTO button to return to auto-
trol dial to set the fan speed to maximum.
the system automatically works to keep a
matic control of the fan speed.
• As soon as possible after the windshield
constant temperature. Air flow distribution
and fan speed are also controlled
is clean, press the AUTO button to return
Temperature control dial
to the automatic mode.
automatically.
• When the
front defroster button is
The temperature control dial allows you to
1. Press the AUTO button on.
pressed, the air conditioner will automati-
adjust the temperature of the outlet air. To
cally be turned on.
lower the temperature, turn the dial to the
left. To increase the temperature, turn the
dial to the right.
Monitor, climate, audio, phone and voice recognition systems
4-25
Air recirculation
To turn system off
Press the
air recirculation button to
To turn off the heater and air conditioner,
recirculate interior air inside the vehicle.
press the ON-OFF button. Press the ON-
OFF button again, the system will turn on in
A/C (air conditioner) button
the mode which was used immediately
before the system was turned off.
Start the engine, turn the
fan speed
control dial to the desired position and
Rear window and outside mirror
press the
button to turn on the air
conditioner. To turn off the air conditioner,
(if so equipped) defroster switch
press the
button again.
For additional information, see “Rear win-
The air conditioner cooling function op-
dow and outside mirror (if so equipped)
erates only when the engine is running.
defroster switch” (P. 2-40).
Heated seat switches (if so
LHA4125
Air flow control
Press the MODE button to manually control
equipped)
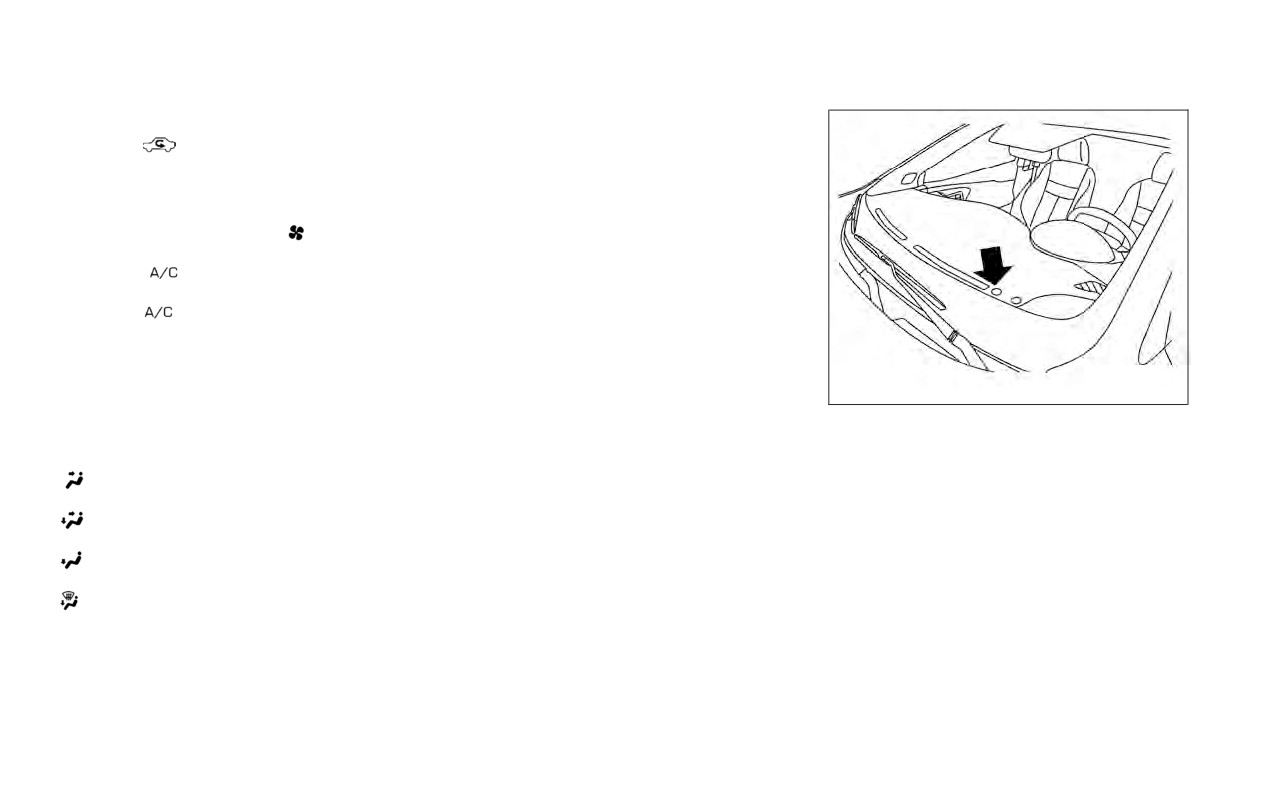
OPERATING TIPS
air flow and select the air outlet.
For additional information, see
“Heated
The sunload sensor, located on the driver’s
seat switches” (P. 2-49).
side of the instrument panel, as shown,
— Air flows from center and side
helps the system maintain a constant
vents.
temperature. Do not put anything on or
— Air flows from center and side
around this sensor.
vents and foot outlets.
— Air flows mainly from foot outlets.
• When the engine coolant temperature
— Air flows from defroster and foot
and outside air temperature are low, the
air flow from the foot outlets may not
outlets.
operate for a maximum of 150 seconds.
However, this is not a malfunction. After
the coolant temperature warms up, air
flow from the foot outlets will operate
normally.
4-26
Monitor, climate, audio, phone and voice recognition systems