Nissan Versa (2022 year). Manual in english - page 11
SERVICING AIR CONDITIONER
AUDIO SYSTEM
•
If you feel that the air flow mode you have
The air conditioner system in your NISSAN
RADIO
selected and the outlets the air is coming
vehicle is charged with a refrigerant de-
When the ignition is placed in the AUTO
out do not match, select the
mode.
signed with the environment in mind.
ACC or ON position, press the PUSH
•
When you change the air flow mode, you
This refrigerant does not harm the
(power) button to turn the radio on. If
may feel air flow from the foot outlets for
earth's ozone layer.
you listen to the radio with the engine not
just a moment. This is not a malfunction.
running, the ignition should be placed in
Special charging equipment and lubricant
the AUTO ACC position.
is required when servicing your NISSAN air
conditioner. Using improper refrigerants or
Radio reception is affected by station sig-
lubricants will cause severe damage to
nal strength, distance from radio transmit-
your air conditioner system. For additional
ter, buildings, bridges, mountains and other
information, see “Air conditioner system re-
external influences. Intermittent changes
frigerant and oil recommendations”
in reception quality normally are caused by
(P. 10-8).
these external influences.
It is recommended that you visit a NISSAN
Using a cellular phone in or near the vehicle
dealer to service your
“environmentally
may influence radio reception quality.
friendly” air conditioning system.
Radio reception
WARNING
Your NISSAN radio system is equipped with
state-of-the-art electronic circuits to en-
The air conditioner system contains re-
hance radio reception. These circuits are
frigerant under high pressure. To avoid
designed to extend reception range, and to
personal injury, any air conditioner ser-
enhance the quality of that reception.
vice should be done only by an experi-
enced technician with proper
However, there are some general charac-
teristics of both FM and AM radio signals
equipment.
that can affect radio reception quality in a
moving vehicle, even when the finest
equipment is used. These characteristics
are completely normal in a given reception
area and do not indicate any malfunction
in your NISSAN radio system.
Monitor, climate, audio, phone and voice recognition systems
4-27
Reception conditions will constantly
Static and flutter: During signal interfer-
Static: Caused by thunderstorms, electrical
change because of vehicle movement.
ence from buildings, large hills or due to
power lines, electric signs and even traffic
Buildings, terrain, signal distance and inter-
antenna position (usually in conjunction
lights.
ference from other vehicles can work
with increased distance from the station
AUDIO OPERATION PRECAUTIONS
against ideal reception. Described below
transmitter), static or flutter can be heard.
are some of the factors that can affect your
This can be reduced by adjusting the treble
radio reception.
control to reduce treble response.
MP3 or WMA terms
•
MP3 — MP3 is short for Moving Pictures
Some cellular phones or other devices may
Multipath reception: Because of the reflec-
Experts Group Audio Layer 3. MP3 is the
cause interference or a buzzing noise to
tive characteristics of FM signals, direct and
most well-known compressed digital au-
come from the audio system speakers.
reflected signals reach the receiver at the
dio file format. This format allows for near
Storing the device in a different location
same time. The signals may cancel each
“CD quality” sound, but at a fraction of the
may reduce or eliminate the noise.
other, resulting in momentary flutter or loss
size of normal audio files. MP3 conversion
of sound.
FM RADIO RECEPTION
of an audio track from CD-ROM can re-
AM RADIO RECEPTION
duce the file size by approximately a 10:1
Range: FM range is normally limited to 25 -
ratio with virtually no perceptible loss in
30 mi (40 - 48 km), with monaural (single
AM signals, because of their low frequency,
quality. MP3 compression removes the
channel) FM having slightly more range
can bend around objects and skip along
redundant and irrelevant parts of a
than stereo FM. External influences may
the ground. In addition, the signals can be
sound signal that the human ear doesn’t
sometimes interfere with FM station re-
bounced off the ionosphere and bent back
hear.
ception even if the FM station is within 25
to earth. Because of these characteristics,
•
WMA — Windows Media Audio (WMA)* is a
mi (40 km). The strength of the FM signal is
AM signals are also subject to interference
compressed audio format created by Mi-
directly related to the distance between
as they travel from transmitter to receiver.
crosoft as an alternative to MP3. The WMA
the transmitter and receiver. FM signals fol-
Fading: Occurs while the vehicle is passing
codec offers greater file compression
low a line-of-sight path, exhibiting many of
through freeway underpasses or in areas
than the MP3 codec, enabling storage of
the same characteristics as light. For ex-
with many tall buildings. It can also occur
more digital audio tracks in the same
ample, they will reflect off objects.
for several seconds during ionospheric tur-
amount of space when compared to
Fade and drift: As your vehicle moves away
bulence even in areas where no obstacles
MP3s at the same level of quality.
from a station transmitter, the signals will
exist.
tend to fade and/or drift.
4-28
Monitor, climate, audio, phone and voice recognition systems
•
Bit rate — Bit rate denotes the number of
USB (Universal Serial Bus)
This system cannot be used to format USB
bits per second used by a digital music
devices. To format a USB device, use a per-
connection port
file. The size and quality of a compressed
sonal computer.
digital audio file is determined by the bit
WARNING
In some jurisdictions, the USB device for the
rate used when encoding the file.
front seats plays only sound without im-
•
Sampling frequency
— Sampling fre-
Do not connect, disconnect or operate
ages for regulatory reasons, even when the
quency is the rate at which the samples
the USB device while driving. Doing so
vehicle is parked.
of a signal are converted from analog to
can be a distraction. If distracted you
This system supports various USB
digital (A/D conversion) per second.
could lose control of your vehicle and
cause an accident or serious injury.
memory devices, USB hard drives and
•
Multisession — Multisession is one of the
iPod® players. Some USB devices may not
methods for writing data to media. Writ-
be supported by this system.
ing data once to the media is called a
CAUTION
• Partitioned USB devices may not play
single session, and writing more than
correctly.
once is called a multisession.
•
Do not force the USB device into the
USB port. Inserting the USB device
• Some characters used in other lan-
•
ID3/WMA Tag — The ID3/WMA tag is the
tilted or up-side-down into the port
guages (Chinese, Japanese, etc.) may not
part of the encoded MP3 or WMA file that
contains information about the digital
may damage the port. Make sure
appear properly in the display. Using Eng-
that the USB device is connected cor-
lish language characters with a USB de-
music file such as song title, artist, encod-
ing bit rate, track time duration, etc. ID3
rectly into the USB port.
vice is recommended.
tag information is displayed on the Artist/
•
Do not grab the USB port cover (if so
General notes for USB use
song title line on the display.
equipped) when pulling the USB de-
• For additional information, refer to your
vice out of the port. This could dam-
device manufacturer's owner informa-
* Windows® and Windows Media® are reg-
istered trademarks and trademarks in the
age the port and the cover.
tion regarding the proper use and care of
United States of America and other coun-
•
Do not leave the USB cable in a place
the device.
tries of Microsoft Corporation of the USA.
where it can be pulled unintention-
ally. Pulling the cable may damage
the port.
The vehicle is not equipped with a USB de-
vice. USB devices should be purchased
separately as necessary.
Monitor, climate, audio, phone and voice recognition systems
4-29
Notes for iPod® use
iPod®* player
•
The iPod® nano (1st Generation) may re-
main in fast forward or rewind mode if it is
iPod® is a trademark of Apple Inc., regis-
•
Some characters used in other lan-
connected during a seek operation. In
tered in the U.S. and other countries.
guages (Chinese, Japanese, etc.) are not
this case, please manually reset the
displayed properly on the vehicle center
•
Improperly plugging in the iPod® may
iPod®.
screen. We recommend using English or
cause a checkmark to be displayed on
Spanish language characters with an
•
If you are using an iPod® (3rd Generation
and off (flickering). Always make sure that
iPod®.
with Dock connector), do not use very
the iPod® is connected properly.
long names for the song title, album
•
Large video podcast files cause slow re-
•
An iPod® nano (1st Generation) may re-
name or artist name to prevent the iPod®
sponses in the iPod®. The vehicle center
main in fast forward or rewind mode if it is
from resetting itself.
display may momentarily black out, but it
connected during a seek operation. In
will soon recover.
•
Be careful not to do the following, or the
this case, please manually reset the
cable could be damaged and a loss of
iPod®.
•
If the iPod® automatically selects large
function may occur:
video podcast files while in the shuffle
•
An iPod® nano (2nd Generation) will con-
- Bend the cable excessively (1.6 in (40
mode, the vehicle center display may
tinue to fast-forward or rewind if it is dis-
mm) radius maximum).
momentarily black out, but it will soon
connected during a seek operation.
- Twist the cable excessively (more than
recover.
•
An incorrect song title may appear when
180 degrees).
•
Improperly plugging in the iPod® may
the Play Mode is changed while using an
- Pull or drop the cable.
cause a checkmark to be displayed on
iPod® nano (2nd Generation).
- Do not force the iPod® cable connector
and off (flickering). Always make sure that
•
Audiobooks may not play in the same
into the device port.
the iPod® is connected properly.
order as they appear on an iPod®.
- Close the center console lid on the
•
The iPod® nano (2nd Generation) will con-
•
Large video files cause slow responses in
cable or connectors.
tinue to fast forward or rewind if it is dis-
- Store objects with sharp edges in the
an iPod®. The vehicle center display may
connected during a seek operation.
momentarily black out, but will soon
storage where the cable is stored.
•
An incorrect song title may appear when
- Spill liquids on the cable and
recover.
the Play Mode is changed while using the
connectors.
•
If an iPod® automatically selects large
iPod® nano (2nd Generation).
•
Do not connect the cable to the iPod® if
video files while in the shuffle mode, the
•
Audiobooks may not play in the same
the cable and/or connectors are wet. It
vehicle center display may momentarily
order as they appear on the iPod®.
may damage the iPod®.
black out, but will soon recover.
4-30
Monitor, climate, audio, phone and voice recognition systems

•
If the cable and connectors are exposed
Bluetooth® streaming audio
•
While an audio device is connected
to water, allow the cable and/or connec-
through the Bluetooth® wireless connec-
•
Some Bluetooth® audio devices may not
tors to dry completely before connecting
tion, the battery power of the device may
be recognized by the in-vehicle audio
the cable to the iPod® (wait 24 hours for it
discharge quicker than usual.
system.
to dry).
•
This system supports the Bluetooth® Au-
•
It is necessary to set up the wireless con-
•
If the connector is exposed to fluids other
dio Distribution Profile (A2DP, AVRCP).
nection
between a compatible
than water, evaporative residue may
Bluetooth® audio device and the in-
cause a short between the connector
BLUETOOTH® is a
vehicle Bluetooth® module before using
pins. In this case, replace the cable, other-
the Bluetooth® audio.
trademark owned by
wise damage to the iPod® and a loss of
•
Operating procedure of the Bluetooth®
Bluetooth SIG, Inc. and
function may occur.
audio will vary depending on the devices.
licensed to
•
If the cable is damaged (insulation cut,
Make sure how to operate your audio de-
connectors cracked, contamination such
Panasonic.
vice before using it with this system.
as liquids, dust, dirt, etc. in the connec-
•
The Bluetooth® audio may be stopped
tors), do not use the cable. It is recom-
under the following conditions:
mended that you visit a NISSAN dealer to
- Receiving a call on the Bluetooth®
replace the cable with a new one.
Hands-Free Phone System.
•
When not in use for extended periods of
- Checking the connection to the
time, store the cable in a clean, dust free
hands-free phone.
environment at room temperature and
•
Do not place the Bluetooth® audio device
without direct sun exposure.
in an area surrounded by metal or far
•
Do not use the cable for any other pur-
away from the in-vehicle Bluetooth®
poses other than its intended use in the
module to prevent tone quality degrada-
vehicle.
tion and wireless connection disruption.
*iPod® is a trademark of Apple Inc., regis-
tered in the U.S. and other countries.
Monitor, climate, audio, phone and voice recognition systems
4-31

8. AUDIO button
Audio main operation
VOL (volume) knob / PUSH
(power) button
Place the ignition switch in the AUTO ACC
or ON position and press the PUSH
(power) button while the system is off
to call up the mode (radio, AUX, Bluetooth®
audio, USB or iPod®) that was playing im-
mediately before the system was turned
off.
To turn the system off, press the PUSH
(power) button.
Turn the VOL (volume) control knob to ad-
just the volume.
This vehicle may be equipped with Speed
Sensitive Volume. When this feature is ac-
tive, the audio volume changes as the driv-
ing speed changes.
LHA4704
FM/AM RADIO
4.
TRACK button
For additional information, see “Audio op-
5.
BACK button
eration precautions” (P. 4-28).
6.
PUSH SOUND button / TUNE• SCROLL
1.
MENU button
knob
2. Display screen
7. VOL (volume) knob/PUSH
(power)
button
3.
SEEK button
4-32
Monitor, climate, audio, phone and voice recognition systems

MENU button
Press the
MENU button to show the
Menu screen. Touch the “Settings” key on
the display, then touch the “Sound” key.
Sound
Bass
Adjusts the bass to the desired level.
Treble
Adjusts the treble to the desired level.
Balance
Adjusts the balance to the desired level. Balance adjusts the sound level between the left and right
speakers.
Fade
Adjusts the fade to the desired level. Fade adjusts the sound level between the front and rear
speakers.
Speed Sensitive Volume
Adjusts the speed sensitive volume function, which increases the volume of the audio system as
the speed of the vehicle increases. Set to “OFF” to disable the feature. The higher the setting, the
more the volume increases in relation to vehicle speed.
Bass, treble, balance, fade and Speed Sensitive Volume can be adjusted by touching ”-”/”+”, “L”/”R”, or “R”/”F” keys.
BACK button
AUDIO button
Press the
BACK button to return to the
Press to display the audio screen. When
previous menu screen.
this button is pressed while the audio
screen is not displayed, the last audio
source played will play.
Monitor, climate, audio, phone and voice recognition systems
4-33

5. Preset list
• Refresh: Touch the “Refresh” key to up-
To listen to a preset station, touch the
date the station list displayed on the right
corresponding station from the preset
side of the AM Menu screen.
list. If displayed, touch the “ <” or “ >” keys
(SEEK/TRACK) buttons
to scroll the preset list.
Press the
or
buttons to tune
AM radio operation
from low to high or high to low frequencies
and to stop at the next broadcasting
Press the
MENU button and touch the
station.
“AM” key or press the AUDIO button and
select AM on the bottom of the Launch Bar
Direct Tune
to bring up the AM display screen.
Touch the “Direct Tune” key to display the
If another audio source is playing when the
Direct Tune menu and manually enter a
“AM” key is pressed, the audio source play-
station.
LHA4708
ing will automatically be turned off and the
1 to 6 station memory operations
last radio station played will begin playing.
AM/FM radio screen
Up to six stations can be registered in the
AM Menu
preset list.
1.
“AM Menu” / “FM Menu” key
Touch to display the radio menu screen.
Touch the “AM Menu” key to display the AM
1. Select the AM radio band.
Menu screen options:
2.
“Direct Tune” (if so equipped)
2. Tune to the station you wish to store.
• SCAN: To scan the stations, touch the “AM
Touch to manually enter a station.
Menu” key on the radio screen and then
3. Touch and hold one of the preset num-
3. Audio source indicator
touch the “SCAN” key. The stations will be
bers in the preset list.
Indicates the currently selected audio
turned from low to high frequencies and
The information such as frequency will be
source.
stop at each broadcasting station for
displayed on the preset list.
several seconds. Touching the “SCAN” key
4. Reception information display
again during this period of several sec-
To select and listen to the preset stations,
Reception information currently avail-
onds will stop tuning and the radio will
press
or
on the steering wheel
able such as frequency, station name,
remain tuned to that station.
briefly or touch a preferred station on the
etc. is displayed.
preset list on the radio screen.
4-34
Monitor, climate, audio, phone and voice recognition systems

FM radio operation
• Refresh: Touch the “Refresh” key to up-
Auxiliary (AUX) devices operation
date the station list displayed on the right
Press the
MENU button and touch the
Connecting auxiliary devices
side of the FM Menu screen.
“FM” key or press the AUDIO button and
• RDS Info: Radio station and song informa-
Connect an AUX device into the AUX input
select FM on the bottom of the Launch Bar
jack located on the center console below
tion can be displayed on the FM display
to bring up the FM display screen.
screen.
the heater and air conditioner controls.
If another audio source is playing when the
The AUX input jack accepts any standard
(SEEK/TRACK) buttons
“FM” key is pressed, the audio source play-
analog audio input such as from a portable
ing will automatically be turned off and the
Press the
or
buttons to tune
cassette player, CD player, MP3 player or
last radio station played will begin playing.
from low to high or high to low frequencies
phone.
and to stop at the next broadcasting
The FM stereo indicator (STEREO) is shown
Insert a 1/8 in (3.5 mm) stereo mini plug in
station.
on the screen during FM stereo reception.
the audio input jack. If a cable with a mono
When the stereo broadcast signal is weak,
1 to 12 station memory operations
plug is used, the audio output may not
the radio automatically changes from ste-
Up to 12 stations can be registered in the
function normally.
reo to monaural reception.
preset list.
Activation and playing
FM Menu
1. Select the FM radio band.
Turn on the AUX device. Connect an AUX
Touch the “FM Menu” key to display the FM
2. Tune to the station you wish to store.
cable to the AUX device and the AUX input
Menu screen options:
jack. Select AUX mode from the audio
• SCAN: To scan the stations, touch the “FM
3. Touch and hold one of the preset num-
source menu screen or by pressing the
Menu” key on the radio screen and then
bers in the preset list.
Source button on the steering wheel.
touch the “SCAN” key. The stations will be
The information such as frequency will be
tuned from low to high frequencies and
displayed on the preset list.
stop at each broadcasting stations for
several seconds. Touching the “SCAN” key
To select and listen to the preset stations,
again during this period of several sec-
press
or
on the steering wheel
onds will stop tuning and the radio will
briefly or touch a preferred station on the
remain tuned to that station.
preset list on the radio screen.
Monitor, climate, audio, phone and voice recognition systems
4-35

Additional features
For additional information, see
“iPod®
player operation” (P. 4-39) regarding the
iPod® player available with this system.
For additional information, see “USB (Uni-
versal Serial Bus) connection port” (P. 4-36)
regarding the USB connection port avail-
able with this system.
For additional information, see “Bluetooth®
streaming audio”
(P.
4-42) about the
Bluetooth® audio interface available with
this system.
LHA4709
LHA4701
Microsoft (WMA) Obligation of
AUX screen
Labeling
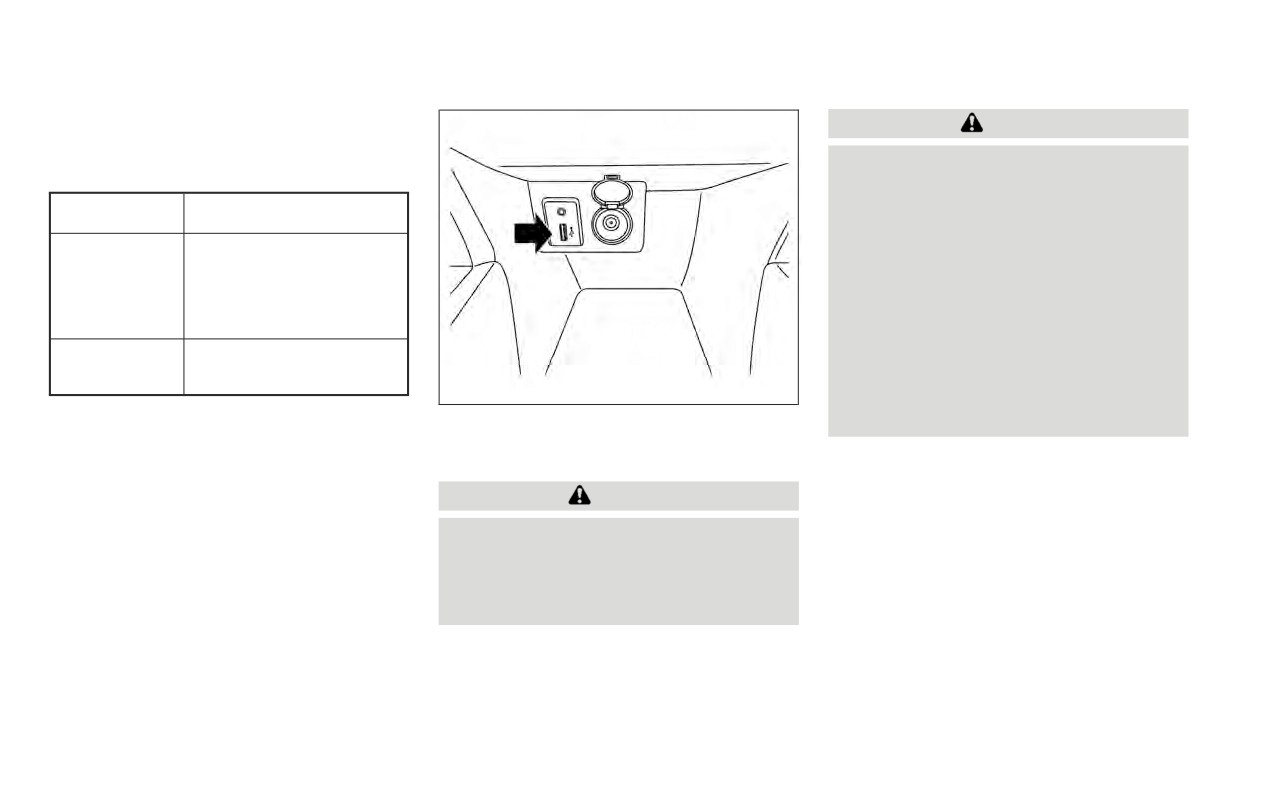
USB (Universal Serial Bus)
• Audio source indicator
Additional Obligation of Labeling
CONNECTION PORT
Indicates that the AUX source is currently
playing.
This product is protected by certain intel-
Connecting a device to the USB
lectual property rights of Microsoft
• “Volume Setting” keys
connection port
Corporation and third parties. Use or distri-
Touch one of the keys to select the sound
bution of such technology outside of this
output gain from Low, Medium and High.
product is prohibited without a license
WARNING
• AUX from Launch Bar
from Microsoft or an authorized Microsoft
Touch to change from another source to
Do not connect, disconnect, or operate
subsidiary and third parties.
AUX.
the USB device while driving. Doing so
can be a distraction. If distracted you
could lose control of your vehicle and
cause an accident or serious injury.
4-36
Monitor, climate, audio, phone and voice recognition systems

CAUTION
•
To avoid damage and loss of function
when using a USB device, note the
following precautions.
•
Do not force the USB device into the
USB port. Inserting the USB device
tilted or up-side-down into the port
may damage the port. Make sure
that the USB device is connected cor-
rectly into the USB port.
•
Do not grab the USB port cover (if so
equipped) when pulling the USB de-
vice out of the port. This could dam-
LHA4711
LHA4710
age the port and the cover.
•
Do not leave the USB cable in a place
USB connections screen
USB screen
where it can be pulled unintentionally.
Press the
MENU button and touch the
1.
“USB Menu” key
Pulling the cable may damage the port.
“Connections” key or touch the “Settings”
Touch to switch to the USB Menu screen.
For additional information, refer to your de-
key and touch the “Connections” key to
2. Track information
vice manufacturer's owner information re-
change USB settings.
Track information such as the song
garding the proper use and care of the device.
• Auto Change Source
name, artist name and album name are
Touch “ON” or “OFF” to change the audio
The USB port is located on the center con-
displayed.
source settings for USB memory devices
sole beneath the heater and air condi-
or an iPod® connected through a USB
3. Audio source indicator
tioner controls. Insert the USB device into
cable.
Indicates the currently selected audio
the connection port.
source.
When a compatible storage device is
4. USB operation keys
plugged into the connection port, compat-
Touch to control USB playback
ible audio files on the storage device can be
functions
played through the vehicle's audio system.
Monitor, climate, audio, phone and voice recognition systems
4-37
5. Play time and progress bar
USB memory device player
Fast-forwarding/rewinding
The play time of the track is displayed.
operation
To rewind or fast-forward the track, press
The bar indicates the progress in playing
and hold the
or
buttons on the
a track.
Activation and playing
control panel or touch and hold the “
”
Connecting the USB memory device into
or “
” keys on the screen.
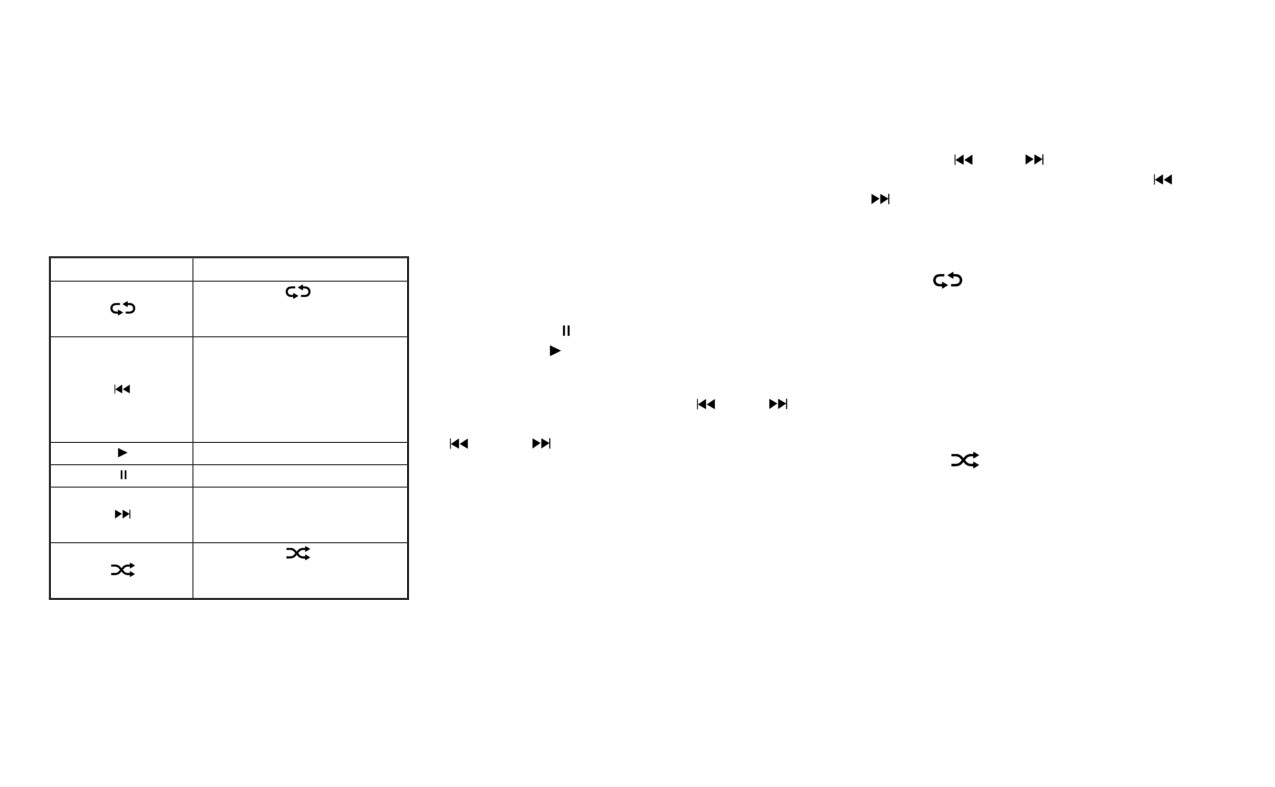
USB operation keys
the port will start playing the USB memory.
Touch to control USB playback functions.
Changing play mode
USB memory device can also be played by
Repeat mode
Keys
Description
touching the “USB” key on the Menu screen
or by touching USB on the Launch Bar.
Touch the “
” key on the USB screen to
Each time “
” key is
change the repeat mode.
touched, the repeat mode
To pause playing the USB memory device
changes.
The following modes are available:
touch the “
” key. To resume playing,
Touch to return to the begin-
touch the “
” key.
All: Repeat all
ning of the current track.
Touch again to select the
Skipping tracks
1 Folder: Repeat folder/sub-folder
previous track. Touch and
To skip the tracks, press the
or
1 Track: Repeat track
hold to rewind the current
track.
buttons on the control panel or touch the “
Random mode
” or “
” keys on the screen repeat-
Touch to play the track.
edly until the preferred track is selected.
Touch the “
” key on the screen to
Touch to pause the track.
change the random mode as follows:
Touch to select the next
NOTE:
No text displayed: Random off
track. Touch and hold to
fast-forward the track.
Depending on the condition, skipping to
All: Repeat all
Each time “
” key is
the previous track may require pressing
touched, the random mode
the button or touching the key twice.
1 Folder: Repeat folder/sub-folder
changes.
Pressing the button or touching the key
once may only restart the current track
from the beginning.
4-38
Monitor, climate, audio, phone and voice recognition systems
USB menu
CAUTION
Touch the “USB Menu” key on the USB
•
Do not force the USB device into the
screen to display the USB Menu screen.
USB port. Inserting the USB device
tilted or up-side-down into the port
“Now Playing” key
Touch to display the USB
screen.
may damage the port. Make sure
that the USB device is connected cor-
“Folder List” key
Touch to display the folder list.
Touch an item on the list to
rectly into the USB port.
select the folder. The sub-
•
Do not grab the USB port cover (if so
folder or track list will be dis-
equipped) when pulling the USB de-
played. Select a sub-folder or
vice out of the port. This could dam-
track from the list.
age the port and the cover.
“Album Artwork”
Touch to run on/off the album
artwork display on the USB
•
Do not leave the USB cable in a place
screen.
where it can be pulled unintention-
LHA4701
ally. Pulling the cable may damage
iPod®* PLAYER OPERATION
the port.
Connecting iPod®
For additional information, refer to your de-
vice manufacturer’s owner information re-
garding the proper use and care of the
WARNING
device.
Do not connect, disconnect, or operate
the USB device while driving. Doing so
can be a distraction. If distracted you
could lose control of your vehicle and
cause an accident or serious injury.
Monitor, climate, audio, phone and voice recognition systems
4-39
To connect an iPod® to the vehicle so that
Compatibility
• iPod® nano - 5th generation (firmware
the iPod® can be controlled with the audio
version 1.0.2 or later)
The following models are compatible:
system controls and display screen, use
• iPod® nano - 6th generation (firmware
the USB connection port located on the
•
iPod® Classic 5th generation
(firmware
version 1.1 or later)
version 1.3.0 or later)
center console below the heater and air
• iPhone® 3G (firmware version 4.2.1 or later)
conditioner controls. Connect the iPod®-
•
iPod® Classic 6th generation
(firmware
• iPhone® 3GS (firmware version 5.1 or later)
specific end of the cable to the iPod® and
version 2.0.1 or later)
the USB end of the cable to the USB con-
• iPhone® 4 (firmware version 5.1 or later)
•
iPod® Classic 7th generation
(firmware
nection port on the vehicle. If your iPod®
version 2.0.4 or later)
• iPhone® 4S (firmware version 5.1 or later)
supports charging via a USB connection, its
•
iPod® Touch 2nd generation
(firmware
* Some features of this iPod® may not be
battery will be charged while connected to
version 4.2.1 or later)*
fully functional.
the vehicle with the ignition switch in the
•
iPod® Touch 3rd generation
(firmware
ON position.
Make sure that your iPod® firmware is up-
version 5.1 or later)
dated to the version indicated above.
While connected to the vehicle, the iPod®
•
iPod® Touch 4th generation
(firmware
can only be operated by the vehicle audio
version 5.1 or later)
controls.
•
iPod® nano - 1st generation
(firmware
To disconnect the iPod® from the vehicle,
version 1.3.1 or later)
remove the USB end of the cable from the
•
iPod® nano - 2nd generation (firmware
USB connection port on the vehicle, then
version 1.1.3 or later)
remove the cable from the iPod®.
•
iPod® nano - 3rd generation (firmware
* iPod® is a trademark of Apple Inc., regis-
version 1.1.3 or later)
tered in the U.S. and other countries.
•
iPod® nano - 4th generation (firmware
version 1.0.4 or later)
4-40
Monitor, climate, audio, phone and voice recognition systems

5. iPod® operation keys
iPod® memory device player
Touch to control iPod® playback
operation
functions
Activation and playing
6. Play time and progress bar
Connecting the iPod® to the vehicle via USB
The play time of the track is displayed.
cable will activate the iPod® mode.
The bar indicates the progress in playing
a track.
The iPod® can also be played by touching
the “iPod” key on the Menu screen or by
iPod® operation keys
touching iPod on the Launch Bar.
Touch to control iPod® playback functions.
Skipping tracks
Keys
Description
To skip the tracks, press the
or
Each time “
” key is
buttons on the control panel or touch the “
touched, the repeat mode
” or “
” keys on the screen repeat-
LHA4724
changes.
edly until the preferred track is selected.
Touch to return to the begin-
iPod screen
ning of the current track.
NOTE:
1.
“iPod Menu” key
Touch again to select the
previous track. Touch and
Depending on the condition, skipping to
Touch to switch to the iPod Menu screen.
hold to rewind the current
the previous track may require pressing
2. Track information
track.
the button or touching the key twice.
Track information such as the song
Touch to play the track.
Pressing the button or touching the key
name, artist name and album name are
Touch to pause the track.
once may only restart the current track
displayed.
from the beginning.
Touch to select the next
track. Touch and hold to
3. Audio source indicator
Fast-forwarding/rewinding
fast-forward the track.
Indicates the currently selected audio
To rewind or fast-forward the track, press
Each time “
” key is
source.
and hold the
or
buttons on the
touched, the random mode
changes.
control panel or touch and hold the “
”
4. Album artwork
or “
” keys on the screen,
An image of the album artwork is displayed
when available if the setting is turned on.
Monitor, climate, audio, phone and voice recognition systems
4-41

Changing play mode
iPod® Menu
BLUETOOTH® STREAMING AUDIO
Repeat mode
Touch the “iPod Menu” key on the iPod®
If you have a compatible Bluetooth® audio
Touch the “
” key on the iPod® screen
screen to display the iPod® Menu screen.
device that is capable of playing audio files,
to change the repeat mode. The following
the device can be connected to the vehi-
modes are available.
“Now Playing” key
Touch to display the USB
cle's audio system so that the audio files on
screen.
the device play through the vehicle's
No text displayed: Repeat off
“Folder List” key (if
Touch to display the folder list.
speakers. For additional information, see
All: Repeat all
so equipped)
Touch an item on the list to
“FM/AM radio” (P. 4-32).
select the folder. The sub-
One: Repeat track
folder or track list will be dis-
NOTE:
played. Select a sub-folder or
Random mode
track from the list.
For additional information regarding
Touch the “
” key on the screen to
“Album Artwork”
Touch to run on/off the album
Bluetooth® Streaming Audio, refer to the
change the random mode as follows.
key
artwork display on the USB
cellular phone owner’s manual.
screen.
“
” is not highlighted: Random off
“Playlists” key
Touch to display the list ac-
“
” highlighted: Random on
“Artists” key
cording to the selected item.
“Albums” key
“Songs” key
“Podcasts” key
“Genres” key
“Composers” key
“Audiobooks” key
“iTunes Radio”
key
4-42
Monitor, climate, audio, phone and voice recognition systems
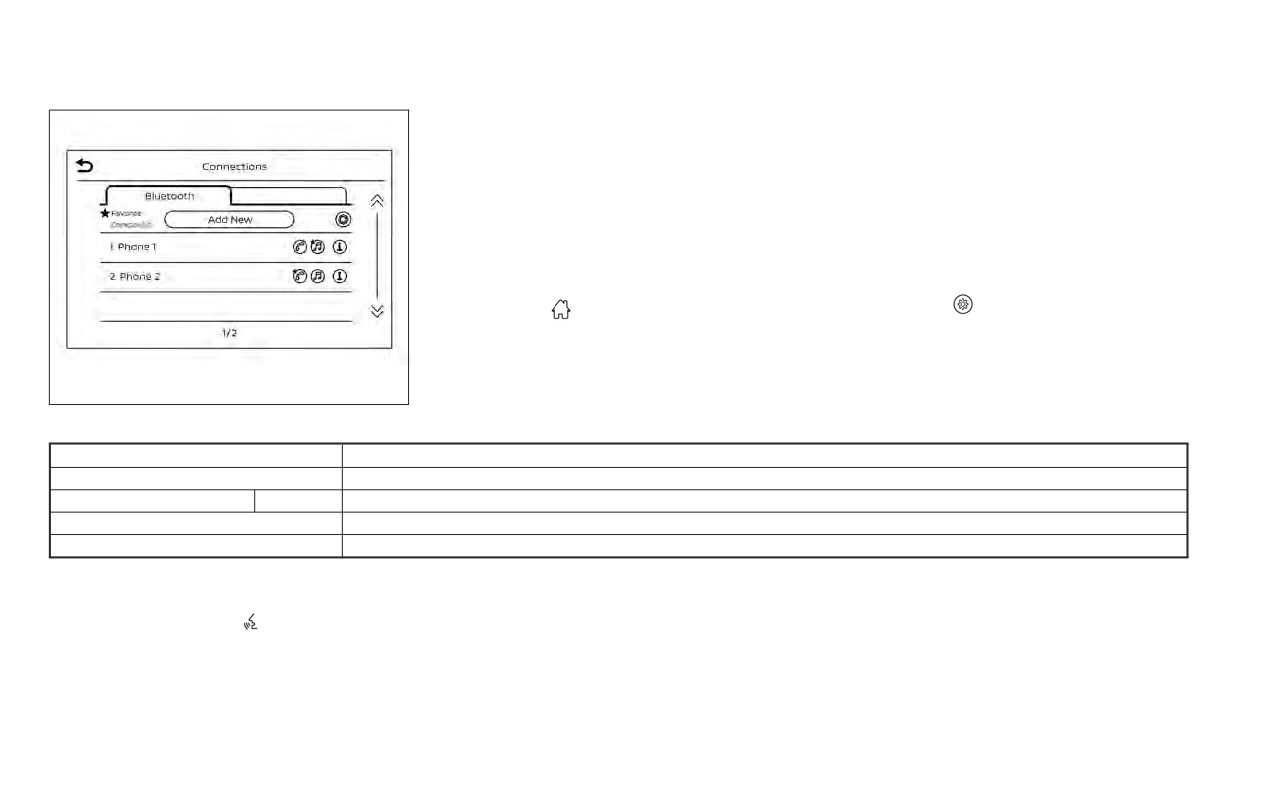
NOTE:
3.
In the Bluetooth tab, touch the “Add New”
key to connect a phone.
The connecting procedure must be per-
formed when the vehicle is stationary. If
4.
When a compatible phone is found a
the vehicle starts moving during the pro-
message with a PIN appears on the
cedure, the procedure will be canceled.
screen.
To connect a phone to the Bluetooth®
5.
Verify the PIN is correct and accept the
Hands-Free Phone System:
connection.
Manual Connecting Procedure
6.
To access the Bluetooth® settings menu
1. Press the
MENU button on the con-
touch the “
” key on the Connections
screen. The
following
options
are
trol panel.
available:
2. Touch the
“Connections” key on the
screen.
LHA4726
Connecting procedure
Menu Item
Result
Bluetooth
Allows user to switch Bluetooth® on and off. Bluetooth® must be turned on in order to connect a device.
ON
Turns Bluetooth® functionality on. To turn off, touch the “ON” key again. The indicator light will go off.
Favorite (Connection first)
Allows user to toggle “Phone” and “Audio” favorite settings on and off.
PIN
Allows user to customize the PIN to a four digit number.
Automatic Connecting Procedure
start the pairing procedure. When a com-
patible phone is found, a message with a
If no phone is connected to the system,
PIN appears on the screen. Operate the
press and hold the
button on the
Bluetooth® phone to complete the con-
steering wheel for less than 1.5 seconds.
nection process. For additional informa-
After the prompt, speak “Add Phone”, the
tion, see “Bluetooth® connections screen”
system will announce “transferring to the
(P. 4-63).
add phone settings menu”. The system will
Monitor, climate, audio, phone and voice recognition systems
4-43
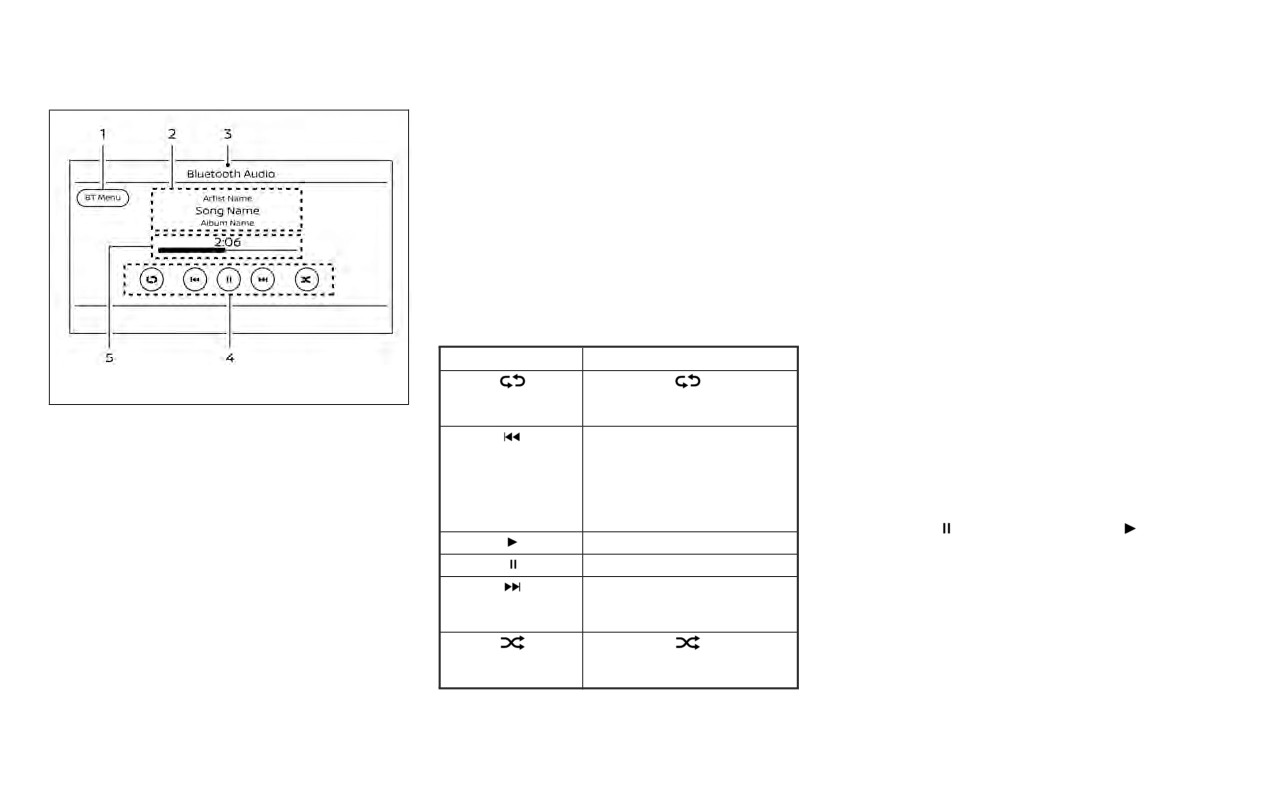
4. Bluetooth® audio operation keys
Bluetooth® audio operation
Touch to control Bluetooth® audio play-
The ability to pause, change tracks, fast
back functions
forward, rewind, randomize and repeat
5. Play time and progress bar
music may be different between devices.
The play time of the track is displayed.
Some or all of these functions may not be
The bar indicates the progress in playing
supported on each device.
a track.
NOTE:
Bluetooth® operation keys
Depending on the Bluetooth® audio de-
Touch to
control Bluetooth® playback
vice that is connected, it may not be pos-
functions.
sible to perform audio operations or a
delay may occur before music is played
Keys
Description
back.
Each time “
” key is
LHA4727
touched, the repeat mode
Activation and playing
changes.
Bluetooth® screen
A Bluetooth® audio device can be played by
Touch to return to the begin-
touching the “Bluetooth” key on the Menu
1.
“BT Menu” key
ning of the current track.
screen or by touching Bluetooth on the
Depending on the Bluetooth®
version
Touch again to select the
previous track. Touch and
Launch Bar.
supported by the connected device, ei-
hold to rewind the current
ther the “BT Menu” key or “Connections”
To pause playing the Bluetooth® audio,
track.
key is displayed.
touch the “
” key. Touch the “
” key
Touch to play the track.
to resume playing.
2. Track information
Touch to pause the track.
Track information such as the song
Changing folders
Touch to select the next
name, artist name and album name are
track. Touch and hold to
To change folders, touch the “BT Menu” key.
displayed.
fast-forward the track.
Each time “
” key is
3. Audio source indicator
touched, the random mode
Indicates the currently selected audio
changes.
source.
4-44
Monitor, climate, audio, phone and voice recognition systems

Fast-forwarding/rewinding
BT Menu
To fast-forward or rewind the track, press
Touch the “BT Menu” key on the Bluetooth®
and hold the
or
buttons on the
audio screen to display the Bluetooth® au-
control panel or touch the “
” or “
”
dio menu screen.
keys on the screen.
The following items are available.
Changing play mode
Repeat mode
“Now Playing” key
Touch to display the
Bluetooth® audio screen.
Touch the “
” key on the screen to
“Current List” key (if so
A list of track in the cur-
change the repeat mode.
equipped)*
rently selected folder is
displayed.
Random mode
“Connections” key
Touch to display the con-
Touch the “
” key on the screen to
nections screen.
change the random mode.
“Folder List” key*
Touch to display the
LHA4227
folder list. Touch an item
NOTE:
on the list to select the
STEERING WHEEL SWITCH FOR
folder.
Available repeat/random modes change
AUDIO CONTROL
depending on the connected device.
*: displayed only when available.
1.
SEEK/TRACK buttons
NOTE:
2. SOURCE switch
Depending on the connected device, the
3. Volume control switch
“BT Menu” key may not be displayed.
Monitor, climate, audio, phone and voice recognition systems
4-45

ANTENNA (Type A) (if so equipped)
SOURCE switch
Bluetooth® Streaming Audio
• Press or hold for less than 1.5 seconds to
Push the SOURCE switch to change the
skip ahead or back to the next song.
mode in the following sequence:
USB
AM → FM→ USB/iPod®*→ Bluetooth® Au-
dio* → AUX* → AM.
•
Press or hold for less than 1.5 seconds to
increase or decrease the track number.
* These modes are only available when
•
Press or hold for more than 1.5 seconds to
compatible media storage is inserted into
reverse or fast forward the track being
the device or connected to the system.
played.
Volume control switch
Push the volume control switch to increase
or decrease the volume.
LHA4236
SEEK/TRACK buttons
The rod antenna cannot be shortened, but
can be removed. When you need to remove
AM and FM
the antenna, turn the antenna rod counter-
• Press or hold for less than 1.5 seconds to
B .
increase or decrease the preset station
To install the antenna rod, turn the antenna
and show a list of the preset stations.
A and hand tighten.
• Press or hold for more than 1.5 seconds to
seek up or down to the next station.
CAUTION
iPod®
To avoid damaging or deforming the
• Press or hold for less than 1.5 seconds to
antenna, be sure to remove the an-
increase or decrease the track number.
tenna under the following conditions.
• Press or hold for more than 1.5 seconds to
• The vehicle enters an automatic car
reverse or fast forward the track being
wash.
played.
4-46
Monitor, climate, audio, phone and voice recognition systems
ANTENNA (Type B) (if so equipped)
SIRI® EYES FREE
The vehicle is equipped with a shark fin
Apple Siri® Eyes Free personal assistant
•
The vehicle enters a garage with a
antenna.
can be accessed from the vehicle. Siri Eyes
low ceiling.
Free can be accessed in Siri Eyes Free
•
The vehicle is covered with a car
mode to reduce user distraction. In this
cover.
mode, Siri Eyes Free is available for interac-
•
Always properly tighten the antenna
tion by voice control. After connecting a
rod during installation or the an-
compatible Apple device by using
tenna rod may break during vehicle
Bluetooth®, Siri Eyes Free can be activated
operation.
from the
button on the steering
wheel.
Siri® is a trademark of Apple Inc., registered
in the U.S. and other countries.
• Some Siri Eyes Free functions, such as
displaying pictures or opening apps, may
not be available while driving.
• For getting best results, always update
your device to the latest software version.
• Keep the interior of the vehicle as quiet as
possible. Close the windows to eliminate
the surrounding noises (traffic noises, vi-
bration sounds, etc.), which may prevent
the system from recognizing the voice
commands correctly.
• For functions that can be used in Siri Eyes
Free, please refer to the Apple website.
Monitor, climate, audio, phone and voice recognition systems
4-47