Nissan Versa (2019 year). Instruction - part 7


  Index      Nissan     Nissan Versa - instruction 2019 year in english


Search            


Content   ..  5  6  7  8   ..


Nissan Versa (2019 year). Instruction - part 7


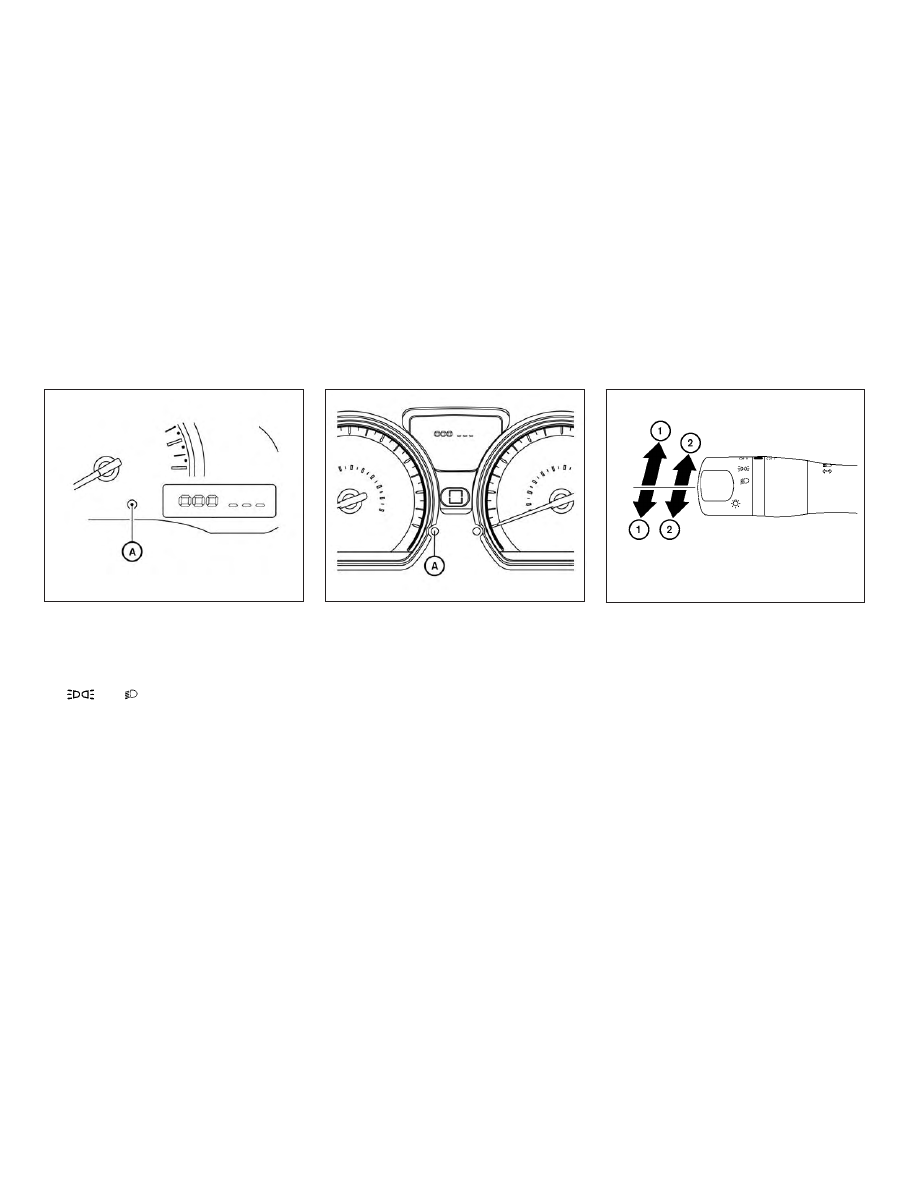
INSTRUMENT BRIGHTNESS
CONTROL

The instrument brightness control oper-
ates when the headlight control switch is in

the

or

position.

Type A: Press the control

A

to adjust the

brightness of instrument panel lights.

Type B: Press the control

A

to adjust the

brightness of instrument panel lights.

Also, Type B is equipped with daytime
brightness control. Brightness can be ad-
justed with the headlight control switch in
the OFF position by pressing the control

A

.

TURN SIGNAL SWITCH

Type A (if so equipped)

LIC2289

Type B (if so equipped)

LIC2137

WIC1512

2-26

Instruments and controls

Turn signal

1

Move the lever up or down to signal the
turning direction. When the turn is
completed, the turn signal cancels au-
tomatically.

Lane change signal

2

Move the lever up or down until the
turn signal begins to flash, but the lever
does not latch, to signal a lane change.
Hold the lever until the lane change is
completed.

Move the lever up or down until the
turn signal begins to flash, but the lever
does not latch, and release the lever.
The turn signal will automatically flash
three times.

Choose the appropriate method to signal
a lane change based on road and traffic
conditions.

FOG LIGHT SWITCH (if so
equipped)

To turn the fog lights on, turn the headlight
switch to the

position, then turn the

fog light switch to the

position.

To turn the fog lights off, turn the fog light
switch to the OFF position.

The headlights must be on and the low
beams selected for the fog lights to oper-
ate. The fog lights automatically turn off
when the high beam headlights are se-
lected.

To sound the horn, push the center pad
area of the steering wheel.

WARNING

Do not disassemble the horn. Doing so
could affect proper operation of the
supplemental front air bag system.
Tampering with the supplemental front
air bag system may result in serious
personal injury.

WIC1513

LIC4017

HORN

Instruments and controls

2-27

The vehicle should be driven with the VDC
system on for most driving conditions.

If the vehicle is stuck in mud or snow, the
VDC system reduces the engine output to
reduce wheel spin. The engine speed will
be reduced even if the accelerator is de-
pressed to the floor. If maximum engine
power is needed to free a stuck vehicle,
turn the VDC system off.

To turn off the VDC system, push the VDC
OFF switch. The

indicator will come

on.

Push the VDC OFF switch again or restart
the engine to turn on the system. For addi-
tional information, refer to “Vehicle Dy-
namic Control (VDC) system” in the “Start-
ing and driving” section of this manual.

The power outlets are for powering electri-
cal accessories such as cellular tele-
phones. The outlets are rated at 12 volt,
120W (10A) maximum.

LIC3344

Instrument panel

LIC3609

VEHICLE DYNAMIC CONTROL (VDC)
OFF SWITCH

POWER OUTLETS

2-28

Instruments and controls

CAUTION

∙ The outlet and plug may be hot during

or immediately after use.

∙ Only certain power outlets are de-

signed for use with a cigarette lighter
unit. Do not use any other power out-
let for an accessory lighter. It is rec-
ommended that you visit a NISSAN
dealer for additional information

∙ Do not use with accessories that ex-

ceed a 12 volt, 120W (10A) power draw.

∙ Do not use double adapters or more

than one electrical accessory.

∙ Use power outlets with the engine

running to avoid discharging the ve-
hicle battery.

∙ Avoid using power outlets when the

air conditioner, headlights or rear win-
dow defroster is on.

∙ Before inserting or disconnecting a

plug, be sure the electrical accessory
being used is turned off.

∙ Push the plug in as far as it will go. If

good contact is not made, the plug
may overheat or the internal tem-
perature fuse may open.

∙ When not in use, be sure to close the

cap. Do not allow water or any other
liquid to contact the outlet.

FRONT-DOOR POCKETS

Console (if so equipped)

LIC3610

LIC2157

STORAGE

Instruments and controls

2-29

SEATBACK POCKET (if so
equipped)

The seatback pocket is located on the
back of the passenger’s seat. The pocket
can be used to store maps.

WARNING

To ensure proper operation of the pas-
senger’s NISSAN Advanced Air Bag Sys-
tem,

please

observe

the

following

items:

∙ Do not allow a passenger in the rear

seat to push or pull on the seatback
pocket or head restraint/headrest.

∙ Do not place heavy loads heavier than

9.1 lbs. (4 kg) on the seatback, head
restraint/headrest or in the seatback
pocket.

STORAGE TRAY

WARNING

Do not place sharp objects in the trays
to help prevent injury in an accident or
sudden stop.

LIC1328

LIC3614

2-30

Instruments and controls

GLOVE BOX

Open the glove box by pulling the handle.

Use pocket on glove box lid

A

to store and

hide small objects.

WARNING

Keep glove box lid closed while driving
to help prevent injury in an accident or a
sudden stop.

CUP HOLDERS

WARNING

Avoid abrupt starting and braking
when the cup holder is being used to
prevent spilling the drink. If the liquid is
hot, it can scald you or your passenger.

CAUTION

Use only soft cups in the cup holder.
Hard objects can injure you in an
accident.

LIC3613

Front

LIC3611

Rear

LIC3612

Instruments and controls

2-31

CAUTION

∙ Do not use bottle holder for any other

objects that could be thrown about in
the vehicle and possibly injure people
during sudden braking or an accident.

∙ Do not use bottle holder for open liq-

uid containers.

POWER WINDOWS (if so equipped)

WARNING

∙ Make sure that all passengers have

their hands, etc., inside the vehicle
while it is in motion and before closing
the windows. Use the window lock
switch to prevent unexpected use of
the power windows.

∙ To help avoid risk of injury or death

through unintended operation of the
vehicle and/or its systems, including
entrapment in windows or inadver-
tent door lock activation, do not leave
children, people who require the as-
sistance of others or pets unattended
in your vehicle. Additionally, the tem-
perature inside a closed vehicle on a
warm day can quickly become high
enough to cause a significant risk of
injury or death to people and pets.

The power windows operate when the ig-
nition switch is placed in the ON position or
for a period of time after the ignition switch
is placed in the OFF position. If the driver’s
or passenger’s door is opened during this
period of time, the power to the windows is
canceled.

1.

Window lock button

2.

Power door lock switch

3.

Front passenger’s side window
switch

4.

Right rear passenger’s window
switch

5.

Left rear passenger’s window
switch

6.

Driver’s side automatic switch

Bottle holder

LIC2158

WIC1100

WINDOWS

2-32

Instruments and controls

Driver’s side power window
switch

The driver’s side control panel is equipped
with switches to open or close the front
and rear passenger windows.

To open a window, push the switch and
hold it down. To close a window, pull the
switch and hold it up. To stop the opening
or closing function at any time, simply re-
lease the switch.

Locking passengers’ windows

When the window lock switch is depressed,
only the driver’s side window can be
opened or closed. Push it again to cancel
the window lock function.

Front passenger’s power window
switch

The passenger’s window switch operates
only the corresponding passenger’s win-
dow. To open the window, push the switch
and hold it down

1

. To close the window,

pull the switch up

2

.

Rear power window switch

The rear power window switches open or
close only the corresponding windows. To
open the window, push the switch and hold
it down

1

. To close the window, pull the

switch up

2

.

LIC0718

LIC0718

Instruments and controls

2-33

Automatic operation

To fully open a window equipped with au-
tomatic

operation,

press

the

window

switch down to the second detent and re-
lease it; it need not be held. The window
automatically opens all the way. To stop
the window, lift the switch up while the win-
dow is opening.

MANUAL WINDOWS (if so
equipped)

The side windows can be opened or closed
by turning the hand crank on each door.

The interior light has a three-position
switch and operates regardless of ignition
switch position.

When the switch is in the ON position

1

,

the interior lights illuminate, regardless of
door position. The lights will go off after a
period of time unless the ignition switch is
placed in the ACC or ON position.

LIC0410

LIC3352

SIC2063A

INTERIOR LIGHTS

2-34

Instruments and controls

When the switch is in the DOOR position

2

,

the interior lights will stay on for a period of
time when:

∙ The doors are unlocked by the key fob (if

so equipped), a key or the power door
lock switch (if so equipped) while all
doors are closed and the ignition switch
is placed in the OFF position.

∙ The driver’s door is opened and then

closed while the key is removed from
the ignition switch.

∙ The key is removed from the ignition

switch while all doors are closed.

The lights will turn off while the timer is
activated when:

∙ The driver’s door is locked by the key fob

(if so equipped), a key, or the power door
lock switch (if so equipped).

∙ The ignition switch is placed in the ON

position.

When the switch is in the OFF position

3

,

the interior lights do not illuminate, regard-
less of door position.

The lights will turn off automatically after a
period of time while doors are open to pre-
vent the battery from becoming dis-
charged.

CAUTION

Do not use for extended periods of time
with the engine stopped. This could re-
sult in a discharged battery.

MAP LIGHT

The map light has a three-position switch
and operates regardless of ignition switch
position.

When the switch is in the ON position

3

,

the map light illuminates, regardless of
door position. The light will go off after a
period of time unless the ignition switch is
placed in the ACC or ON position.

LIC2126

Instruments and controls

2-35

When the switch is in the DOOR position

2

,

the map light will stay on for a period of
time when:

∙ The doors are unlocked by the key fob (if

so equipped), a key or the power door
lock switch while all doors are closed
and the ignition switch is placed in the
OFF position.

∙ The driver’s door is opened and then

closed while the key is removed from
the ignition switch.

∙ The key is removed from the ignition

switch while all doors are closed.

The light will turn off while the timer is acti-
vated when:

∙ The driver’s door is locked by the key fob

(if so equipped), a key, or the power door
lock switch.

∙ The ignition switch is placed in the ON

position.

When the switch is in the OFF position

1

,

the map light does not illuminate, regard-
less of door position.

The light will turn off automatically after a
period of time while doors are open to pre-
vent the battery from becoming dis-
charged.

CAUTION

Do not use for extended periods of time
with the engine stopped. This could re-
sult in a discharged battery.

The light illuminates when the trunk lid is
opened. When the trunk lid is closed, the
light goes off. For additional information,
refer to “Exterior and interior lights” in the
“Do-it-yourself ” section of this manual.

TRUNK LIGHT

2-36

Instruments and controls

3 Pre-driving checks and adjustments

Keys . . . . . . . . . . . . . . . . . . . . . . . . . . . . . . . . . . . . . . . . . . . . . 3-2

NISSAN Intelligent Key® (if so equipped) . . . . . . . 3-4
NISSAN Vehicle Immobilizer System
keys (if so equipped) . . . . . . . . . . . . . . . . . . . . . . . . . . 3-5

Doors . . . . . . . . . . . . . . . . . . . . . . . . . . . . . . . . . . . . . . . . . . . 3-6

Locking with key. . . . . . . . . . . . . . . . . . . . . . . . . . . . . . 3-7
Locking with inside lock knob. . . . . . . . . . . . . . . . . 3-7
Locking with power door lock switch
(if so equipped) . . . . . . . . . . . . . . . . . . . . . . . . . . . . . . . 3-8
Automatic door locks (if so equipped) . . . . . . . . 3-8
Child safety rear door lock . . . . . . . . . . . . . . . . . . . . 3-8

Remote keyless entry system (if so equipped) . . . 3-9

How to use remote keyless entry
system . . . . . . . . . . . . . . . . . . . . . . . . . . . . . . . . . . . . . . 3-10

NISSAN Intelligent Key® (if so equipped) . . . . . . . . . 3-13

Operating range. . . . . . . . . . . . . . . . . . . . . . . . . . . . . 3-14
Door locks/unlocks precaution . . . . . . . . . . . . . . 3-15
NISSAN Intelligent Key® Operation . . . . . . . . . . . 3-16
How to use the remote keyless entry
function . . . . . . . . . . . . . . . . . . . . . . . . . . . . . . . . . . . . . 3-19

Warning lights and audible reminders . . . . . . . 3-23
Warning signals . . . . . . . . . . . . . . . . . . . . . . . . . . . . . 3-23
Troubleshooting guide . . . . . . . . . . . . . . . . . . . . . . 3-25

Hood . . . . . . . . . . . . . . . . . . . . . . . . . . . . . . . . . . . . . . . . . . . 3-27
Trunk lid . . . . . . . . . . . . . . . . . . . . . . . . . . . . . . . . . . . . . . . . 3-28

Key operation . . . . . . . . . . . . . . . . . . . . . . . . . . . . . . . 3-28
Opener operation . . . . . . . . . . . . . . . . . . . . . . . . . . . 3-28
Interior trunk lid release . . . . . . . . . . . . . . . . . . . . . 3-29

Fuel-filler door . . . . . . . . . . . . . . . . . . . . . . . . . . . . . . . . . . 3-30

Opener operation . . . . . . . . . . . . . . . . . . . . . . . . . . . 3-30
Fuel-filler cap . . . . . . . . . . . . . . . . . . . . . . . . . . . . . . . . 3-30

Steering wheel . . . . . . . . . . . . . . . . . . . . . . . . . . . . . . . . . 3-32

Tilt operation . . . . . . . . . . . . . . . . . . . . . . . . . . . . . . . . 3-32

Sun visors . . . . . . . . . . . . . . . . . . . . . . . . . . . . . . . . . . . . . . 3-33

Vanity mirror . . . . . . . . . . . . . . . . . . . . . . . . . . . . . . . . 3-33

Mirrors . . . . . . . . . . . . . . . . . . . . . . . . . . . . . . . . . . . . . . . . . 3-34

Rearview mirror . . . . . . . . . . . . . . . . . . . . . . . . . . . . . 3-34
Outside mirrors . . . . . . . . . . . . . . . . . . . . . . . . . . . . . 3-34

1.

Master key

2.

Valet key

3.

Key number plate

A key number plate is supplied with your
keys. Record the key number and keep it in
a safe place (such as your wallet), not in the
vehicle. If you lose your keys, it is recom-
mended that you visit a NISSAN dealer for
duplicates by using the key number.
NISSAN does not record key numbers so it
is very important to keep track of your key
number plate.

A key number is only necessary when you
have lost all your keys. If you still have a key,
it can be duplicated without knowing the
key number.

1.

Integrated door lock key fob (two
sets)

2.

Key number plate

CAUTION

Do not leave the ignition key inside the
vehicle when you leave the vehicle.

A key number plate is supplied with your
keys. Record the key number and keep it in
a safe place (such as your wallet), not in the
vehicle. If you lose your keys, it is recom-
mended that you visit a NISSAN dealer for
duplicates by using the key number.

Type A (if so equipped)

SPA2342

Type B (if so equipped)

LPD2027

KEYS

3-2

Pre-driving checks and adjustments

NISSAN does not record key numbers so it
is very important to keep track of your key
number plate.

A key number is only necessary when you
have lost all keys and do not have one to
duplicate from. If you still have a key, it can
be duplicated without knowing the key
number.

1.

Integrated door lock key fob (two
sets)

2.

Key number plate

CAUTION

Do not leave the ignition key inside the
vehicle when you leave the vehicle.

A key number plate is supplied with your
keys. Record the key number and keep it in
a safe place (such as your wallet), not in the
vehicle. If you lose your keys, it is recom-
mended that you visit a NISSAN dealer for
duplicates by using the key number.
NISSAN does not record key numbers so it
is very important to keep track of your key
number plate.

A key number is only necessary when you
have lost all your keys. If you still have a key,
it can be duplicated without knowing the
key number.

Type C (if so equipped)

LPD2326

Pre-driving checks and adjustments

3-3

1.

Intelligent Keys (two sets)

2.

Mechanical keys

3.

Key number plate (one plate)

NISSAN INTELLIGENT KEY® (if so
equipped)

Your vehicle can only be driven with the
Intelligent Keys which are registered to
your vehicle’s Intelligent Key System com-
ponents and NISSAN Vehicle Immobilizer
System components.

Never leave these keys in the vehicle.

As many as four Intelligent Keys can be
registered and used with one vehicle. The
new keys must be registered prior to use
with the Intelligent Key System and NISSAN
Vehicle Immobilizer System of your vehicle.
Since the registration process requires
erasing all memory in the Intelligent Key
components when registering new keys,
be sure to take all Intelligent Keys that you
have to the NISSAN dealer.

A key number plate is supplied with your
keys. Record the key number and keep it in
a safe place (such as your wallet), not in the
vehicle. If you lose your keys, it is recom-
mended that you visit a NISSAN dealer for
duplicates by using the key number.
NISSAN does not record key numbers so it
is very important to keep track of your key
number plate.

A key number is only necessary when you
have lost all keys and do not have one to
duplicate from. If you still have a key, it can
be duplicated without knowing the key
number.

CAUTION

Listed below are conditions or occur-
rences which will damage the Intelli-
gent Key:

∙ Do not allow the Intelligent Key, which

contains electrical components, to
come into contact with water or salt
water. This could affect the system
function.

∙ Do not drop the Intelligent Key.

∙ Do not strike the Intelligent Key

sharply against another object.

∙ Do not change or modify the Intelli-

gent Key.

∙ Wetting may damage the Intelligent

Key. If the Intelligent Key gets wet, im-
mediately wipe until it is completely
dry.

∙ Do not place the Intelligent Key for an

extended period in an area where
temperatures exceed 60°C (140°F).

∙ Do not attach the Intelligent Key with

a key holder that contains a magnet.

LPD2076

3-4

Pre-driving checks and adjustments

∙ Do not place the Intelligent Key near

equipment that produces a magnetic
field, such as a TV, audio equipment
and personal computers.

If an Intelligent Key is lost or stolen, NISSAN
recommends erasing the ID code of that
Intelligent Key from the vehicle. This may
prevent the unauthorized use of the Intelli-
gent Key to operate the vehicle. For infor-
mation regarding the erasing procedure, it
is recommended that you visit a NISSAN
dealer.

Mechanical key

The Intelligent Key contains the mechani-
cal key.

To remove the mechanical key, release the
lock knob on the back of the Intelligent Key.

To install the mechanical key, firmly insert it
into the Intelligent Key until the lock knob
returns to the lock position.

Use the mechanical key to lock or unlock
the doors and trunk lid.

For additional information, refer to “Doors”
and “Trunk lid” in this section.

CAUTION

Always carry the mechanical key in-
stalled in the Intelligent Key slot.

NISSAN VEHICLE IMMOBILIZER
SYSTEM KEYS (if so equipped)

You can only drive your vehicle using the
Intelligent Keys which are registered to the
NISSAN Vehicle Immobilizer System com-
ponents in your vehicle.

The mechanical key can be used for all the
locks.

Never leave the keys in the vehicle.

Additional or replacement keys:

If you still have a key, the key number is not
necessary when you need extra NISSAN
Vehicle Immobilizer System keys. Your ex-
isting key can be duplicated without know-
ing the key number. As many as four
NISSAN Vehicle Immobilizer System keys
can be used with one vehicle. You should
bring all NISSAN Vehicle Immobilizer Sys-
tem keys that you have to the NISSAN
dealer for registration. This is because the
registration process will erase the memory
of all key codes previously registered into
the NISSAN Vehicle Immobilizer System. Af-
ter the registration process, these compo-

SPA1951

Pre-driving checks and adjustments

3-5


Content   ..  5  6  7  8   ..