Nissan Versa (2019 year). Instruction - part 6


  Index      Nissan     Nissan Versa - instruction 2019 year in english


Search            


Content   ..  4  5  6  7   ..


Nissan Versa (2019 year). Instruction - part 6


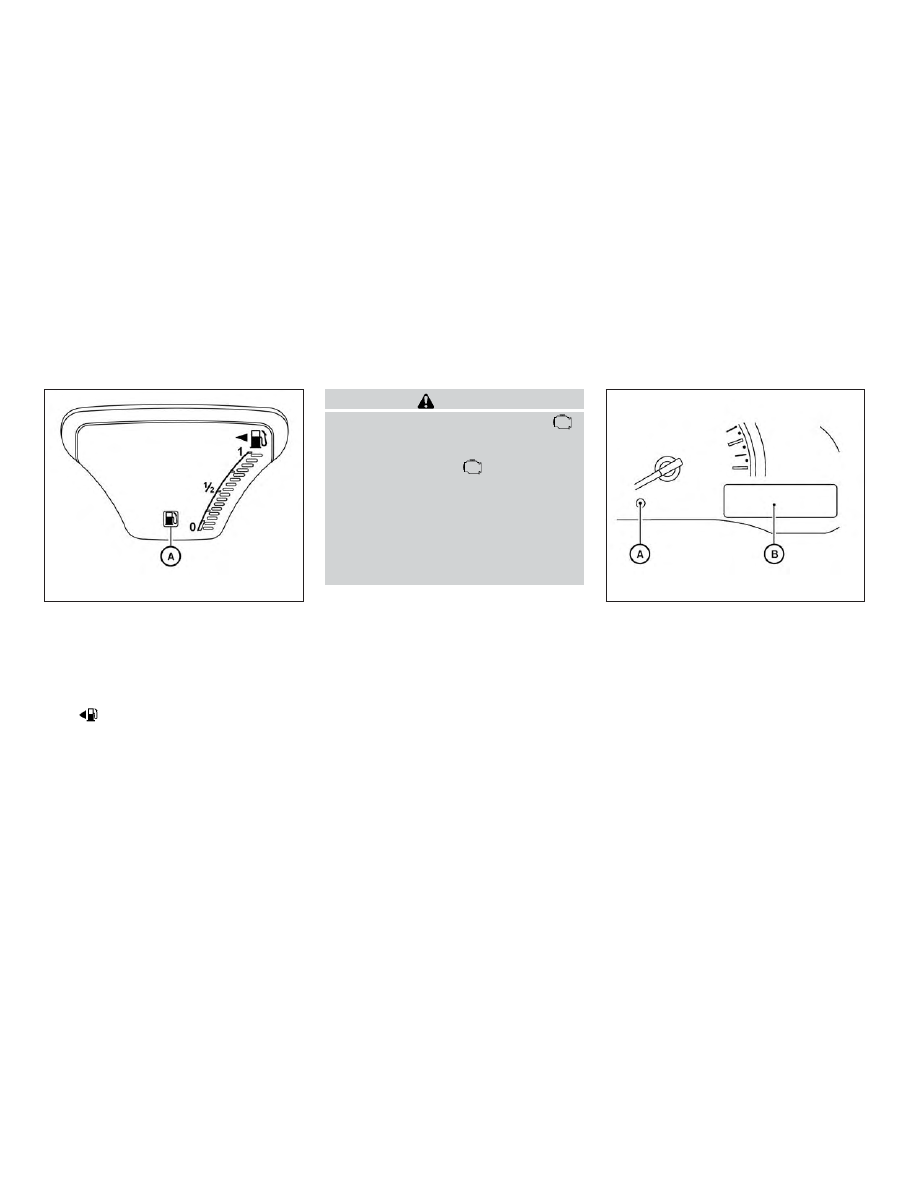
Type B (if so equipped): The low fuel warn-
ing light

A

will turn on when the amount of

fuel in the tank is getting low.
Refill the fuel tank before the gauge reg-
isters 0 (Empty).

The

indicates that the fuel-filler

door is located on the driver’s side of the
vehicle.

CAUTION

∙ If the vehicle runs out of fuel, the

check engine light may come on. Re-
fuel as soon as possible. After a few
driving trips, the

light should

turn off. If the light remains on after a
few driving trips, have the vehicle in-
spected. It is recommended that you
visit a NISSAN dealer for this service.

∙ For additional information, refer to

“Malfunction Indicator Light (MIL)” in
this section.

TRIP COMPUTER

When the ignition switch is placed in the ON
position, modes of the trip computer can
be selected by pushing the change/reset
button

A

on the instrument panel located

near

the

speedometer. The

following

modes can be selected in the display

B

:

∙ Odometer

∙ Trip A

∙ Trip B

∙ Instant fuel consumption

∙ Average fuel consumption

Type B (if so equipped)

LIC2287

Type A (if so equipped)

LIC2470

2-10

Instruments and controls

∙ Distance to empty

∙ Outside air temperature (if so equipped)

Odometer

The odometer records the total distance
the vehicle has been driven.

Trip A

Measures the distance of one specific trip.

Trip B

Measures the distance of a second specific
trip.

Instant fuel consumption

The instant fuel consumption mode shows
the instant fuel economy. The display up-
dates instantly when driving.

Average fuel consumption (mpg
or l (liter)/100 km)

The average fuel consumption mode
shows the average fuel consumption since
the last reset. Resetting is done by pressing
the trip or change button for more than
approximately 1 second. The display is up-
dated every 30 seconds. At about the first
1/3 mi (500 m) after a reset, the display
shows (----).

Distance to empty

The distance to empty mode provides you
with an estimation of the distance that can
be driven before refueling. The range is
constantly being calculated, based on the
amount of fuel in the fuel tank and the
actual fuel consumption.

The distance to empty includes a low
range warning feature: when the fuel level
is low, the distance to empty is automati-
cally selected and the digits blink in order
to draw the driver’s attention. Press the trip
computer change/reset button

A

if you

wish to return to the mode that was se-
lected before the warning occurred.

When the fuel level drops even lower, the
distance to empty will display (----).

Outside air temperature (°F or °C)
(if so equipped)

The outside air temperature is displayed in
°F or °C.

The ambient temperature sensor is lo-
cated in front of the radiator. The sensor
may be affected by road or engine heat,
wind directions and other driving condi-
tions. The display may differ from the ac-
tual ambient temperature or the tempera-
ture

displayed

on

various

signs

or

billboards.

Trip computer reset

Pressing the change/reset button for
more than 3 seconds will reset all modes
except Trip A and distance to empty.

Type B (if so equipped)

LIC2138

Instruments and controls

2-11

or

Anti-lock Braking System
(ABS) warning light

Power steering warning light

Malfunction Indicator Light (MIL)

or

Brake warning light

Seat belt warning light and chime

Overdrive OFF indicator light
(if so equipped)

Charge warning light

Shift P (park) warning light
(if so equipped)

Security indicator light (if so equipped)

Door open warning light

Supplemental air bag warning light

Side light and headlight indicator light
(green) (if so equipped)

Engine oil pressure warning light

Continuously Variable Transmission (CVT)
position indicator light

Slip indicator light

High temperature warning light (red)
(if so equipped)

CRUISE indicator light (if so equipped)

Turn signal/hazard indicator lights

or

Low fuel warning light

Front fog light indicator light
(if so equipped)

Vehicle Dynamic Control (VDC) OFF
indicator light

Low tire pressure warning light

Front passenger air bag status light

NISSAN Intelligent Key®warning light
(if so equipped)

High beam indicator light (blue)

WARNING LIGHTS, INDICATOR LIGHTS
AND AUDIBLE REMINDERS

2-12

Instruments and controls

CHECKING LIGHTS

With all doors closed, apply the parking
brake, fasten the seat belts and place the
ignition switch in the ON position without
starting the engine. The following lights (if
so equipped) will come on:

or

,

,

,

,

The following lights (if so equipped) will
come on briefly and then go off:

or

,

(red) ,

,

,

,

,

,

,

If any light does not come on or operate in
a way other than described, it may indicate
a burned out bulb and/or a system mal-
function. Have the system checked. It is
recommended that you visit a NISSAN
dealer for this service.

WARNING LIGHTS

This vehicle has various warning lights that
may illuminate to indicate a potential prob-
lem. For additional information, refer to the
specific light in this section.

or

Anti-lock Braking

System (ABS)

warning light

When the ignition switch is placed in the ON
position, the ABS warning light illuminates
and then turns off. This indicates the ABS is
operational.

If the ABS warning light illuminates while
the engine is running or while driving, it
may indicate the ABS is not functioning
properly. Have the system checked. It is
recommended that you visit a NISSAN
dealer for this service.

If an ABS malfunction occurs, the anti-lock
function is turned off. The brake system
then operates normally but without anti-
lock assistance. For additional information,
refer to “Brake system” in the “Starting and
driving” section of this manual.

or

Brake warning

light

This light functions for both the parking
brake and the foot brake systems.

Parking brake indicator

When the ignition switch is placed in the ON
position, this light comes on when the
parking brake is applied.

Low brake fluid warning light

When the ignition switch is placed in the ON
position, the light warns of a low brake fluid
level. If the light comes on while the engine
is running with the parking brake not ap-
plied, stop the vehicle and perform the fol-
lowing:

1. Check the brake fluid level. Add brake

fluid as necessary. For additional infor-
mation, refer to “Brake fluid” in the “Do-
it-yourself ” section of this manual.

2. If the brake fluid level is correct, have

the warning system checked. It is rec-
ommended that you visit a NISSAN
dealer for this service.

Instruments and controls

2-13

WARNING

∙ Your brake system may not be work-

ing properly if the warning light is on.
Driving could be dangerous. If you
judge it to be safe, drive carefully to
the nearest service station for repairs.
Otherwise, have your vehicle towed
because

driving

it

could

be

dangerous.

∙ Pressing the brake pedal with the en-

gine stopped and/or a low brake fluid
level may increase your stopping dis-
tance and braking will require greater
pedal effort as well as pedal travel.

∙ If the brake fluid level is below the

MINIMUM or MIN mark on the brake
fluid reservoir, do not drive until the
brake system has been checked. It is
recommended that you visit a NISSAN
dealer for this service.

Charge warning light

If this light comes on while the engine is
running, it may indicate the charging sys-
tem is not functioning properly. Turn the
engine off and check the generator belt. If
the belt is loose, broken, or missing, or if the
light remains on, have the system checked.

It is recommended that you visit a NISSAN
dealer for this service.

CAUTION

∙ Do not ground electrical accessories

directly to the battery terminal. Doing
so will bypass the variable voltage
control system and the vehicle bat-
tery may not charge completely. For
additional information, refer to “Vari-
able voltage control system” in the
“Do-it-yourself ”

section

of

this

manual.

∙ Do not continue driving if the genera-

tor belt is loose, broken or missing.

Door open warning light

This light comes on when any of the doors
are not closed securely while the ignition
switch is in the ON position.

Engine oil pressure

warning light

This light warns of low engine oil pressure. If
the light flickers or comes on during nor-
mal driving, pull off the road in a safe area,
stop the engine immediately and call a
NISSAN dealer or other authorized repair
shop.

The engine oil pressure warning light is
not designed to indicate a low oil level.
Use the dipstick to check the oil level. For
additional information, refer to “Engine oil”
in the “Do-it-yourself ” section of this
manual.

CAUTION

Running the engine with the engine oil
pressure warning light on could cause
serious damage to the engine almost
immediately. Such damage is not cov-
ered by the NISSAN New Vehicle Limited
Warranty. Turn off the engine as soon as
it is safe to do so.

High temperature warning

light (red) (if so equipped)

When the ignition switch is placed in the ON
position, the high temperature warning
light illuminates and then turns off. This in-
dicates that the high temperature sensor
in the engine coolant system is opera-
tional.

When driving, the high temperature warn-
ing light may turn off. This indicates that the
engine coolant temperature is within the
normal range.

2-14

Instruments and controls

CAUTION

If the high temperature warning light
illuminates while the engine is running,
it may indicate the engine temperature
is extremely high. Stop the vehicle
safely as soon as possible. If the vehicle
is overheated, continuing vehicle op-
eration may seriously damage the en-
gine. For additional information, refer
to “If your vehicle overheats” in the “In
case of emergency” section of this
manual.

or

Low fuel warning

light

This light comes on when the fuel level in
the fuel tank is getting low. Refuel as soon
as it is convenient, preferably before the
fuel gauge reaches 0 (Empty). There will be
a small reserve of fuel in the tank when
the fuel gauge reaches 0 (Empty), show-
ing no more fuel bars.

Low tire pressure warning

light

Your vehicle is equipped with a Tire Pres-
sure Monitoring System (TPMS) that moni-
tors the tire pressure of all tires except the
spare.

The low tire pressure warning light warns
of low tire pressure or indicates that the
TPMS is not functioning properly.

After the ignition switch is placed in the ON
position, this light illuminates for about
1 second and turns off.

Low tire pressure warning

If the vehicle is being driven with low tire
pressure, the warning light will illumi-
nate.

A CHECK TIRE PRES (pressure) warning
message is also displayed in the odom-
eter.

When the low tire pressure warning light
illuminates, you should stop and adjust
the tire pressure of all four tires to the
recommended COLD tire pressure shown
on the Tire and Loading Information la-
bel located in the driver’s door opening.
The low tire pressure warning light does
not automatically turn off when the tire
pressure is adjusted. After the tire is in-
flated to the recommended pressure,
the vehicle must be driven at speeds
above 16 mph (25 km/h) to activate the
TPMS and turn off the low tire pressure
warning light. Use a tire pressure gauge
to check the tire pressure.

The low tire pressure warning light remains
illuminated until the tires are inflated to the
recommended COLD tire pressure. The
CHECK TIRE PRES warning message is dis-
played each time the ignition switch is
placed in the ON position as long as the low
tire pressure warning light remains illumi-
nated.

For additional information, refer to "Check
tire pressure warning message" in this sec-
tion and “Tire Pressure Monitoring System
(TPMS)” in the “Starting and driving” section
and in the “In case of emergency” section of
this manual.

TPMS malfunction

If the TPMS is not functioning properly, the
low tire pressure warning light will flash for
approximately 1 minute when the ignition
switch is placed in the ON position. The
light will remain on after 1 minute. Have the
system checked. It is recommended that
you visit a NISSAN dealer for this service.
The "CHECK TIRE PRES" warning does not
appear if the low tire pressure warning light
illuminates to indicate a TPMS malfunction.

Instruments and controls

2-15

For additional information, refer to “Tire
Pressure Monitoring System (TPMS)” in the
“Starting and driving” section and “Tire
pressure” in the “Do-it-yourself ” section of
this manual.

WARNING

∙ Radio waves could adversely affect

electric medical equipment. Those
who use a pacemaker should contact
the

electric

medical

equipment

manufacturer for the possible influ-
ences before use.

∙ If the light does not illuminate with

the ignition switch placed in the ON
position, have the vehicle checked as
soon as possible. It is recommended
that you visit a NISSAN dealer for this
service.

∙ If the light illuminates while driving,

avoid sudden steering maneuvers or
abrupt braking, reduce vehicle speed,
pull off the road to a safe location and
stop the vehicle as soon as possible.
Driving with under-inflated tires may
permanently damage the tires and in-
crease the likelihood of tire failure. Se-
rious vehicle damage could occur and
may lead to an accident and could re-
sult in serious personal injury or
death. Check the tire pressure for all
four tires. Adjust the tire pressure to
the recommended COLD tire pressure
show on the Tire and Loading Infor-
mation label located in the driver’s
door opening to turn the low tire pres-
sure warning light off. If the light still
illuminates while driving after adjust-
ing the tire pressure, a tire may be flat
or the TPMS may be malfunctioning. If
you have a flat tire, replace it with a
spare tire as soon as possible. If no tire
is flat and all tires are properly in-
flated, have the vehicle checked. It is
recommended that you visit a NISSAN
dealer for this service.

∙ When replacing a wheel without the

TPMS such as the spare tire, the TPMS
will not function and the low tire pres-
sure warning light will flash for ap-
proximately 1 minute. The light will re-
main on after 1 minute. Have your
tires replaced and/or TPMS system
reset as soon as possible. It is recom-
mended that you visit a NISSAN dealer
for these services.

∙ Replacing tires with those not origi-

nally specified by NISSAN could affect
the proper operation of the TPMS.

CAUTION

∙ The TPMS is not a substitute for the

regular tire pressure check. Be sure to
check the tire pressure regularly.

∙ If the vehicle is being driven at speeds

of less than 16 mph (25 km/h), the
TPMS may not operate correctly.

∙ Be sure to install the specified size of

tires to the four wheels correctly.

2-16

Instruments and controls

NISSAN Intelligent Key®

warning light (if so
equipped)

The Intelligent Key warning light illumi-
nates green when the ignition switch can
be turned. The Intelligent Key warning light
illuminates red when the ignition switch
cannot be turned.

The Intelligent Key warning light blinks red if
the Intelligent Key is taken outside of the
vehicle while the ignition switch is placed in
the ACC or ON position.

∙ If the Intelligent Key warning light blinks,

make sure of the location of the Intelli-
gent Key as soon as possible. The Intel-
ligent Key should be carried by the
driver while operating the vehicle.

∙ The Intelligent Key warning light turns

off about 10 seconds after the Intelli-
gent Key is brought inside the vehicle.

The Intelligent Key warning light blinks
green indicating that the Intelligent Key
battery is almost discharged.

For additional information, refer to “NISSAN
Intelligent Key®” in the “Pre-driving checks
and adjustments” section of this manual.

Power steering warning

light

WARNING

∙ If the engine is not running or is

turned off while driving, the power as-
sist for the steering will not work.
Steering will be harder to operate.

∙ When the power steering warning

light illuminates with the engine run-
ning, there will be no power assist for
the steering. You will still have control
of the vehicle, but the steering will be
harder to operate. Have the power
steering system checked. It is recom-
mended that you visit a NISSAN dealer
for this service.

When the ignition switch is placed in the ON
position, the power steering warning light
illuminates. After starting the engine, the
power steering warning light turns off. This
indicates the power steering is operational.

If the power steering warning light illumi-
nates while the engine is running, it may
indicate the power steering is not function-
ing properly and may need servicing. Have
the power steering checked. It is recom-
mended that you visit a NISSAN dealer for
this service.

When the power steering warning light illu-
minates with the engine running, there will
be no power assist for the steering, but you
will still have control of the vehicle. At this
time, greater steering effort is required to
operate the steering wheel, especially in
sharp turns and at low speeds.

For additional information, refer to “Power
steering” in the “Starting and driving” sec-
tion of this manual.

Seat belt warning light and

chime

The light and chime remind you to fasten
your seat belts. The light illuminates when-
ever the ignition switch is placed in the ON
or START position and remains illuminated
until the driver’s seat belt is fastened. At the
same time, the chime sounds for about
6 seconds unless the driver’s seat belt is
securely fastened.

The seat belt warning light may also illumi-
nate if the front passenger’s seat belt is not
fastened when the front passenger’s seat
is occupied . For 7 seconds after the igni-
tion switch is placed in the ON position, the
system does not activate the warning light
for the front passenger.

Instruments and controls

2-17

For additional information, refer to “Seat
belts” in the “Safety—Seats, seat belts and
supplemental restraint system” section of
this manual.

Shift P (Park) warning light

(if so equipped)

This light blinks red and the key reminder
chime sounds if the shift lever is in any
position other than P (Park) and the ignition
switch is in the OFF position. Return the
shift lever to P (Park) with the ignition
switch in the OFF position and the light will
turn off. Place the ignition switch in the
LOCK position and the chime will turn off.
For additional information, refer to “NISSAN
Intelligent Key®” in the “Pre-driving checks
and adjustments” section of this manual.

Supplemental air bag

warning light

When the ignition switch is placed in the ON
or START position, the supplemental air
bag warning light illuminates for about
7 seconds and then turns off. This means
the system is operational.

If any of the following conditions occur, the
front air bag, side air bag, curtain air bag,
and pretensioner seat belt systems need
servicing:

∙ The supplemental air bag warning light

remains on after approximately 7 sec-
onds.

∙ The supplemental air bag warning light

flashes intermittently.

∙ The supplemental air bag warning light

does not come on at all.

It is recommended that you visit a NISSAN
dealer for these services.

Unless checked and repaired, the supple-
mental restraint system (air bag system)
and/or the pretensioner(s) may not func-
tion properly. For additional information, re-
fer to “Supplemental Restraint System
(SRS)” in the “Safety—Seats, seat belts and
supplemental restraint system” section of
this manual.

WARNING

If the supplemental air bag warning
light is on, it could mean that the front
air bag, side air bag, curtain air bag
and/or pretensioner systems will not
operate in an accident. To help avoid
injury to yourself or others, have your
vehicle checked as soon as possible. It is
recommended that you visit a NISSAN
dealer for this service.

INDICATOR LIGHTS

This vehicle has various indicator lights
that may illuminate to indicate a system
status. For additional information, refer to
the specific light in this section.

Continuously Variable

Transmission (CVT)
position indicator light

When the ignition switch is placed in the ON
position, this indicator light shows the shift
lever position. For additional information,
refer to “Driving the vehicle” in the “Starting
and driving” section of this manual.

CRUISE indicator light (if so

equipped)

The light comes on when the cruise control
ON/OFF switch is pushed. The light goes
out when the ON/OFF switch is pushed
again. When the CRUISE indicator light
comes on, the cruise control system is op-
erational. For additional information, refer
to “Cruise control” in the “Starting and driv-
ing” section of this manual.

2-18

Instruments and controls

Front fog light indicator

light (if so equipped)

The front fog light indicator light illumi-
nates when the front fog lights are on. For
additional information, refer to “Fog light
switch” in this section.

Front passenger air bag

status light

The front passenger air bag status light will
be lit and the passenger front air bag will be
off depending on how the front passenger
seat is being used.

For additional information, refer to “Front
passenger air bag and status light” in the
“Safety — Seats, seat belts and supplemen-
tal restraint system” section of this manual.

High beam indicator light

(blue)

This blue light comes on when the head-
light high beams are on and goes out when
the low beams are selected.

The high beam indicator light also comes
on when the passing signal is activated.

Malfunction Indicator Light

(MIL)

If this indicator light comes on steady or
blinks while the engine is running, it may
indicate a potential emission control mal-
function.

The MIL may also come on steady if the
fuel-filler cap is loose or missing, or if the
vehicle runs out of fuel. Check to make sure
the fuel-filler cap is installed and closed
tightly, and that the vehicle has at least
3 gallons (11.4 liters) of fuel in the fuel tank.

After a few driving trips, the

light

should turn off if no other potential emis-
sion control system malfunction exists.
If this indicator light comes on steady for
20 seconds and then blinks for 10 seconds
when the engine is not running, it indicates
that the vehicle is not ready for an emission
control system inspection/maintenance
test. For additional information, refer to
“Readiness

for

Inspection/Maintenance

(I/M) test” in the “Technical and consumer
information” section of this manual.

Operation

The MIL will come on in one of two ways:

∙ MIL on steady — An emission control

system malfunction has been de-
tected. Check the fuel-filler cap if the
LOOSE FUEL CAP warning appears in
the trip computer. If the fuel-filler cap is
loose or missing, tighten or install the
cap and continue to drive the vehicle.
The

light should turn off after a

few driving trips. If the

light does

not turn off after a few driving trips, have
the vehicle inspected. It is recom-
mended that you visit a NISSAN dealer
for this service. You do not need to have
your vehicle towed to the dealer.

∙ MIL blinking — An engine misfire has been

detected which may damage the emis-
sion control system. To reduce or avoid
emission control system damage:

– Do not drive at speeds above

45 mph (72 km/h).

– Avoid hard acceleration or decelera-

tion.

– Avoid steep uphill grades.

– If possible, reduce the amount of

cargo being hauled or towed.

Instruments and controls

2-19

The MIL may stop blinking and come on
steady. Have the vehicle inspected. It is rec-
ommended that you visit a NISSAN dealer
for this service. You do not need to have
your vehicle towed to the dealer.

CAUTION

Continued vehicle operation without
having the emission control system
checked and repaired as necessary
could lead to poor driveability, reduced
fuel economy, and possible damage to
the emission control system.

Overdrive OFF indicator

light (if so equipped)

The overdrive OFF indicator light illumi-
nates when the overdrive OFF mode is se-
lected.

For additional information, refer to “Driving
the vehicle” in the “Starting and driving” sec-
tion of this manual.

Security indicator light (if

so equipped)

This light blinks when the ignition switch is
placed in the OFF, LOCK or ACC position.

The blinking security indicator light indi-
cates that the security systems equipped
on the vehicle are operational.

For additional information, refer to “Security
systems” in this section.

Side light and headlight

indicator light (green) (if so
equipped)

The side light and headlight indicator light
illuminates when the side light or head-
lights are on (not including daytime run-
ning or signature lights). If the headlight
switch is in the AUTO position, the side light
and headlight indicator light will illuminate
when the headlights turn on. For additional
information, refer to “Headlight and turn
signal switch” in this section.

Slip indicator light

This indicator will blink when the VDC sys-
tem is operating, thus alerting the driver to
the fact that the road surface is slippery
and the vehicle is nearing its traction limits.

You may feel or hear the system working;
this is normal.

The light will blink for a few seconds after
the VDC system stops limiting wheel spin.

The

indicator light also comes on

when you place the ignition switch in the
ON position. The light will turn off after ap-
proximately 2 seconds if the system is op-
erational. If the light does not come on
have the system checked. It is recom-
mended that you visit a NISSAN dealer for
this service.

Turn signal/hazard

indicator lights

The appropriate light flashes when the turn
signal switch is activated.

Both lights flash when the hazard switch is
turned on.

Vehicle Dynamic Control

(VDC) OFF indicator light

This indicator light comes on when the
VDC OFF switch is pushed to the OFF posi-
tion. This indicates the VDC system has
been turned off.

Push the VDC OFF switch again or restart
the engine and the system will operate
normally. For additional information, refer
to “Vehicle Dynamic Control (VDC) system”
in the “Starting and driving” section of this
manual.

2-20

Instruments and controls

The VDC indicator light also comes on
when you place the ignition switch in the
ON position. The light will turn off after
about 2 seconds if the system is opera-
tional. If the light stays on or comes on
along with the

indicator light while

you are driving, have the VDC system
checked. It is recommended that you visit a
NISSAN dealer for this service.
While the VDC system is operating, you
might feel a slight vibration or hear the sys-
tem working when starting the vehicle or
accelerating, but this is normal.

AUDIBLE REMINDERS

Brake pad wear warning

The disc brake pads have audible wear
warnings. When a disc brake pad requires
replacement, it makes a high pitched
scraping sound when the vehicle is in mo-
tion, whether or not the brake pedal is de-
pressed. Have the brakes checked as soon
as possible if the warning sound is heard. It
is recommended that you visit a NISSAN
dealer for this service.

Key reminder chime

A chime sounds if the driver’s door is
opened while the key is left in the ignition
switch. Remove the key and take it with you
when leaving the vehicle.

Light reminder chime

With the ignition switch placed in the OFF
position, a chime sounds when the driver’s
door is opened if the headlights or parking
lights are on.

Turn the headlight control switch off or to
AUTO before leaving the vehicle.

Parking brake reminder chime

A chime sounds if the parking brake is set
and the vehicle is driven. The chime will
stop if the parking brake is released or the
vehicle speed returns to zero.

Your vehicle has one type of security sys-
tem:

∙ NISSAN Vehicle Immobilizer System

NISSAN VEHICLE IMMOBILIZER
SYSTEM (if so equipped)

The NISSAN Vehicle Immobilizer System
will not allow the engine to start without
the use of a registered key.

LIC2930

SECURITY SYSTEM (if so equipped)

Instruments and controls

2-21

If the engine fails to start using a registered
key (for example, when interference is
caused by another registered key, an auto-
mated toll road device or automatic pay-
ment device on the key ring), restart the
engine using the following procedures:

1. Leave the ignition switch in the ON po-

sition for approximately 5 seconds.

2. Turn the ignition switch to the OFF or

LOCK position, and wait approximately
10 seconds.

3. Repeat steps 1 and 2.

4. Restart the engine while holding the

device (which may have caused the in-
terference) separate from the regis-
tered key.

If the no start condition re-occurs, NISSAN
recommends placing the registered key on
a separate key ring to avoid interference
from other devices.

FCC Notice:

For USA:

This device complies with Part 15 of the
FCC Rules. Operation is subject to the fol-
lowing two conditions; (1) This device
may not cause harmful interference, and
(2) this device must accept any interfer-
ence received, including interference
that may cause undesired operation of
the device.

NOTE:

Changes or modifications not expressly
approved by the party responsible for
compliance could void the user’s author-
ity to operate the equipment.

For Canada:

This

device

complies

with

Industry

Canada licence-exempt RSS standard(s).
Operation is subject to the following two
conditions: (1) this device may not cause
interference, and (2) this device must ac-
cept any interference, including interfer-
ence that may cause undesired opera-
tion of the device.

Security indicator light

For vehicles without Intelligent Key: This
light blinks whenever the ignition switch is
placed in the LOCK, OFF or ACC position.

For vehicles with Intelligent Key: This light
blinks when the ignition switch is placed in
the LOCK position with the key removed
from the ignition switch.

This function indicates the NISSAN Vehicle
Immobilizer System is operational.

LIC0474

2-22

Instruments and controls

If the NISSAN Vehicle Immobilizer System is
malfunctioning, the light will remain on
while the ignition switch is placed in the ON
position.

If the light still remains on and/or the
engine will not start, seek service for the
NISSAN Vehicle Immobilizer System as
soon as possible. Please bring all regis-
tered keys that you have. It is recom-
mended that you visit a NISSAN dealer
for this service.

SWITCH OPERATION

The windshield wiper and washer operates
when the ignition switch is in the ON posi-
tion.

Push the lever down to operate the wiper
at the following speed:

1

Intermittent (INT) — intermittent op-
eration

can

be

adjusted

(if

so

equipped) by turning the knob toward

A

(Slower) or

B

(Faster).

2

Low (LO) — continuous low speed op-
eration

3

High (HI) — continuous high speed op-
eration

Push the lever up

4

to have one sweep

operation (MIST) of the wiper.

Pull the lever toward you

5

to operate the

washer. The wiper will also operate several
times.

Type A (if so equipped)

LIC2789

Type B (if so equipped)

LIC2131

WIPER AND WASHER SWITCH

Instruments and controls

2-23

WARNING

In freezing temperatures the washer
solution may freeze on the windshield
and obscure your vision which may lead
to an accident. Warm the windshield
with the defroster before you wash the
windshield.

CAUTION

∙ Do not operate the washer continu-

ously for more than 30 seconds.

∙ Do not operate the washer if the res-

ervoir is empty.

∙ Do not fill the windshield-washer fluid

reservoir with washer fluid concen-
trates at full strength. Some methyl
alcohol based washer fluid concen-
trates may permanently stain the
grille

if

spilled

while

filling

the

windshield-washer fluid reservoir.

∙ Pre-mix windshield-washer fluid con-

centrates with water to the manufac-
turer’s recommended levels before
pouring the fluid into the windshield-
washer fluid reservoir. Do not use the
windshield-washer fluid reservoir to
mix the windshield-washer fluid con-
centrate and water.

To defrost the rear window glass, start the
engine and push the rear window defroster
switch on. The rear window defroster indi-
cator light on the switch comes on. Push
the switch again to turn the defroster off.

The rear window defroster automatically
turns off after approximately 15 minutes.

CAUTION

When cleaning the inner side of the rear
window, be careful not to scratch or
damage the rear window defroster.

HEADLIGHT CONTROL SWITCH

Lighting

1

Rotate the switch to the

position,

and the front parking, tail, license plate,
and instrument panel lights will come
on.

2

Rotate the switch to the

position,

and the headlights will come on and all
the other lights remain on.

LIC2116

Type A (if so equipped)

LIC2127

REAR WINDOW DEFROSTER SWITCH

HEADLIGHT AND TURN SIGNAL
SWITCH

2-24

Instruments and controls

CAUTION

Use the headlights with the engine run-
ning to avoid discharging the vehicle
battery.

Headlight beam select

1

To select the high beam function, en-
sure the low beams are engaged and
push the lever forward. The high beam
lights come on and the

light illu-

minates. For additional information, re-
fer to “Headlight control switch” in this
section.

2

Pull the lever back to return to the low
beams.

3

Pulling and releasing the lever flashes
the headlight high beams on and off.
The low beams need not be engaged
for this function.

Battery saver system

If the ignition switch is placed in the OFF
position while the headlight switch is in

the

or

position, the headlights

will turn off after a period of time.

CAUTION

Even though the battery saver feature
automatically turns off the headlights
after a period of time, you should turn
the headlight switch to the OFF position
when the engine is not running to avoid
discharging the vehicle battery.

Type B (if so equipped)

WIC1509

LIC2128

Instruments and controls

2-25


Content   ..  4  5  6  7   ..