Nissan Quest (2017 year). Instruction - part 16
4-54
Monitor, heater, air conditioner, audio, phone and voice recognition systems
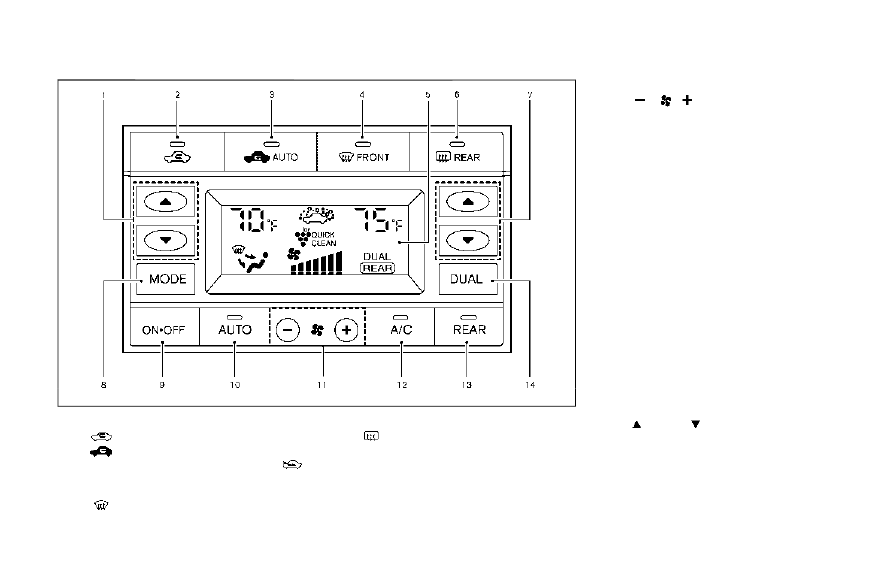
SAA3595
1.
Temperature control buttons (driver side)
2.
“
” air recirculation button
3.
“
AUTO” auto-recirculation button (models
with Advanced Climate Control System)/“
”
Outside air circulation button (models without
Advanced Climate Control System)
4.
“
FRONT” front defroster button
5.
Display
6.
“
REAR” rear window defroster button (See
“Rear window and outside mirror defroster
switch” (P.2-33).)
7.
Temperature control buttons (passenger side)
8.
“MODE” manual air flow control button
9.
“ON·OFF” button for air conditioning system
10.
“AUTO” button
11.
“
” fan speed control buttons
12.
“A/C” air conditioner ON/OFF button
13.
“REAR” control button
14.
“DUAL” zone control ON/OFF button
AUTOMATIC AIR CONDITIONER
Automatic operation (AUTO)
The AUTO mode may be used year-round as the
system automatically controls constant tempera-
ture, air flow distribution and fan speed after the
desired temperature is set manually.
To turn the heater and air conditioner on or off,
push the “ON·OFF” button.
Cooling and dehumidified heating:
1. Push the “AUTO” button.
(The AUTO indicator light will illuminate.)
2. If the A/C indicator light does not illuminate,
push the “A/C” button.
(The A/C indicator light will illuminate.)
3. Push the temperature control buttons
(“
” and “
”) (driver’s side) to set the
desired temperature.
.
When “DUAL” does not appear on the
display:
Pushing the “AUTO” button changes
both the driver’s and front passenger’s
side temperature.