Nissan Altima (2018 year). Instruction - part 23


  Index      Nissan     Nissan Altima - instruction 2018 year in english


Search            


Content   ..  21  22  23  24   ..


Nissan Altima (2018 year). Instruction - part 23


∙ Wax your vehicle only after a thorough

washing. Follow the instructions sup-
plied with the wax.

∙ Do not use a wax containing any abra-

sives, cutting compounds or cleaners
that may damage the vehicle finish.

Machine compounding or aggressive pol-
ishing on a base coat/clear coat paint fin-
ish may dull the finish or leave swirl marks.

REMOVING SPOTS

Remove tar and oil spots, industrial dust,
insects, and tree sap as quickly as possible
from the surface of the paint to avoid last-
ing damage or staining. Special cleaning
products are available at a NISSAN dealer
or any automotive accessory store. It is
recommended that you visit a NISSAN
dealer for these products.

UNDERBODY

In areas where road salt is used in winter, it
is necessary to clean the underbody regu-
larly in order to prevent dirt and salt from
building up and causing the acceleration of
corrosion on the underbody and suspen-
sion. Before the winter period and again in
the spring, the underseal must be checked
and, if necessary, re-treated.

GLASS

When cleaning the rear window, it may be
easier to clean if the inside high-mounted
stop light (if so equipped) is removed first.

Be careful when removing the high-
mounted stop light to reduce the risk of
damaging the high-mounted stop light
wires.

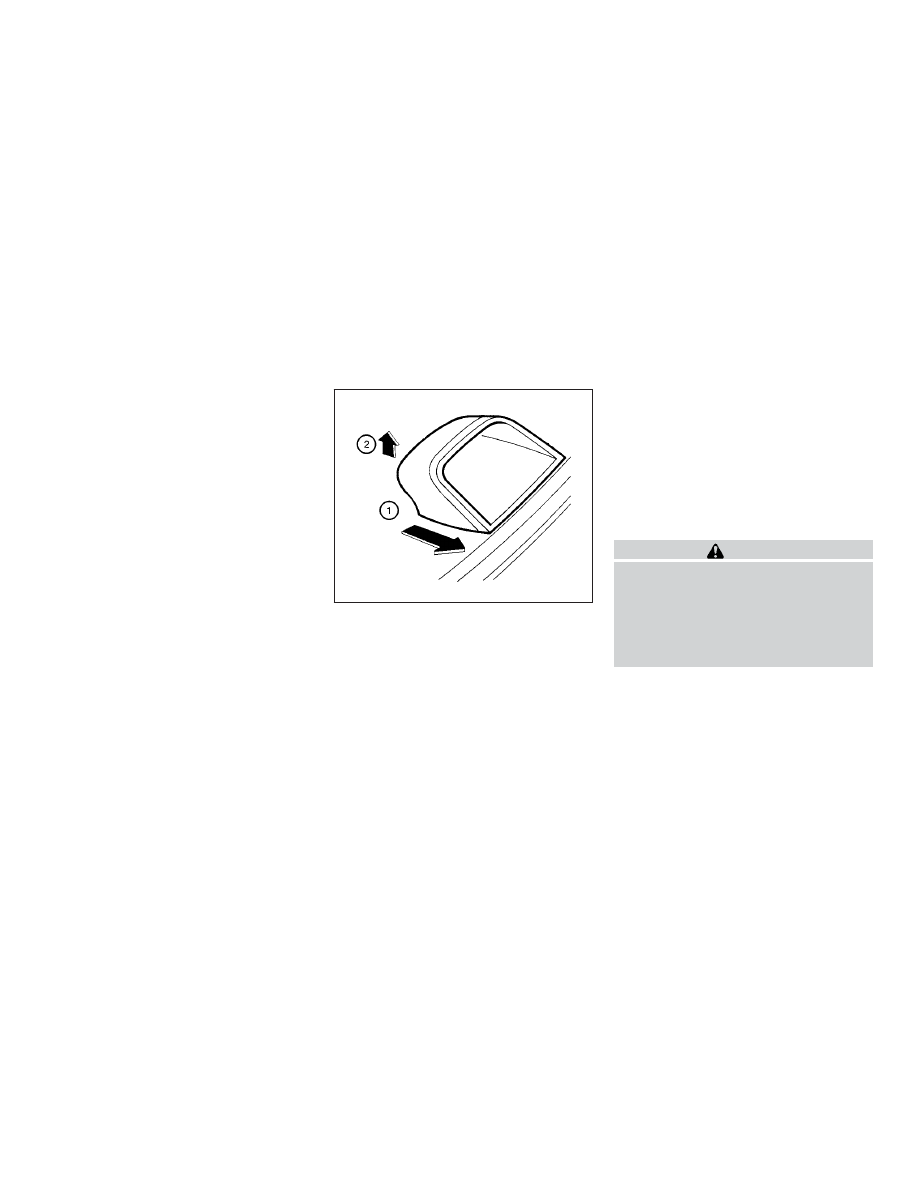
To remove the high-mounted stop light:

1

Push toward rear of vehicle.

2

Lift to remove.

The high-mounted stop light must be
properly reinstalled before driving your ve-
hicle.

Use glass cleaner to remove smoke and
dust film from the glass surfaces. It is nor-
mal for glass to become coated with a film
after the vehicle is parked in the hot sun.
Glass cleaner and a soft cloth will easily
remove this film.

CAUTION

When cleaning the inside of the win-
dows, do not use sharp-edged tools,
abrasive cleaners or chlorine-based
disinfectant cleaners. They could dam-
age the electrical conductors, radio an-
tenna elements or rear window de-
froster elements.

ALUMINUM ALLOY WHEELS (if so
equipped)

Wash the wheels regularly with a sponge
dampened in a mild soap solution, espe-
cially during winter months in areas where
road salt is used. If not removed, road salt
can discolor the wheels.

WAI0005

Appearance and care

7-3

CAUTION

Follow the directions below to avoid
staining or discoloring the wheels:

∙ Do not use a cleaner that uses strong

acid or alkali contents to clean the
wheels.

∙ Do not apply wheel cleaners to the

wheels when they are hot. The wheel
temperature should be the same as
ambient temperature.

∙ Rinse the wheel to completely remove

the cleaner within 15 minutes after
the cleaner is applied.

CHROME PARTS

Clean all chrome parts regularly with a
non-abrasive chrome polish to maintain
the finish.

TIRE DRESSINGS

NISSAN does not recommend the use of
tire dressings. Tire manufacturers apply a
coating to the tires to help reduce discolor-
ation of the rubber. If a tire dressing is ap-
plied to the tires, it may react with the coat-
ing and form a compound. This compound
may come off the tire while driving and
stain the vehicle paint.

If you choose to use a tire dressing, take the
following precautions:

∙ Use a water-based tire dressing. The

coating on the tire dissolves more easily
than with an oil-based tire dressing.

∙ Apply a light coat of tire dressing to help

prevent

it

from

entering

the

tire

tread/grooves (where it would be diffi-
cult to remove).

∙ Wipe off excess tire dressing using a dry

towel. Make sure the tire dressing is
completely

removed

from

the

tire

tread/grooves.

∙ Allow the tire dressing to dry as recom-

mended by the tire dressing manufac-
turer.

Occasionally remove loose dust from the
interior trim, plastic parts and seats using a
vacuum cleaner or soft bristled brush. Wipe
the vinyl and leather (if so equipped) sur-
faces with a clean, soft cloth dampened in
mild soap solution, then wipe clean with a
dry, soft cloth.

Regular care and cleaning is required in
order to maintain the appearance of the
leather (if so equipped).

Before using any fabric protector, read the
manufacturer’s recommendations. Some
fabric protectors contain chemicals that
may stain or bleach the seat material.

Use a cloth dampened only with water to
clean the meter and gauge lens.

WARNING

Do not use water or acidic cleaners (hot
steam cleaners) on the seat. This can
damage the seat or occupant classifi-
cation sensor. This can also affect the
operation of the air bag system and re-
sult in serious personal injury.

CLEANING INTERIOR

7-4

Appearance and care

CAUTION

∙ Never use benzine, thinner or any

similar material.

∙ Small dirt particles can be abrasive

and damaging to leather surfaces
and should be removed promptly. Do
not use saddle soap, car waxes, pol-
ishes, oils, cleaning fluids, solvents,
detergents or ammonia-based clean-
ers as they may damage the leather’s
natural finish.

∙ Never use fabric protectors unless

recommended by the manufacturer.

∙ Do not use glass or plastic cleaner on

meter or gauge lens covers. It may
damage the lens cover.

AIR FRESHENERS

Most air fresheners use a solvent that
could affect the vehicle interior. If you use
an air freshener, take the following precau-
tions:

∙ Hanging-type air fresheners can cause

permanent discoloration when they
contact vehicle interior surfaces. Place
the air freshener in a location that al-
lows it to hang free and not contact an
interior surface.

∙ Liquid-type air fresheners typically clip

on the vents. These products can cause
immediate damage and discoloration
when spilled on interior surfaces.

Carefully read and follow the manufactur-
er’s instructions before using the air fresh-
eners.

FLOOR MATS (if so equipped)

WARNING

To avoid potential pedal interference
that may result in a collision, injury or
death:

∙ NEVER place a floor mat on top of an-

other floor mat in the driver front po-
sition or install them upside down or
backwards.

LAI0009

Appearance and care

7-5

∙ Use only Genuine NISSAN floor mats,

or equivalent floor mats, that are spe-
cifically designed for use in your ve-
hicle model and model year.

∙ Properly position the mats in the

floorwell using the floor mat position-
ing hook. For additional information,
refer to "Floor mat installation" in this
section.

∙ Make sure the floor mat does not in-

terfere with pedal operation.

∙ Periodically check the floor mats to

make sure they are properly installed.

∙ After cleaning the vehicle interior,

check the floor mats to make sure
they are properly installed.

The use of Genuine NISSAN floor mats can
extend the life of your vehicle carpet and
make it easier to clean the interior. Mats
should be maintained with regular clean-
ing and replaced if they become exces-
sively worn.

Floor mat installation

Your vehicle is equipped with floor mat po-
sitioning hook(s). The number and shape of

the floor mat positioning hooks for each
seating position varies depending on the
vehicle.

When installing Genuine NISSAN floor mats,
follow the installation instructions provided
with the mat and the following:

1. With the ignition in the OFF position, the

shift lever in P (Park) position and with
the parking brake fully applied, position
the floor mat in the floorwell so that the
floor mat grommet holes are aligned
with the hook(s).

2. Secure the grommet holes into the

hook(s) and ensure that the floor mat is
properly positioned.

3. Make sure the floor mat does not inter-

fere with pedal operation. With the igni-
tion still in the OFF position, the shift
lever in the P (Park) position and with
the parking brake applied, fully apply
and release all pedals. The floor mat
must not interfere with pedal opera-
tion or prevent the pedal from return-
ing to its normal position.

It is recommended that you visit a NISSAN
dealer for details about installing the floor
mats in your vehicle.

The illustration shows the location of the
floor mat positioning hooks.

SEAT BELTS

The seat belts can be cleaned by wiping
them with a sponge dampened in a mild
soap solution. Allow the belts to dry com-
pletely in the shade before using them. For
additional information, refer to “Seat belt
maintenance” in the “Safety—Seats, seat
belts and supplemental restraint system”
section of this manual.

Positioning hooks

LAI2045

7-6

Appearance and care

WARNING

Do not allow wet seat belts to roll up in
the retractor. NEVER use bleach, dye or
chemical solvents to clean the seat
belts, since these materials may se-
verely weaken the seat belt webbing.

MOST COMMON FACTORS
CONTRIBUTING TO VEHICLE
CORROSION

Most vehicle corrosion is caused by:

∙ The

accumulation

of

moisture-

retaining dirt and debris in body panel
sections, cavities, and other areas.

∙ Damage to paint and other protective

coatings caused by gravel and stone
chips or minor traffic collisions.

ENVIRONMENTAL FACTORS
INFLUENCE THE RATE OF
CORROSION

Moisture

Accumulation of sand, dirt and water on
the vehicle body underside can accelerate
corrosion. Wet floor coverings will not dry
completely inside the vehicle and should
be removed for drying to avoid floor panel
corrosion.

Relative humidity

Corrosion will be accelerated in areas of
high relative humidity, especially those ar-
eas where the temperatures stay above

freezing and where atmospheric pollution
exists and road salt is used.

Temperature

High temperatures accelerate the rate of
corrosion to those parts which are not well
ventilated.

Air pollution

Industrial pollution, the presence of salt in
the air in coastal areas, or heavy road salt
use accelerates the corrosion process.
Road salt also accelerates the disintegra-
tion of paint surfaces.

PROTECT YOUR VEHICLE FROM
CORROSION

∙ Wash and wax your vehicle often to

keep the vehicle clean.

∙ Always check for minor damage to the

paint and repair it as soon as possible.

∙ Keep drain holes at the bottom of the

doors open to avoid water accumula-
tion.

∙ Check the underbody for accumulation

of sand, dirt or salt. If present, wash with
water as soon as possible.

CORROSION PROTECTION

Appearance and care

7-7

CAUTION

∙ NEVER remove dirt, sand or other de-

bris from the passenger compart-
ment by washing it out with a hose.
Remove dirt with a vacuum cleaner or
broom.

∙ Never allow water or other liquids to

come in contact with electronic com-
ponents inside the vehicle as this may
damage them.

Chemicals used for road surface de-icing
are extremely corrosive. They accelerate
corrosion and deterioration of underbody
components such as the exhaust system,
fuel and brake lines, brake cables, floor pan
and fenders.

In

winter,

the

underbody

must

be

cleaned periodically.

For additional protection against rust and
corrosion, which may be required in some
areas, it is recommended that you visit a
NISSAN dealer.

License plate bracket padding

1. License plate

2. Trunk

3. License plate frame

4. Padding

CAUTION

A license plate frame could vibrate and
cause noise or paint damage. To avoid
damage or noise, add a soft adhesive
pad with a maximum thickness of 1/8 in
(4 mm) to the back lower edge of the
license plate frame.

LAI2001

7-8

Appearance and care

8 Do-it-yourself

Maintenance precautions . . . . . . . . . . . . . . . . . . . . . . . 8-2
Engine compartment check locations . . . . . . . . . . . 8-3
Engine cooling system . . . . . . . . . . . . . . . . . . . . . . . . . . 8-5

Checking engine coolant level . . . . . . . . . . . . . . . . 8-6
Changing engine coolant. . . . . . . . . . . . . . . . . . . . . 8-6

Engine oil. . . . . . . . . . . . . . . . . . . . . . . . . . . . . . . . . . . . . . . . 8-7

Checking engine oil level . . . . . . . . . . . . . . . . . . . . . 8-7
Changing engine oil . . . . . . . . . . . . . . . . . . . . . . . . . . 8-8
Changing engine oil filter . . . . . . . . . . . . . . . . . . . . 8-10

Continuously Variable Transmission (CVT)
fluid . . . . . . . . . . . . . . . . . . . . . . . . . . . . . . . . . . . . . . . . . . . . .8-11
Power steering fluid . . . . . . . . . . . . . . . . . . . . . . . . . . . . .8-11
Brake fluid . . . . . . . . . . . . . . . . . . . . . . . . . . . . . . . . . . . . . . 8-12
Windshield-washer fluid . . . . . . . . . . . . . . . . . . . . . . . . 8-12

Windshield-washer fluid reservoir. . . . . . . . . . . . 8-12

Battery . . . . . . . . . . . . . . . . . . . . . . . . . . . . . . . . . . . . . . . . . 8-13

Jump starting . . . . . . . . . . . . . . . . . . . . . . . . . . . . . . . 8-15

Variable voltage control system . . . . . . . . . . . . . . . . 8-15
Drive belt . . . . . . . . . . . . . . . . . . . . . . . . . . . . . . . . . . . . . . . 8-16
Spark plugs . . . . . . . . . . . . . . . . . . . . . . . . . . . . . . . . . . . . 8-17

Replacing spark plugs . . . . . . . . . . . . . . . . . . . . . . . 8-17

Air cleaner. . . . . . . . . . . . . . . . . . . . . . . . . . . . . . . . . . . . . . 8-18

In-cabin microfilter . . . . . . . . . . . . . . . . . . . . . . . . . . 8-18

Windshield wiper blades . . . . . . . . . . . . . . . . . . . . . . . . 8-19

Cleaning . . . . . . . . . . . . . . . . . . . . . . . . . . . . . . . . . . . . 8-19
Replacing . . . . . . . . . . . . . . . . . . . . . . . . . . . . . . . . . . . 8-19

Brakes. . . . . . . . . . . . . . . . . . . . . . . . . . . . . . . . . . . . . . . . . . 8-20
Fuses. . . . . . . . . . . . . . . . . . . . . . . . . . . . . . . . . . . . . . . . . . . 8-21

Engine compartment . . . . . . . . . . . . . . . . . . . . . . . 8-21
Passenger compartment. . . . . . . . . . . . . . . . . . . . 8-22

Battery replacement . . . . . . . . . . . . . . . . . . . . . . . . . . . 8-23

NISSAN Intelligent Key® . . . . . . . . . . . . . . . . . . . . . . 8-24

Lights . . . . . . . . . . . . . . . . . . . . . . . . . . . . . . . . . . . . . . . . . . 8-25

Headlights. . . . . . . . . . . . . . . . . . . . . . . . . . . . . . . . . . . 8-25
Fog lights (if so equipped) . . . . . . . . . . . . . . . . . . . 8-26
Exterior and interior lights . . . . . . . . . . . . . . . . . . . 8-27

Wheels and tires . . . . . . . . . . . . . . . . . . . . . . . . . . . . . . . . 8-30

Tire pressure . . . . . . . . . . . . . . . . . . . . . . . . . . . . . . . . 8-30
Tire labeling . . . . . . . . . . . . . . . . . . . . . . . . . . . . . . . . . 8-34
Types of tires . . . . . . . . . . . . . . . . . . . . . . . . . . . . . . . . 8-37
Tire chains . . . . . . . . . . . . . . . . . . . . . . . . . . . . . . . . . . 8-38
Changing wheels and tires . . . . . . . . . . . . . . . . . . 8-39

When performing any inspection or main-
tenance work on your vehicle, always take
care to prevent serious accidental injury to
yourself or damage to the vehicle. The fol-
lowing are general precautions which
should be closely observed.

WARNING

∙ Park the vehicle on a level surface, ap-

ply the parking brake securely and
block the wheels to prevent the ve-
hicle from moving. Move the shift le-
ver to P (Park).

∙ Be sure the ignition key is in the OFF or

LOCK position when performing any
parts replacement or repairs.

∙ If you must work with the engine run-

ning, keep your hands, clothing, hair
and tools away from moving fans,
belts and any other moving parts.

∙ It is advisable to secure or remove any

loose clothing and remove any jew-
elry, such as rings, watches, etc. be-
fore working on your vehicle.

∙ Always wear eye protection whenever

you work on your vehicle.

∙ Your vehicle is equipped with an auto-

matic engine cooling fan. It may come on
at any time without warning, even if the
ignition key is in the OFF position and the
engine is not running. To avoid injury, al-
ways disconnect the negative battery
cable before working near the fan.

∙ If you must run the engine in an en-

closed space such as a garage, be sure
there is proper ventilation for exhaust
gases to escape.

∙ Never get under the vehicle while it is

supported only by a jack. If it is neces-
sary to work under the vehicle, sup-
port it with safety stands.

∙ Keep smoking materials, flame and

sparks away from the fuel tank and
battery.

∙ On gasoline engine models, the fuel

filter or fuel lines should be serviced. It
is recommended that you visit a
NISSAN dealer for this service because
the fuel lines are under high pressure
even when the engine is off.

CAUTION

∙ Do not work under the hood while the

engine is hot. Turn the engine off and
wait until it cools down.

∙ Avoid contact with used engine oil and

coolant. Improperly disposed engine
oil, engine coolant and/or other vehicle
fluids can damage the environment. Al-
ways conform to local regulations for
disposal of vehicle fluid.

∙ Never leave the engine or the trans-

mission related component harness
connector disconnected while the ig-
nition switch is in the ON position.

∙ Never connect or disconnect the bat-

tery or any transistorized component
while the ignition switch is in the ON
position.

This “Do-it-yourself ” section gives instruc-
tions regarding only those items which are
relatively easy for an owner to perform.

A Genuine NISSAN service manual is also
available. For additional information, refer
to “Owner’s Manual/Service Manual order
information” in the “Technical and con-
sumer information” section of this manual.

You should be aware that incomplete or
improper servicing may result in operating
difficulties or excessive emissions, and
could affect warranty coverage. If in doubt
about any servicing, it is recommended
that you have it done by a NISSAN dealer.

MAINTENANCE PRECAUTIONS

8-2

Do-it-yourself

QR25DE engine

1.

Power steering fluid reservoir

2.

Engine coolant reservoir

3.

Engine oil filler cap

4.

Brake fluid reservoir

5.

Air cleaner

6.

Fuse/Fusible link box

7.

Battery

8.

Engine oil dipstick

9.

Radiator cap

10.

Drive belt location

11.

Windshield-washer fluid reservoir

LDI2111

ENGINE COMPARTMENT CHECK
LOCATIONS

Do-it-yourself

8-3

VQ35DE engine

1.

Power steering fluid reservoir

2.

Engine coolant reservoir

3.

Engine oil filler cap

4.

Brake fluid reservoir

5.

Air cleaner

6.

Fuse/Fusible link box

7.

Battery

8.

Engine oil dipstick

9.

Radiator cap

10.

Drive belt location

11.

Windshield-washer fluid reservoir

LDI2112

8-4

Do-it-yourself

The engine cooling system is filled at the
factory with a pre-diluted mixture of 50%
Genuine

NISSAN

Long

Life

Antifreeze/Coolant (blue) and 50% water to
provide year-round antifreeze and coolant
protection. The antifreeze solution con-
tains rust and corrosion inhibitors. Addi-
tional engine cooling system additives are
not necessary.

WARNING

∙ Never remove the radiator or coolant

reservoir cap when the engine is hot.
Wait until the engine and radiator cool
down. Serious burns could be caused
by high pressure fluid escaping from
the radiator. For additional informa-
tion on precautions, refer to “If your
vehicle overheats” in the “In case of
emergency” section of this manual.

∙ The radiator is equipped with a pres-

sure type radiator cap. To prevent en-
gine damage, use only a Genuine
NISSAN radiator cap.

CAUTION

∙ Never use any cooling system addi-

tives such as radiator sealer. Additives
may clog the cooling system and
cause damage to the engine, trans-
mission and/or cooling system.

∙ When adding or replacing coolant, be

sure to use only Genuine NISSAN Long
Life

Antifreeze/Coolant

(blue)

or

equivalent. Genuine NISSAN Long Life
Antifreeze/Coolant

(blue)

is

pre-

diluted to provide antifreeze protec-
tion to -34° F (-37° C). If additional
freeze protection is needed due to
weather where you operate your ve-
hicle, add Genuine NISSAN Long Life
Antifreeze/Coolant

(blue)

concen-

trate following the directions on the
container. If an equivalent coolant
other than Genuine NISSAN Long Life
Antifreeze/Coolant (blue) is used, fol-
low the coolant manufacturer’s in-
structions to maintain minimum anti-
freeze protection to -34° F (-37° C). The
use of other types of coolant solu-
tions other than Genuine NISSAN Long
Life

Antifreeze/Coolant

(blue)

or

equivalent may damage the engine
cooling system.

∙ The life expectancy of the factory-fill

coolant is 105,000 miles (168,000 km)
or 7 years. Mixing any other type of
coolant other than Genuine NISSAN
Long Life Antifreeze/Coolant (blue),
including Genuine NISSAN Long Life
Antifreeze/Coolant (green), or the use
of non-distilled water will reduce the
life expectancy of the factory-fill cool-
ant. For additional information, refer
to the "Maintenance and schedules"
section of this manual.

ENGINE COOLING SYSTEM

Do-it-yourself

8-5

CHECKING ENGINE COOLANT
LEVEL

Check the coolant level in the reservoir
when the engine is cold. 
If the coolant
level is below the MIN level

B

, add coolant

to the MAX level

A

. If the reservoir is empty,

check the coolant level in the radiator
when the engine is cold. If there is insuffi-
cient coolant in the radiator, fill the radiator
with coolant up to the filler opening and
also add it to the reservoir up to the MAX
level

A

.

This vehicle contains Genuine NISSAN Long
Life Antifreeze/Coolant (blue). The life ex-
pectancy of the factory-fill coolant is
105,000 miles (168,000 km) or 7 years. Mixing
any other type of coolant or the use of
non-distilled water will reduce the life ex-
pectancy of the factory-fill coolant. For ad-
ditional information, refer to the "Mainte-
nance and schedules" section of this
manual.

For additional information on the location
of the engine coolant reservoir, refer to “En-
gine compartment check locations” in this
section.

If the cooling system frequently requires
coolant, have it checked. It is recom-
mended that you visit a NISSAN dealer
for this service.

CHANGING ENGINE COOLANT

A NISSAN dealer can change the engine
coolant. The service procedure can be
found in the NISSAN Service Manual.

Improper servicing can result in reduced
heater performance and engine over-
heating.

WARNING

∙ To avoid the danger of being scalded,

never change the coolant when the
engine is hot.

∙ Never remove the radiator cap when

the engine is hot. Serious burns could
be caused by high pressure fluid es-
caping from the radiator.

∙ Avoid direct skin contact with used

coolant. If skin contact is made, wash
thoroughly with soap or hand cleaner
as soon as possible.

∙ Keep coolant out of the reach of chil-

dren and pets.

Engine coolant must be disposed of prop-
erly. Check your local regulations.

LDI2750

8-6

Do-it-yourself

CHECKING ENGINE OIL LEVEL

1. Park the vehicle on a level surface and

apply the parking brake.

2. Start the engine and let it idle until it

reaches operating temperature.

3. Turn off the engine. Wait more than

10 minutes for the oil to drain back
into the oil pan.

4. Remove the dipstick and wipe it clean.

Reinsert it all the way.

5. Remove the dipstick again and check

the oil level. It should be between the H
(High) and L (Low) marks

B

. This is the

normal operating oil level range. If the
oil level is below the L (Low) mark

A

,

remove the oil filler cap and pour rec-
ommended oil through the opening.
Do not overfill

C

.

6. Recheck oil level with the dipstick.

It is normal to add some oil between oil
maintenance intervals or during the
break-in period, depending on the sever-
ity of operating conditions.

QR25DE engine

LDI2120

VQ35DE engine

LDI2121

QR25DE engine

LDI2812

ENGINE OIL

Do-it-yourself

8-7

CAUTION

∙ Oil level should be checked regularly.

Operating the engine with an insuffi-
cient amount of oil can damage the
engine, and such damage is not cov-
ered by warranty.

∙ It is normal to add some oil between

oil maintenance intervals or during
the break-in period, depending on the
severity of operating conditions.

CHANGING ENGINE OIL

1. Park the vehicle on a level surface and

apply the parking brake.

2. Start the engine and let it idle until it

reaches operating temperature, then
turn it off.

3. Remove the oil filler cap

A

by turning it

counterclockwise.

4. Place a large drain pan under the drain

plug

B

.

5. Remove the drain plug

B

with a

wrench by turning it counterclockwise
and completely drain the oil.

If the oil filter is to be changed, remove
and replace it at this time. For addi-
tional information, refer to “Changing
engine oil filter” in this section.

∙ Waste oil must be disposed of prop-

erly.

∙ Check your local regulations.

VQ35DE engine

WDI0214

LDI2866

QR25DE engine

LDI2867

8-8

Do-it-yourself

WARNING

∙ Prolonged and repeated contact with

used engine oil may cause skin
cancer.

∙ Try to avoid direct skin contact with

used oil. If skin contact is made, wash
thoroughly with soap or hand cleaner
as soon as possible.

∙ Keep used engine oil out of reach of

children.

CAUTION

Be careful not to burn yourself. The en-
gine oil may be hot.

6. Clean and reinstall the drain plug

B

and a new washer. Securely tighten the
drain plug with a wrench. Do not use
excessive force.

Drain plug tightening torque:

25 ft-lb (34 N·m)

7. Refill engine with recommended oil

through the oil filler opening, then install
the oil filler cap securely.

For additional information on drain
and refill capacity, refer to “Recom-
mended fluids/lubricants and capaci-
ties” in the “Technical and consumer
information” section of this manual.

The drain and refill capacity depends
on the oil temperature and drain time.
Use these specifications for reference
only. Always use the dipstick to deter-
mine when the proper amount of oil is
in the engine.

8. Start the engine. Check for leakage

around the drain plug and oil filter. Cor-
rect as required.

9. Turn the engine off and wait more than

10 minutes. Check the oil level with the
dipstick. Add engine oil if necessary.

VQ35DE engine

LDI2868

Do-it-yourself

8-9

CHANGING ENGINE OIL FILTER

1. Park the vehicle on a level surface and

apply the parking brake.

2. Turn the engine off.

3. Place a large drain pan under the oil

filter

B

.

4. Remove pins

A

from the right engine

protector located inside right wheel
well, remove protector. Remove oil filter

B

with an oil filter wrench by turning it

counterclockwise. Then remove the oil
filter by turning it by hand.

CAUTION

Be careful not to burn yourself. The en-
gine oil may be hot.

5. Wipe the engine oil filter sealing surface

with a clean rag.

CAUTION

∙ Be sure to remove any old gasket

material remaining on the sealing
surface of the engine. Failure to do
so could lead to an oil leak and en-
gine damage.

∙ The dipstick must be inserted in

place to prevent oil spillage from
the dipstick hole when filling the
engine with oil.

6. Coat the gasket on the new filter with

clean engine oil.

7. Screw on the oil filter until a slight resis-

tance is felt, then tighten an additional
2/3 turn.

8. Start the engine and check for leakage

around the oil filter. Correct as required.

9. Turn the engine off and wait more than

10 minutes. Check the oil level. Add en-
gine oil if necessary.

LDI2806

8-10

Do-it-yourself


Content   ..  21  22  23  24   ..