Nissan Frontier D40. Manual - part 854


  Index      Nissan     Nissan Frontier D40 (2010 year) - Service and Repair Manual


Search            


Content   ..  852  853  854  855   ..


Nissan Frontier D40. Manual - part 854


MWI

COMPASS

MWI-21

< FUNCTION DIAGNOSIS >

C

D

E

F

G

H

I

J

K

L

M

B

A

O

P

COMPASS

Description

INFOID:0000000005275811

DESCRIPTION

With the ignition switch in the ON position, and the mode (N) switch
ON, the compass display will indicate the direction the vehicle is
heading.
Vehicle direction is displayed as follows:
• N: north
• E: east
• S: south
• W:  west

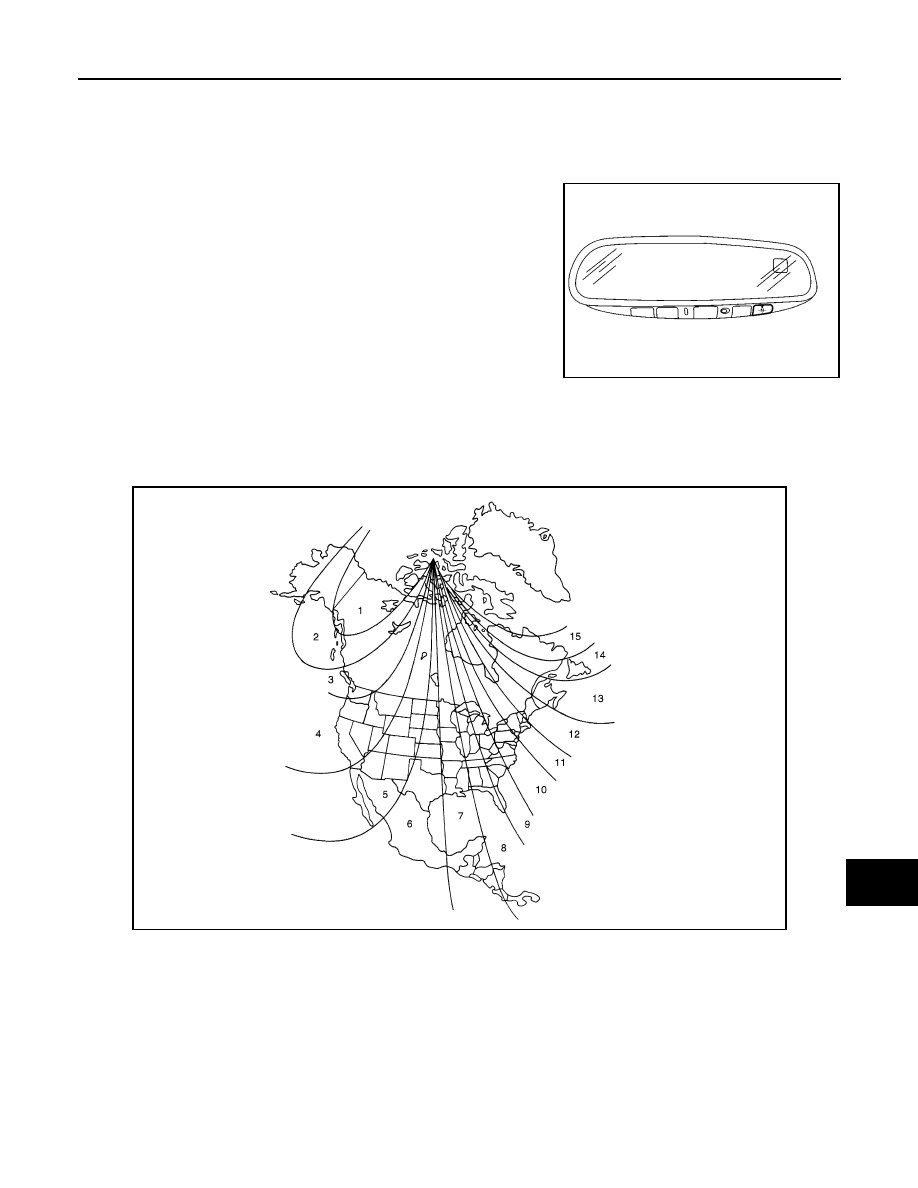
ZONE VARIATION SETTING PROCEDURE

The difference between magnetic north and geographical north can sometimes be great enough to cause
false compass readings. This difference is known as variance. In order for the compass to operate properly
(accurately) in a particular zone, the zone variation must be calibrated using the following procedure. 

Zone Variation Chart

1.

Determine your location on the zone map.

2.

Turn the ignition switch to the ON position.

3.

Press and hold the mode (N) switch for about 8 seconds. The current zone number will appear in the dis-
play.

4.

Press the mode (N) switch repeatedly until the desired zone number appears in the display.

Once the desired zone number is displayed, stop pressing the mode (N) switch and the display will show a
compass direction after a few seconds.
NOTE:
Use zone number 5 for Hawaii.

CALIBRATION PROCEDURE

LKIA0447E

WKIA4148E

MWI-22

< FUNCTION DIAGNOSIS >

COMPASS

The compass display is equipped with an automatic correction function. If the compass display reads “CAL” or
the direction is not shown correctly, perform the correction procedure below.
1.

Press and hold the mode (N) switch for about 10 seconds. The
display will read “CAL”.

2.

Drive the vehicle slowly in a circle, in an open, safe place. The
initial calibration is completed in about 3 turns.

NOTE:
In places where the terrestrial magnetism is extremely disturbed, the
initial correction may start automatically.

LKIA0447E

MWI

DIAGNOSIS SYSTEM (METER)

MWI-23

< FUNCTION DIAGNOSIS >

C

D

E

F

G

H

I

J

K

L

M

B

A

O

P

DIAGNOSIS SYSTEM (METER)

Diagnosis Description

INFOID:0000000005275812

SELF-DIAGNOSIS MODE

The following items can be checked during Combination Meter Self-Diagnosis Mode.
• Gauge sweep and present gauge values.
• Illuminates all odometer/trip meters and A/T indicator segments.
• Illuminates all micro controlled lamps/LEDs regardless of switch position.
• Displays estimated present battery voltage.
• Displays seat belt buckle switch LH status.

OPERATION PROCEDURE

NOTE:
• Once entered, combination meter self-diagnosis mode will function with the ignition switch in ON or START.

Combination meter self-diagnosis mode will exit upon turning the ignition switch to OFF or ACC. 

• If the diagnosis function is activated with trip A displayed, the mileage on trip A is reset to 0000.0. (Trip B

operates the same way.)

To initiate combination meter self-diagnosis mode, refer to the following procedure.
1.

Turn the ignition switch ON, while pressing the odometer/trip meter switch for 5 - 8 seconds. When the
diagnosis function is activated, the odometer/trip meter will display tESt.

NOTE:
Check combination meter power supply and ground circuit when self-diagnosis mode of combination meter
does not start. Refer to 

MWI-29, "COMBINATION METER : Diagnosis Procedure"

. Replace combination

meter if normal. Refer to 

MWI-95, "Removal and Installation"

.

COMBINATION METER SELF-DIAGNOSIS MODE FUNCTIONS

To interpret combination meter self-diagnosis mode functions, refer to the following table.

Event

Odometer Display

Description of Test/Data

Notes:

Odometer/trip meter A/B 
switch held from 5 to 8 
seconds (or until re-
leased)

tESt

Initiating self-diagnosis mode

Switch released

GAGE

Performs sweep of all 
gauges, then displays 
present gauge values.

Gauges sweep within 10 seconds

Switch pressed

(All segments illuminated)

Lights all LCD segments. 
Compare with picture.

USA

 Except USA

Switch pressed

bulb

Illuminates all micro-con-
trolled lamps/LEDs.

Part may not be configured for all 
lamps (functions) that turn on dur-
ing test. This is normal.

Switch pressed

r XXXX, FAIL

Return to normal opera-
tion of all lamps/LEDs and 
displays “r XXXX”.

If a malfunction exists, “FAIL” will 
flash.

AWNIA0219ZZ

AWNIA0220ZZ

MWI-24

< FUNCTION DIAGNOSIS >

DIAGNOSIS SYSTEM (METER)

CONSULT-III Function (METER/M&A)

INFOID:0000000005275813

CONSULT-III can display each diagnostic item using the diagnostic test modes shown following.

Switch pressed

nrXXXX

Displays Hex ROM rev as 
stored in NVM.

Switch pressed

EE XX, FAIL

Displays “EE XX”.

If a malfunction exists, “FAIL” will 
flash.

Switch pressed

dtXXXX

Hex coding of final manu-
facturing test date.

Switch pressed
(3 times)

Sc1 XX through Epr XX

Displays 8 bit software 
configuration value in Hex 
format

Switch pressed

1nF XX

Displays 8-bit market info 
value in Hex format.

$31 = USA
$2A = Canada

Switch pressed
(3 times)

cYL XX through tF

N/A

Switch pressed

ot1 XX

Displays oil pressure tell-
tale “” in Hex format.

Switch pressed

ot0 XX

Displays oil pressure tell-
tale “” in Hex format.

Switch pressed

XXXXX

“Corrected” speed value 
in hundredths of MPH. 
Gauge indication may be 
slightly higher. This is nor-
mal.

Will display “-----” if message is not 
received. Will display “99999” if 
data received is invalid.

Switch pressed

XXXXX

“Corrected” speed value 
in hundredths of KPH. 
Gauge indication may be 
slightly different. This is 
normal.

Will display “-----” if message is not 
received. Will display “99999” if 
data received is invalid.

Switch pressed

t XXXX

Tachometer value in 
RPM. Gauge indication 
may be higher at higher 
RPM. This is normal.

Will display “-----” if message is not 
received.

Switch pressed

F1XXXX

Present fuel level A/D in-
put. This input represents 
fuel sender input.

000-009 = Short circuit
010-254 = Normal range
255 = Open circuit

Switch pressed

XXXC

Last temperature gauge 
input value in degrees C. 
Temperature gauge indi-
cates present tempera-
ture per indication 
standard.

Will display “---”C if message is not 
received.
Will display “999” if data received 
is invalid.
High = 130 deg C
Normal = 70 - 105 deg C
Low = less than 50 deg C

Switch pressed

BAtXX.X

Estimated present battery 
voltage.

Switch pressed

rES -X

Seat belt buckle switch LH 
status.

1= Buckled
0 = Unbuckled

Switch pressed
(30 times)

PA -XX through PA1-XX

N/A

Switch pressed

GAGE

Return to beginning of self-diagno-
sis cycle.

Event

Odometer Display

Description of Test/Data

Notes:


Content   ..  852  853  854  855   ..