Nissan Frontier D40. Manual - part 802
 

  Index      Nissan     Nissan Frontier D40 (2010 year) - Service and Repair Manual


Search            


Content   ..  800  801  802  803   ..


Nissan Frontier D40. Manual - part 802


INSTRUMENT PANEL ASSEMBLY

IP-15

< ON-VEHICLE REPAIR >

C

D

E

F

G

H

I

K

L

M

A

B

IP

N

O

P

Installation

Installation is in the reverse order of removal.

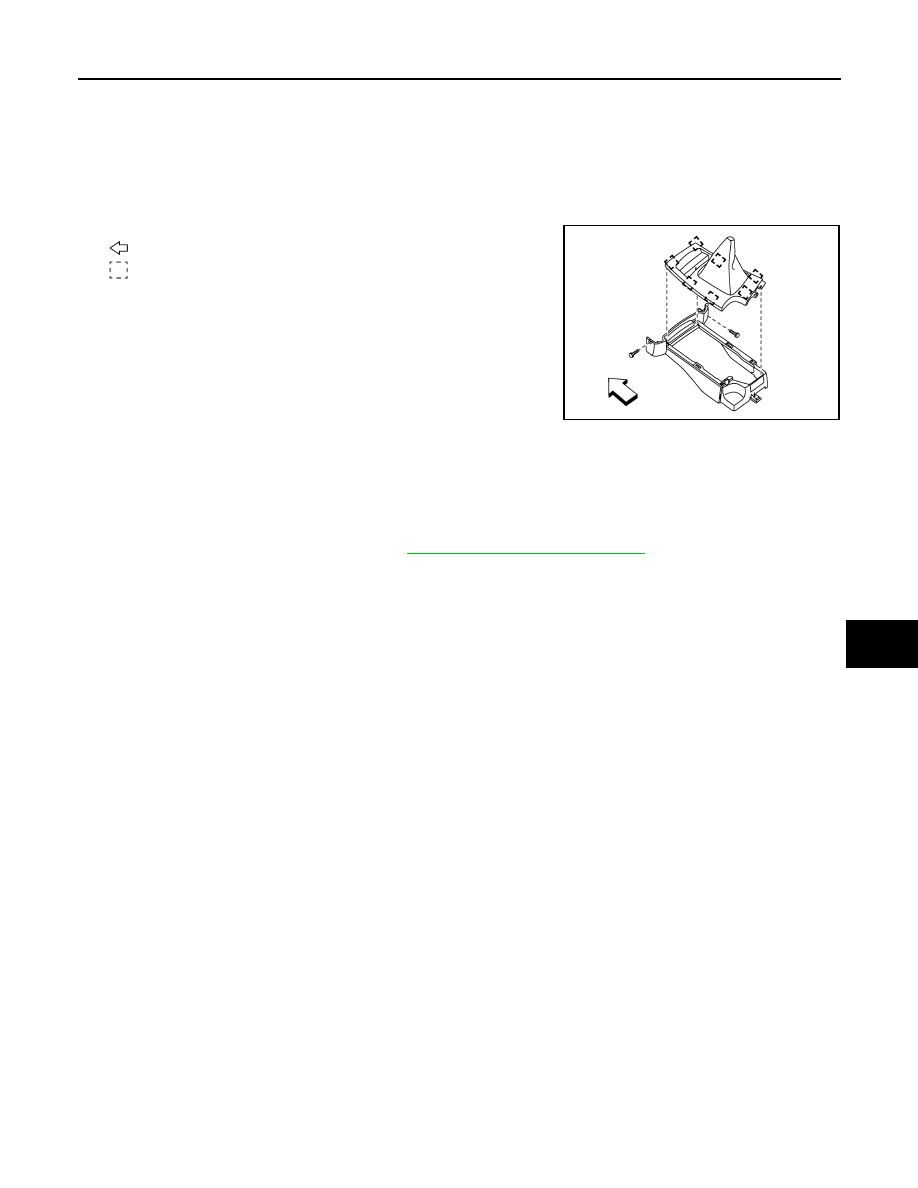
M/T FINISHER

Removal

1.

Remove cup holder finisher. 

2.

Rotate shift knob counterclockwise, then remove.

3.

Pull up to release clips, then remove the M/T finisher.

: Vehicle front

:Metal clip

Installation

Installation is in the reverse order of removal.

LOWER INSTRUMENT PANEL RH AND LOWER GLOVE BOX

Removal

1.

Remove front pillar lower finisher. Refer to 

INT-18, "Removal and Installation"

.

2.

Remove lower instrument panel RH screws, using power tool.

3.

Remove lower instrument panel RH and lower glove box.

Installation

NOTE:
Install upper glove box before installing lower glove box. 
Installation is in the reverse order of removal.

UPPER GLOVE BOX

Removal

1.

Remove lower instrument panel RH and lower glove box. Refer to LOWER INSTRUMENT PAHEL RH in
this section.

2.

Remove upper glove box lid screws, using power tool.

3.

Remove upper glove box.

Installation

Installation is in the reverse order of removal.

CENTER CONSOLE

Removal

ALJIA0461ZZ

IP-16

< ON-VEHICLE REPAIR >

INSTRUMENT PANEL ASSEMBLY

1.

Remove lower instrument panel RH and glove box. Refer to LOWER INSTRUMENT PANEL RH AND
GLOVE BOX in this section.

2.

Remove cup holder finisher.

3.

Remove A/T or M/T finisher. Refer to AT FINISHER or MT FINISHER in this section.

4.

Remove center console screws, then lift center console rear base away from center console front base
and disconnect harness connectors.

5.

Disconnect harness connectors, then remove center console front base.

Installation

Installation is in the reverse order of removal.

1.

Center console front base

2.

Center console rear base

Vehicle front

AWJIA0415ZZ

INSTRUMENT LOWER PANEL RH AND GLOVE BOX

IP-17

< DISASSEMBLY AND ASSEMBLY >

C

D

E

F

G

H

I

K

L

M

A

B

IP

N

O

P

DISASSEMBLY AND ASSEMBLY

INSTRUMENT LOWER PANEL RH AND GLOVE BOX

Exploded View

INFOID:0000000005272875

Disassembly and Assembly

INFOID:0000000005272876

INSTRUMENT LOWER PANEL RH AND GLOVE BOX

Disassembly

1.

Remove fuse block cover.

2.

Remove damper hook.

3.

Remove lower glove box latch cover. 

4.

Remove lower glove box latch assembly.

Assembly

Assembly is in the reverse order of disassembly.

UPPER GLOVE BOX

Disassembly

1.

Remove upper glove box lid screws.

2.

Remove upper glove box lid.

1.

Upper glove box

2.

Upper glove box lid

3.

Lower instrument panel RH

4.

Fuse block cover

5.

Lower glove box latch assembly cover 6.

Lower glove box

7.

Lower glove box latch assembly

8.

Damper hook

9.

Lower glove box damper

WIIA1049E

IP-18

< DISASSEMBLY AND ASSEMBLY >

INSTRUMENT LOWER PANEL RH AND GLOVE BOX

Assembly

Assembly is in the reverse order of disassembly.


Content   ..  800  801  802  803   ..