Nissan Frontier D40. Manual - part 801
 

  Index      Nissan     Nissan Frontier D40 (2010 year) - Service and Repair Manual


Search            


Content   ..  799  800  801  802   ..


Nissan Frontier D40. Manual - part 801


INSTRUMENT PANEL ASSEMBLY

IP-11

< ON-VEHICLE REPAIR >

C

D

E

F

G

H

I

K

L

M

A

B

IP

N

O

P

Removal and Installation

INFOID:0000000005272874

INSTRUMENT PANEL

Removal

CAUTION:

Before servicing, turn the ignition switch off, disconnect both battery terminals, then wait at least 3
minutes.

1.

Disconnect the negative and positive battery negative terminals.

2.

Remove the center console. Refer to CENTER CONSOLE in this section.

3.

Remove the combination meter. Refer to 

MWI-95, "Removal and Installation"

.

4.

Remove front pillar upper finisher. Refer to 

INT-18, "Removal and Installation"

.

5.

Remove audio unit. Refer to 

AV-28, "Removal and Installation"

6.

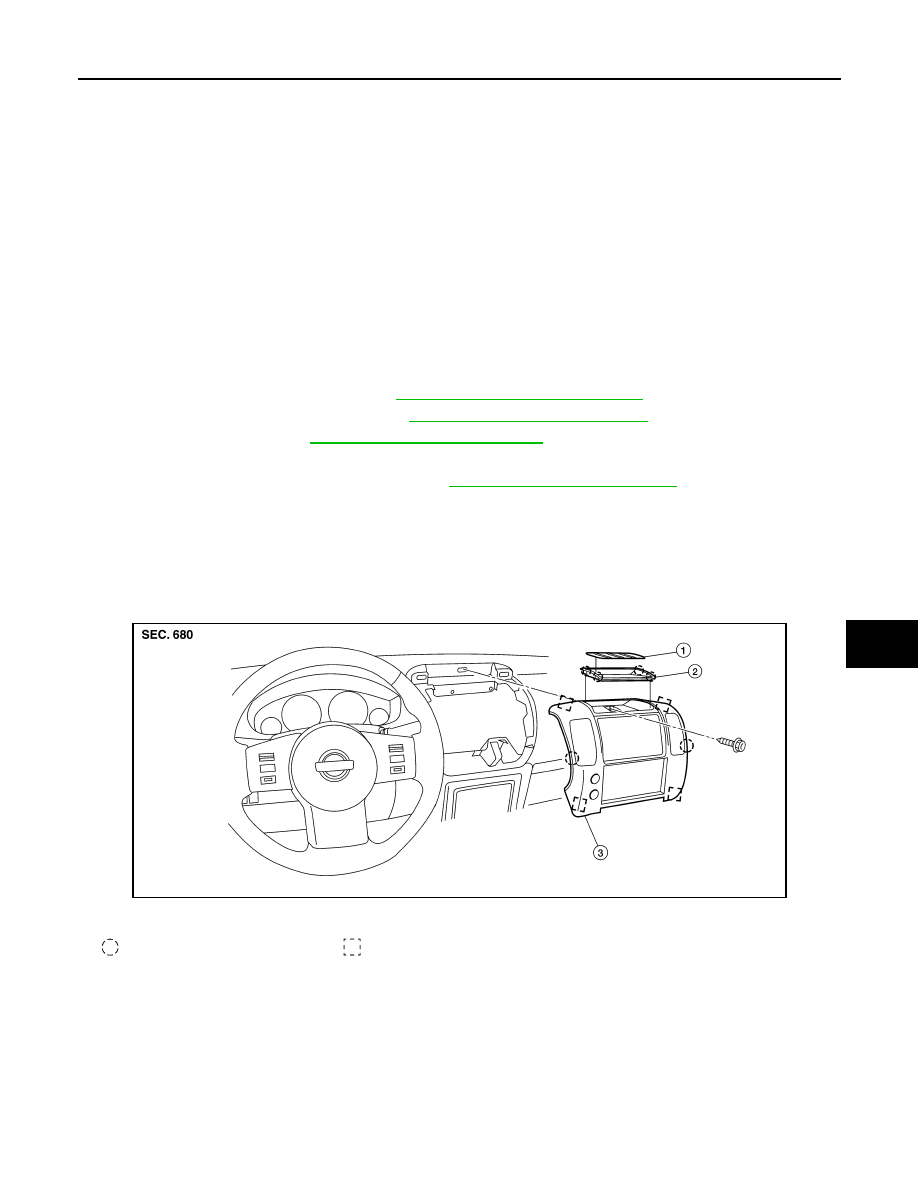
Remove cluster lid D. Refer to CLUSTER LID D (BASE or PUSH TYPE) in this section.

7.

Remove the passenger air bag module. Refer to 

SR-8, "Removal and Installation"

.

8.

Remove the instrument stay RH/LH bolts.

9.

Remove instrument panel and pad assembly.
• Disconnect all remaining harnesses.

Installation

Installation is in the reverse order of removal.

CLUSTER LID C - BASE 

Removal

CAUTION:

Before servicing, turn the ignition switch off, disconnect both battery terminals, then wait at least 3
minutes.

1.

Remove tray mat, then release the clips and remove storage tray.

2.

Remove the screw, then release the clips and remove cluster lid C from instrument panel and pad assem-
bly.

3.

Disconnect harness connectors and remove cluster lid C.

Installation

16.

Center ventilator assembly RH/LH

17.

Cluster lid D

18.

Audio unit

19.

Lower glove box latch assembly

20.

Lower glove box assembly

21.

Fuse block cover

22.

Lower glove box damper assembly

23.

Instrument lower panel RH

24.

Upper glove box door

25.

Upper glove box lid

27.

Instrument panel and pad assembly 28.

Passenger air bag module

29.

Sensor cover

ALJIA0462ZZ

1.

Tray mat

2.

Storage tray

3.

Cluster lid C

Pawl

Metal clip

IP-12

< ON-VEHICLE REPAIR >

INSTRUMENT PANEL ASSEMBLY

Installation is in the reverse order of removal.

CLUSTER LID C - PUSH TYPE 

Removal

CAUTION:

Before servicing, turn the ignition switch off, disconnect both battery terminals, then wait at least 3
minutes.

1.

Release the clips and remove storage tray.

2.

Remove the cluster lid C screws, then release the clips.

3.

Disconnect harness connectors and remove cluster lid C.

Installation

Installation is in the reverse order of removal.

CLUSTER LID D - BASE

ALJIA0458ZZ

1.

Storage tray

2.

Cluster lid C

Pawl

Metal clip

ALJIA0464ZZ

ALJIA0463ZZ

INSTRUMENT PANEL ASSEMBLY

IP-13

< ON-VEHICLE REPAIR >

C

D

E

F

G

H

I

K

L

M

A

B

IP

N

O

P

Removal

1.

Remove center console. Refer to CENTER CONSOLE in this section.

2.

Remove lower instrument panel LH. Refer to LOWER INSTRUMENT PANEL LH in this section.

3.

Remove lower instrument panel RH and lower glove box. Refer to LOWER INSTRUMENT PANEL RH
AND LOWER GLOVE BOX in this section.

4.

Remove cluster lid C. Refer to CLUSTER LID C in this section.

5.

Remove the screws, then disconnect the harness connectors and remove cluster lid D.

Installation

Installation is in the reverse order of removal.

CLUSTER LID D - PUSH TYPE

Removal

1.

Remove center console. Refer to CENTER CONSOLE in this section.

2.

Remove lower instrument panel LH. Refer to LOWER INSTRUMENT PANEL LH in this section.

3.

Remove lower instrument panel RH and lower glove box. Refer to LOWER INSTRUMENT PANEL RH
AND LOWER GLOVE BOX in this section.

4.

Remove cluster lid C. Refer to CLUSTER LID C in this section.

5.

Remove the screws, then disconnect the harness connectors and remove cluster lid D.

Installation

Installation is in the reverse order of removal.

LOWER INSTRUMENT PANEL LH

Removal

1.

Remove front pillar lower finisher. Refer to 

INT-18, "Removal and Installation"

.

2.

Remove lower instrument panel LH screws, using power tool.

3.

Pull rearward to release lower instrument panel LH.

4.

Disconnect lower instrument panel LH harness connectors.

1.

Cluster lid D 

A.

Cluster lid D screw

ALJIA0459ZZ

1.

Cluster lid D 

A.

Cluster lid D screw

LIIA1744E

IP-14

< ON-VEHICLE REPAIR >

INSTRUMENT PANEL ASSEMBLY

Installation

Installation is in the reverse order of removal.

CLUSTER LID A

Removal

1.

Remove front pillar upper finisher. Refer to 

INT-18, "Removal and Installation"

.

2.

Remove lower instrument panel LH. Refer to 

IP-11, "Removal and Installation"

.

3.

Remove steering lock escutcheon.

4.

Remove the screws and clips, then lift cluster lid A rearward in vehicle away from the instrument panel.

Installation

Installation is in the reverse order of removal. 

STEERING COLUMN COVER

Removal

1.

Partially remove driver door weatherstrip and set aside. 

2.

Remove front pillar lower finisher. Refer to 

INT-18, "Removal and Installation"

.

3.

Remove lower intstrument panel LH. Refer to LOWER INSTRUMET PANEL LH in this section.

4.

Remove the steering column cover screws, then remove both the upper and lower portions of the steering
column cover.

Installation

Installation is in the reverse order of removal.

A/T FINISHER

Removal

1.

Remove cup holder finisher. 

2.

Pull up to release clips, then remove the A/T finisher.

ALJIA0460ZZ

1.

Combination meter

2.

Cluster lid A

3.

Ignition key lamp assembly

4.

Steering lock escutcheon

Metal clip

LIIA1941E


Content   ..  799  800  801  802   ..