Nissan Frontier D40. Manual - part 181
 

  Index      Nissan     Nissan Frontier D40 (2010 year) - Service and Repair Manual


Search            


Content   ..  179  180  181  182   ..


Nissan Frontier D40. Manual - part 181


CL-10

< ON-VEHICLE REPAIR >

CLUTCH PEDAL

ON-VEHICLE REPAIR

CLUTCH PEDAL

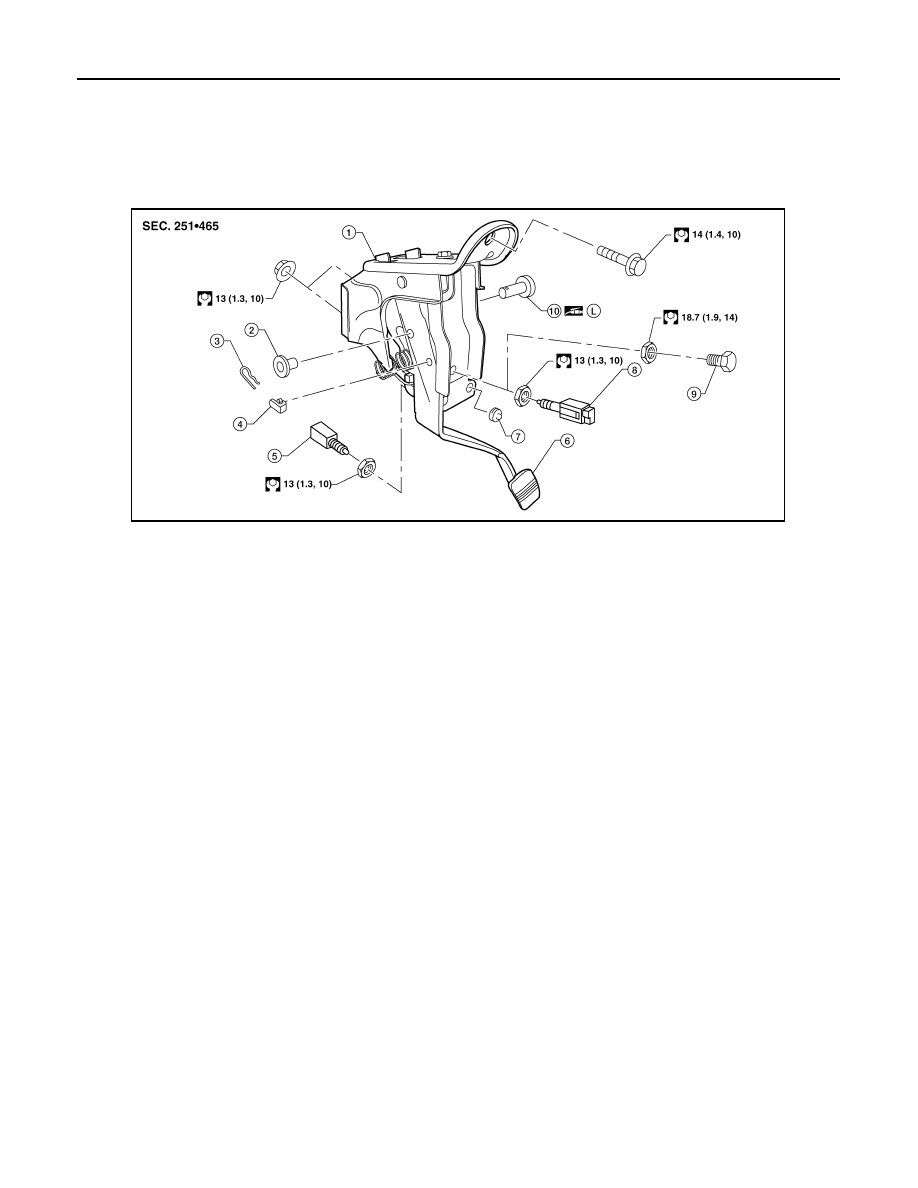
Exploded View

INFOID:0000000005276131

Removal and Installation

INFOID:0000000005276132

REMOVAL

1.

Remove the clutch pedal bracket nuts from inside the engine compartment.

2.

Disconnect the clutch interlock switch and ASCD clutch switch, then remove the wiring harness from the
pedal assembly.

3.

Remove the snap pin and clevis pin.

4.

Remove the pedal bracket bolt and then remove the clutch pedal assembly.

INSTALLATION

Installation is in the reverse order of removal.
NOTE:
Tighten the pedal stopper bolt lock nut or ASCD clutch switch lock nut to the specified torque after installing
the clutch pedal assembly in the vehicle and adjusting the pedal free play.

Inspection

INFOID:0000000005589622

INSPECTION AFTER REMOVAL

• Inspect the clutch pedal for bends, damage, or cracked welds. Replace if necessary.
• Make sure that the assist spring and return spring have not lost their spring. Replace if necessary.

1.

Bracket

2.

Bushing

3.

Snap pin

4.

Pedal stopper rubber

5.

Clutch interlock switch 

6.

Clutch pedal

7.

Stopper rubber

8.

ASCD clutch switch (with ASCD)

9.

Pedal stopper bolt (without ASCD)

10. Clevis pin

WCIA0548E

CLUTCH MASTER CYLINDER

CL-11

< ON-VEHICLE REPAIR >

C

E

F

G

H

I

J

K

L

M

A

B

CL

N

O

P

CLUTCH MASTER CYLINDER

Removal and Installation

INFOID:0000000005276135

REMOVAL

1.

Remove the snap pin and clevis pin from the clevis, and separate it from the clutch pedal.

2.

Drain the brake fluid from the clutch hydraulic system.

CAUTION:

Do not spill brake fluid onto painted surfaces. If it spills, wipe up immediately and wash the
affected area with water.

3.

Remove the hose clamp and hose from the clutch master cylinder.

4.

Remove the clutch tube using suitable tool.

5.

Remove the clutch master cylinder nuts, and remove the clutch master cylinder from the vehicle.

INSTALLATION

Installation is in the reverse order of removal.

• Before installation, check the position of the clevis and push rod. If

(L) is outside standard length, adjust the position of the clevis and
push rod. 

• After installation, inspect and adjust the clutch pedal as necessary,

then bleed the clutch hydraulic system. Refer to 

CL-8, "On-Vehicle

Inspection and Adjustment"

 and 

CL-9, "Bleeding"

.

Clutch master cylinder nuts

: 9.3 N·m (0.95 kg-m, 82 in-lb)

Clutch tube

: Refer to 

CL-14, "Exploded View"

Length (L)

QR25DE

: 119.5 mm (4.70 in)

VQ40DE

: 120.5 mm (4.74 in)

Push rod nut

: 9.8 N·m (1.0 kg-m, 87 in-lb)

SCIA5158E

CL-12

< ON-VEHICLE REPAIR >

CLUTCH RESERVOIR

CLUTCH RESERVOIR

Removal and Installation

INFOID:0000000005589321

For removal and installation of clutch reservoir, refer to 

BR-33, "Removal and Installation"

.

NOTE:
• Be sure to check clutch fluid after installation. Refer to 

BR-21, "Drain and Refill"

.

• Be sure to bleed clutch system after installation. Refer to 

CL-9, "Bleeding"

.

OPERATING CYLINDER

CL-13

< ON-VEHICLE REPAIR >

C

E

F

G

H

I

J

K

L

M

A

B

CL

N

O

P

OPERATING CYLINDER

Removal and Installation

INFOID:0000000005276139

REMOVAL

1.

Drain the brake fluid from the clutch hydraulic system.

CAUTION:

Do not spill brake fluid on painted surfaces. If it spills, wipe up immediately and wash the affected
area with water.

2.

Remove the clutch hose and copper washer from the operating cylinder.

CAUTION:

Do not reuse the copper washer.

3.

Remove the operating cylinder bolts, and remove the operating cylinder from the vehicle.

INSTALLATION

Installation is in the reverse order of removal.

• Tighten the clutch hose fitting to the specified torque. 

CAUTION:

Make sure the clutch hose is not bent or twisted.

• After installation, bleed the clutch hydraulic system. Refer to 

CL-9, "Bleeding"

.

Operating cylinder bolts

35.3 N·m (3.6 kg-m, 26 ft-lb)

Clutch hose fitting

Refer to 

CL-14, "Exploded View"


Content   ..  179  180  181  182   ..