Nissan Frontier D40. Manual - part 1096


  Index      Nissan     Nissan Frontier D40 (2010 year) - Service and Repair Manual


Search            


Content   ..  1094  1095  1096  1097   ..


Nissan Frontier D40. Manual - part 1096


TM-282

< ON-VEHICLE REPAIR >

[5AT: RE5R05A]

CONTROL VALVE WITH TCM

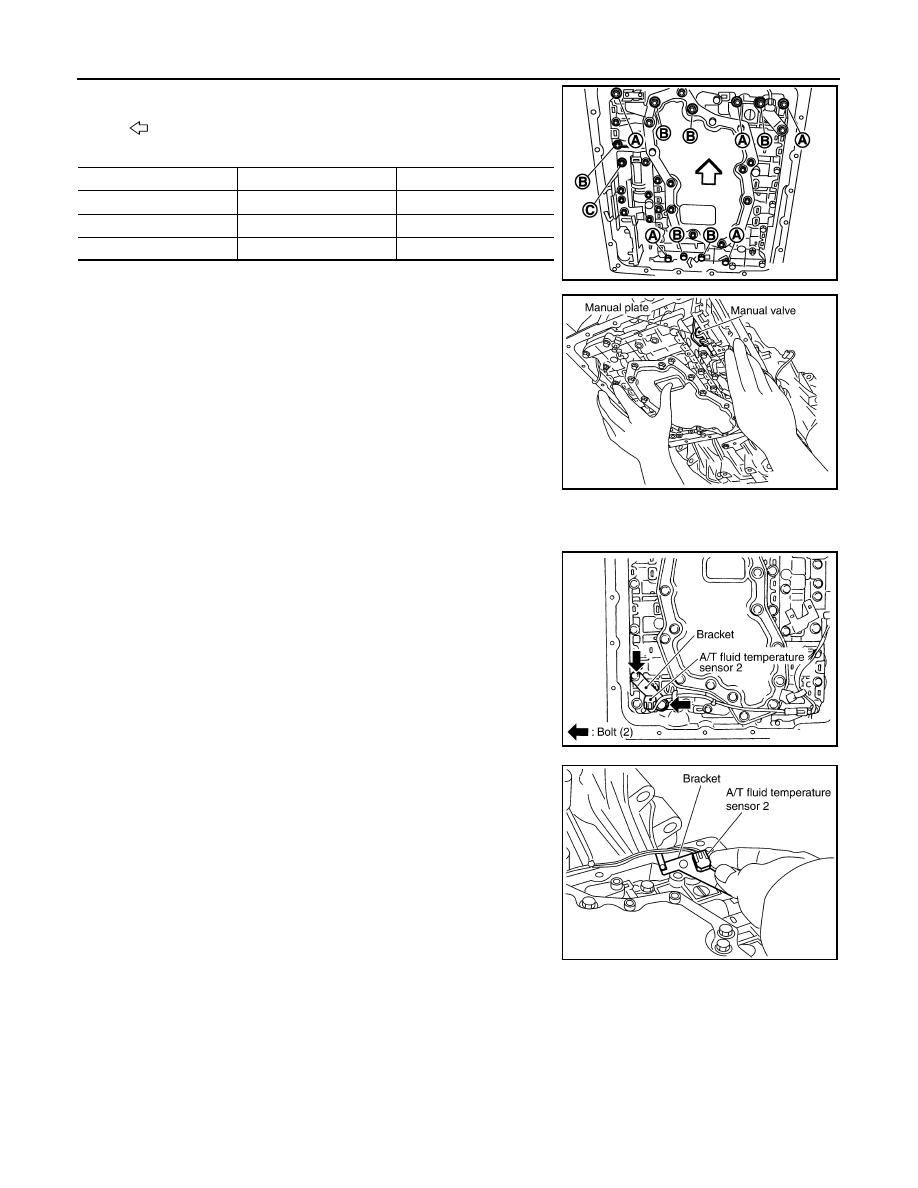
10. Remove bolts (A), (B) and (C) from control valve with TCM.

11. Remove control valve with TCM from transmission case.

CAUTION:

When removing, be careful with the manual valve notch and
manual plate height. Remove it vertically.

12. Remove the A/T fluid temperature sensor 2 or plug as shown below.

a.

A/T fluid temperature sensor 2

i.

Remove A/T fluid temperature sensor 2 with bracket from con-
trol valve with TCM.

ii.

Remove bracket from A/T fluid temperature sensor 2.

b.

Plug

: Front

Bolt symbol

Length mm (in)

Number of bolts

A

42 (1.65)

5

B

55 (2.17)

6

C

40 (1.57)

1

SCIA8074E

SCIA5142E

SCIA5253E

SCIA5264E

CONTROL VALVE WITH TCM

TM-283

< ON-VEHICLE REPAIR >

[5AT: RE5R05A]

C

E

F

G

H

I

J

K

L

M

A

B

TM

N

O

P

i.

Remove plug (1) with bracket (2) from control valve with TCM.

ii.

Remove bracket (1) from plug (2).

iii.

Remove O-ring (1) from plug (2).

13. Remove O-ring from A/T assembly harness connector.

14. Disconnect TCM connectors.

CAUTION:

Do not damage connectors.

: Bolt

JSDIA1311ZZ

JSDIA1312ZZ

JSDIA1313ZZ

SCIA5155E

SCIA5447E

TM-284

< ON-VEHICLE REPAIR >

[5AT: RE5R05A]

CONTROL VALVE WITH TCM

15. Remove A/T assembly harness connector from control valve

with TCM using suitable tool.

16. Disconnect TCM connector (1) and transmission range switch

connector (2).

CAUTION:

Do not damage connectors.

INSTALLATION

CAUTION:

After completing installation, check A/T fluid leakage and fluid level. Refer to 

TM-261, "Checking the A/

T Fluid (ATF)"

.

1.

Connect TCM connector (1) and transmission range switch con-
nector (2).

2.

Install A/T assembly harness connector to control valve with
TCM.

SCIA5448E

JSDIA1317ZZ

JSDIA1317ZZ

SCIA5450E

CONTROL VALVE WITH TCM

TM-285

< ON-VEHICLE REPAIR >

[5AT: RE5R05A]

C

E

F

G

H

I

J

K

L

M

A

B

TM

N

O

P

3.

Connect TCM connector.

4.

Install new O-ring in A/T assembly harness connector.

CAUTION:

• Do not reuse O-ring.
• Apply ATF to O-ring.

5.

Install the A/T fluid temperature sensor 2 or plug as shown below.

a.

A/T fluid temperature sensor 2

i.

Install A/T fluid temperature sensor 2 to bracket.

ii.

Install A/T fluid temperature sensor 2 (with bracket) to control
valve with TCM. Tighten A/T fluid temperature sensor 2 bolt to
the specified torque.

CAUTION:

Adjust bolt hole of bracket to bolt hole of control valve with
TCM.

b.

Plug
NOTE:
• When replacing the A/T fluid temperature sensor 2 with the plug, the A/T fluid temperature sensor 2 con-

nector should not be connected.

• Fold the terminal clips.

SCIA5447E

SCIA5155E

SCIA5264E

SCIA5253E


Content   ..  1094  1095  1096  1097   ..