Nissan Terrano model r20 series 2004. Manual - part 356


  Index      Nissan     Nissan Terrano model r20 series 2004 - Service and Repair Manual


Search            


Content   ..  354  355  356  357   ..


Nissan Terrano model r20 series 2004. Manual - part 356


q

A

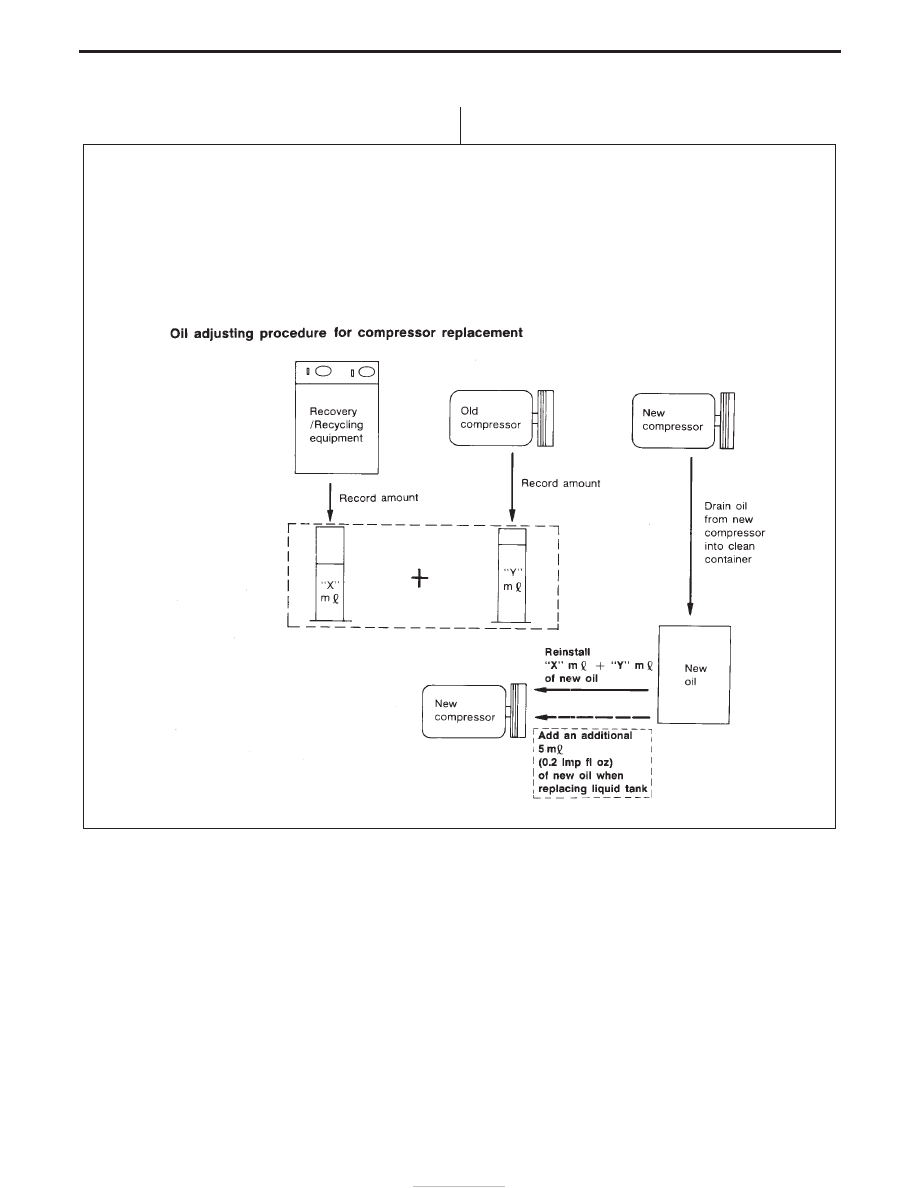
1. Discharge refrigerant into the refrigerant recovery/recycling equipment. Measure oil discharged into the recovery/recycling

equipment.

2. Drain the oil from the “old” (removed) compressor into a graduated container, and record the amount of oil drained.
3. Drain the oil from the “new” compressor into a separate, clean container.
4. Measure an amount of the new oil equivalent to that drained from the “old” compressor, and add this oil to the “new” com-

pressor through the drain plug or suction port opening.

5. Measure an amount of the “new” oil equivalent to that recovered during discharging, and add this oil to the “new” compressor

through the drain plug or suction port opening.

6. If the liquid tank also needs to be replaced, add an additional 5 m


(0.2 Imp fl oz) of oil at this time.

Do not add this 5 m


(0.2 Imp fl oz) of oil if only replacing the compressor.

SHA563D

H

LUBRICATION OIL — Checking and Adjusting

Checking and Adjusting (Cont’d)

HA-24

Compressor Clutch

REMOVAL

I

When removing center bolt, hold clutch disc with clutch disc
wrench.

I

Remove the drive plate using Tool.
Insert holder’s three pins into the drive plate. Rotate the holder
clockwise to hook it onto the plate. Then, tighten the center bolt
to remove the drive plate.
After removing the drive plate, remove the shims from either the
drive shaft or the drive plate.

I

Remove the snap ring using external snap ring pliers.

SHA049F

SHA792E

SHA793E

SHA794E

COMPRESSOR — Model DKS-17CH (ZEXEL make)

HA-25

I

Pulley removal
Use any commercially available pulley puller and tool. Position
the center of it on the end of the tool, and remove the pulley
assembly.
For pressed pulleys
To prevent deformation of the pulley groove, the puller
claws should be hooked under the pulley (not into the
groove). For machine latched pulleys
Align the pulley puller groove with the pulley groove, and
then remove the pulley assembly.

I

Remove the three field coil fixing screws and remove the field
coil.

INSPECTION

Clutch disc: If the contact surface shows signs of damage due to
excessive heat, replace clutch disc and pulley.
Pulley: Check the appearance of the pulley assembly. Check the
contact surface of the pulley for any sign of excessive grooving due
to slippage. If any sign is found, replace both the pulley and clutch
disc. The contact surfaces of the pulley assembly should be
cleaned with a suitable solvent before reinstallation.
Coil: Check coil for loose connection or cracked insulation.

INSTALLATION

I

Install the field coil.

Be sure to align the coil’s pin with the hole in the compres-
sor’s front head.

I

Install the pulley assembly using the installer and a hand press,
and then install the snap ring using snap ring pliers.

SHA050F

SHA051F

RHA075C

SHA051F

SHA797EA

COMPRESSOR — Model DKS-17CH (ZEXEL make)

Compressor Clutch (Cont’d)

HA-26

I

Install the drive plate on the drive shaft, together with the origi-
nal shim(s). Press the drive plate down by hand.

I

Using the holder to prevent drive plate rotation, tighten the bolt
to 12 to 14 N

m (1.2 to 1.4 kg-m, 9 to 10 ft-lb) torque.

After tightening the bolt, check that the pulley rotates
smoothly.

I

Check clearance around the entire periphery of clutch disc.

Disc-to-pulley clearance:

0.3 - 0.6 mm (0.012 - 0.024 in)

If the specified clearance is not obtained, replace adjusting
shim and readjust.

BREAK-IN OPERATION

When replacing compressor clutch assembly, always conduct the
break-in operation. This is done by engaging and disengaging the
clutch about thirty times. Break-in operation raises the level of
transmitted torque.

SHA798E

SHA799E

SHA052F

COMPRESSOR — Model DKS-17CH (ZEXEL make)

Compressor Clutch (Cont’d)

HA-27


Content   ..  354  355  356  357   ..