Nissan Titan A60. Manual - part 104


  Index      Nissan     Nissan Titan A60 (2011 year) - Service and Repair Manual


Search            


Content   ..  102  103  104  105   ..


Nissan Titan A60. Manual - part 104


AV

FRONT DOOR SPEAKER

AV-241

< DTC/CIRCUIT DIAGNOSIS >

[PREMIUM WITH NAVIGATION]

C

D

E

F

G

H

I

J

K

L

M

B

A

O

P

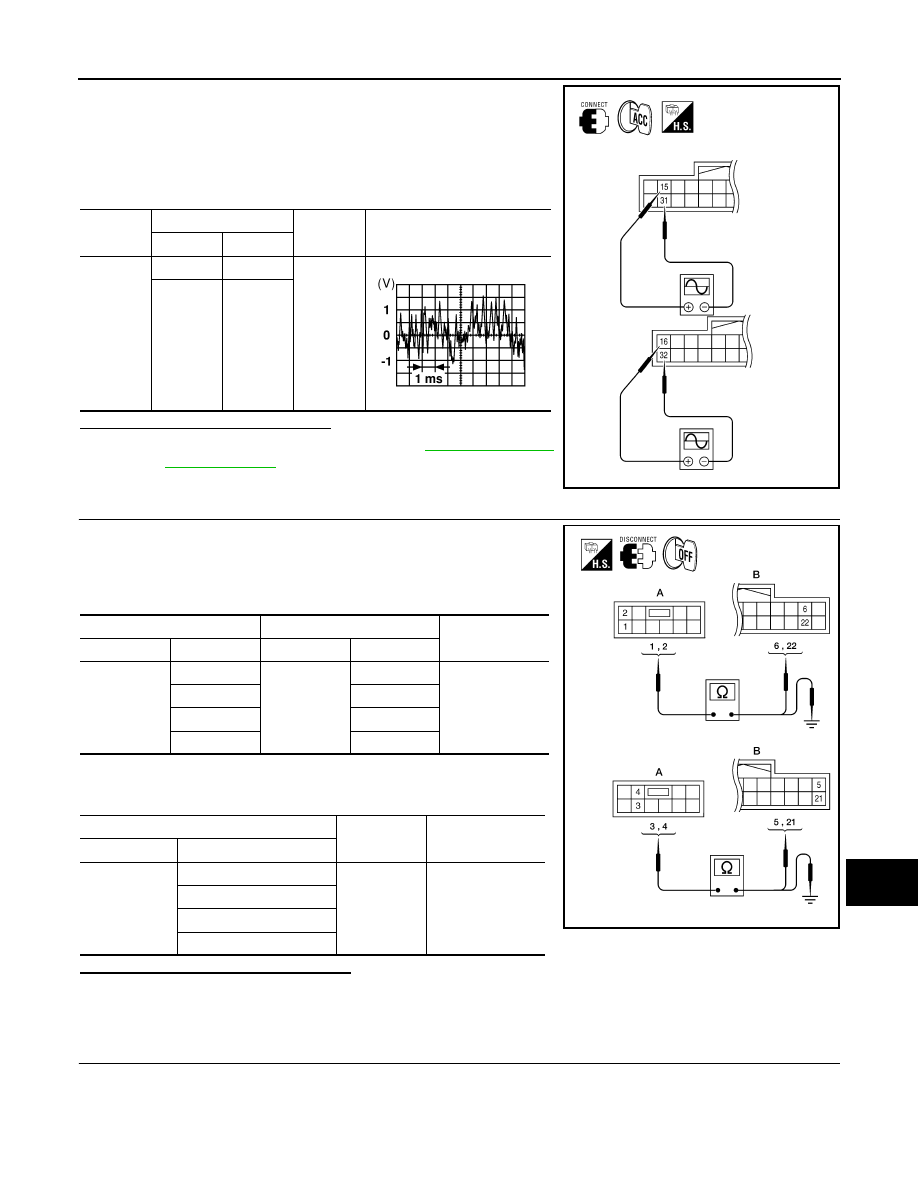
1. Connect audio amp. connector M113 and suspect speaker con-

nector.

2. Turn ignition switch to ACC.

3. Push “POWER” switch.

4. Check the signal between audio amp. harness connector M113

terminals with CONSULT-III or oscilloscope.

Is audio signal voltage as specified?

YES

>> Replace suspect speaker. Refer to 

AV-330, "Removal

and Installation"

.

NO

>> GO TO 3.

3.

PRE-AMP HARNESS CHECK

1. Disconnect audio unit connector M43 and audio amp. connector

M113.

2. Check continuity between audio unit harness connector M43 (A)

and audio amp. harness connector M113 (B).

3. Check continuity between audio unit harness connector M43 (A)

and ground.

Are continuity test results as specified?

YES

>> GO TO 4.

NO

>> • Check connector housings for disconnected or loose terminals.

• Repair harness or connector.

4.

PRE-AMP SIGNAL CHECK

Connec-

tor

Terminal

Condition

Reference

signal

(+)

(-)

M113

15

31

Receive 
audio sig-
nal

16

32

ALNIA0719GB

SKIA0177E

A

B

Continuity

Connector

Terminal

Connector

Terminal

M43

1

M113

6

Yes

2

22

3

5

4

21

Continuity

Connector

Terminal

M43

1

Ground

No

2

3

4

ALNIA0720GB

AV-242

< DTC/CIRCUIT DIAGNOSIS >

[PREMIUM WITH NAVIGATION]

FRONT DOOR SPEAKER

1. Connect audio unit connector and audio amp. connector.

2. Turn ignition switch ACC.

3. Push “POWER” switch.

4. Check the signal between audio unit harness connector M43

terminals with CONSULT-III or oscilloscope.

Are the audio signal voltage readings as specified?

YES

>> Replace audio amp. Refer to 

AV-335, "Removal and

Installation"

.

NO

>> Replace audio unit. Refer to 

AV-326, "Removal and

Installation"

.

Connector

Terminals

Condition

Reference

signal

(+)

(-)

M43

2

1

Receive 
audio sig-
nal

4

3

AWNIA1615ZZ

SKIA0177E

AV

FRONT TWEETER

AV-243

< DTC/CIRCUIT DIAGNOSIS >

[PREMIUM WITH NAVIGATION]

C

D

E

F

G

H

I

J

K

L

M

B

A

O

P

FRONT TWEETER

Description

INFOID:0000000006166602

The audio unit sends audio signals to the audio amp. The audio amp. amplifies the audio signals before send-

ing them to the tweeters using the audio signal circuits.

Diagnosis Procedure

INFOID:0000000006166603

Regarding Wiring Diagram information, refer to 

AV-285, "Wiring Diagram - With Navigation System"

.

1.

HARNESS CHECK

1. Disconnect audio amp. connector M113 and suspect tweeter

connector.

2. Check continuity between audio amp. harness connector M113

(A) and suspect tweeter harness connector (B).

3. Check continuity between audio amp. harness connector M113

(A) and ground.

Are continuity test results as specified?

YES

>> GO TO 2.

NO

>> • Check connector housings for disconnected or loose terminals.

• Repair harness or connector.

2.

FRONT TWEETER SIGNAL CHECK

A B

Continuity

Connector

Terminal

Connector

Terminal

M113

14

M109

1

Yes

30

2

13

M111

1

29

2

A

Continuity

Connector

Terminal

M113

14

Ground

No

30

13

29

ALNIA0722GB

AV-244

< DTC/CIRCUIT DIAGNOSIS >

[PREMIUM WITH NAVIGATION]

FRONT TWEETER

1. Connect audio amp. connector M113 and suspect tweeter con-

nector.

2. Turn ignition switch to ACC.

3. Push “POWER” switch.

4. Check the signal between audio amp. harness connector M113

terminals with CONSULT-III or oscilloscope.

Is audio signal voltage as specified?

YES

>> Replace suspect tweeter. Refer to 

AV-328, "Removal

and Installation"

.

NO

>> GO TO 3.

3.

PRE-AMP HARNESS CHECK

1. Disconnect audio unit connector M43 and audio amp. connector

M113.

2. Check continuity between audio unit harness connector M43 (A)

and audio amp. harness connector M113 (B).

3. Check continuity between audio unit harness connector M43 (A)

and ground.

Are continuity test results as specified?

YES

>> GO TO 4.

NO

>> • Check connector housings for disconnected or loose terminals.

• Repair harness or connector.

4.

PRE-AMP SIGNAL CHECK

Connec-

tor

Terminal

Condition

Reference

signal

(+)

(-)

M113

14

30

Receive 
audio sig-
nal

13

29

ALNIA0723GB

SKIA0177E

A

B

Continuity

Connector

Terminal

Connector

Terminal

M43

1

M113

6

Yes

2

22

3

5

4

21

Continuity

Connector

Terminal

M43

1

Ground

No

2

3

4

ALNIA0720GB


Content   ..  102  103  104  105   ..