Nissan Quest E52. Manual - part 165


  Index      Nissan     Nissan Quest E52 (2011-2014 year) - Service and Repair Manual


Search            


Content   ..  163  164  165  166   ..


Nissan Quest E52. Manual - part 165


AV

U111A REAR CAMERA IMAGE SIGNAL CIRCUIT

AV-539

< DTC/CIRCUIT DIAGNOSIS >

[BOSE AUDIO WITH NAVIGATION]

C

D

E

F

G

H

I

J

K

L

M

B

A

O

P

4.

Check continuity between around view monitor control unit harness connector and ground.

Is inspection result normal?

YES

>> GO TO 4.

NO

>> Repair harness or connector.

4.

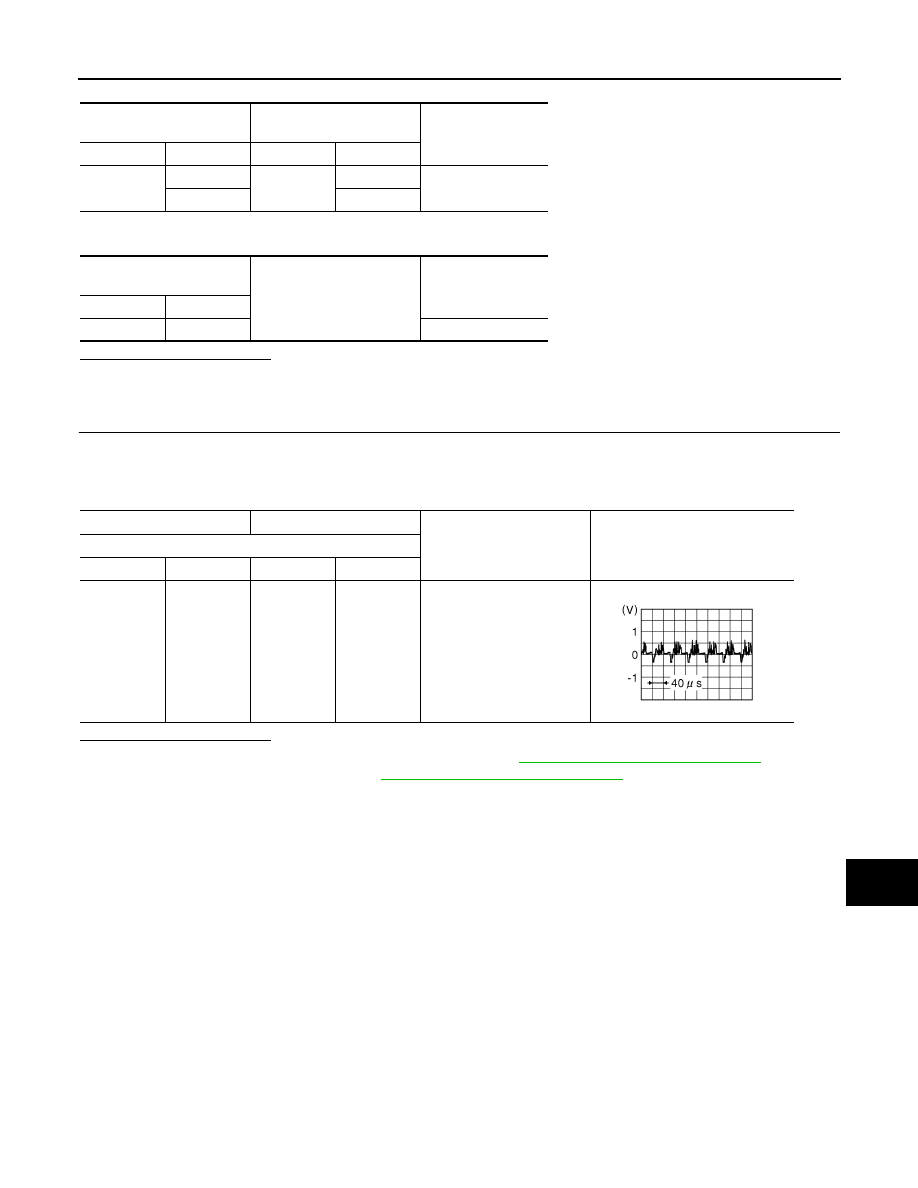
CHECK REAR CAMERA IMAGE SIGNAL

1.

Connect around view monitor control unit connector and rear camera connector.

2.

Turn ignition switch ON.

3.

Check signal between around view monitor control unit harness connector.

Is inspection result normal?

YES

>> Replace around view monitor control unit. Refer to 

AV-631, "Removal and Installation"

.

NO

>> Replace rear camera. Refer to 

AV-633, "Removal and Installation"

.

Around view monitor control 

unit

Rear camera

Continuity

Connector

Terminals

Connector

Terminals

M253

28

D197

3

Existed

27

4

Around view monitor control 

unit

Ground

Continuity

Connector

Terminals

M253

27, 28

Not existed

(+)

(

)

Condition

Reference value

Around view monitor control unit

Connector

Terminal

Connector

Terminal

M253

28

M253

27

“CAMERA” switch is ON or 
shift position is “R”.

JSNIA0834GB

AV-540

< DTC/CIRCUIT DIAGNOSIS >

[BOSE AUDIO WITH NAVIGATION]

U111B SIDE CAMERA RH IMAGE SIGNAL CIRCUIT

U111B SIDE CAMERA RH IMAGE SIGNAL CIRCUIT

DTC Logic

INFOID:0000000009652313

Diagnosis Procedure

INFOID:0000000009652314

1.

CHECK CONTINUITY SIDE CAMERA RH POWER SUPPLY AND GROUND CIRCUIT

1.

Turn ignition switch OFF.

2.

Disconnect around view monitor control unit connector and door mirror (passenger side) connector.

3.

Check continuity between around view monitor control unit harness connector and door mirror (passenger
side) harness connector.

4.

Check continuity between around view monitor control unit harness connector and ground.

Is inspection result normal?

YES

>> GO TO 2.

NO

>> Repair harness or connector.

2.

CHECK VOLTAGE SIDE CAMERA RH POWER SUPPLY

1.

Connect around view monitor control unit connector and door mirror (passenger side) connector.

2.

Turn ignition switch ON.

3.

Check voltage between around view monitor control unit harness connector and ground.

Is inspection result normal?

YES

>> GO TO 3.

NO

>> Replace around view monitor control unit. Refer to 

AV-631, "Removal and Installation"

.

3.

CHECK CONTINUITY SIDE CAMERA RH IMAGE SIGNAL CIRCUIT

1.

Turn ignition switch OFF.

2.

Disconnect around view monitor control unit connector and door mirror (passenger side) connector.

3.

Check continuity between around view monitor control unit harness connector and door mirror (passenger
side) harness connector.

DTC

Display contents of 

CONSULT

DTC detection condition

Possible malfunction factor

U111B

SIDE CAMERA RH IM-
AGE SIGNAL

Side camera RH image signal circuit is open or shorted.

Check side camera RH image signal 
circuit between side camera RH and 
around view monitor control unit.

Around view monitor control 

unit

Door mirror

 (passenger side)

Continuity

Connector

Terminals

Connector

Terminals

M253

34

D3

6

Existed

33

13

Around view monitor control 

unit

Ground

Continuity

Connector

Terminal

M253

34

Not existed

(+)

(

)

Condition

Voltage

(Approx.)

Around view monitor control 

unit

Connector

Terminal

M253

34

Ground

“CAMERA” switch is ON or 
shift position is “R”.

6.2 V

AV

U111B SIDE CAMERA RH IMAGE SIGNAL CIRCUIT

AV-541

< DTC/CIRCUIT DIAGNOSIS >

[BOSE AUDIO WITH NAVIGATION]

C

D

E

F

G

H

I

J

K

L

M

B

A

O

P

4.

Check continuity between around view monitor control unit harness connector and ground.

Is inspection result normal?

YES

>> GO TO 4.

NO

>> Repair harness or connector.

4.

CHECK SIDE CAMERA RH IMAGE SIGNAL

1.

Connect around view monitor control unit connector and door mirror (passenger side) connector.

2.

Turn ignition switch ON.

3.

Check signal between around view monitor control unit harness connector.

Is inspection result normal?

YES

>> Replace around view monitor control unit. Refer to 

AV-631, "Removal and Installation"

.

NO

>> Replace side camera RH. Refer to 

AV-634, "Removal and Installation"

.

Around view monitor control 

unit

Door mirror

 (passenger side)

Continuity

Connector

Terminals

Connector

Terminals

M253

36

D3

5

Existed

35

17

Around view monitor control 

unit

Ground

Continuity

Connector

Terminals

M253

36, 35

Not existed

(+)

(

)

Condition

Reference value

Around view monitor control unit

Connector

Terminal

Connector

Terminal

M253

36

M253

35

“CAMERA” switch is ON or 
shift position is “R”.

JSNIA0834GB

AV-542

< DTC/CIRCUIT DIAGNOSIS >

[BOSE AUDIO WITH NAVIGATION]

U111C FRONT CAMERA IMAGE SIGNAL CIRCUIT

U111C FRONT CAMERA IMAGE SIGNAL CIRCUIT

DTC Logic

INFOID:0000000009652315

Diagnosis Procedure

INFOID:0000000009652316

1.

CHECK CONTINUITY FRONT CAMERA POWER SUPPLY AND GROUND CIRCUIT

1.

Turn ignition switch OFF.

2.

Disconnect around view monitor control unit connector and front camera connector.

3.

Check continuity between around view monitor control unit harness connector and front camera harness
connector.

4.

Check continuity between around view monitor control unit harness connector and ground.

Is inspection result normal?

YES

>> GO TO 2.

NO

>> Repair harness or connector.

2.

CHECK VOLTAGE FRONT CAMERA POWER SUPPLY

1.

Connect around view monitor control unit connector and front camera connector.

2.

Turn ignition switch ON.

3.

Check voltage between around view monitor control unit harness connector.

Is inspection result normal?

YES

>> GO TO 3.

NO

>> Replace around view monitor control unit. Refer to 

AV-631, "Removal and Installation"

.

3.

CHECK CONTINUITY FRONT CAMERA IMAGE SIGNAL CIRCUIT

1.

Turn ignition switch OFF.

2.

Disconnect around view monitor control unit connector and front camera connector.

3.

Check continuity between around view monitor control unit harness connector and front camera harness
connector.

DTC

Display contents of 

CONSULT

DTC detection condition

Possible malfunction factor

U111C

FRONT CAMERA IM-
AGE SIGNAL

Front camera image signal circuit is open or shorted.

Check front camera image signal cir-
cuit between front camera and 
around view monitor control unit.

Around view monitor control 

unit

Front camera

Continuity

Connector

Terminals

Connector

Terminals

M253

38

E404

1

Existed

37

2

Around view monitor control 

unit

Ground

Continuity

Connector

Terminal

M253

38

Not existed

(+)

(

)

Condition

Voltage

(Approx.)

Around view monitor control 

unit

Connector

Terminal

M253

38

Ground

“CAMERA” switch is ON or 
shift position is “R”.

6.2 V


Content   ..  163  164  165  166   ..