Nissan Cube. Manual - part 661


  Index      Nissan     Nissan Cube (2014 year) - Service and Repair Manual


Search            


Content   ..  659  660  661  662   ..


Nissan Cube. Manual - part 661


MA-18

< PERIODIC MAINTENANCE >

ENGINE MAINTENANCE

3.

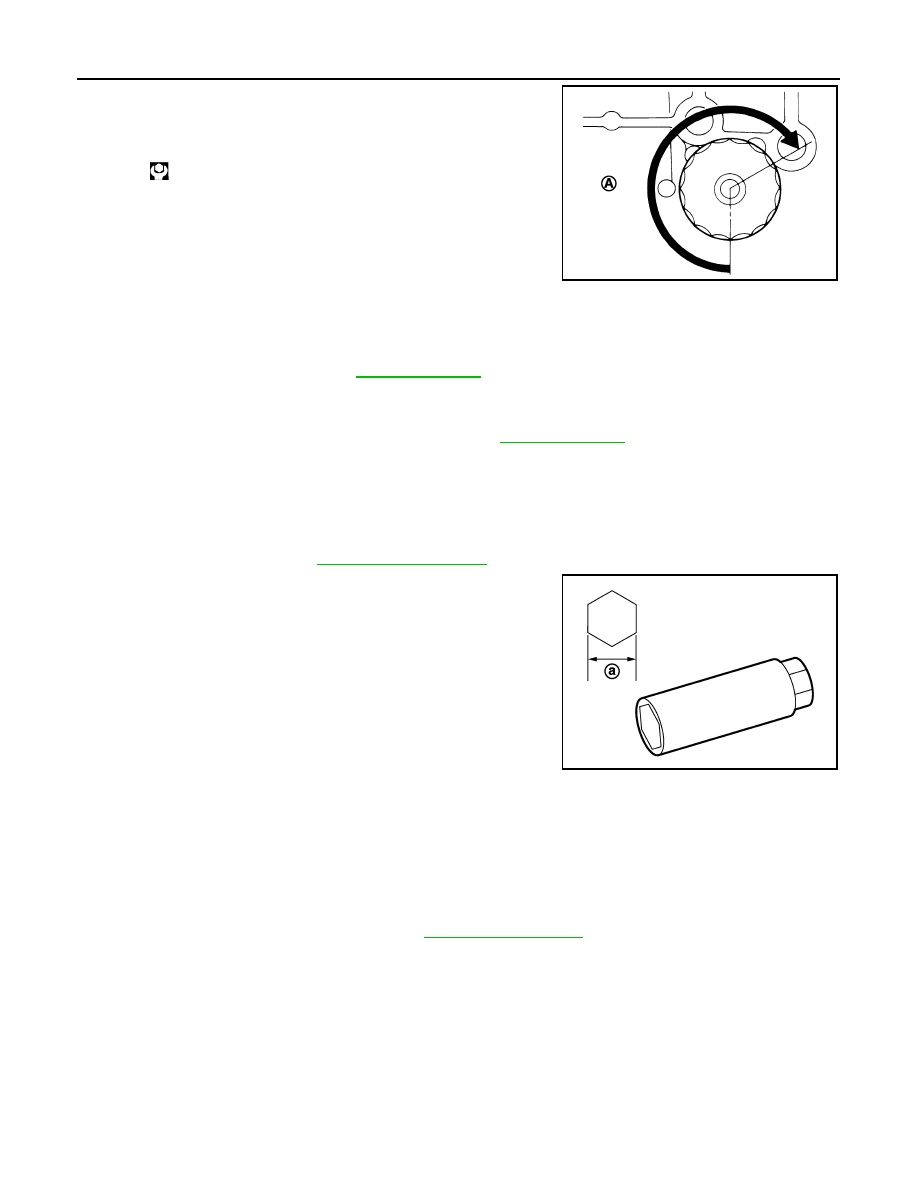
Screw oil filter manually until it touches the installation surface,
then tighten it by 2/3 turn (A). Or tighten to specification.

OIL FILTER : Inspection

INFOID:0000000009949429

INSPECTION AFTER INSTALLATION

1.

Check the engine oil level. Refer to 

LU-8, "Inspection"

.

2.

Start the engine, and check that there is no leakage of engine oil.

3.

Stop the engine and wait for 10 minutes.

4.

Check the engine oil level, and adjust the level. Refer to 

LU-8, "Inspection"

.

SPARK PLUG

SPARK PLUG : Removal and Installation

INFOID:0000000010269295

REMOVAL

1.

Remove ignition coil. Refer to 

EM-40, "Exploded View"

.

2.

Remove spark plug with a spark plug wrench (commercial ser-
vice tool).

CAUTION:

Never drop or shock spark plug.

INSTALLATION

Install in the reverse order of removal.

SPARK PLUG : Inspection

INFOID:0000000010269296

INSPECTION AFTER REMOVAL

Use the standard type spark plug for normal condition.

CAUTION:

Oil filter:

: 17.7 N·m (1.8 kg-m, 13 ft-lb)

JPBIA0077ZZ

a

: 14 mm (0.55 in)

JPBIA0030ZZ

Spark plug (Standard type)

: Refer to 

EM-113, "Spark Plug"

.

ENGINE MAINTENANCE

MA-19

< PERIODIC MAINTENANCE >

C

D

E

F

G

H

I

J

K

L

M

B

MA

N

O

A

• Never drop or shock spark plug.
• Never use a wire brush for cleaning.
• If plug tip is covered with carbon, spark plug cleaner may be

used.

• Spark plug gap adjustment is not required between replace-

ment intervals.

• Measure spark plug gap. when it exceeds the limit, replace

spark plug even if it is with in the specified replacement mile-
age. Refer to 

EM-113, "Spark Plug"

.

EVAP VAPOR LINES

EVAP VAPOR LINES : Inspection

INFOID:0000000009949432

1.

Visually inspect EVAP vapor lines for improper attachment and for cracks, damage, loose connections,
chafing and deterioration. Refer to 

EC-480, "Inspection"

.

2.

Inspect fuel tank filler cap vacuum relief valve for clogging, sticking, etc.
Refer to 

EC-296, "Component Inspection"

.

Cleaner air pressure

: Less than 588 kPa (6 kg/cm

2

85 psi)

Cleaning time

: Less than 20 seconds

SMA773C

JPBIA0031ZZ

MA-20

< PERIODIC MAINTENANCE >

CHASSIS MAINTENANCE

CHASSIS MAINTENANCE

EXHAUST SYSTEM

EXHAUST SYSTEM : Inspection

INFOID:0000000009949433

Check exhaust pipes, muffler, and mounting for improper attach-
ment, leakage, cracks, damage or deterioration.
• If anything is found, repair or replace damaged parts.

CVT FLUID

CVT FLUID : Inspection

INFOID:0000000010269324

Level check

Check fluid level in HOT state [CVT fluid temperature is between 50 to 80

°

C (122 to 176

°

F)], according to the

following procedures.

1.

Visually check that CVT fluid leakage from transaxle assembly is not detected.

2.

After engine warms up, drive the vehicle in an urban area for approximately 10 minutes.
NOTE:
When ambient temperature is 20

°

C (68

°

F), driving vehicle for approximately 10 minutes in an urban area

ordinarily warms up CVT fluid temperature between 50 to 80

°

C (122 to 176

°

F).

3.

Park the vehicle on a level surface.

4.

Fully apply parking brake.

5.

Adjust engine speed at idle state.

6.

Shift selector lever through entire position from “P” to “D” while depressing brake pedal.

7.

Press claw of CVT fluid level gauge lock to unlock.

8.

Remove CVT fluid level gauge from CVT fluid charging pipe.

9.

Wipe CVT fluid that is on CVT fluid level gauge.

CAUTION:

Always use shop paper when wiping off CVT fluid that is on
CVT fluid level gauge.

10. Rotate CVT fluid level gauge 180

°

 from installed state.

11. Inset CVT fluid level gauge until it contacts CVT fluid charging

pipe end.

12. Check that CVT fluid level is within the specified level of CVT fluid level gauge (MAX side).

SMA211A

SCIA1933E

SCIA1931E

CHASSIS MAINTENANCE

MA-21

< PERIODIC MAINTENANCE >

C

D

E

F

G

H

I

J

K

L

M

B

MA

N

O

A

CAUTION:

• After level check, when returning CVT fluid level gauge to the original state, insert CVT fluid level

gauge to CVT fluid charging pipe until it is locked.

• Always use shop paper when wiping off CVT fluid that is on CVT fluid level gauge.

CVT FLUID CONDITION

Check CVT fluid condition.
• If CVT fluid is very dark or smells burned, check operation of tran-

saxle assembly. Flush cooling system after repair of transaxle
assembly.

• If CVT fluid contains frictional material (clutches, brakes, etc.),

replace radiator and flush cooler line using cleaning solvent and
compressed air after repair of transaxle assembly. Refer to 

TM-

231, "CVT FLUID COOLER HOSE : Exploded View"

.

CVT FLUID : Changing

INFOID:0000000010269325

1.

Remove drain plug from oil pan and then the CVT fluid.

2.

Remove drain plug gasket from drain plug.

3.

Install drain plug gasket to drain plug.

CAUTION:

Never reuse drain plug gasket.

4.

Install drain plug to oil pan.

5.

Fill CVT fluid from CVT fluid charging pipe to the specified level.

CAUTION:

• Always use the specified fluid. If use, misuse, or mixing of fluid other than the specified fluid

occurs, original performance cannot be obtained or it may cause serious malfunctions.

• CVT fluid is not reusable. Never reuse CVT fluid.
• Always use shop paper. Never use shop cloth.
• After replacement, always perform CVT fluid leakage check.
• Delete CVT fluid deterioration date with CONSULT after changing CVT fluid.

6.

After engine warms up, drive the vehicle in an urban area for approximately 10 minutes.
NOTE:
When ambient temperature is 20

°

C (68

°

F), it takes about 10 minutes for the CVT fluid to warm up to 50 to

80

°

C (122 to 176

°

F).

7.

Check CVT fluid level and condition. Refer to 

MA-20, "CVT FLUID : Inspection"

.

8.

Repeat steps 1 to 6 if CVT fluid has been contaminated.

GEAR OIL

Fluid status

Conceivable cause

Required operation

Varnished (viscous 
varnish state)

CVT fluid become 
degraded due to 
high temperatures

• Replace the CVT fluid.
• Check the transaxle assembly 

and the vehicle for malfunctions 
(wire harnesses, cooler pipes, 
etc.)

Milky white or 
cloudy

Water in the fluid

• Replace the CVT fluid.
• Check for places where water is 

getting in.

Large amount of 
metal powder mixed 
in

Unusual wear of 
sliding parts within 
transaxle assembly

• Replace the CVT fluid.
• Check for improper operation of 

the transaxle assembly.

ATA0022D

TM-225, "Exploded View"

CVT fluid and fluid capacity

MA-10, "Fluids and Lubricants"


Content   ..  659  660  661  662   ..