Nissan Versa Note. Manual - part 571


  Index      Nissan     Nissan Versa Note (2014 year) - Service and Repair Manual


Search            


Content   ..  569  570  571  572   ..


Nissan Versa Note. Manual - part 571


MA-20

< PERIODIC MAINTENANCE >

ENGINE MAINTENANCE

2. Remove the air cleaner filter (1) from the air cleaner body.

INSTALLATION

Installation is in the reverse order of removal.

NOTE:

Check that the air cleaner filter is securely placed in the air cleaner body.

ENGINE OIL
ENGINE OIL : Inspection

INFOID:0000000009681912

ENGINE OIL LEVEL

NOTE:

Before starting engine, position the vehicle so that it is level and check the engine oil level. If engine is already

started, stop it and allow 10 minutes before checking.
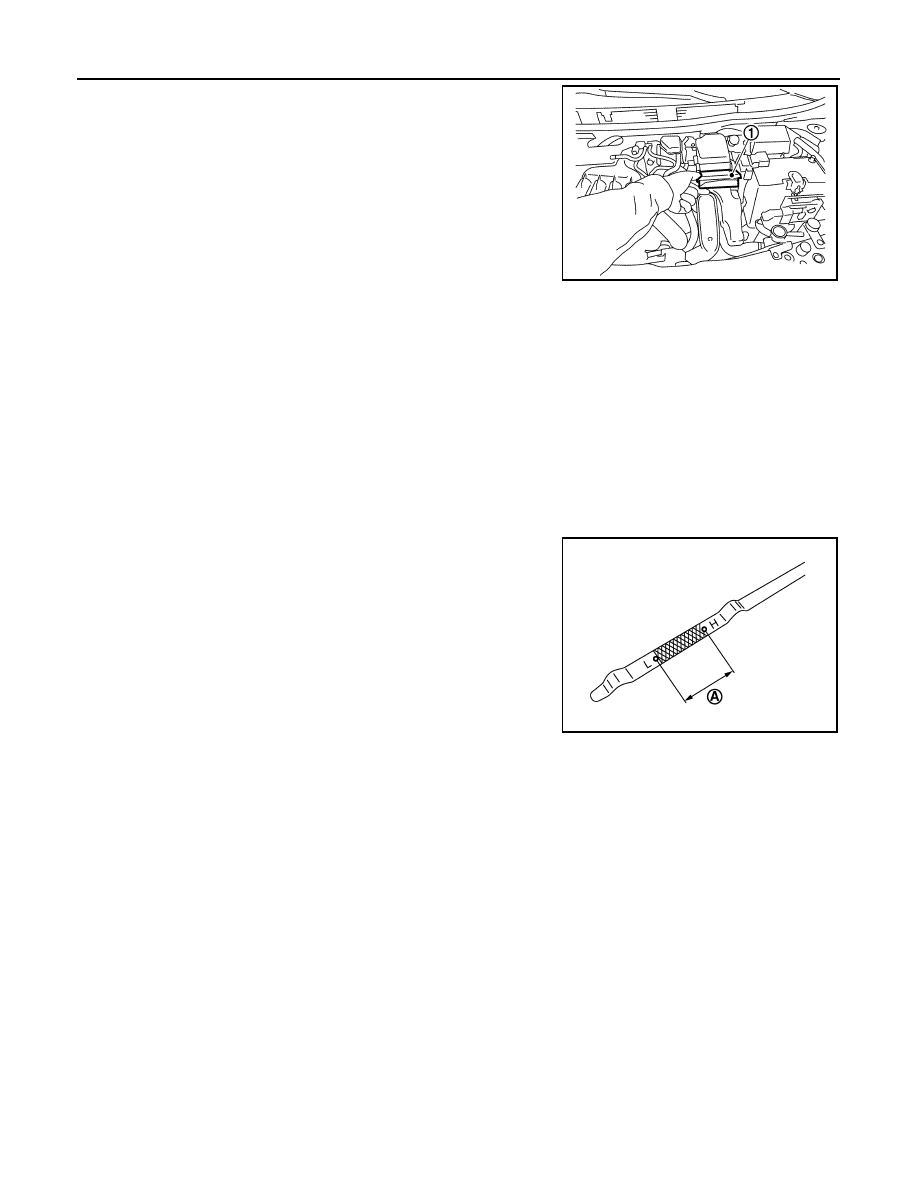
1. Pull out oil level gauge and wipe it clean.
2. Insert oil level gauge and check that the engine oil level is within

the range (A) as shown.

3. If it is out of range, adjust it.

ENGINE OIL APPEARANCE

• Check engine oil for white milky appearance or excessive contamination.

• If engine oil becomes turbid and white, it is highly probable that it is contaminated with engine coolant.

Repair or replace damaged parts.

ENGINE OIL LEAKS 

Check for engine oil leaks around the following areas:

• Oil pan (upper and lower)

• Oil pan drain plug

• Oil pressure sensor

• Oil filter

• Oil cooler

• Oil level sensor

• Engine oil temperature sensor

• Intake valve timing control solenoid valve

• Exhaust valve timing control solenoid valve

• Mating surface between front cover and rocker cover

• Mating surface between cylinder block and cylinder head

• Mating surface between cylinder head and rocker cover

• Crankshaft oil seals (front and rear)

• Front cover

ENGINE OIL PRESSURE CHECK

JSBIA1093ZZ

JPBIA0554ZZ

ENGINE MAINTENANCE

MA-21

< PERIODIC MAINTENANCE >

C

D

E

F

G

H

I

J

K

L

M

B

MA

N

O

A

WARNING:

• Be careful not to burn yourself, as engine oil may be hot.

• When checking engine oil pressure, shift selector should be in the "P" (Park) or "N" (Neutral) posi-

tion, and apply parking brake securely.

1. Check engine oil level.
2. Disconnect harness connector at oil pressure switch. Remove

oil pressure switch using suitable tool and install suitable tools

(A/B).

CAUTION:

Do not drop or shock oil pressure switch.

3. Start engine and warm it up to normal operating temperature.
4. Check engine oil pressure with engine running under no-load.

NOTE:

• When engine oil temperature is low, engine oil pressure becomes high.

• If difference is extreme, check oil passage and oil pump for engine oil leaks.

5. After the inspections, install oil pressure switch as follows:
a. Remove old liquid gasket adhering to oil pressure switch and engine.
b. Apply liquid gasket and tighten oil pressure switch to specification.

Use Genuine Liquid Gasket or equivalent. Refer to 

GI-22, "Recommended Chemical Products and

Sealants"

.

6. Check engine oil level.
7. After warming up engine, check that there is no engine oil leaks with the running engine.

ENGINE OIL : Draining

INFOID:0000000009681913

WARNING:

• Be careful not to get burned, as engine oil may be hot.

• Prolonged and repeated contact with used engine oil may cause skin cancer. Try to avoid direct skin

contact with used engine oil. If skin contact is made, wash thoroughly with soap or hand cleaner as

soon as possible. 

1. Warm up the engine, park the vehicle on a level surface and check for engine oil leaks. Refer to 

MA-20,

"ENGINE OIL : Inspection"

.

2. Stop the engine and wait for 10 minutes.
3. Loosen oil filler cap.
4. Remove drain plug and then drain engine oil.

ENGINE OIL : Refilling

INFOID:0000000009681914

1. Install drain plug with new copper sealing washer. Refer to 

EM-34, "Exploded View"

.

CAUTION:

• Be sure to clean drain plug.

• Do not reuse copper sealing washer.

2. Refill with new engine oil.

JPBIA0074ZZ

Engine oil pressure

Refer to 

LU-15, "Engine Oil Pressure"

.

Tightening torque

: Refer to 

EM-34, "Exploded View"

.

MA-22

< PERIODIC MAINTENANCE >

ENGINE MAINTENANCE

CAUTION:

• The refill capacity depends on the engine oil temperature and drain time. Use these specifica-

tions for reference only.

• Always use oil level gauge to determine the proper amount of engine oil in the engine.

3. Warm up engine and check area around drain plug and oil filter for engine oil leaks. Repair as necessary.
4. Stop engine and wait for 10 minutes.
5. Check the engine oil level. Refer to 

MA-20, "ENGINE OIL : Inspection"

.

OIL FILTER
OIL FILTER : Removal and Installation

INFOID:0000000009681915

REMOVAL

1. Drain engine oil. Refer to 

MA-21, "ENGINE OIL : Draining"

.

2. Remove oil filter using suitable tool (A).

: Front

WARNING:

Be careful not to get burned; engine and engine oil may be

hot.

CAUTION:

• When removing, prepare a shop cloth to absorb engine oil

leaks and spills.

• Do not spill engine oil on drive belt.

• Completely wipe off any engine oil that spills on engine

and vehicle.

• Oil filter is provided with relief valve. Use Genuine NIS-

SAN oil filter or equivalent.

INSTALLATION

1. Remove foreign materials adhering to the oil filter installation surface.
2. Apply new engine oil to the oil seal contact surface of new oil fil-

ter.

3. Screw oil filter manually until it touches the installation surface,

then tighten it by 2/3 turn (A), or tighten to specification.

4. Refill engine with new engine oil. Refer to 

MA-21, "ENGINE OIL : Refilling"

SPARK PLUG

Engine oil capacity and viscosity

Refer to 

MA-11, "Fluids and Lubricants"

.

JSBIA0620ZZ

SMA010

Oil filter

: 17.7 N·m (1.8 kg-m, 13 ft-lb)

JPBIA0077ZZ

ENGINE MAINTENANCE

MA-23

< PERIODIC MAINTENANCE >

C

D

E

F

G

H

I

J

K

L

M

B

MA

N

O

A

SPARK PLUG : Exploded View

INFOID:0000000009681916

SPARK PLUG : Removal and Installation

INFOID:0000000009681917

REMOVAL

1. Remove ignition coil. Refer to 

EM-48, "Removal and Installation"

.

CAUTION:

Do not drop or shock ignition coil. 

2. Remove spark plug using a suitable tool. 

CAUTION:

Do not drop or shock spark plug.

INSPECTION AFTER REMOVAL

• If the spark plug tip is covered with carbon, a spark plug cleaner may be used.

CAUTION:

1.

Ignition coil

2.

Spark plug

3.

Rocker cover

Front

AWBIA1599ZZ

Diameter (a)

: 14 mm (0.55 in)

JPBIA0030ZZ

Cleaner air pressure

: Less than 588 kPa (6 kg/cm

2

, 85 psi)

Cleaning time

: Less than 20 seconds


Content   ..  569  570  571  572   ..