Nissan Rogue. Manual - part 380
 

  Index      Nissan     Nissan Rogue (2015 year) - Service and Repair Manual


Search            


Content   ..  378  379  380  381   ..


Nissan Rogue. Manual - part 380


DLK-362

< REMOVAL AND INSTALLATION >

[WITHOUT INTELLIGENT KEY SYSTEM]

HOOD

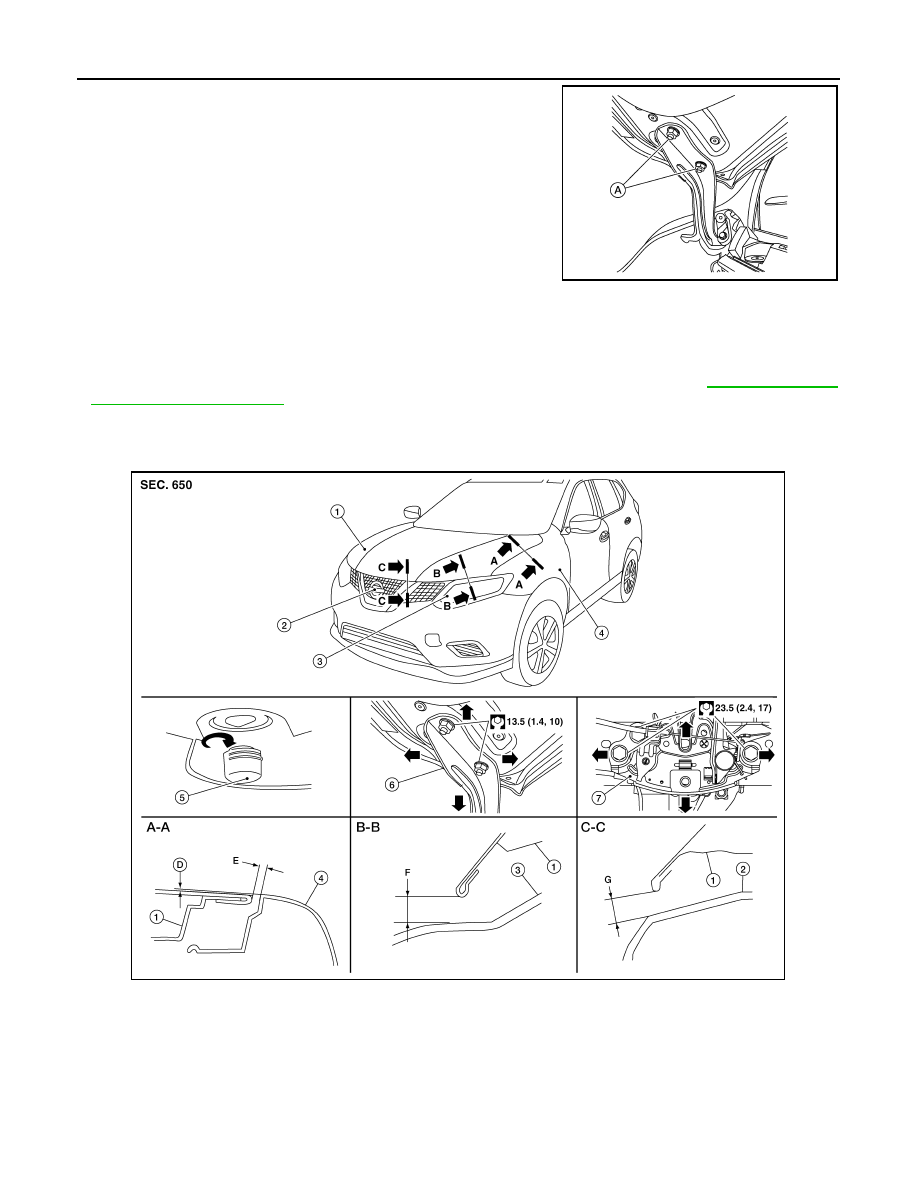
2. Remove hood hinge to hood nuts (A) and hood assembly.

NOTE:

RH side shown; LH similar.

INSTALLATION

Installation is in the reverse order of removal.

CAUTION:

• Before installing the hood hinge, apply anticorrosive agent onto the surface of the vehicle.

• After installation, perform the hood assembly adjustment procedure. Refer to 

DLK-362, "HOOD

ASSEMBLY : Adjustment"

.

HOOD ASSEMBLY : Adjustment

INFOID:0000000011279137

Check the clearance and the surface height between hood and each part by visual inspection and tactile feel.

If the clearance and the surface height are out of specification, adjust them according to the adjustment proce-

dures.

ALKIA3338ZZ

1.

Hood assembly

2.

Front grille

3.

Front combination lamp

4.

Fender

5.

Bumper rubber

6.

Hood hinge

7.

Hood lock

AWKIA2916ZZ

2015 Rogue NAM

HOOD

DLK-363

< REMOVAL AND INSTALLATION >

[WITHOUT INTELLIGENT KEY SYSTEM]

C

D

E

F

G

H

I

J

L

M

A

B

DLK

N

O

P

Unit: mm (in)

HEIGHT ADJUSTMENT

1. Loosen the hood lock assembly bolts.
2. Adjust the surface height of hood assembly to front grille and front fender according to the specified val-

ues by rotating hood bumper rubber.

3. Temporarily tighten hood lock assembly bolts.
4. Adjust (A) and (B) as shown to the following value with hood's own weight by dropping it from approxi-

mately 200 mm (7.87 in) height or by pressing hood lightly [approximately 29 N (3.0 kg, 6.5 lb)].

5. After adjustment, tighten hood hinge nuts and bolts to the specified torque.

CAUTION:

• Check hood hinge rotating part for poor lubrication. If necessary, apply a suitable multi-purpose

grease.

• After adjusting, apply touch-up paint (body color) to the head of hood hinge bolts and nuts.

CLEARANCE ADJUSTMENT

1. Loosen hood hinge nuts and bolts.
2. Loosen the hood lock assembly bolts.
3. Adjust the hood assembly so the clearance measurements are within specifications.
4. Tighten the hood hinge nuts and bolts to specified torque.
5. Tighten the hood lock assembly bolts to specified torque.

HOOD HINGE
HOOD HINGE : Removal and Installation

INFOID:0000000011279138

REMOVAL

1. Remove hood assembly. Refer to 

DLK-361, "HOOD ASSEMBLY : Removal and Installation"

.

Portion

Section

Item

Measurement

Standard

Parallelism

Hood - Fender 

A - A

D

Surface height

0.0 

± 1.0 (0.0 ± 0.04)

 1.4 (0.06)

E

Clearance

3.5 

± 1.5 (0.14 ± 0.04)

1.4 (0.06)

Fender - Front combination lamp

B - B

F

Clearance

9.0 

± 2.0 (0.35 ± 0.08)

 2.0 (0.08)

Hood - Front combination lamp

C - C

G

Clearance

1.9 

± 1.1 (0.07 ± 0.04)

1.5 (0.06)

1.

Secondary striker

2.

Primary striker

3.

Hood assembly

A.

20 mm (0.79 in)

B.

6.8 mm (0.27 in)

AWKIA2925ZZ

2015 Rogue NAM

DLK-364

< REMOVAL AND INSTALLATION >

[WITHOUT INTELLIGENT KEY SYSTEM]

HOOD

2. Remove front fender. Refer to 

DLK-366, "Removal and Installation"

.

3. Remove hood hinge bolts, and then remove hood hinge.

INSTALLATION

Installation is in the reverse order of removal.

CAUTION:

• Before installing the hood hinge, apply anticorrosive agent onto the surface of the vehicle.

• After installation, perform hood assembly adjustment procedure. Refer to 

DLK-362, "HOOD ASSEM-

BLY : Adjustment"

.

2015 Rogue NAM

RADIATOR CORE SUPPORT

DLK-365

< REMOVAL AND INSTALLATION >

[WITHOUT INTELLIGENT KEY SYSTEM]

C

D

E

F

G

H

I

J

L

M

A

B

DLK

N

O

P

RADIATOR CORE SUPPORT

Exploded View

INFOID:0000000011279139

Removal and Installation

INFOID:0000000011279140

CAUTION:

When removing radiator core support upper, be careful not to damage the painted surface.

REMOVAL

Radiator Core Upper Support

1. Remove front combination lamp (LH). Refer to 

EXL-119, "Removal and Installation"

.

2. Remove front air duct. Refer to 

EM-26, "Exploded View"

.

3. Remove hood lock. Refer to 

DLK-260, "HOOD LOCK : Removal and Installation"

.

4. Remove secondary latch. Refer to 

DLK-261, "SECONDARY LATCH : Removal and Installation"

.

5. Remove crash zone sensor. Refer to 

SR-22, "Removal and Installation"

.

6. Remove bolts and radiator core upper support.

Radiator Core Lower Support

1. Remove front bumper fascia. Refer to 

EXT-17, "Removal and Installation"

.

2. Support the radiator using a suitable tool.
3. Remove bolts and radiator core lower support.

INSTALLATION

Installation is in the reverse order of removal. 

CAUTION:

Tighten bolts to specified torque. Refer to 

DLK-365, "Exploded View"

.

1.

Radiator core upper support

2.

Secondary latch bracket

3.

Radiator core lower support

ALKIA3498ZZ

2015 Rogue NAM


Content   ..  378  379  380  381   ..