Nissan Rogue. Manual - part 238


  Index      Nissan     Nissan Rogue (2015 year) - Service and Repair Manual


Search            


Content   ..  236  237  238  239   ..


Nissan Rogue. Manual - part 238


DAS

U111D SIDE CAMERA LH IMAGE SIGNAL CIRCUIT

DAS-123

< DTC/CIRCUIT DIAGNOSIS >

[DRIVER ASSISTANCE SYSTEM]

C

D

E

F

G

H

I

J

K

L

M

B

N

P

A

Is the inspection result normal?

YES

>> Replace around view monitor control unit. Refer to 

AV-380, "Removal and Installation"

.

NO

>> Replace LH side camera. Refer to 

AV-382, "Removal and Installation"

.

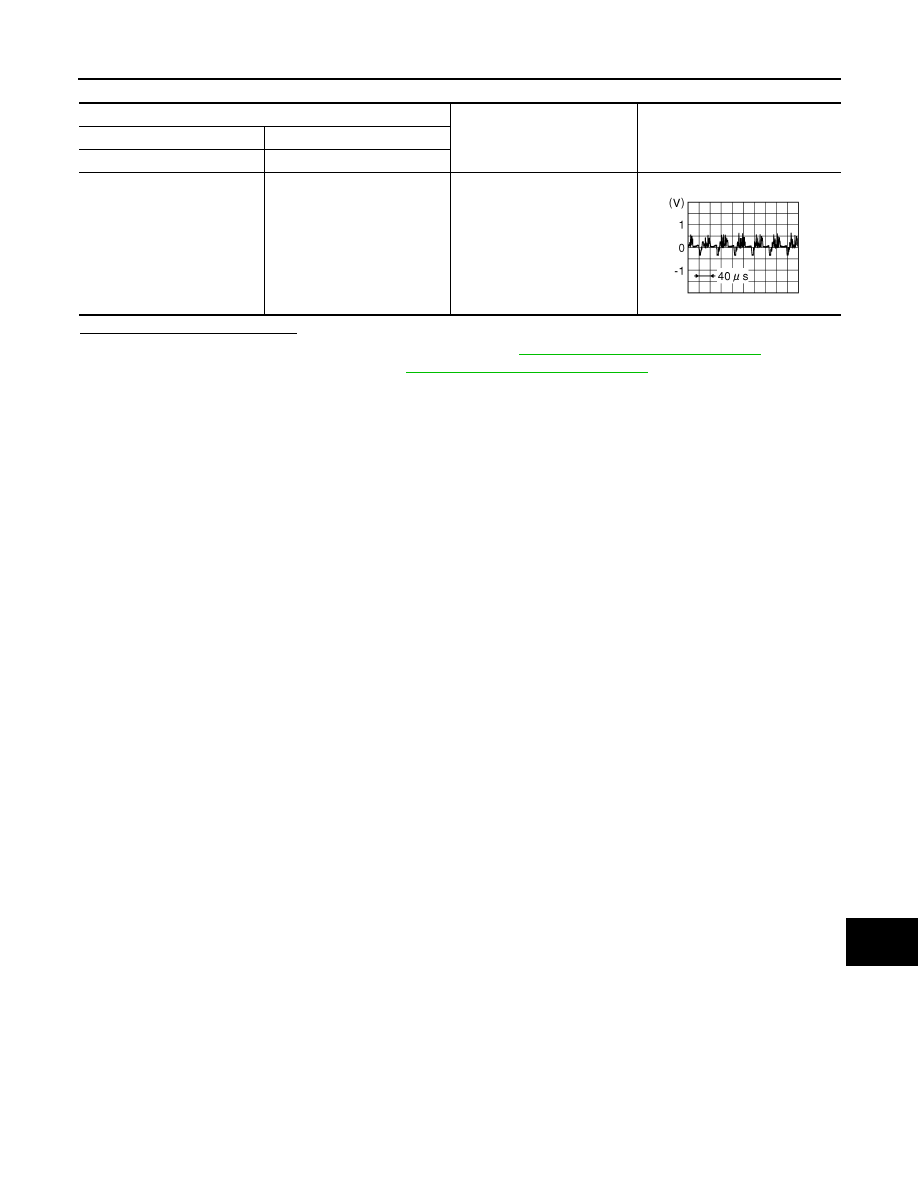
Around view monitor control unit connector M114

Condition

Reference value

(+)

(

−)

Terminal

Terminal

59

60

CAMERA switch is ON or se-
lector lever in R (reverse).

JSNIA0834GB

DAS-124

< DTC/CIRCUIT DIAGNOSIS >

[DRIVER ASSISTANCE SYSTEM]

U1232 STEERING ANGLE SENSOR

U1232 STEERING ANGLE SENSOR

DTC Logic

INFOID:0000000011419760

DTC DETECTION LOGIC

Diagnosis Procedure

INFOID:0000000011419761

1.

ADJUST PREDICTIVE COURSE LINE CENTER POSITION ADJUSTMENT OF STEERING ANGLE SEN-

SOR
When U1232 is detected, the predictive course line center position of steering angle sensor needs to be

adjusted.

>> Adjust the predictive course line center position of steering angle sensor. Refer to 

AV-284, "PRE-

DICTED COURSE LINE CENTER POSITION ADJUSTMENT : Work Procedure"

.

CONSULT Display

DTC Detection Condition

Possible Cause

ST ANG SEN CALIB
 [U1232]

Predictive course line center position adjustment 
of steering angle sensor is incomplete.

Adjust predictive course line center position ad-
justment of steering angle sensor.

DAS

U1302 CAMERA POWER VOLT

DAS-125

< DTC/CIRCUIT DIAGNOSIS >

[DRIVER ASSISTANCE SYSTEM]

C

D

E

F

G

H

I

J

K

L

M

B

N

P

A

U1302 CAMERA POWER VOLT

DTC Logic

INFOID:0000000011277267

DTC DETECTION LOGIC

Diagnosis Procedure

INFOID:0000000011277268

Regarding Wiring Diagram information, refer to 

DAS-52, "Wiring Diagram"

.

1.

CHECK AVM CAMERA DATA MONITOR ITEMS

Check “F-CAMERA IMAGE SIGNAL”, “REAR CAMERA IMAGE SIGNAL”, “DR-SIDE CAMERA IMAGE SIG”

and “PA-SIDE CAMERA IMAGE SIG” in “Data Monitor” of “AVM” using CONSULT.
Is “OK” displayed for all cameras?

YES

>> Refer to 

GI-44, "Intermittent Incident"

.

NO-1 (Front camera)>>GO TO 2.

NO-2 (Rear camera)>>GO TO 5.

NO-3 (LH side camera)>>GO TO 8.

NO-4 (RH side camera)>>GO TO 11.

2.

CHECK FRONT CAMERA POWER SUPPLY (CAMERA)

1. Turn ignition switch ON.

2. Check voltage between front camera connector E226 and ground.

Is the inspection result normal?

YES

>> Replace front camera. Refer to 

DAS-169, "Removal and Installation"

.

NO

>> GO TO 3.

3.

CHECK FRONT CAMERA POWER SUPPLY (AROUND VIEW MONITOR CONTROL UNIT)

Check voltage between around view monitor control unit connector M114 and ground.

Is the inspection result normal?

YES

>> GO TO 4.

NO

>> Replace around view monitor control unit. Refer to 

DAS-173, "Removal and Installation"

.

4.

CHECK FRONT CAMERA POWER SUPPLY CIRCUIT CONTINUITY

1. Turn ignition switch OFF.

2. Disconnect around view monitor control unit connector M114 and front camera connector.

3. Check continuity between around view monitor control unit connector M114 and front camera connector

E226.

CONSULT Display

DTC Detection Condition

Possible Cause

Camera supply power supply 
voltage abnormality
[U1302]

Short in camera power supply circuit.

• Harness or connectors.
• Camera.
• Around view monitor control unit.

Front camera

Ground

Condition

Voltage

(Approx.)

Connector

Terminal

E226

2

CAMERA switch is ON.

6.0 V

Around view monitor control unit

Ground

Condition

Voltage

(Approx.)

Connector

Terminal

M114

68

CAMERA switch is ON.

6.0 V

DAS-126

< DTC/CIRCUIT DIAGNOSIS >

[DRIVER ASSISTANCE SYSTEM]

U1302 CAMERA POWER VOLT

4. Check continuity between around view monitor control unit connector M114 and ground.

Is the inspection result normal?

YES

>> Replace front camera. Refer to 

DAS-169, "Removal and Installation"

.

NO

>> Repair or replace harness or connectors.

5.

CHECK REAR CAMERA POWER SUPPLY (CAMERA)

1. Turn ignition switch ON.

2. Check voltage between rear camera connector D514 and ground.

Is the inspection result normal?

YES

>> Replace rear camera. Refer to 

DAS-176, "Removal and Installation"

.

NO

>> GO TO 6.

6.

CHECK REAR CAMERA POWER SUPPLY (AROUND VIEW MONITOR CONTROL UNIT)

Check voltage between around view monitor control unit connector M114 and ground.

Is the inspection result normal?

YES

>> GO TO 7.

NO

>> Replace around view monitor control unit. Refer to 

DAS-173, "Removal and Installation"

.

7.

CHECK REAR CAMERA POWER SUPPLY CIRCUIT CONTINUITY

1. Turn ignition switch OFF.

2. Disconnect around view monitor control unit connector M114 and rear camera connector.

3. Check continuity between around view monitor control unit connector M114 and rear camera connector

D514.

4. Check continuity between around view monitor control unit connector M114 and ground.

Is the inspection result normal?

YES

>> Replace rear camera. Refer to 

DAS-176, "Removal and Installation"

.

NO

>> Repair or replace harness or connectors.

Around view monitor control unit

Front camera

Continuity

Connector

Terminal

Connector

Terminal

M114

68

E226

2

Yes

Around view monitor control unit

Ground

Continuity

Connector

Terminal

M114

68

No

Rear camera

Ground

Condition

Voltage

(Approx.)

Connector

Terminal

D514

8

CAMERA switch is ON.

6.0 V

Around view monitor control unit

Ground

Condition

Voltage

(Approx.)

Connector

Terminal

M114

50

CAMERA switch is ON.

6.0 V

Around view monitor control unit

Rear camera

Continuity

Connector

Terminal

Connector

Terminal

M114

50

D514

8

Yes

Around view monitor control unit

Ground

Continuity

Connector

Terminal

M114

50

No


Content   ..  236  237  238  239   ..