Nissan Rogue. Manual - part 1264


  Index      Nissan     Nissan Rogue (2015 year) - Service and Repair Manual


Search            


Content   ..  1262  1263  1264  1265   ..


Nissan Rogue. Manual - part 1264


FRONT WASHER NOZZLE AND TUBE

WW-59

< REMOVAL AND INSTALLATION >

C

D

E

F

G

H

I

J

K

M

A

B

WW

N

O

P

Removal and Installation - Front Washer Nozzle

INFOID:0000000011280417

REMOVAL

1. Remove front wiper arms (LH/RH). Refer to 

WW-62, "Removal and Installation"

.

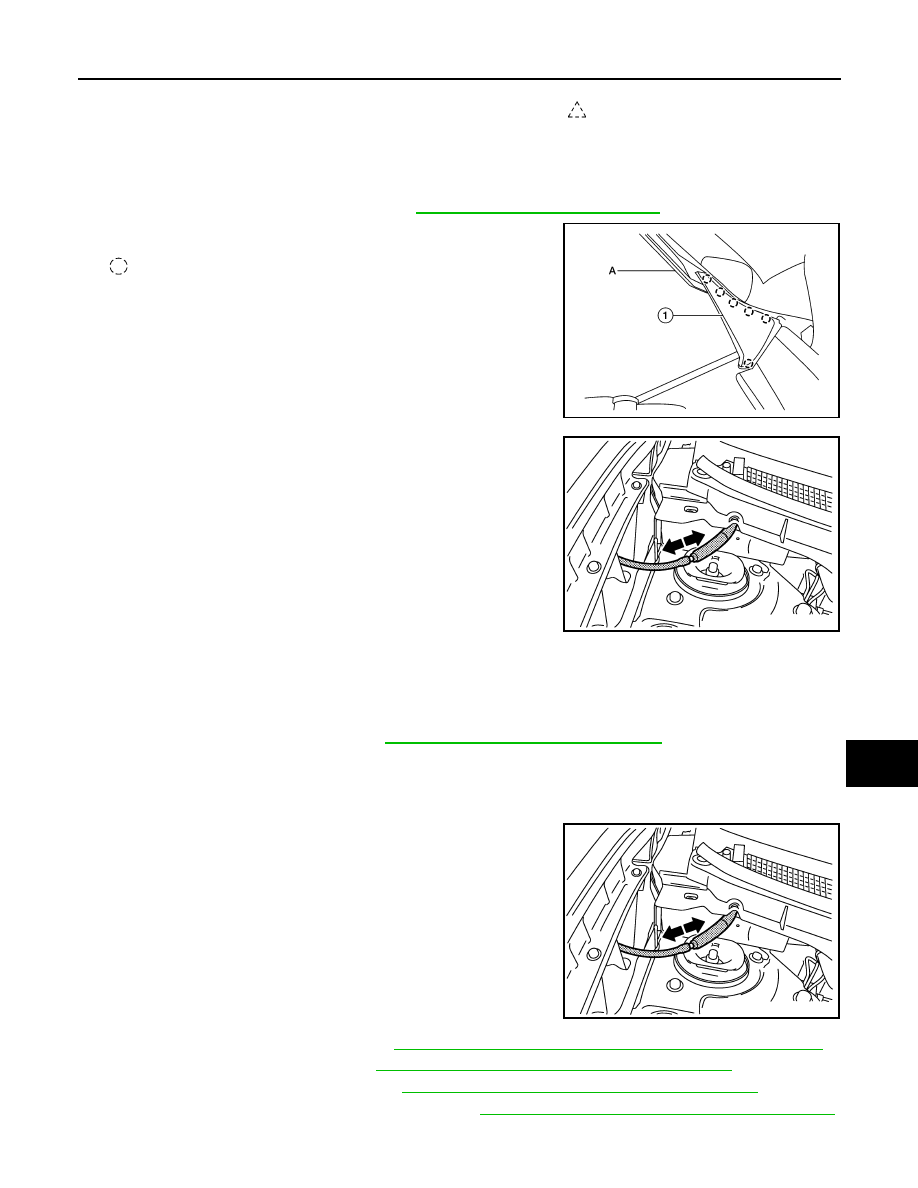
2. Release pawls using suitable tool (A) and remove cowl top side

trim cover (1) (LH/RH).

: Pawl

3. Disconnect front washer tube connector.

4. Release pawls and remove front washer nozzle (LH/RH).

INSTALLATION

Installation is in the reverse order of removal.

CAUTION:

Adjust the nozzle spray pattern. Refer to 

WW-60, "Inspection and Adjustment"

.

Removal and Installation - Front Washer Tube

INFOID:0000000011280418

REMOVAL

1. Disconnect front washer tube connector.

2. Remove front over fender (RH). Refer to 

EXT-30, "FRONT OVER FENDER : Removal and Installation"

.

3. Remove wind deflector (RH). Refer to 

EXT-28, "FENDER PROTECTOR : Exploded View"

.

4. Remove engine side cover (RH). Refer to 

EXT-28, "FENDER PROTECTOR : Exploded View"

.

5. Partially remove front fender protector (RH). Refer to 

EXT-28, "FENDER PROTECTOR : Exploded View"

.

6. Unclip front washer hose and remove.

1.

Cowl top cover

2.

Front washer tube

Clip

ALKIA3399ZZ

JMKIA1316ZZ

JMKIA1316ZZ

WW-60

< REMOVAL AND INSTALLATION >

FRONT WASHER NOZZLE AND TUBE

INSTALLATION

Installation is in the reverse order of removal.

Inspection and Adjustment

INFOID:0000000011280419

WASHER TUBE INSPECTION

Check that air can pass through the check valve splitter by blowing

into the check valve splitter and that air cannot flow in the opposite

direction.

O: Air can flow

X: Air cannot flow

ADJUSTMENT

If operating properly, spray positions should match the positions shown. If spray positions do not match, con-

firm the rear washer nozzle is properly seated and working properly. If the spray positions still do not match as

shown, then replace the front washer nozzle. Refer to 

WW-59, "Removal and Installation - Front Washer Noz-

zle"

JMLIA1538ZZ

1.

Windshield glass

2.

Black printed area line

3.

Front washer nozzle (LH/RH)

A.

Center line

B.

409 mm (16.10 in)

C.

103 mm (4.06 in)

D.

497 mm (19.57 in)

E.

398 mm (15.67 in)

F.

100 mm (3.94 in)

AWLIA2302ZZ

FRONT WASHER NOZZLE AND TUBE

WW-61

< REMOVAL AND INSTALLATION >

C

D

E

F

G

H

I

J

K

M

A

B

WW

N

O

P

G.

356 mm (14.02 in)

H.

127 mm (5.00 in)

J.

93 mm (3.66 in)

K.

80 mm (3.15 in)

M.

133 mm (5.24 in)

N.

354 mm (13.94 in)

O.

90 mm (3.54 in)

P.

380 mm (14.96 in)

Q.

496 mm (19.53 in)

R.

103 mm (4.06 in)

S.

409 mm (16.10 in)

WW-62

< REMOVAL AND INSTALLATION >

FRONT WIPER ARM

FRONT WIPER ARM

Exploded View

INFOID:0000000011280420

Removal and Installation

INFOID:0000000011280421

REMOVAL

1. Move front wiper into the service position by turning the ignition switch ON, then quickly push the wiper

washer switch to the mist position two times within 0.5 seconds.

2. Turn the ignition switch OFF. 
3. Remove front wiper arm covers.
4. Remove nuts and remove front wiper arms.

INSTALLATION

1. Clean wiper arm mount as shown in the figure to prevent nuts

from being loosened.

2. Move front wiper into the service position by turning the ignition switch ON, then quickly push the wiper

washer switch to the mist position two times within 0.5 seconds.

3. Turn the ignition switch OFF. 
4. Adjust front wiper blade position. Refer to 

WW-63, "Adjustment"

.

5. Install front wiper arm by tightening the nuts.
6. Install front wiper arm covers.
7. Check that the front wiper blades stop at the specified position.

1.

Front wiper blade (RH)

2.

Front wiper arm (RH)

3.

Front wiper arm cover

4.

Front wiper drive assembly

5.

Front wiper arm (LH)

6.

Front wiper blade (LH)

AWLIA2294ZZ

ELH0717D


Content   ..  1262  1263  1264  1265   ..