Nissan Maxima. Manual - part 457


  Index      Nissan     Nissan Maxima (2009-2014 year) - Service and Repair Manual


Search            


Content   ..  455  456  457  458   ..


Nissan Maxima. Manual - part 457


EC-312

< DTC/CIRCUIT DIAGNOSIS >

[VQ35DE]

P0441 EVAP CONTROL SYSTEM

1.

PERFORM COMPONENT FUNCTION CHECK

Without CONSULT

1. Lift up drive wheels.

2. Start engine (VDC switch OFF) and warm it up to normal operating temperature.

3. Turn ignition switch OFF, wait at least 10 seconds.

4. Turn ignition switch ON.

5. Turn ignition switch OFF, wait at least 10 seconds.

6. Start engine and wait at least 70 seconds.

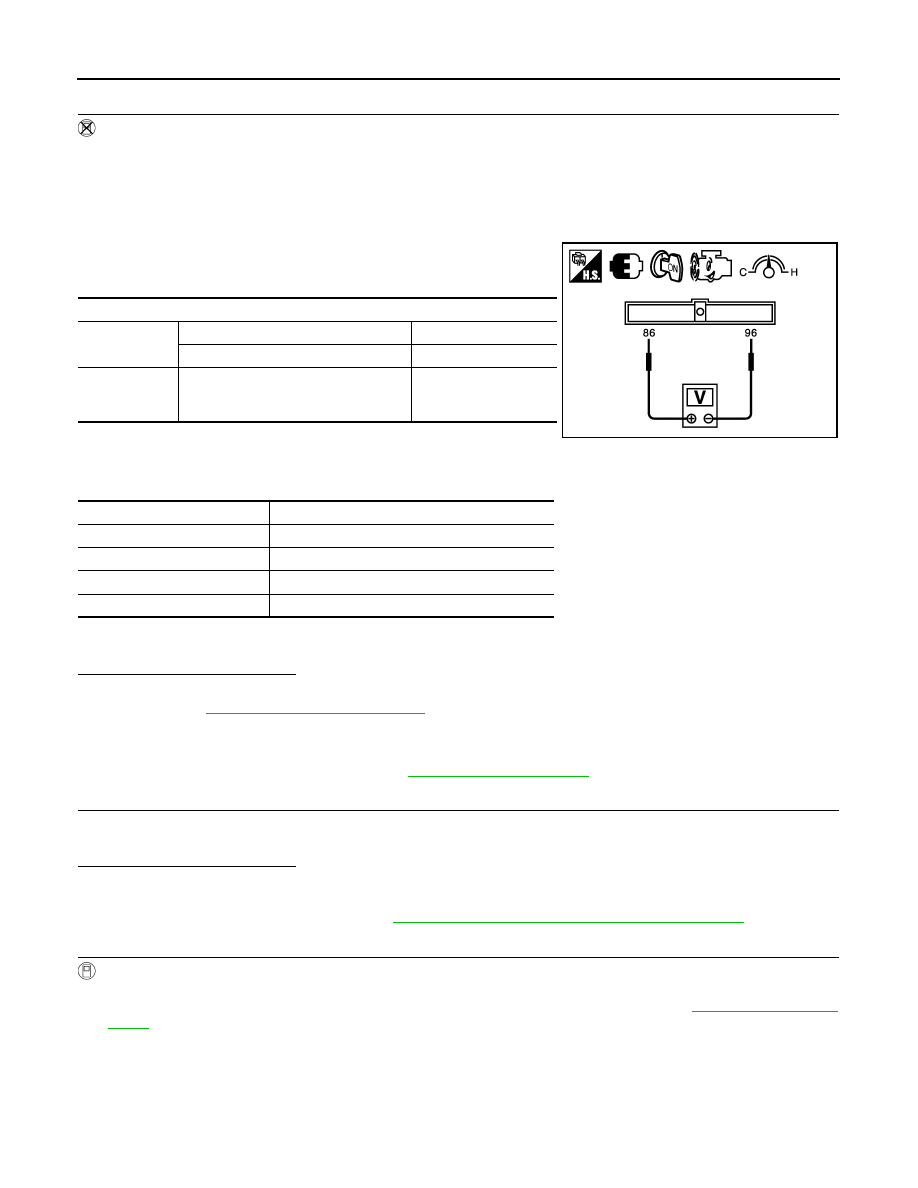
7. Set voltmeter probes to ECM harness connector terminals under

the following conditions.

8. Check EVAP control system pressure sensor value at idle speed

and note it.

9. Establish and maintain the following conditions for at least 1 minute.

10. Verify that EVAP control system pressure sensor value stays 0.1 V less than the value at idle speed (mea-

sured at step 6) for at least 1 second.

Is the inspection result normal?

YES

>> INSPECTION END

NO

>> Go to 

EC-312, "Diagnosis Procedure"

.

Diagnosis Procedure

INFOID:0000000010095003

Regarding Wiring Diagram information, refer to 

EC-554, "Wiring Diagram"

.

1.

CHECK EVAP CANISTER

1. Turn ignition switch OFF.

2. Check EVAP canister for cracks.
Is the inspection result normal?

YES-1 >> With CONSULT: GO TO 2.

YES-2 >> Without CONSULT: GO TO 3.

NO

>> Replace EVAP canister. Refer to 

FL-14, "Removal and Installation (EVAP Canister)"

.

2.

CHECK PURGE FLOW

With CONSULT

1. Disconnect vacuum hose connected to EVAP canister purge volume control solenoid valve at EVAP ser-

vice port and install vacuum gauge. For the location of EVAP service port, refer to 

EC-94, "System Dia-

gram"

.

2. Start engine and let it idle.

3. Select “PURG VOL CONT/V” in “ACTIVE TEST” mode with CONSULT.

4. Touch “Qd” and “Qu” on CONSULT screen to adjust “PURG VOL CONT/V” opening and check vacuum

existence.

ECM

Connector

+

Terminal

Terminal

E10

86

(EVAP control system pressure sensor 

signal)

96

(Sensor ground)

Air conditioner switch

ON

Head lamp switch

ON

Rear window defogger switch

ON

Engine speed

Approx. 3,000 rpm

Gear position

Any position other than P, N or R

JMBIA1870ZZ

P0441 EVAP CONTROL SYSTEM

EC-313

< DTC/CIRCUIT DIAGNOSIS >

[VQ35DE]

C

D

E

F

G

H

I

J

K

L

M

A

EC

N

P

O

Is the inspection result normal?

YES

>> GO TO 7.

NO

>> GO TO 4.

3.

CHECK PURGE FLOW

 Without CONSULT

1. Start engine and warm it up to normal operating temperature.

2. Stop engine.

3. Disconnect vacuum hose connected to EVAP canister purge volume control solenoid valve at EVAP ser-

vice port and install vacuum gauge. For the location of EVAP service port, refer to 

EC-94, "System Dia-

gram"

.

4. Start engine and let it idle.

Do not depress accelerator pedal even slightly.

5. Check vacuum gauge indication before 60 seconds pass after starting engine.

6. Rev engine up to 2,000 rpm after 100 seconds pass after starting engine.

Is the inspection result normal?

YES

>> GO TO 7.

NO

>> GO TO 4.

4.

CHECK EVAP PURGE LINE

1. Turn ignition switch OFF.

2. Check EVAP purge line for improper connection or disconnection.

Refer to 

EC-94, "System Diagram"

.

Is the inspection result normal?

YES

>> GO TO 5.

NO

>> Repair EVAP purge line.

5.

CHECK EVAP PURGE HOSE AND PURGE PORT

1. Disconnect purge hoses connected to EVAP service port A and

EVAP canister purge volume control solenoid valve B.

2. Blow air into each hose and EVAP purge port C.

PURG VOL CONT/V

Vacuum

100%

Existed

0%

Not existed

Vacuum should not exist.

Vacuum should exist.

SEF367U

EC-314

< DTC/CIRCUIT DIAGNOSIS >

[VQ35DE]

P0441 EVAP CONTROL SYSTEM

3. Check that air flows freely.
Is the inspection result normal?

YES-1 >> With CONSULT: GO TO 6.

YES-2 >> Without CONSULT: GO TO 7.

NO

>> Repair or clean hoses and/or purge port.

6.

CHECK EVAP CANISTER PURGE VOLUME CONTROL SOLENOID VALVE

With CONSULT

1. Start engine.

2. Perform “PURG VOL CONT/V” in “ACTIVE TEST” mode with CONSULT. Check that engine speed varies

according to the valve opening.

Does engine speed vary according to the valve opening?

YES

>> GO TO 8.

NO

>> GO TO 7.

7.

CHECK EVAP CANISTER PURGE VOLUME CONTROL SOLENOID VALVE

Refer to 

EC-327, "Component Inspection"

.

Is the inspection result normal?

YES

>> GO TO 8.

NO

>> Replace EVAP canister purge volume control solenoid valve.

8.

CHECK EVAP CONTROL SYSTEM PRESSURE SENSOR CONNECTOR

1. Disconnect EVAP control system pressure sensor harness connector.

2. Check that water is not inside connectors.
Is the inspection result normal?

YES

>> GO TO 9.

NO

>> Replace EVAP control system pressure sensor. Refer to 

FL-17, "Removal and Installation"

.

9.

CHECK EVAP CONTROL SYSTEM PRESSURE SENSOR FUNCTION

Refer to 

EC-347, "DTC Logic"

 for DTC P0452, 

EC-352, "DTC Logic"

 for DTC P0453.

Is the inspection result normal?

YES

>> GO TO 10.

NO

>> Replace EVAP control system pressure sensor. Refer to 

FL-17, "Removal and Installation"

.

10.

CHECK RUBBER TUBE FOR CLOGGING

1. Disconnect rubber tube connected to EVAP canister vent control valve.

2. Check the rubber tube for clogging.
Is the inspection result normal?

YES

>> GO TO 11.

NO

>> Clean the rubber tube using an air blower.

11.

CHECK DRAIN FILTER

Refer to 

EC-315, "Component Inspection"

.

Is the inspection result normal?

YES

>> GO TO 12.

NO

>> Replace drain filter.

12.

CHECK EVAP CANISTER VENT CONTROL VALVE

Refer to 

EC-335, "Component Inspection"

.

Is the inspection result normal?

YES

>> GO TO 13.

SEF368U

P0441 EVAP CONTROL SYSTEM

EC-315

< DTC/CIRCUIT DIAGNOSIS >

[VQ35DE]

C

D

E

F

G

H

I

J

K

L

M

A

EC

N

P

O

NO

>> Replace EVAP canister vent control valve. Refer to 

FL-16, "Removal and Installation"

.

13.

CHECK EVAP PURGE LINE

Inspect EVAP purge line (pipe and rubber tube). Check for evidence of leakage.

Refer to 

EC-94, "System Diagram"

.

Is the inspection result normal?

YES

>> GO TO 14.

NO

>> Repair EVAP purge line.

14.

CLEAN EVAP PURGE LINE

Clean EVAP purge line (pipe and rubber tube) using air blower.

>> GO TO 15.

15.

CHECK INTERMITTENT INCIDENT

Refer to 

GI-41, "Intermittent Incident"

.

>> INSPECTION END

Component Inspection

INFOID:0000000010095004

DRAIN FILTER

1. Check visually for insect nests in the drain filter air inlet.
2. Check visually for cracks or flaws in the appearance.
3. Check visually for cracks or flaws in the hose.
4. Blow air into port A and check that it flows freely out of port B.
5. Block port B.
6. Blow air into port A and check that there is no leakage.
7. If NG, replace drain filter.

PBIB3641E


Content   ..  455  456  457  458   ..