Nissan Frontier. Manual - part 746


  Index      Nissan     Nissan Frontier (2014 year) - Service and Repair Manual


Search            


Content   ..  744  745  746  747   ..


Nissan Frontier. Manual - part 746


FRONT TIMING CHAIN CASE

EM-173

< REMOVAL AND INSTALLATION >

[VQ40DE]

C

D

E

F

G

H

I

J

K

L

M

A

EM

N

P

O

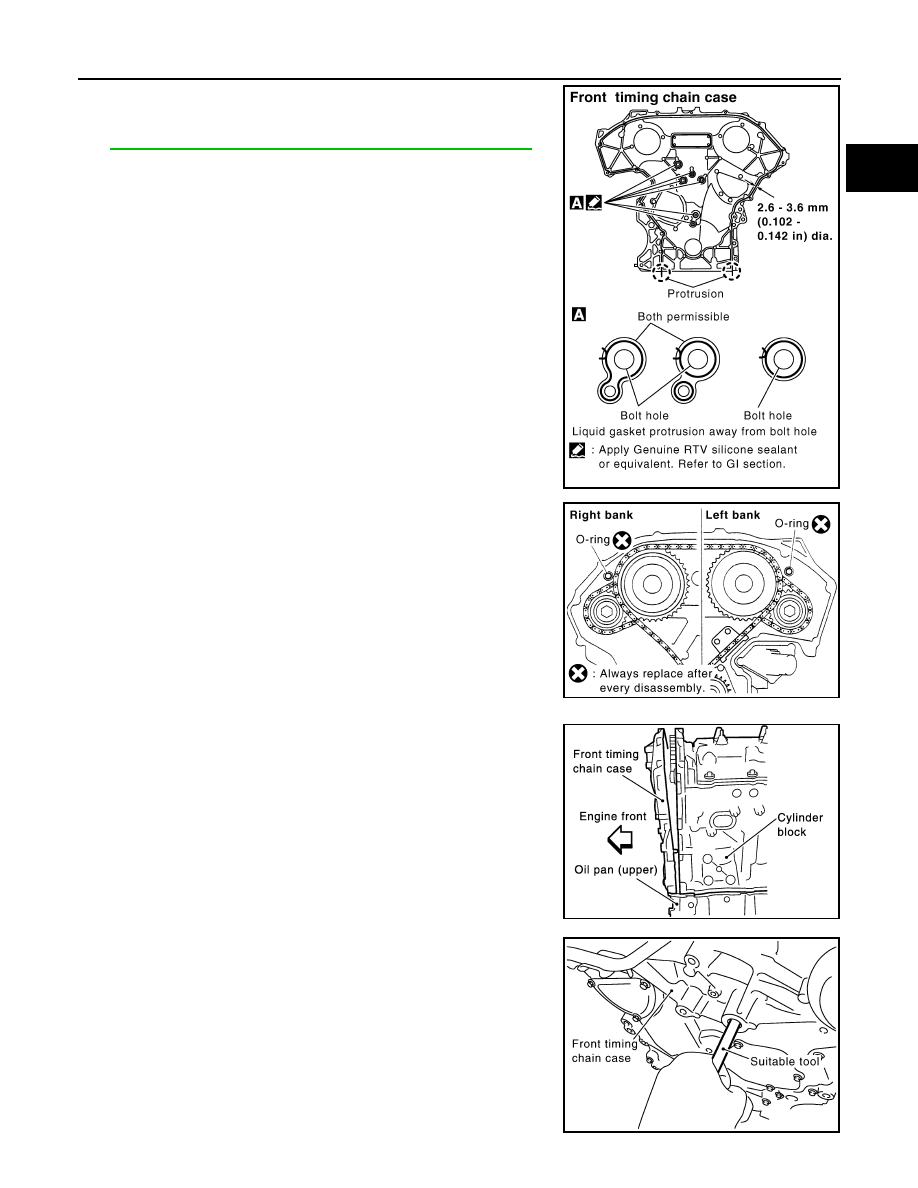
a. Apply a continuous bead of liquid gasket using Tool to front tim-

ing chain case back side as shown.

Use Genuine RTV Silicone Sealant or equivalent. Refer to

GI-21, "Recommended Chemical Products and Sealants"

.

b. Install new O-rings on rear timing chain case.

CAUTION:

Do not reuse O-rings.

c. Assemble front timing chain case as follows:

i.

Fit lower end of front timing chain case tightly onto top face of oil

pan (upper). From the fitting point, make entire front timing chain

case contact rear timing chain case completely.

ii.

Since front timing chain case is offset for difference of bolt holes,

tighten bolts temporarily while holding front timing chain case

from front and top as shown.

iii. Same as the previous step, insert dowel pin while holding front

timing chain case from front and top completely.

Tool number

: WS39930000 ( — )

PBIC2913E

PBIC2548E

PBIC1100E

PBIC2915E

EM-174

< REMOVAL AND INSTALLATION >

[VQ40DE]

FRONT TIMING CHAIN CASE

d. Tighten bolts to the specified torque in numerical order as

shown.

e. After all bolts are tightened, retighten them to the specified

torque in numerical order as shown.

• There are two type of bolts. 

6. Install two bolts in front of oil pan (upper) in numerical order as

shown.

7. Install right and left intake valve timing control covers as follows:
a. Install new seal rings in shaft grooves.
b. Apply a continuous bead of liquid gasket using Tool to intake

valve timing control covers as shown.

Use Genuine RTV Silicone Sealant or equivalent. Refer to

GI-21, "Recommended Chemical Products and Sealants"

.

c.

Install new collared O-rings in front timing chain case oil hole

(left and right sides).

CAUTION:

Do not reuse O-rings.

d. Being careful not to move seal ring from the installation groove, align dowel pins on front timing chain

case with the holes to install intake valve timing control covers.

Bolt position Bolt diameter
1 - 5

: 10 mm (0.39 in)

6 – 25

: 6 mm (0.24 in)

Bolt position Tightening specification
1 - 5

: 55.0 N·m (5.6 kg-m, 41 ft-lb)

6 – 25

: 12.7 N·m (1.3 kg-m, 9 ft-lb)

Front oil pan bolt : 22.0 N·m (2.2 kg-m, 16 ft-lb)

PBIC2908E

PBIC2907E

Tool number

: WS39930000 (

)

SBIA0492E

PBIC2631E

FRONT TIMING CHAIN CASE

EM-175

< REMOVAL AND INSTALLATION >

[VQ40DE]

C

D

E

F

G

H

I

J

K

L

M

A

EM

N

P

O

e. Tighten bolts in numerical order as shown.

8. Install crankshaft pulley as follows:
a. Install crankshaft pulley, taking care not to damage front oil seal.

• When press-fitting crankshaft pulley with plastic hammer, tap on its center portion (not circumference).

b. Tighten crankshaft pulley bolt in two steps.

c. Remove Ring Gear Stopper Tool. 

9. Rotate crankshaft pulley in normal direction (clockwise when viewed from front) to confirm it turns

smoothly.

10. Installation of the remaining components is in the reverse order of removal.

INSPECTION AFTER INSTALLATION

• Before starting engine, check oil/fluid levels including engine coolant and engine oil. If less than required

quantity, fill to the specified level. Refer to 

MA-16, "FOR USA AND CANADA : Fluids and Lubricants"

 (United

States and Canada) and 

MA-18, "FOR MEXICO : Fluids and Lubricants"

 (Mexico).

• Use procedure below to check for fuel leakage.

• Turn ignition switch ON (with engine stopped). With fuel pressure applied to fuel piping, check for fuel leak-

age at connection points.

• Start engine. With engine speed increased, check again for fuel leakage at connection points.

• Run engine to check for unusual noise and vibration.

NOTE:

If hydraulic pressure inside timing chain tensioner drops after removal and installation, slack in the guide

may generate a pounding noise during and just after engine start. However, this is normal. Noise will stop

after hydraulic pressure rises.

• Warm up engine thoroughly to make sure there is no leakage of fuel, exhaust gas, or any oils/fluids including

engine oil and engine coolant.

• Bleed air from passages in lines and hoses, such as in cooling system.

• After cooling down engine, again check oil/fluid levels including engine oil and engine coolant. Refill to spec-

ified level, if necessary.

• Summary of the inspection items:

*Power steering fluid, brake fluid, etc.

PBIC0918E

Step 1

: 44.1 N·m (4.5 kg-m, 33 ft-lb)

Step 2

: 84

° - 90° degrees clockwise

Tool number

:   KV11105210 (J-44716)

Item

Before starting engine

Engine running

After engine stopped

Engine coolant

Level

Leakage

Level

Engine oil

Level

Leakage

Level

Transmission/
transaxle fluid 

A/T and CVT Models

Leakage

Level/Leakage

Leakage

M/T Models

Level/Leakage

Leakage

Level/Leakage

Other oils and fluids*

Level

Leakage

Level

Fuel

Leakage

Leakage

Leakage

Exhaust gas

Leakage

EM-176

< REMOVAL AND INSTALLATION >

[VQ40DE]

TIMING CHAIN

TIMING CHAIN

Exploded View

INFOID:0000000009478128

Removal and Installation

INFOID:0000000009478129

CAUTION:

• After removing timing chains, do not turn the crankshaft and camshaft separately, or the valves will

strike the pistons.

• When installing camshafts, chain tensioners, oil seals, or other sliding parts, lubricate contacting

surfaces with new engine oil.

• Apply new engine oil to bolt threads and seat surfaces when installing camshaft sprockets, camshaft

brackets, and crankshaft pulley.

NOTE:

It is not necessary to remove the rocker covers or intake manifold collector to remove or install the timing

chain(s).

REMOVAL

AWBIA0859GB

1.

Internal chain guide

2.

O-ring

3.

Timing chain tensioner (secondary) (RH)

4.

Camshaft sprocket (EXH)

5.

Timing chain (secondary)

6.

Timing chain (primary)

7.

Camshaft sprocket RH (INT)

8.

Camshaft sprocket LH (INT)

9.

Slack guide

10. Timing chain tensioner (primary)

11. Crankshaft sprocket

12.

Timing chain tensioner (secondary) (LH)

13. O-ring

14. Tension guide


Content   ..  744  745  746  747   ..