Nissan Sentra. Manual - part 6


  Index      Nissan     Nissan Sentra (2014 year) - Service and Repair Manual


Search            


Content   ..  4  5  6  7   ..


Nissan Sentra. Manual - part 6


AV-16

< SYSTEM DESCRIPTION >

[BASE AUDIO]

DIAGNOSIS SYSTEM (AUDIO UNIT)

DIAGNOSIS SYSTEM (AUDIO UNIT)

Diagnosis Description

INFOID:0000000009758802

The audio unit on board diagnosis performs the functions listed in the table below:

On Board Diagnosis Function

INFOID:0000000009758803
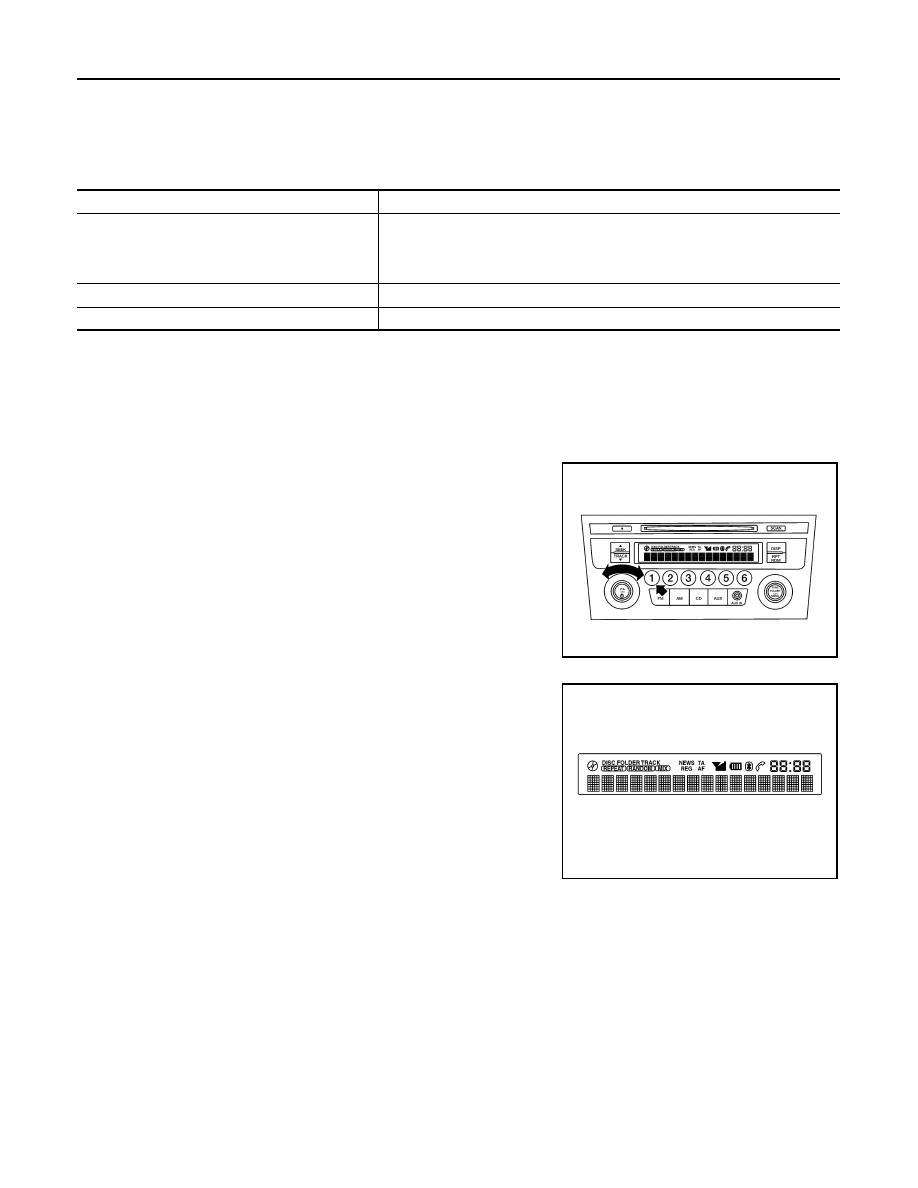
METHOD OF STARTING

Hardware/Software Versions and Speaker Channel Check

1. Turn the ignition ON.

2. Turn the audio system OFF.

3. While pressing the preset 1 button, turn the volume control dial

clockwise or counterclockwise 30 clicks or more.

4. Initially, all display segments will be illuminated.

5. To exit hardware/software versions and speaker channel check, turn the ignition OFF.

Communication Diagnosis

1. Turn the ignition ON.

2. Turn the audio system OFF.

Mode

Description

Hardware/Software Versions

The following information is available for the audio unit:
• hardware version.
• software version.
• EQ pin info.

Speaker Channel Check

The connection of the speakers to the audio unit can be confirmed.

Communication Diagnosis

The AV communication (M-CAN) message history can be monitored.

ALNIA1381GB

ALNIA1382GB

AV

DIAGNOSIS SYSTEM (AUDIO UNIT)

AV-17

< SYSTEM DESCRIPTION >

[BASE AUDIO]

C

D

E

F

G

H

I

J

K

L

M

B

A

O

P

3. While pressing the preset 6 button, turn the volume control dial

clockwise or counterclockwise 30 clicks or more.

4. Initially, the communication diagnosis mode is displayed.

5. To exit communication diagnosis, turn the ignition OFF.

SELF DIAGNOSIS MODE

Hardware/Software Versions

1. Press the DISP button to enter versions display, and the audio

head unit software version is displayed.

2. With each additional press of the DISP button, the following information is available:

-

HARD V###### (hardware version)

-

EEP V###### (EEPROM version)

-

@@@@ EQ1-4 # (EQ pin info)

If an EQ error is present, INVALID EQ is displayed

3. Hold the DISP button down to return to all display segments screen.

Speaker Channel Check

ALNIA1385GB

ALNIA1387GB

ALNIA1383GB

AV-18

< SYSTEM DESCRIPTION >

[BASE AUDIO]

DIAGNOSIS SYSTEM (AUDIO UNIT)

1. Press the RPT/DRM button to enter speaker channel check, and

the front left tweeter (front tweeter LH) is displayed.

2. With each additional press of the RPT/DRM button, the following information is available:

-

FR RIGHT TWEETER (front tweeter RH)

-

FR RIGHT (front door speaker RH)

-

RR RIGHT (rear speaker RH)

-

RR LEFT (rear speaker LH)

-

FR LEFT (front door speaker LH)

3. Hold the RPT/DRM button down to return to all display segments screen.

Communication Diagnosis

1. Press the DISP button, and the M-CAN message transmission

error history screen is displayed.

2. Press the DISP button again, and the TEL $$ nn (CMF message reception error history from M-CAN TEL)

screen is displayed.

3. Press the DISP button again, and the TROUBLE DEL. (deletion of M-CAN message communication his-

tory) screen is displayed. To retain the M-CAN message communication history and return to the commu-

nication diagnosis mode screen, press the DISP button.

4. To proceed to the M-CAN message communication history deletion screen, press the SEEK/TRACK 

button. The REC DEL-NO? (selection of M-CAN message communication history deletion) screen is dis-

played. To cancel M-CAN message communication history deletion, wait 6 seconds and you will be

returned to the TROUBLE DEL. (deletion of M-CAN message communication history) screen. To proceed
with M-CAN message communication history deletion, press the SEEK/TRACK   button again.

5. The REC DEL-YES?@ (selection of M-CAN message communication history deletion) screen is dis-

played. To cancel M-CAN message communication history deletion, press the SEEK/TRACK   button

and you will be returned to the REC DEL-NO? (selection of M-CAN message communication history dele-

tion) screen. To proceed with M-CAN message communication history deletion, wait 6 seconds and the

communication history deletion will be executed. After the communication history deletion has been exe-

cuted, you will be returned to the TROUBLE DEL. (deletion of M-CAN message communication history)

screen. To return to the communication diagnosis mode screen, press the DISP button.

ALNIA1384GB

ALNIA1386GB

AV

DIAGNOSIS SYSTEM (BLUETOOTH® CONTROL UNIT)

AV-19

< SYSTEM DESCRIPTION >

[BASE AUDIO]

C

D

E

F

G

H

I

J

K

L

M

B

A

O

P

DIAGNOSIS SYSTEM (BLUETOOTH® CONTROL UNIT)

Diagnosis Description

INFOID:0000000009758804

The Bluetooth

®

 control unit has two diagnostic checks. The first diagnostic check is performed automatically

every ignition cycle during control unit initialization. The second diagnostic check is performed by the techni-

cian using the steering wheel audio control switches prior to trouble diagnosis.

Bluetooth

®

 CONTROL UNIT INITIALIZATION CHECKS

• Internal control unit failure
• Bluetooth

®

 antenna connection open or shorted

• Steering wheel audio control switches [

 (PHONE/SEND),   (PHONE/END)] stuck closed

• Vehicle speed pulse count

• Microphone connection test (with playback to operator)
• Bluetooth

®

 inquiry check

OPERATION PROCEDURE

1. Turn ignition switch to ACC or ON.
2. Wait for the Bluetooth

®

 system to complete initialization. This may take up to 20 seconds.

3. Press and hold the steering wheel audio control switch 

(PHONE/SEND) button for at least 5 seconds. The Bluetooth

®

system will begin to play a verbal prompt.

4. While the prompt is playing, press and hold the steering wheel

audio control switch   (PHONE/END) button until you hear the
“Diagnostics mode” prompt. The Bluetooth

®

 system will sound a

5-second beep.

5. While the beep is sounding, press and hold the steering wheel

audio control switch 

 (PHONE/END) button again until you

hear prompts.

6. The Bluetooth

®

 system has now entered into the diagnostic

mode. Results of the diagnostic checks will be verbalized to the

technician. Refer to 

AV-19, "Work Flow"

.

7. After the failure records are reported, an interactive microphone

test will be performed. Follow the voice prompt. If the micro-

phone test fails, refer to 

AV-19, "Work Flow"

.

Work Flow

INFOID:0000000009758805

AWNIA2834ZZ

AWNIA2835ZZ

Failure Message

Action

“Internal failure”

Replace Bluetooth

®

 control unit. Refer to 

AV-68, "Removal and Installation"

“Bluetooth

®

 antenna open”

1.

Inspect harness connection.

2.

Replace Bluetooth

®

 antenna. Refer to 

AV-68, "Removal and Installation"

.

“Bluetooth

®

 antenna shorted”

“Phone/Send for Hands Free System is stuck”

Check steering switches. Refer to 

AV-50, "Diagnosis Procedure"

.

“Phone/End for the Hands Free System is stuck”

“Microphone test” (failed interactive test)

1.

Inspect harness between Bluetooth

®

 control unit and microphone.

2.

Replace microphone. Refer to 

AV-69, "Removal and Installation"

 .


Content   ..  4  5  6  7   ..