Nissan Leaf. Manual - part 940


  Index      Nissan     Nissan Leaf (2011-2014 year) - Service and Repair Manual


Search            


Content   ..  938  939  940  941   ..


Nissan Leaf. Manual - part 940


MA-18

< PERIODIC MAINTENANCE >

EV SYSTEM MAINTENANCE

EV SYSTEM MAINTENANCE

COOLANT
COOLANT : Inspection

INFOID:0000000010121525

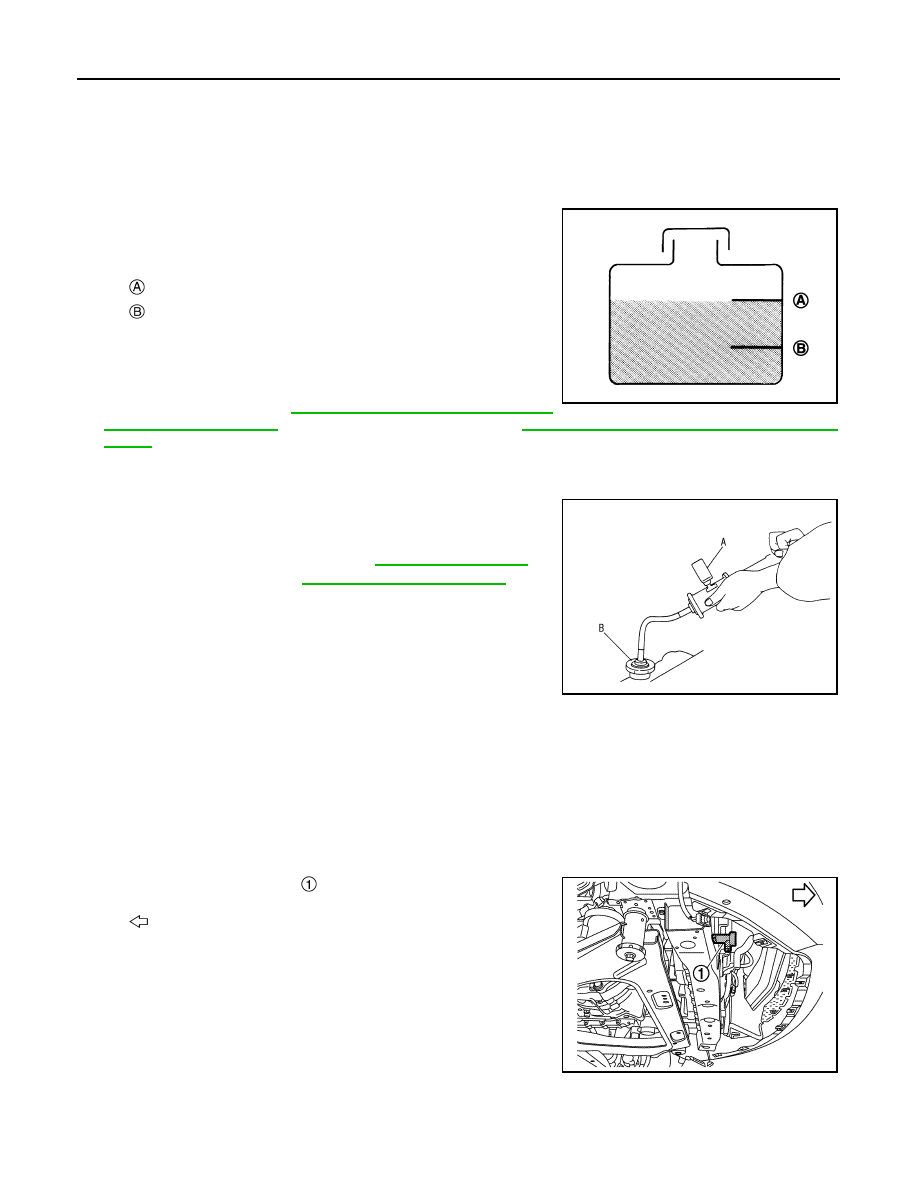
COOLANT AMOUNT INSPECTION

• When coolant temperature is low (about 50

°C or less), confirm that

the coolant level of the reservoir tank is in the range from MIN to

MAX. 

• Adjust level if it is outside the range.

CAUTION:

• Refill Genuine NISSAN Long Life Antifreeze/Coolant (blue)

or equivalent in its quality mixed with water (distilled or

demineralized). Refer to 

MA-16, "FOR USA AND CANADA :

Fluids and Lubricants"

 (United States and Canada) or 

MA-17, "FOR MEXICO : Fluids and Lubri-

cants"

 (Mexico)

• Confirm that the reservoir tank cap is tightened. 

LEAKAGE CHECK

• Apply pressure to the cooling system using radiator cap tester (A)

(commercial service tool). Check system for coolant leakage.

CAUTION:

• Remove the degas tank cap when coolant temperature is

low. 

• Perform the inspection with the radiator filled with water.

• Use hose adapter (B) (commercial service tool) between

radiator cap tester (A) (commercial service tool) and the

filler neck so that the degas tank filler neck is not deformed. 

• Be sure to observe the maximum pressure standards. Otherwise, radiator may be damaged.

• If there is a malfunction, repair and replace applicable part.

COOLANT : Draining

INFOID:0000000010121526

CAUTION:

• Be sure to drain when coolant temperature is cold.

• This should be performed so that coolant does not come in contact with surrounding parts.
1. Remove Li-ion battery undercover. 
2. Remove radiator drain plug  , and drain coolant.

3. Remove reservoir tank and drain the coolant as per the following procedure.

1. Remove radiator upper grille cover.

2. Remove water hose (reservoir tank side) and reservoir tank mounting bolts. 

: MAX
: MIN

JPBIA0102ZZ

Maximum pressure

: Refer to 

HCO-27, "Periodical 

Maintenance Specification"

.

PBIC5121J

: Vehicle front

JPCIA0342ZZ

EV SYSTEM MAINTENANCE

MA-19

< PERIODIC MAINTENANCE >

C

D

E

F

G

H

I

J

K

L

M

B

MA

N

O

A

COOLANT : Refilling

INFOID:0000000010121527

REFILLING

CAUTION:

• Do not reuse O-rings.

• Do not put additive such as waterleak preventive, since it may cause cooling waterway clogging.

• When refilling use Genuine NISSAN Long Life Antifreeze/Coolant (blue) or equivalent in its quality

mixed with water (distilled or demineralized). Refer to 

MA-16, "FOR USA AND CANADA : Fluids and

Lubricants"

 (United States and Canada) or 

MA-17, "FOR MEXICO : Fluids and Lubricants"

 (Mexico)

1. Install reservoir tank if removed and radiator drain plug.

CAUTION:

Be sure to clean drain plug and install with new O-ring.

2. Check that each hose clamp has been firmly tightened.
3. Refill reservoir tank to “MAX” level line with engine coolant.

4. Install reservoir tank cap.
5. Set the vehicle to READY and operate the electric water pump.
6. If reservoir tank fluid level drops, set the vehicle in READY OFF state and fill with coolant to the “MAX” line

of the reservoir tank.

7. Repeat from Step 4 to 7 until the reservoir tank fluid level stops dropping.
8. Operate the electrically-controlled water pump for approximately 10 minutes with the vehicle set in

READY state, and check that the reservoir tank fluid level does not drop.

9. If reservoir tank fluid level drops, repeat from Step 4 to 7.

CHECK WATER FLOW SOUND

CAUTION:

Prior to check, be sure to close windows, doors, and hood, and turn off audio system and other elec-

trical loads.
1. Set the vehicle to READY and operate the electric water pump. 
2. Operate the electric water pump for 1 minute. 
3. Check if water flow sound can be heard from the back of the compartment (near the on board charger). 
4. If water flow sound is heard, operate the electric water pump until it cannot be heard. 
5. When water flow sound cannot be heard, fill the reservoir tank up to "MAX" line.

CAUTION:

• Insufficient coolant may cause low power or stop of vehicle due to insufficient cooling of the traction

motor inverter. Be sure to bleed air thoroughly. 

• Never operate the electric water pump without coolant. 

RESERVOIR TANK CAP

Radiator drain plug

Refer to 

HCO-14, "Exploded View"

.

: MAX

: MIN

JPBIA0102ZZ

MA-20

< PERIODIC MAINTENANCE >

EV SYSTEM MAINTENANCE

RESERVOIR TANK CAP : Inspection

INFOID:0000000010121528

• Check valve seat   of reservoir tank cap. 

- Check that valve seat is swollen to the extent that the edge of the

plunger cannot be seen when watching it vertically from the top.

- Check that valve seat has no soil and damage.

• Pull negative-pressure valve to open it, and that it close completely

when released.

- Check that there is no dirt or damage on the valve seat of reservoir

tank cap negative-pressure valve. 

- Check that there are no unusualness in the opening and closing

conditions of negative-pressure valve.

• Check reservoir tank cap relief pressure.

- When connecting reservoir tank cap to the radiator cap tester

(commercial service tool) (A) and the radiator cap tester adapter

(commercial service tool) (B), apply engine coolant to the cap seal

surface. 

• Replace reservoir tank cap if there is an unusualness related to the above three.

CHARGE PORT
CHARGE PORT : Inspection

INFOID:0000000010121529

INSPECTION PROCEDURES

Quick Charge Port

1. Perform the following visual inspections.

• Dust and foreign matter in the quick charge port and normal charge port

• Damage in the quick charge port and normal charge port

• Malfunction in opening/closing the charge port caps and looseness when closed and locked.

: Metal plunger

JPBIA0108ZZ

SMA967B

Standard

: Refer to 

HCO-27, "Periodical 

Maintenance Specification"

.

PBIC5122J

EV SYSTEM MAINTENANCE

MA-21

< PERIODIC MAINTENANCE >

C

D

E

F

G

H

I

J

K

L

M

B

MA

N

O

A

• Cracks in the packing   of quick charge port

• Check that the quick charge port terminals   are not welded.

CAUTION:

If they are welded, inspect the quick charge gun used for

the last charge, and replace the quick charge port. For

replacement of the quick charge port, refer to 

VC-128,

"Removal and Installation"

.

• Check that there is no irregular wear of the quick charge port lock  .

• If the port is damaged, for example if the metal plate   on the inside is lost, replace the quick charge

port. For replacement of the quick charge port, refer to 

VC-128, "Removal and Installation"

.

- If irregular wear is found at the visual inspection, check the

charge port inner diameter   and replace the quick charge

port if the limit value is exceeded.

2.

Normal Charge Port

1. Perform the following visual inspections.

• Dust and foreign matter in the quick charge port and normal charge port

• Damage in the quick charge port and normal charge port

JSCIA0211ZZ

JPCIA0367ZZ

Repair limit

: 71 mm (2.80 in)

JPCIA0368ZZ

JPCIA0372ZZ


Content   ..  938  939  940  941   ..