Nissan Leaf. Manual - part 478


  Index      Nissan     Nissan Leaf (2011-2014 year) - Service and Repair Manual


Search            


Content   ..  476  477  478  479   ..


Nissan Leaf. Manual - part 478


LI-ION BATTERY

EVB-195

< UNIT DISASSEMBLY AND ASSEMBLY >

D

E

F

G

H

I

J

K

L

M

A

B

EVB

N

O

P

• If adhesive cutting particles enter the battery pack, clean (use of air blow is prohibited) when

assembling so that no particles remain on the battery module, bus bar, and high-voltage har-

ness.

• Operation must be performed by 2 persons. Be careful that the battery pack upper case does not

contact the battery module.

INSTALLATION

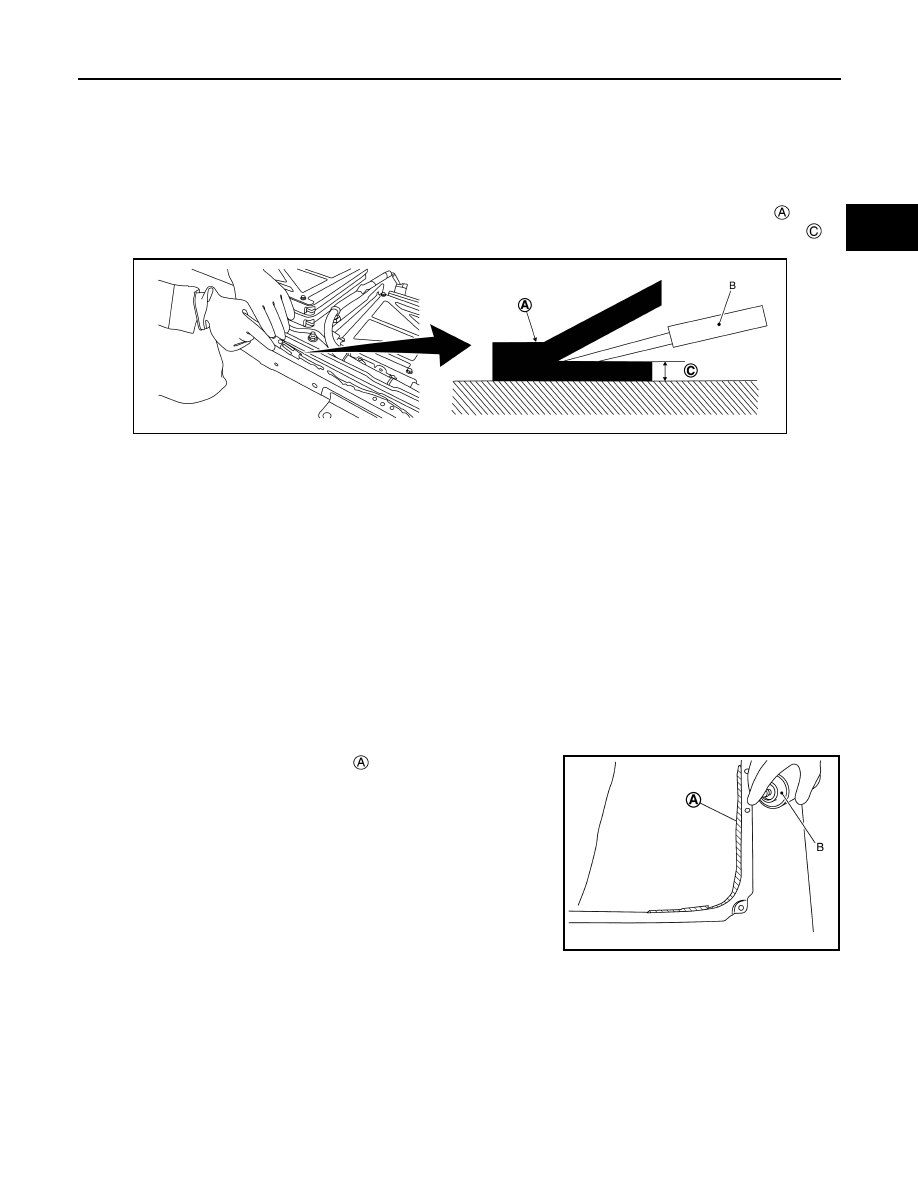
1. To remove remaining adhesive on the battery pack upper case and battery pack lower case  , use a

scraper (B), and cut so that the surface is smooth, leaving approximately 1 – 2 mm (0.04 – 0.08 in)   of

adhesive behind.

CAUTION:

• Because airtightness leakage is likely to occur, cut the seal in such a way that burrs are not pro-

duced.

• Be careful not to damage the paint sealant.

- If the paint sealant on a straight section is damaged in excess of the limit, the battery pack lower

case must be replaced. If the paint sealant damage is less than the limit, repair by applying

primer (adhesive primer: 999MP-43533PP).

- If the paint sealant damage on a corner is damaged, repair by applying primer (adhesive primer:

999MP-43533PP).

NOTE:

• Leave 1 – 2 mm (0.04 – 0.08 in) of adhesive so that the battery pack coating surface and paint sealant

are not damaged.

• Sharpen the blade of the scraper.

2. Repair scratches to the battery pack upper case by the following procedure.
a. Protect the seal with masking tape  .

NOTE:

If primer surfacer (anti-corrosion primer) contacts the seal, the

adhesive strength is reduced.

b. Spray primer surfacer (anti-corrosion primer) (B) into the cracks

in the battery pack upper case.

Paint sealant damage limit:

Continuous length of undamaged section:

: 210 mm (8.27 in) or more

JSCIA0576ZZ

JSCIA0577ZZ

EVB-196

< UNIT DISASSEMBLY AND ASSEMBLY >

LI-ION BATTERY

3. Install a carabiner (A) onto the bracket of the battery pack upper

case.

NOTE:

This is to provide a handle for use after the adhesive is applied

and prevent adhesive from adhering to the operator's hands.

4. Apply dam rubber (KA390-0059U)   on the inside of the old adhesive   on the battery pack lower case.

WARNING:

To prevent electric shock, wear insulated protective gear.

CAUTION:

If dam rubber is already applied there, replace it with new dam rubber.

NOTE:

Apply the dam rubber so that adhesive does not enter the inner side. If the adhesive enters the inner side,

then the next time the battery pack is disassembled, the windshield cutter may not be able to reach the

adhesive and removing the battery pack upper case may be difficult.

5. Apply adhesive (999MP-57302NP) to the battery pack lower case as shown in the figure.

WARNING:

To prevent electric shock, wear insulated protective gear.

JSCIA0634ZZ

C

: 10 mm (0.39 in)

JSCIA0578ZZ

LI-ION BATTERY

EVB-197

< UNIT DISASSEMBLY AND ASSEMBLY >

D

E

F

G

H

I

J

K

L

M

A

B

EVB

N

O

P

CAUTION:

• Because there is a risk of airtightness leakage, apply the adhesive so that there are no seams or

overlaps.

• Complete installation of the battery pack upper case before the adhesive surface hardens. The

adhesive begins to harden in as little as 12 minutes. [Humidity: 80%, Temperature: 35

°C (95°F)] 

• Before installing the battery pack upper case, check that there are no locations of insufficient

adhesive. If there is insufficient adhesive, correct the location. (If the adhesive height is lower

than the height of the dam rubber, then the amount of adhesive is insufficient.) 

• Do not apply too much adhesive as doing so may make work difficult the next time the battery

pack upper case is removed.

NOTE:

A

: 5 mm (0.20 in)

B

: 10 mm (0.39 in)

: Old adhesive

: Dam rubber

E

: 50 mm (1.97 in) or more

JSCIA0580ZZ

EVB-198

< UNIT DISASSEMBLY AND ASSEMBLY >

LI-ION BATTERY

• For applying the adhesive in a triangle, cut the end of the nozzle as shown in the figure.

6. Grasp the carabiner installed in Step 3, and install the battery pack upper case while visually aligning the

alignment holes on the battery pack upper case and battery pack lower case  .

WARNING:

To prevent electric shock, wear insulated protective gear.

CAUTION:

• Operation must be performed by 2 persons. Be careful

that the battery pack upper case does not contact the bat-

tery module.

• Moving the upper case after it is installed makes airtight-

ness leakage more likely. Therefore, position the upper

case carefully.

Nozzle inner diameter (A) : Approx. 5 mm (0.20 in)

JSCIA0642ZZ

JSCIA0680ZZ

JSCIA0581ZZ


Content   ..  476  477  478  479   ..