Nissan Leaf. Manual - part 1018


  Index      Nissan     Nissan Leaf (2011-2014 year) - Service and Repair Manual


Search            


Content   ..  1016  1017  1018  1019   ..


Nissan Leaf. Manual - part 1018


PG-84

< BASIC INSPECTION >

12V BATTERY INSPECTION

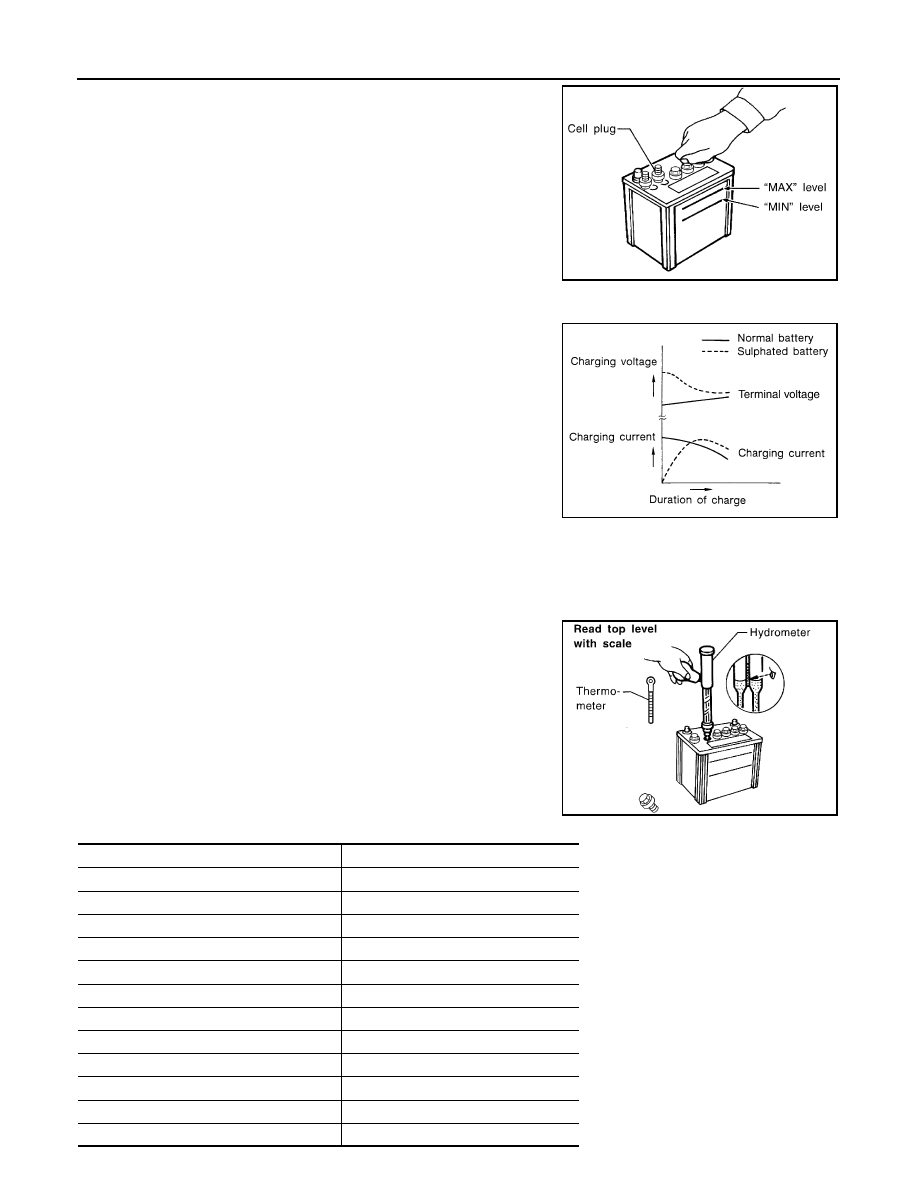
• Remove the cell plug using a suitable tool.

• Add distilled water up to the MAX level.

SULFATION

• A 12V battery will be completely discharged if it is left unat-

tended for a long time and the specific gravity will become

less than 1.100. This may result in sulfation on the cell plates.

• To determine if a 12V battery has been “sulfated”, note its

voltage and current when charging it. As shown in the figure,

less current and higher voltage are observed in the initial

stage of charging sulfated batteries.

• A sulfated 12V battery may sometimes be brought back into

service by means of a long, slow charge, 12 hours or more,

followed by a battery capacity test.

Specific Gravity Check

NOTE:

Check the charge condition of the battery.

Periodically check the specific gravity of the electrolyte. Keep a close check on charge condition to prevent

over-discharge.
1. Read hydrometer and thermometer indications at eye level.
2. Use the chart below to correct your hydrometer reading accord-

ing to electrolyte temperature.

Hydrometer Temperature Correction

MEL043F

PKIA2353E

MEL042FA

12V Battery electrolyte temperature [

°C (°F)]

Add to specific gravity reading

71 (160)

0.032

66 (150)

0.028

60 (140)

0.024

54 (130)

0.020

49 (120)

0.016

43 (110)

0.012

38 (100)

0.008

32 (90)

0.004

27 (80)

0

21 (70)

−0.004

16 (60)

−0.008

10 (50)

−0.012

PG

12V BATTERY INSPECTION

PG-85

< BASIC INSPECTION >

C

D

E

F

G

H

I

J

K

L

B

A

O

P

N

Charging The 12V Battery

CAUTION:

• Never “quick charge” a fully discharged 12V battery.

• Keep the 12V battery away from open flame while it is being charged.

• When connecting the charger, connect the leads first, then turn on the charger. Never turn on the

charger first, as this may cause a spark.

• If 12V battery electrolyte temperature rises above 55 

°C (131 °F), stop charging. Always charge bat-

tery at a temperature below 55 

°C (131 °F).

Charging Rates (Standard Charge)

Charging Rates (Quick Charge)

NOTE:

The ammeter reading on your 12V battery charger will automatically decrease as the 12V battery charges.

This indicates that the voltage of the 12V battery is increasing normally as the state of charge improves. The

charging amps indicated above refer to initial charge rate.

• If, after charging, the specific gravity of any two cells varies more than 0.050, the 12V battery should be

replaced.

4 (40)

−0.016

−1 (30)

−0.020

−7 (20)

−0.024

−12 (10)

−0.028

−18 (0)

−0.032

12V Battery electrolyte temperature [

°C (°F)]

Add to specific gravity reading

Corrected specific gravity

Approximate charge condition

1.260 - 1.280

Fully charged

1.230 - 1.250

3/4 charged

1.200 - 1.220

1/2 charged

1.170 - 1.190

1/4 charged

1.140 - 1.160

Almost discharged

1.110 - 1.130

Completely discharged

Approximate charge condi-

tion

Charge current (A)

Charge time (h)

Fully charged

7

2

3/4 charged

2.5

1/2 charged

5

1/4 charged

7.5

Almost discharged

9

Completely discharged

10

Approximate charge condi-

tion

Charge current (A)

Charge time (h)

Fully charged

3/4 charged

16

0.5

1/2 charged

33

1/4 charged

Almost discharged

Completely discharged

PG-86

< BASIC INSPECTION >

ADDITIONAL SERVICE WHEN REMOVING 12V BATTERY NEGATIVE TERMI-

NAL

ADDITIONAL SERVICE WHEN REMOVING 12V BATTERY NEGATIVE
TERMINAL

Special Repair Requirement

INFOID:0000000010119398

System

Item

Reference

EV Control System

VCM Timer Adjustment

EVC-130, "Description"

Power Window Control System

Power Window System Initialization

PWC-28, "Description"

Heater & Air Conditioning Control System

Temperature Setting Trimmer

HAC-83, "Temperature Setting Trimmer"


(with heat pump)

Inlet Port Memory Function (REC)

HAC-83, "Inlet Port Memory Function 

(REC)"

 (with heat pump)

Inlet Port Memory Function (FRE)

HAC-84, "Inlet Port Memory Function 

(FRE)"

 (with heat pump)

Foot Position Setting Trimmer

HAC-84, "Foot Position Setting Trimmer"


(with heat pump)

Compressor Operation Setting at Defroster 
Mode (Timer/Remote Climate Control)

HAC-84, "Compressor Operation Setting at 

Defroster Mode (Timer/Remote Climate 

Control)"

 (with heat pump)

Setting of Compressor Maximum Rotation 
Speed During Pre Air Conditioning

HAC-85, "Setting of Compressor Maximum 

Rotation Speed During Pre Air Condition-

ing"

 (with heat pump)

Setting of Compressor Maximum Rotation 
Speed During Idling

HAC-85, "Setting of Compressor Maximum 

Rotation Speed During Idling"

 (with heat 

pump)

Temperature Setting Trimmer

HAC-274, "Temperature Setting Trimmer"


(without heat pump)

Inlet Port Memory Function (REC)

HAC-274, "Inlet Port Memory Function 

(REC)"

 (without heat pump)

Inlet Port Memory Function (FRE)

HAC-275, "Inlet Port Memory Function 

(FRE)"

 (without heat pump)

Foot Position Setting Trimmer

HAC-275, "Foot Position Setting Trimmer"


(without heat pump)

Compressor Operation Setting at Defroster 
Mode (Timer/Remote Climate Control)

HAC-275, "Compressor Operation Setting 
at Defroster Mode (Timer/Remote Climate 

Control)"

 (without heat pump)

Setting of Compressor Maximum Rotation 
Speed During Pre Air Conditioning

HAC-276, "Setting of Compressor Maxi-

mum Rotation Speed During Pre Air Condi-

tioning"

 (without heat pump)

Setting of Compressor Maximum Rotation 
Speed During Idling

HAC-276, "Setting of Compressor Maxi-

mum Rotation Speed During Idling"

 (without 

heat pump)

Audio, Visual & Navigation System

Audio (Radio Preset)

Refer to Owner’s Manual

Navigation System

Refer to Owner’s Manual

PG

FUSE INSPECTION

PG-87

< BASIC INSPECTION >

C

D

E

F

G

H

I

J

K

L

B

A

O

P

N

FUSE INSPECTION

How To Check

INFOID:0000000010119399

• If fuse is blown, be sure to eliminate cause of malfunction before

installing new fuse.

• Use fuse of specified rating. Never use fuse of more than specified

rating.

• Do not partially install fuse; always insert it into fuse holder prop-

erly.

• Remove fuse for “ELECTRICAL PARTS (BAT)” if vehicle is not

used for a long period of time.

CEL083


Content   ..  1016  1017  1018  1019   ..