Nissan Xterra. Manual - part 610


  Index      Nissan     Nissan Xterra (2014 year) - Service and Repair Manual


Search            


Content   ..  608  609  610  611   ..


Nissan Xterra. Manual - part 610


POWER STEERING GEAR AND LINKAGE

ST-15

< REMOVAL AND INSTALLATION >

C

D

E

F

H

I

J

K

L

M

A

B

ST

N

O

P

POWER STEERING GEAR AND LINKAGE

Removal and Installation

INFOID:0000000009483751

CAUTION:

Spiral cable may snap due to steering operation if the steering column is separated from the steering

gear assembly. Therefore secure the steering wheel to avoid turning.

NOTE:

When removing components such as hoses, tubes/lines, etc., cap or plug openings to prevent fluid from spill-

ing.

REMOVAL

1. Set front wheels in the straight-ahead position.
2. Remove the front wheels and tires using power tool. Refer to 

WT-48, "Adjustment"

.

3. Drain power steering fluid.
4. Remove the engine under cover. Refer to 

EXT-15, "Removal and Installation"

.

5. On 4WD models, remove the front final drive, then support the drive shafts using suitable wire. Refer to

DLN-165, "Removal and Installation"

.

6. Remove the stabilizer bar brackets and reposition the stabilizer bar. Refer to 

FSU-15, "Removal and

Installation"

.

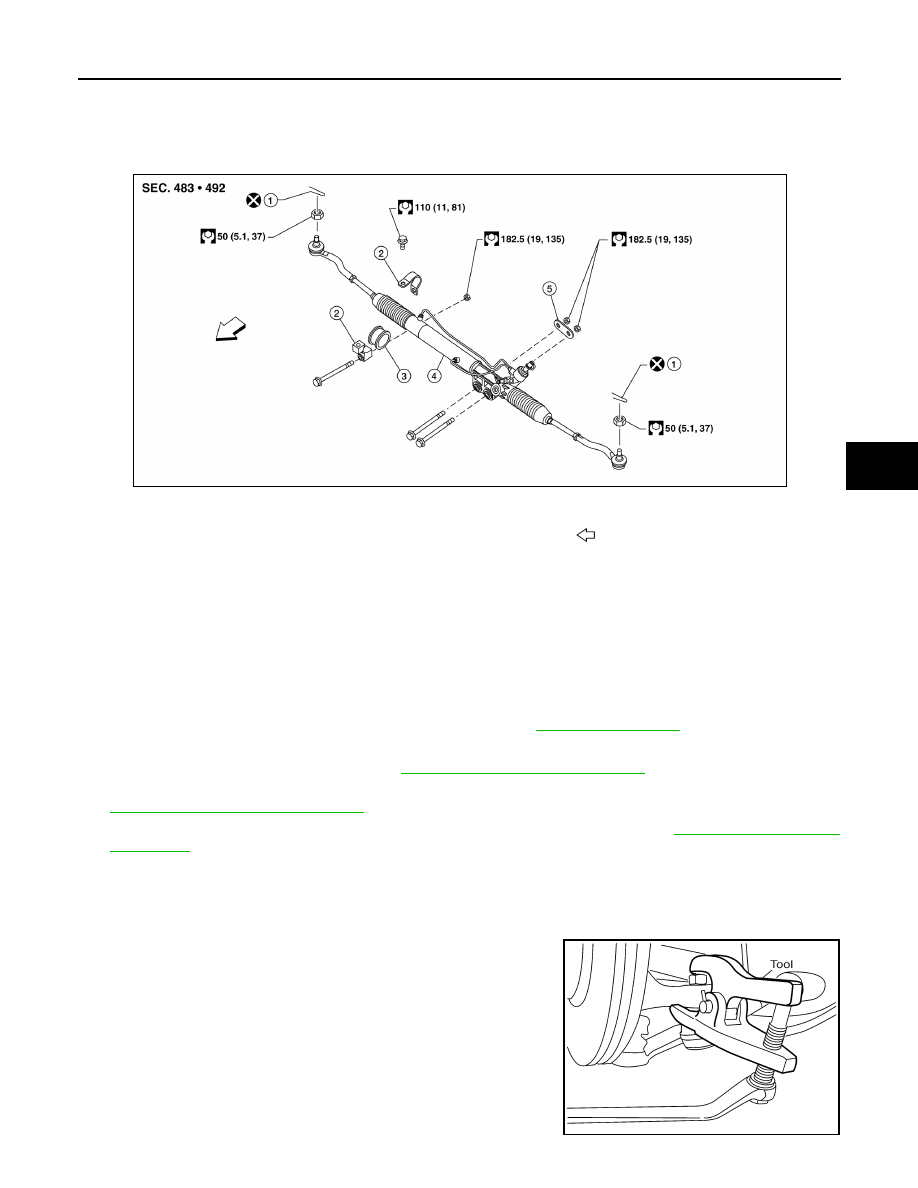
7. Remove the cotter pins at the steering outer sockets.

CAUTION:

Do not reuse the cotter pins.

8. Loosen the outer socket nuts.
9. Remove the steering outer sockets from the steering knuckles

using Tool, then remove the nuts. 

CAUTION:

• Do not damage the outer socket boots.

• Do not damage the outer socket threads. Thread the ball

joint nut onto the end of the outer socket during removal. 

1.

Cotter pin

2.

Bracket

3.

Insulator

4.

Steering gear assembly

5.

Washer

Front

AWGIA0136GB

Tool number

: HT72520000 (J-25730-A)

WGIA0130E

ST-16

< REMOVAL AND INSTALLATION >

POWER STEERING GEAR AND LINKAGE

10. Remove the high-pressure and low-pressure piping from the

steering gear assembly, then drain the fluid from the piping.

CAUTION:

Do not reuse O-ring.

11. Remove the pinch bolt from the lower joint shaft and separate

the lower joint from the steering gear assembly.

CAUTION:

Do not damage the lower joint.

12. Remove the nuts and bolts of the steering gear assembly using

power tool, then remove the steering gear assembly from the

vehicle.

INSTALLATION

Installation is in the reverse order of removal.

CAUTION:

Do not reuse O-ring.

• With the steering wheel in the straight ahead position, align the slit

of the lower joint with the projection on the dust cover. Insert the

joint until surface (A) contacts surface (B).

• After removing/installing or replacing steering components, check

wheel alignment. Refer to 

FSU-6, "Front Wheel Alignment"

.

• After adjusting wheel alignment, adjust neutral position of the

steering angle sensor. Refer to 

BRC-12, "ADJUSTMENT OF

STEERING ANGLE SENSOR NEUTRAL POSITION : Special

Repair Requirement"

 (TYPE 1), 

BRC-122, "ADJUSTMENT OF

STEERING ANGLE SENSOR NEUTRAL POSITION : Special

Repair Requirement"

 (TYPE 2).

• Bleed the air from the steering hydraulic system. Refer to 

ST-6,

"Air Bleeding Hydraulic System"

.

INSPECTION AFTER INSTALLATION

• Check that the steering wheel turns smoothly to the left and right locks.

• Check that the number of turns are the same from the straight-forward position to the left and right locks.

• Check that the steering wheel is in the neutral position when driving straight ahead.

LGIA0032E

LGIA0029E

LGIA0024E

SST491C

POWER STEERING OIL PUMP

ST-17

< REMOVAL AND INSTALLATION >

C

D

E

F

H

I

J

K

L

M

A

B

ST

N

O

P

POWER STEERING OIL PUMP

Component

INFOID:0000000009483752

Removal and Installation

INFOID:0000000009483753

NOTE:

When removing components such as hoses, tubes/lines, etc., cap or plug openings to prevent fluid from spill-

ing.

REMOVAL

1. Drain the power steering fluid from the reservoir tank.
2. Remove the coolant fan. Refer to 

CO-19, "Removal and Installation (Motor driven type)"

.

3. Remove the air duct assembly. Refer to 

EM-24, "Exploded View"

.

4. Remove the drive belt from the drive belt auto-tensioner and power steering oil pump. Refer to 

EM-13,

"Removal and Installation"

.

5. Disconnect the harness connector from the pressure sensor.
6. Remove the high pressure and low pressure piping from the power steering oil pump. Refer to 

ST-19,

"Removal and Installation"

.

CAUTION:

Do not reuse copper sealing washers.

7. Remove the power steering oil pump bolts, then remove the power steering pump.

INSTALLATION

Installation is in the reverse order of removal. 

CAUTION:

Do not reuse copper sealing washers.

AWGIA0137GB

1.

Joint

2.

Suction pipe

3.

O-ring

4.

Front bracket

5.

Pulley

6.

Lock washer

7.

Body assembly

8.

Copper sealing washers

Apply Genuine Nissan PSF or equivalent

ST-18

< REMOVAL AND INSTALLATION >

POWER STEERING OIL PUMP

• Install the bolts to specification in the order shown.

• After installation, bleed the air from the hydraulic circuit thoroughly.

Refer to 

ST-6, "Air Bleeding Hydraulic System"

.

NOTE:

Belt tension is automatic and requires no adjustment.

POWER STEERING OIL PUMP BRACKET

Removal

1. Remove the power steering oil pump. 
2. Remove the bolts and the power steering oil pump bracket.

Installation

1. Position the bracket and install the bracket to block bolts but do

not tighten. Finger tighten bolt (1) first to seat bracket to front of

engine, then finger tighten bolts (2).

2. Tighten the bolts to specification in order as shown.

3. Install the power steering oil pump.

Power steering pump to 
bracket bolt (1)

64.7 N·m (6.6 kg-m, 48 ft-lb)

Power steering pump to 
block bolt (2)

28 N·m (2.9 kg-m, 21 ft-lb)

ALGIA0047ZZ

Bracket to front of block 
bolt (1)

61.3 Nm (6.3 kg-m, 45 ft–
lb)

Bracket to side of block 
bolt (2)

61.3 Nm (6.3 kg-m, 45 ft–
lb)

ALGIA0048ZZ


Content   ..  608  609  610  611   ..