Nissan Xterra. Manual - part 175
 

  Index      Nissan     Nissan Xterra (2014 year) - Service and Repair Manual


Search            


Content   ..  173  174  175  176   ..


Nissan Xterra. Manual - part 175


RADIATOR

CO-15

< REMOVAL AND INSTALLATION >

[VQ40DE]

C

D

E

F

G

H

I

J

K

L

M

A

CO

N

P

O

REMOVAL AND INSTALLATION

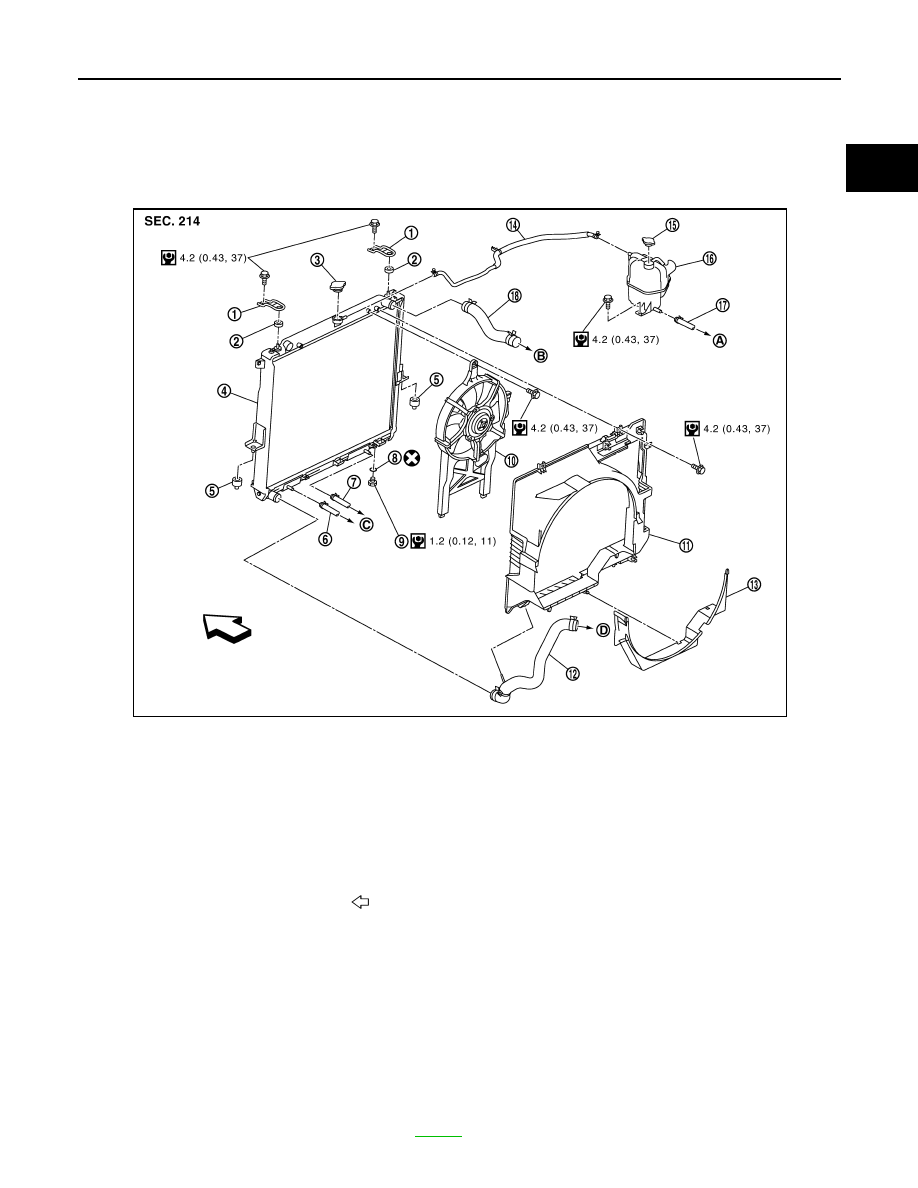
RADIATOR

Exploded View

INFOID:0000000009484583

Removal and Installation

INFOID:0000000009484584

WARNING:

Do not remove the radiator cap when the engine is hot. Serious burns could occur from high pressure

engine coolant escaping from the radiator. Wrap a thick cloth around the cap. Slowly turn it a quarter

of a turn to release built-up pressure. Carefully remove radiator cap by turning it all the way.

NOTE:

When removing components such as hoses, tubes/lines, etc., cap or plug openings to prevent fluid from spill-

ing.

REMOVAL

1. Drain engine coolant from radiator. Refer to 

CO-10

.

1.

Radiator mounting bracket

2.

Mounting rubber (upper)

3.

Radiator cap

4.

Radiator

5.

Mounting rubber (lower)

6.

A/T fluid cooler hose (if equipped)

7.

A/T fluid cooler hose (if equipped)

8.

O-ring

9.

Drain plug

10. Cooling fan assembly (Motor driven 

type)

11. Radiator shroud (upper)

12. Radiator hose (lower)

13. Radiator shroud (lower)

14. Reservoir tank hose

15. Reservoir tank cap

16. Reservoir tank

17. Water hose

18. Radiator hose (upper)

A.

To heater return tube

B.

To water pipe

C.

To A/T cooler tube

D.

To water inlet and thermostat assembly

Front

AWBIA1010GB

CO-16

< REMOVAL AND INSTALLATION >

[VQ40DE]

RADIATOR

CAUTION:

• Perform this step when engine is cold.

• Do not spill engine coolant on drive belts.

2. Remove air duct and resonator assembly and air cleaner case upper. Refer to 

EM-24, "Removal and

Installation"

.

3. Remove reservoir tank hose from the radiator.
4. Remove radiator hoses (upper/lower).

CAUTION:

Be careful not to allow engine coolant to contact drive belts.

5. Disconnect A/T fluid cooler hoses (if equipped).
6. Remove engine cooling fan (Motor driven type). Refer to 

CO-19, "Removal and Installation (Motor driven

type)"

.

7. Remove front grille. Refer to 

EXT-19, "Removal and Installation"

.

8. Remove the upper radiator mounting bracket bolts.

9. Remove the two A/C condenser bolts.

10. Remove radiator as follows:

CAUTION:

Do not damage or scratch A/C condenser and radiator core when removing.

a. Lift and pull radiator rearward to disengage mounting rubber

(lower) from radiator core support center.

CAUTION:

Because A/C condenser is attached to the front-lower por-

tion of radiator, moving it in the rear direction should be at a

minimum.

LBIA0419E

LBIA0421E

PBIC1936E

RADIATOR

CO-17

< REMOVAL AND INSTALLATION >

[VQ40DE]

C

D

E

F

G

H

I

J

K

L

M

A

CO

N

P

O

b. Lift A/C condenser up and remove radiator after disengaging the

fitting at front-bottom surface.

CAUTION:

Lifting A/C condenser should be minimum to prevent a load

to A/C piping.

c. After removing radiator, put A/C condenser on radiator core sup-

port center to prevent a load to A/C piping, and temporarily

secure it with a suitable device.

INSTALLATION

Installation is in the reverse order of removal.

INSPECTION AFTER INSTALLATION

• Check for engine coolant leaks. Refer to 

CO-10, "System Inspection"

.

• Start and warm up engine. Visually check for coolant and A/T fluid (if equipped) leaks. Repair as necessary.

• Check and adjust engine coolant level and A/T fluid (if equipped). Refer to 

MA-12, "Fluids and Lubricants"

PBIC1054E

CO-18

< REMOVAL AND INSTALLATION >

[VQ40DE]

ENGINE COOLING FAN

ENGINE COOLING FAN

Exploded View

INFOID:0000000009484585

Crankshaft Driven Type

Removal and Installation (Crankshaft driven type)

INFOID:0000000009484586

WARNING:

Do not remove the radiator cap when the engine is hot. Serious burns could occur from high pressure

engine coolant escaping from the radiator. Wrap a thick cloth around the cap. Slowly turn it a quarter

of a turn to release built-up pressure. Carefully remove radiator cap by turning it all the way.

REMOVAL

1. Remove the engine cooling fan (Motor driven type). Refer to 

CO-19, "Removal and Installation (Motor

driven type)"

.

2. Remove the drive belt. Refer to 

EM-13, "Removal and Installation"

.

3. Remove the cooling fan.
4. Remove the fan coupling, if necessary.
5. Remove the cooling fan pulley, if necessary.
6. Remove the drive belt auto-tensioner, if necessary. Refer to 

EM-14, "Drive Belt Auto-Tensioner and Idler

Pulley"

7. Remove the fan bracket, if necessary.

INSPECTION AFTER REMOVAL

Fan Coupling

• Inspect fan coupling for oil leaks and bimetal corrosion conditions.

• If there are concerns, replace the fan coupling.

Fan Bracket

AWBIA1124GB

1.

Cooling fan

2.

Fan coupling

3.

Fan bracket

4.

Cooling fan pulley

5.

Stud

F.

Front mark

SLC072


Content   ..  173  174  175  176   ..